background image

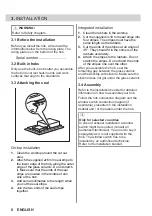
• If the appliance is installed above a

drawer:

– Do not store any small pieces or

sheets of paper that could be pulled in,

as they can damage the cooling fans

or impair the cooling system.

– Keep a distance of minimum 2 cm

between the bottom of the appliance

and parts stored in the drawer.

• Remove any separator panels installed in

the cabinet below the appliance.

2.2 Electrical Connection

WARNING!

Risk of fire and electric shock.

• All electrical connections should be made

by a qualified electrician according to the

connection diagram or installation booklet.

• In case of exhaust installation, and where

the accessories are present or mandatory

(wall valve, window switch and/or window

opener) electrical connections should be

made by a qualified electrician, according

to the connection diagram or installation

booklet.

• The appliance must be earthed.

• Before carrying out any operation make

sure that the appliance is disconnected

from the power supply.

• Make sure that the parameters on the

rating plate are compatible with the

electrical ratings of the mains power

supply.

• Make sure the appliance is installed

correctly. Loose and incorrect electricity

mains cable or plug (if applicable) can

make the terminal become too hot.

• Use the correct electricity mains cable.

• Do not let the electricity mains cable

tangle.

• Make sure that a shock protection is

installed.

• Use the strain relief clamp on the cable.

• Make sure the mains cable or plug (if

applicable) does not touch the hot

appliance or hot cookware, when you

connect the appliance to a socket.

• Do not use multi-plug adapters and

extension cables.

• Make sure not to cause damage to the

mains plug (if applicable) or to the mains

cable. Contact our Authorised Service

Centre or an electrician to change a

damaged mains cable.

• The shock protection of live and insulated

parts must be fastened in such a way that

it cannot be removed without tools.

• Connect the mains plug to the mains

socket only at the end of the installation.

Make sure that there is access to the

mains plug after the installation.

• If the mains socket is loose, do not

connect the mains plug.

• Do not pull the mains cable to disconnect

the appliance. Always pull the mains plug.

• Use only correct isolation devices: line

protecting cut-outs, fuses (screw type

fuses removed from the holder), earth

leakage trips and contactors.

• The electrical installation must have an

isolation device which lets you disconnect

the appliance from the mains at all poles.

The isolation device must have a contact

opening width of minimum 3 mm.

2.3 Use

WARNING!

Risk of injury, burns and electric shock.

• Do not change the specification of this

appliance.

• Remove all the packaging, labelling and

protective film (if applicable) before first

use.

• Make sure that the ventilation openings

are not blocked. The ventilation must be

checked periodically by a qualified person.

• Do not let the appliance stay unattended

during operation.

• Set the cooking zone to “off” after each

use.

• Do not put cutlery or saucepan lids on the

cooking zones. They can become hot.

• Do not operate the appliance with wet

hands or when it has contact with water.

• Do not use the appliance as a work

surface or as a storage surface.

• If the surface of the appliance is cracked,

disconnect immediately the appliance from

the power supply. This to prevent an

electrical shock.

• Users with a pacemaker must keep a

distance of minimum 30 cm from the

6 ENGLISH

Summary of Contents for CCE84543CB

Page 1: ...CCE84543CB EN User Manual Hob aeg com register ...

Page 2: ...re parts When contacting our Authorised Service Centre ensure that you have the following data available Model PNC Serial Number The information can be found on the rating plate Warning Caution Safety information General information and tips Environmental information Subject to change without notice CONTENTS 1 SAFETY INFORMATION 2 2 SAFETY INSTRUCTIONS 5 3 INSTALLATION 8 4 PRODUCT DESCRIPTION 11 5...

Page 3: ... with the appliance Keep all packaging away from children and dispose of it appropriately WARNING The appliance and its accessible parts become hot during use Keep children and pets away from the appliance when in use and when cooling down If the appliance has a child safety device it should be activated Children shall not carry out cleaning and user maintenance of the appliance without supervisio...

Page 4: ...before installing it in the built in structure Do not use a steam cleaner to clean the appliance After use switch off the hob element by its control and do not rely on the pan detector If the glass ceramic surface glass surface is cracked switch off the appliance and unplug it from the mains In case the appliance is connected to the mains directly using junction box remove the fuse to disconnect t...

Page 5: ...n the appliance The use of inappropriate guards can cause accidents 2 SAFETY INSTRUCTIONS 2 1 Installation WARNING Only a qualified person must install this appliance WARNING Risk of injury or damage to the appliance Remove all the packaging Do not install or use a damaged appliance Follow the installation instructions supplied with the appliance Keep the minimum distance from other appliances and...

Page 6: ...e sure not to cause damage to the mains plug if applicable or to the mains cable Contact our Authorised Service Centre or an electrician to change a damaged mains cable The shock protection of live and insulated parts must be fastened in such a way that it cannot be removed without tools Connect the mains plug to the mains socket only at the end of the installation Make sure that there is access t...

Page 7: ...ated hood or the appliance operates Do not place small or light objects near the integrated hood to avoid the risk of being trapped Cookware made of cast iron or with a damaged bottom can cause scratches on the glass glass ceramic Always lift these objects up when you have to move them on the cooking surface 2 4 Care and cleaning Clean the appliance regularly to prevent the deterioration of the su...

Page 8: ...the supplied 3x10 mm seal stripe into four stripes The stripes must have the same length as the rabbets 3 Cut the ends of the stripes at an angle of 45 They should fit in the corners of the rabbets accurately 4 Attach the stripes to the rabbets Do not stretch the stripes Do not bond the ends of the stripes one over the other After you assemble the hob seal the remaining gap between the glass ceram...

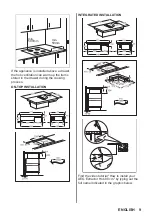
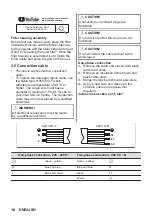
Page 9: ...e hob ventilation can warm up the items stored in the drawer during the cooking process ON TOP INSTALLATION INTEGRATED INSTALLATION Find the video tutorial How to install your AEG Extractor Hob 80 cm by typing out the full name indicated in the graphic below ENGLISH 9 ...

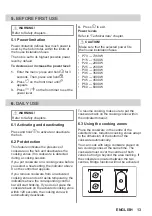
Page 10: ...ak to your local Service Centre The connection cable may only be replaced by a qualified electrician WARNING All electrical connections must be made by a qualified electrician CAUTION Connections via contact plugs are forbidden CAUTION Do not drill or solder the wire ends It is forbidden CAUTION Do not connect the cable without cable end sleeve One phase connection 1 Remove the cable end sleeve fr...

Page 11: ...uct overview 3 2 1 4 5 6 7 7 6 5 4 8 8 1 Grid 2 Filter 3 Filter housing 4 Hob 5 Connector 6 Cabinet back wall fitting 7 Tube 8 Adapter 4 2 Cooking surface layout 3 2 1 1 1 1 1 Induction cooking zone 2 Control panel 3 Hood ENGLISH 11 ...

Page 12: ...To activate and deactivate the function 7 AUTO Automatic mode of the hood To activate and deactivate the function 8 Manual mode of the hood To activate deactivate the function and to switch be tween 3 fan speed levels 9 Boost To activate and deactivate the function 10 Control bar To set a heat setting 11 PowerBoost To activate the function 12 Lock Child Safety Device To lock unlock the control pan...

Page 13: ...he presence of cookware on the hob and deactivates the cooking zones if no cookware is detected during a cooking session If you put cookware on a cooking zone before you select a heat setting the indicator above 0 on the control bar appears If you remove cookware from an activated cooking zone and set it aside temporarily the indicators above the corresponding control bar will start blinking If yo...

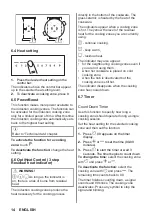
Page 14: ...dicators appear when a cooking zone is hot They show the level of the residual heat for the cooking zones you are currently using continue cooking keep warm residual heat The indicator may also appear for the neighbouring cooking zones even if you are not using them when hot cookware is placed on cold cooking zone when the hob is deactivated but the cooking zone is still hot The indicator disappea...

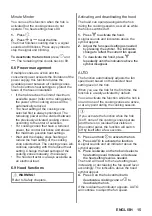
Page 15: ...s WARNING Refer to Safety chapters Activating and deactivating the hood The hood can operate alongside the hob during the cooking session as well as while the hob is switched off 1 Press to activate the hood A signal sounds and indicators above the symbol appear 2 Adjust the fan speed setting as needed by pressing the symbol The indicators change to reflect the current fan speed 3 To deactivate th...

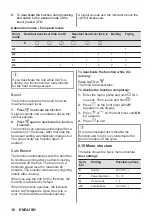
Page 16: ...nction automatically sets the hood fan to continue running after you finish cooking and switch off the hob The fan runs at a minimum speed level for maximum 20 minutes The function removes any lingering smells after cooking When you use the hob for the first time the function is activated by default When the function operates the indicator above AUTO appears Once the cycle is over the fan switches...

Page 17: ...he activation of the hob you spill something or put something on the control panel for more than 10 seconds a pan a cloth etc A signal sounds and the hob deactivates Remove the object or clean the control panel the appliance gets too hot e g when a saucepan boils dry Let the cooking zone cool down before you use the hob again you do not deactivate a cooking zone or change the heat setting After so...

Page 18: ...then press for 3 seconds until the indicator above the symbol disappears You can operate the hob When you deactivate the hob with the function operates again 7 5 Bridge The function operates when the pot covers the centres of the two zones For more information on the correct placement of cookware refer to Using the cooking zones This function connects two left side cooking zones and they operate a...

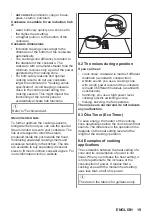
Page 19: ...towards the hood minimizing unwanted cooking smells and excessive humidity in the kitchen The lids are available to buy separately in several sizes to fit most common cookware types For more information visit our website 8 2 The noises during operation If you can hear crack noise cookware is made of different materials a sandwich construction whistle sound you use a cooking zone with a high power ...

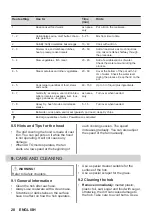
Page 20: ... neces sary Turn over when needed 7 8 Heavy fry hash browns loin steaks steaks 5 15 Turn over when needed 9 Boil water cook pasta sear meat goulash pot roast deep fry chips Boil large quantities of water PowerBoost is activated 8 5 Hints and Tips for the hood The grid covering the hood is made of cast iron You can put pots on it while the hood is not operating It will not cause any damage When AUT...

Page 21: ...leaning the hood filter switch on the hood set the fan speed level to 2 or higher and let it run for some time to get rid of the remaining moisture 9 4 Cleaning the hood filter The 2 in 1 long life carbon filter combines the filtration of grease and odour in one unit The filter consists of two elements located on the left and right side of the filter housing Each element is made up of the grease f...

Page 22: ...er Cleaning the filter 1 Wash the filter in warm water without any cleaning agents Detergents can damage the odour filtration You can use a soft sponge a soft cloth or a non abrasive cleaning brush to remove food remains if necessary You can also wash the filter in a dishwasher at 65 70 C using a program longer than 90 min without detergents and without dishes in the same load 2 Dry the filter in ...

Page 23: ...eat setting for one of the cook ing zones The other zones consume the maxi mum available power Your hob works properly Reduce the heat setting of the other cooking zones connected to the same phase Refer to Power management An acoustic signal sounds and the hob deactivates An acoustic signal sounds when the hob is deactivated You put something on one or more sensor fields Remove the object from th...

Page 24: ...surrounding area Take out the hood filter and remove the residual moisture from the inside of the hood Refer to Care and cleaning Leave the hood system to dry for one day then activate the hood again The steam produced during cooking is not sufficiently absor bed by the hood The lids on the cookware are not properly placed If your cookware does not have vented lids make sure to tilt the lids so th...

Page 25: ...e power of the cooking zones can be different in some small range from the data in the table It changes with the material and dimensions of the cookware For optimal cooking results use cookware no larger than the diameter in the table 12 ENERGY EFFICIENCY 12 1 Product Information for hob Model identification CCE84543CB Type of hob Built In Hob Number of cooking zones 4 Heating technology Induction...

Page 26: ...formation Sheet according to EU No 65 2014 Supplier s name or trade mark AEG Model identifier CCE84543CB Annual Energy Consumption AEChood 30 9 kWh a Energy Efficiency Class A Fluid Dynamic Efficiency FDEhood 33 1 Fluid Dynamic Efficiency class A Lighting Efficiency LEhood lux W Lighting Efficiency Class Grease Filtering Efficiency GFEhood 85 1 Grease Filtering Efficiency class B Minimum Air Flow ...

Page 27: ...low speed level Once the cooking is finished keep the hood running for a few minutes Increase the fan speed only to get rid of large amounts of steam or smoke It is recommended to use the Boost function only in extreme situations Clean the hood filter regularly and replace it when necessary to maintain its efficiency Use the maximum diameter of the ducting system to optimize efficiency and minimiz...

Page 28: ...867373868 E 062023 ...

Reviews: