background image

• Do not operate the appliance with wet

hands or when it has contact with

water.

• Do not use the appliance as a work

surface or as a storage surface.

• If the surface of the appliance is

cracked, disconnect immediately the

appliance from the power supply. This

to prevent an electrical shock.

• Users with a pacemaker must keep a

distance of minimum 30 cm from the

induction cooking zones when the

appliance is in operation.

• When you place food into hot oil, it

may splash.

• Never use an open flame when the

integrated hood operates.

WARNING!

Risk of fire and explosion

• Fats and oil when heated can release

flammable vapours. Keep flames or

heated objects away from fats and

oils when you cook with them.

• The vapours that very hot oil releases

can cause spontaneous combustion.

• Used oil, that can contain food

remnants, can cause fire at a lower

temperature than oil used for the first

time.

• Do not put flammable products or

items that are wet with flammable

products in, near or on the appliance.

WARNING!

Risk of damage to the

appliance.

• Do not keep hot cookware on the

control panel.

• Do not put a hot pan cover on the

glass surface of the hob.

• Do not let cookware boil dry.

• Be careful not to let objects or

cookware fall on the appliance. The

surface can be damaged.

• Do not activate the cooking zones

with empty cookware or without

cookware.

• Do not put aluminium foil on the

appliance.

• Never remove the grid or the hood

filter when the integrated hood or the

appliance operates.

• Never use the integrated hood without

the hood filter.

• Do not cover the inlet of the integrated

hood with cookware.

• Do not open the bottom lid when the

integrated hood or the appliance

operates.

• Do not place small or light objects

near the integrated hood to avoid the

risk of being trapped.

• Cookware made of cast iron,

aluminium or with a damaged bottom

can cause scratches on the glass /

glass ceramic. Always lift these

objects up when you have to move

them on the cooking surface.

2.4 Care and cleaning

• Clean the appliance regularly to

prevent the deterioration of the

surface material.

• Switch off the appliance and let it cool

down before cleaning.

• Do not use water spray and steam to

clean the appliance.

• Clean the appliance with a moist soft

cloth. Use only neutral detergents. Do

not use abrasive products, abrasive

cleaning pads, solvents or metal

objects.

2.5 Service

• To repair the appliance contact the

Authorised Service Centre. Use

original spare parts only.

• Concerning the lamp(s) inside this

product and spare part lamps sold

separately: These lamps are intended

to withstand extreme physical

conditions in household appliances,

such as temperature, vibration,

humidity, or are intended to signal

information about the operational

status of the appliance. They are not

intended to be used in other

applications and are not suitable for

household room illumination.

2.6 Disposal

WARNING!

Risk of injury or suffocation.

• Contact your municipal authority for

information on how to dispose of the

appliance.

ENGLISH

7

Summary of Contents for CDE84751FB

Page 1: ...USER MANUAL EN User Manual Hob CDE84751FB ...

Page 2: ...Get usage advice brochures trouble shooter service and repair information www aeg com support Register your product for better service www registeraeg com Buy Accessories Consumables and Original spare parts for your appliance www aeg com shop CUSTOMER CARE AND SERVICE Always use original spare parts When contacting our Authorised Service Centre ensure that you have the following data available Mo...

Page 3: ...hey do not play with the appliance Keep all packaging away from children and dispose of it appropriately WARNING Keep children and pets away from the appliance when it operates or when it cools down Accessible parts become hot during use If the appliance has a child safety device it should be activated Children shall not carry out cleaning and user maintenance of the appliance without supervision ...

Page 4: ...fore installing it in the built in structure Do not use a steam cleaner to clean the appliance After use switch off the hob element by its control and do not rely on the pan detector If the glass ceramic surface glass surface is cracked switch off the appliance and unplug it from the mains In case the appliance is connected to the mains directly using junction box remove the fuse to disconnect the...

Page 5: ...incorporated in the appliance The use of inappropriate guards can cause accidents 2 SAFETY INSTRUCTIONS 2 1 Installation WARNING Only a qualified person must install this appliance WARNING Risk of injury or damage to the appliance Remove all the packaging Do not install or use a damaged appliance Follow the installation instructions supplied with the appliance Keep the minimum distance from other ...

Page 6: ...able or plug if applicable does not touch the hot appliance or hot cookware when you connect the appliance to a socket Do not use multi plug adapters and extension cables Make sure not to cause damage to the mains plug if applicable or to the mains cable Contact our Authorised Service Centre or an electrician to change a damaged mains cable The shock protection of live and insulated parts must be ...

Page 7: ... grid or the hood filter when the integrated hood or the appliance operates Never use the integrated hood without the hood filter Do not cover the inlet of the integrated hood with cookware Do not open the bottom lid when the integrated hood or the appliance operates Do not place small or light objects near the integrated hood to avoid the risk of being trapped Cookware made of cast iron aluminium...

Page 8: ... Service Centre The connection cable may only be replaced by a qualified electrician 3 4 Attaching the seal On top installation 1 Clean the worktop around the cut out area 2 Attach the supplied 2x6mm seal stripe to the lower edge of the hob along the outer edge of the glass ceramic Do not stretch it Make sure that the ends of the seal stripe are located in the middle of one side of the hob 3 Add s...

Page 9: ...ame indicated in the graphic below www youtube com electrolux www youtube com aeg How to install your AEG Extractor Hob Filter housing assembly Before first use make sure to place the filter inside the housing with the silver side facing out Once the filter housing is assembled put it inside the hood cavity and place the grid on the hood ENGLISH 9 ...

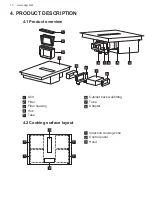
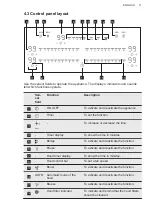
Page 10: ...uct overview 3 2 1 4 5 6 7 7 6 5 4 8 8 1 Grid 2 Filter 3 Filter housing 4 Hob 5 Tube 6 Cabinet back wall fitting 7 Tube 8 Adapter 4 2 Cooking surface layout 3 2 1 1 1 1 1 Induction cooking zone 2 Control panel 3 Hood www aeg com 10 ...

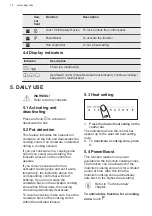
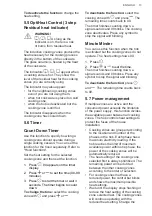
Page 11: ...e the time 4 Timer display To show the time in minutes 5 Bridge To activate and deactivate the function 6 Pause To activate and deactivate the function 7 Hood timer display To show the time in minutes 8 Hood control bar To set a fan speed 9 Boost To activate and deactivate the function 10 AUTO Automatic mode of the hood To activate and deactivate the function 11 Breeze To activate and deactivate t...

Page 12: ... you remove cookware from an activated cooking zone and set it aside temporarily the indicators above the corresponding control bar will start blinking If you do not place the cookware back on the activated cooking zone within 60 seconds the cooking zone will automatically deactivate To resume cooking make sure to put the cookware back on the cooking zones within the indicated timeout 5 3 Heat set...

Page 13: ...emaining time counts back to 00 The timer finishes counting down a signal sounds and 00 blinks The cooking zone deactivates Press any symbol to stop the signal and blinking Minute Minder You can use this function when the hob is activated but the cooking zones do not operate The heat setting shows 00 1 Press 2 Press or to set the time The timer finishes counting down a signal sounds and 00 blinks ...

Page 14: ... You can activate the function while the hob is on but none of the cooking zones are active or at any point during the cooking session If you activate the function while the hob is off none of the cooking zones operate and there is no residual heat visible on the control panel the function will switch off by itself after a few seconds 1 Press and hold to activate the hob 2 Press AUTO to activate t...

Page 15: ...th cases AUTO will be activated next time you switch on the hob Boost The function activates the hood fan at its maximum speed level Press to activate the function A signal sounds and an indicator above the symbol appears The function can operate uninterrupted for a maximum of 10 minutes After that time the fan speed setting automatically changes to 3 You can activate the function again if needed ...

Page 16: ...ob you spill something or put something on the control panel for more than 10 seconds a pan a cloth etc A signal sounds and the hob deactivates Remove the object or clean the control panel the appliance gets too hot e g when a saucepan boils dry Let the cooking zone cool down before you use the hob again you do not deactivate a cooking zone or change the heat setting After some time the hob deacti...

Page 17: ... with the function activated press then press for 3 seconds until the indicator above the symbol disappears You can operate the hob When you deactivate the hob with the function operates again 6 5 Bridge The function operates when the pot covers the centres of the two zones This function connects two cooking zones and they operate as one First set the heat setting for one of the cooking zones To a...

Page 18: ...wards the hood minimizing unwanted cooking smells and excessive humidity in the kitchen The lids are available to buy separately in several sizes to fit most common cookware types For more information visit our website 7 2 The noises during operation If you can hear crack noise cookware is made of different materials a sandwich construction whistle sound you use a cooking zone with a high power le...

Page 19: ...nuts as nec essary Turn halfway through 7 8 Heavy fry hash browns loin steaks steaks 5 15 Turn halfway through 9 Boil water cook pasta sear meat goulash pot roast deep fry chips Boil large quantities of water PowerBoost is activated 7 5 Hints and Tips for the hood The grid covering the hood is made of aluminium and stainless steel You can put pots on it while the hood is not operating It will not ...

Page 20: ...r the hood It collects the condensation created during each cooking process Remember to empty the water tank regularly To open the water tank slide the latches out and open them one by one WARNING Make sure you do not let water get inside the hood If water or other liquids spill inside the hood system switch off the hood in the first place lift the grid and clean the hood area carefully with a moi...

Page 21: ...e sure the hob is switched off and Child Safety Device does not operate 2 Clean the filter and place it back inside the hood 3 Press twice The indicator appears and the signal sounds The counter restarts The counter starts automatically when you turn on the hood for the first time The maximum number of cleaning cycles is 8 After that time the filter needs to be replaced with a new one WARNING An o...

Page 22: ...vates An acoustic signal sounds when the hob is deactiva ted You put something on one or more sensor fields Remove the object from the sensor fields The hob deactivates You put something on the sensor field Remove the object from the sensor field Residual heat indicator does not come on The zone is not hot because it operated only for a short time or the sensor is dam aged If the zone operated suf...

Page 23: ... plug it in again Other suggestions Try to cool down the tempera ture of the surrounding area Take out the hood filter and re move the residual moisture from the inside of the hood Refer to Care and cleaning Leave the hood system to dry for one day then activate the hood again The steam produced dur ing cooking is not suffi ciently absorbed by the hood The lids on the cookware are not properly pla...

Page 24: ...ade in Germany Ser Nr 7 35 kW AEG 10 2 Cooking zones specification Cooking zone Nominal power maximum heat setting W PowerBoost W PowerBoost maximum du ration min Cookware di ameter mm Left front 2300 3200 10 125 210 Left rear 2300 3200 10 125 210 Right front 2300 3200 10 125 210 Right rear 2300 3200 10 125 210 The power of the cooking zones can be different in some small range from the data in th...

Page 25: ...ance 11 2 Energy saving You can save energy during everyday cooking if you follow below hints When you heat up water use only the amount you need If it is possible always put the lids on the cookware Before you activate the cooking zone put the cookware on it Put the smaller cookware on the smaller cooking zones Put the cookware directly in the centre of the cooking zone Use the residual heat to k...

Page 26: ......

Page 27: ......

Page 28: ...www aeg com shop 867373167 A 452021 ...

Reviews: