background image

57

Safety warnings

For  the  user

•

The cooker hood is designed to extract unpleasant odours

from the kitchen, it will not extract steam.

• Always cover heating elements, to prevent excess heat from

damaging the appliance.  In the case of oil, gas and coal fired

cookers it is essential to avoid open flames.

• Also, when frying, keep the deep frying pan on the cooker top/cooker

under careful control.

• The hot oil in the frying pan might ignite due to overheating.

• The risk of self-ignition increases when the oil being used is dirty.

• It is extremely important to note that overheating can cause a fire.

•

Never carry out any flambé cooking under the hood.

•

Always disconnect the unit from the power supply before

carrying out any work on the hood, including replacing the

light bulb

 (take the cartridge fuse out of the fuse holder or switch off

the automatic circuit breaker).

•

It is very important to clean the hood and replace the filter at

the recommended intervals. Failure to do so could cause

grease deposits to build up, resulting in a fire hazard.

For  the  installer

• When used as an extractor unit, the hood must be fitted with a

150mm diameter hose.

• Should there already be a pipe of diameter 125 mm that ducts to the

outside through the walls or roof, it is possible to use the 150/125

mm reduction flange provided (DD 8794 and  DD 8795 only). In this

case the hood will be slightly noisier.

•

When installing the hood, make sure you respect the following

minimum distance from the top edge of the cooking hob/ring

surfaces:

electric cookers

300 mm

• The national Standard on fuel-burning systems specifies a maximum

depression of 0.04 mbar in such rooms.

• The air outlet must not be connected to chimney flues or combustion

gas ducts. The air outlet must under no circumstances be connected

to ventilation ducts for rooms in which fuel-burning appliances are

installed.

• The air outlet installation must comply with the regulations laid down

by the relevant authorities.

Summary of Contents for CHDD 8795

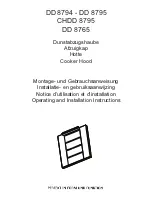
Page 1: ... 8795 CHDD 8795 DD 8765 Dunstabzugshaube Afzuigkap Hotte Cooker Hood Montage und Gebrauchsanweisung Installatie en gebruiksaanwijzing Notice d utilisation et d installation Operating and Installation Instructions ...

Page 2: ...filter 61 Re setting the saturation signal 61 Maintenance and care 62 Cleaning the hood 62 Metal grease filter 62 Removing the frontal screens 62 Removing the metal grease filter 63 Charcoal filter 64 Changing the light bulb 65 Changing the upper light DD 8765 65 Changing the side light DD 8765 66 Special accessories 66 Technical assistance service 67 Technical Specifications 68 Mounting accessori...

Page 3: ...ortant to clean the hood and replace the filter at the recommended intervals Failure to do so could cause grease deposits to build up resulting in a fire hazard For the installer When used as an extractor unit the hood must be fitted with a 150mm diameter hose Should there already be a pipe of diameter 125 mm that ducts to the outside through the walls or roof it is possible to use the 150 125 mm ...

Page 4: ...evant controlling authority or building inspector s office Since the rule for rooms with fuel burning appliances is outlet hole of the same size as the ventilation hole a hole of 500 600 cm2 which is to say a larger hole could reduce the performance of the extractor hood If the hood is used in its filtering function it will operate simply and safely in the above conditions without the need for any...

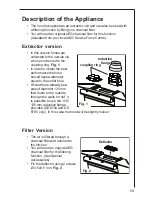
Page 5: ...the best performance the hose should have a diameter equal to the outlet hole Should there already be a pipe of diameter 125 mm that ducts to the outside through the walls or roof it is possible to use the 150 125 mm reduction flange provided DD 8794 and DD 8795 only In this case the hood will be slightly noisier Filter Version The air is filtered through a charcoal filter and returned to the kitc...

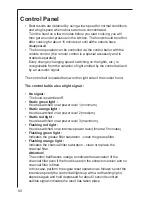
Page 6: ... is also a light signal No signal The hood is switched off Static green light Hood is switched on at power level 1 minimum Static orange light Hood is switched on at power level 2 medium Static red light Hood is switched on at power level 3 maximum Flashing red light Hood is switched on at intensive power level timed at 5 minutes Flashing green light Indicates the grease filter saturation clean th...

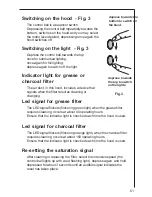
Page 7: ...LED signal flickers flickering green light when the grease filter requires cleaning occurs at about 40 operating hours Ensure that the indicator light is checked each time the hood is used Led signal for charcoal filter The LED signal flickers flickering orange light when the charcoal filter requires cleaning occurs at about 160 operating hours Ensure that the indicator light is checked each time ...

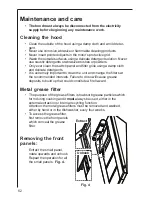
Page 8: ...s It is extremely important to clean the unit and change the filters at the recommended intervals Failure to do so will cause grease deposits to build up that could constitute a fire hazard Metal grease filter The purpose of the grease filters is to absorb grease particles which form during cooking and it must always be used either in the external extraction or internal recycling function Attentio...

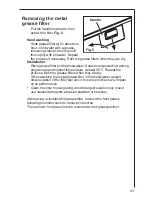
Page 9: ... powerful washing programme and highest temperature at least 65 C Repeat the process Refit the grease filters when they are dry When washing the metal grease filter in the dishwasher a slight discolouration of the filter can occur this does not have any impact on its performance Clean the inner housing using a hot detergent solution only never use caustic detergents abrasive powders or brushes Aft...

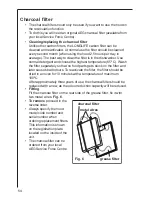
Page 10: ...er separately so that no food parts gets stuck on the filter and later causes bad odours To reactivate the filter the filter should be dried in an oven for 10 minutes with a temperature of maximum 100ºC After approximately three years of use the charcoal filter should be replaced with a new as the odour reduction capacity will be reduced Fitting Fit the charcoal filter on the rear side of the grea...

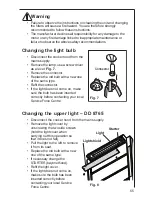
Page 11: ...a new one of the same type Refit the connector If the light does not come on make sure the bulb has been inserted correctly before contacting your local Service Force Centre Changing the upper light DD 8765 Disconnect the cooker hood from the mains supply Remove the light cover by unscrewing the two side screws hold the light cover when carrying out this operation so that it does not fall Pull the...

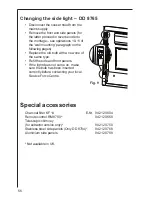
Page 12: ...d bulb with a new one of the same type Refit the side and front panels If the light does not come on make sure the bulb has been inserted correctly before contacting your local Service Force Centre Special accessories Charcoal filter KF 14 E Nr 942 120 604 Remote control RM 8700 942 120 658 Telescopic chimney for extractor version only 942 120 750 Stainless steel side panels Only DD 8794 942 120 7...

Page 13: ... Force Centre by telephoning 08705 929 929 Your call will be automatically routed to the Service Centre covering your post code area For the address of your local Service Force Centre and further information about Service Force please visit the website at www serviceforce co uk Please ensure that you have read the section What to do if as the engineer will make a charge if the fault is not a mecha...

Page 14: ...rption upperlight 1 x 36W PL sidelights 2 x 13W Neon Ø16mm G5 Length of the cable 150 cm Electrical connection 230 V Attention To guarantee the same quality of illumination we advise using the same type of light 13W Phillips neon lamp Cod Ref 8711500644305 Ensure that the transparent part of the bulb is directed towards the outside to guaranteeacorrectdiffusionofthelight Mounting accessories inclu...

Page 15: ...Fixed connection of the appliance must only be carried out by an authorised electrician Electrical connection for UK only Safety warnings for the electrician Connect the hood to the mains supply via a double pole switch which has 3 mm minimum separation between the contacts The switch must be accessible at all times The following is valid in the United Kingdom only the wire which is coloured green...

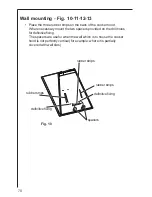
Page 16: ...the drill holes for definitive fixing The spacers are useful when the wall which is to house the cooker hood is not perfectly vertical for example where it is partially covered with wall tiles Wall mounting Fig 10 11 12 13 Fig 10 rubber strips spacers definitive fixing rubber strips rubber strips definitive fixing ...

Page 17: ...e of the hood once mounted 2 Drill two holes Ø 8mm and fix the support bracket with two wall plugs and screws 3 Remove the front panels see paragraph Removing the front panels Hang the hood 4 adjust its position 5 6 and from the inside of the hood sign two points for definitive fixing 7 remove the hood and drill two holes Ø 8mm 8 fit two wall plugs hang the hood again and fix it securely with two ...

Page 18: ...connected from the home general electric panel In the case that it is decided to use the cooker hood in the suction version then place one of the two flanges provided in the exit hole 13 Suction Attention The tall flange should be used when a telescopic chimney is required to be mounted this item should be ordered see special accessories the short flange is to be used in all other cases Remount th...

Page 19: ...73 ...

Page 20: ...74 ...

Page 21: ...75 ...

Page 22: ...rld s No 1 choice The Electrolux Group is the world s largest producer of powered appliances for kitchen cleaning and outdoor use More than 55 million Electrolux Group products such as refrigerators cookers washing machines vacuum cleaners chain saws and lawn mowers are sold each year to a value of approx USD 14 billion in more than 150 countries around the world ...

Reviews: