background image

87

Installing the front panel (see also “Special accessories”)
• Remove first the rear then the front grease filters.
• Remove the internal cover pressing both unlocking devices (press

and pull). Fig. 12.

• Predrill the front panel as per template and fix it to the vapour

catcher with 3 screws. Fig. 13-14.

• Clip the Internal cover back in and insert both grease filters (first the

front one and then the rear one).

Fig. 15

Fig. 14

Fig. 13

Summary of Contents for CHDF 6260

Page 1: ...DF 6260 DF 6260 Dunstabzugshaube Afzuigkap Hotte Cooker Hood Montage und Gebrauchsanweisung Installatie en gebruiksaanwijzing Notice d utilisation et d installation Operating and Installation Instructions ...

Page 2: ...68 Printed on recycled paper AEG putting words into action ...

Page 3: ...anel 73 Maintenance and care 74 Metal grease filter 74 Open the metal grease filter 74 Charcoal filter 75 Changing the light bulb s 76 Cleaning 77 Special accessories 77 Technical assistance service 77 Guarantee conditions 78 Technical Specifications 80 Mounting accessories included 80 Electrical connection 81 Safety warnings for the electrician 81 Installation 82 ...

Page 4: ...tervals Failure to do so could cause grease deposits to build up resulting in a fire hazard The appliance is not intended for use by young children or infirm persons without supervision Young children should be supervised to ensure that they do not play with the appliance WARNING Ensure that the appliance is switched off before replacing the lamp to avoid the possibility of electric shock for the ...

Page 5: ...ment combination is ventilated from outside using a suitable ventilation hole approximately 500 600 cm2 large to avoid the possibility of a depression being created during operation of the hood If you have any doubts contact the relevant controlling authority or building inspector s office Since the rule for rooms with fuel burning appliances is outlet hole of the same size as the ventilation hole...

Page 6: ...essories In this version fumes are extracted to the outside via a hose In order to obtain the best performance the hose should have a diameter equal to the outlet hole Filter Version The air is filtered through a charcoal filter and returned to the kitchen You will need an original AEG KLF60 80 charcoal filter for the filtering function See Special Accessories A Switches Motor light B Grease filte...

Page 7: ...ce is withdrawn without preceding disengagement of the hood via the switches the set fan output is automatically re engaged If the extractor part is re inserted without operation of the switches first the blower is switched off The lighting can be separately switched on and off with the sliding switch Turn the hood on a few minutes before you start cooking then you will get an underpressure in the...

Page 8: ...r this purpose then proceed in the same way to remove the front grease filter Fig 2 Hand washing Soak grease filters for about one hour in hot water with a grease loosening cleaner then rinse off thoroughly with hot water Repeat the process if necessary Refit the grease filters when they are dry Dishwasher machine Place grease filters in dish washer Select most powerful washing programme and highe...

Page 9: ...G filters only making sure they are replaced when necessary Mounting 1 Pull out the vapour catcher A 2 Remove first the rear then the front grease filters 3 Insert the charcoal filter into the lugs of the holding frame above using the 2 red clips to retain it below press the red clips inwards and insert the charcoal filter in the holding frame Fig 3 Dismounting 1 Press both red lugs upwards toward...

Page 10: ...enance or failure to observe the above safety recommendations Changing the light bulb s Disconnect the unit from the mains power supply Unlock the lighting cover D by twisting the bolts to the left and fold down the bulb cover Fig 4 Replace the old light bulb s with a new light bulb of the same kind Close the bulb cover and relock it by twisting the bolts to the right If the light does not come on...

Page 11: ... Special accessories Charcoal filter KLF 60 80 E Nr 610 899 421 Front panel BL3D w White 942 118 603 Front panel BL3D b Black 942 118 604 Front panel BL3D m Inox 942 118 605 Finishing strip 660 012 698 Clips 3x 660 012 697 Technical assistance service You are welcome to telephone our technical assistance service see list of technical assistance centres whenever you need information or in the unlik...

Page 12: ...sed agent AEG reserves the right to stipulate the place of the repair i e the customer s home place of installation or AEG workshop 4 The guarantee or free replacement includes both labour and materials 5 Repairs carried out under guarantee do not extend the guarantee period for the appliance Parts removed during guarantee repairs become the property of AEG 6 The purchaser s statutory rights are n...

Page 13: ... of your new home They will then ensure that the local Service Organisation is aware of your move and able to look after you and your appliances France Senlis 33 0 44 62 29 29 Germany Nürnberg 49 0 911 323 2600 Italy Pordenone 39 0 1678 47053 Sweden Stockholm 46 0 8 738 7910 UK Slough 44 0 1753 219899 ...

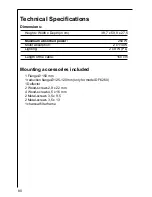
Page 14: ...W Motor absorption 2 x 110 W Lighting 2 x 9 W PL Length of the cable 150 cm Mounting accessories included 1 Flange Ø 150 mm 1 reduction flange Ø 125 120 mm only for model DF 6260 1 Deflector 2 Wood screws 2 9 x 22 mm 4 Wood screws 4 5 x 16 mm 2 Metal screws 3 5 x 9 5 2 Metal screws 3 5 x 13 1 charcoal filter frame ...

Page 15: ...necessary to provide a fixed connection the hood must only be installed by an electrician authorised by the local electricity board When installing an omnipolar disconnector with a distance of at least 3 mm between contacts must be provided The manufacture declines all responsibility for malfunctions resulting from failure to comply with the above instructions Electrical connection 220 240 V by me...

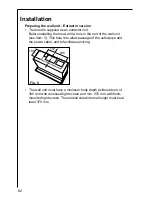
Page 16: ... roof of the wall unit see item 5 This hole is to allow passage of the outlet pipe and the power cable and to facilitate servicing The wall unit must have a minimum body depth without door of 300 mm with recessed light screen and min 370 mm with flush mounted light screen The unobstructed internal height must be at least 370 mm 190 238 172 Fig 5 ...

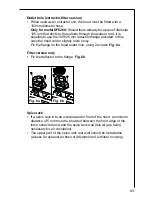
Page 17: ...ood will be slightly more noisy Fix the flange on the hood outlet hole using 2 screws Fig 6a Filter version only Fix the deflector to the flange Fig 6b Spice rack If a spice rack is to be incorporated in front of the hood a minimum distance of 5 mm must be provided between the front edge of the fume extractor hood and the spice rack wall this air gap being necessary for air circulation The upper p...

Page 18: ...t extent so that it is retained Fully withdraw the vapour catcher of the hood Important Detach and insert the grease filters only when the vapour catcher is fully withdrawn Remove the grease filters First remove the rear and then the front grease filter For 19 mm side walls the spacer discs clipped in on the appliance body must be taken out Mount the hood with 4 or 6 x Ø 4 mm screws Fig 7 Insert t...

Page 19: ...ccessories Apply pressure Fig 8 Fitting the charcoal filter for filter version If the fume extractor hood is installed as a return air appliance Filter version air outlet above the wall unit the charcoal filter special accessory must be fitted before the grease filters are fitted Installation sequence 1 Insert the holding frame for the charcoal filter in the shaft of the hood with the 2 lugs facin...

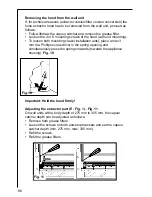
Page 20: ...nting claws installation aids place a max 3 mm dia Phillips screw driver in the spring opening and simultaneously press the springs inwards towards the appliance housing Fig 10 Important Hold the hood firmly Adjusting the extractor part E Fig 1 Fig 11 On wall units with a body depth of 275 mm to 335 mm the vapour catcher depth can be adjusted as follows Remove both grease filters Loosen the screws...

Page 21: ...ters Remove the internal cover pressing both unlocking devices press and pull Fig 12 Predrill the front panel as per template and fix it to the vapour catcher with 3 screws Fig 13 14 Clip the Internal cover back in and insert both grease filters first the front one and then the rear one Fig 15 Fig 14 Fig 13 ...

Page 22: ...AEG Hausgeräte GmbH Postfach 1036 D 90327 Nürnberg http www aeg hausgeraete de Copyright by AEG LI1SJD Ed 05 02 ...

Reviews: