


Operating Instructions
27
Roasting
For roasting, use the rothitherm
I
or conventional
O
oven function.
1
Important:
Use the fat filter when roasting!
Roasting Dishes
• Any heat-resistant dish is suitable for roasting.
• In the case of dishes with plastic handles, ensure that the handles are
heat-resistant.
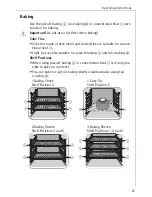
• Large roasts can be roasted
directly on the universal sheet or on
the shelf with the universal sheet underneath
(e.g. turkey, goose,
3-4 chickens, 3-4 knuckles).
• We recommend roasting all lean types of meat
in a casserole with a
lid
(e.g. veal, pork or beef pot roasts, frozen meat). This way the meat
will remain juicier.
• You can roast all types of meat that should have a crispy exterior
in a
casserole without a lid
(e.g. pork, meat loaf, lamb, mutton, duck,
1-2 knuckles, 1-2 chickens, small poultry, sirloin, fillet, game).
•
Tip
: If you use dishes for roasting (particularly for small amounts), the
oven will not get so dirty!
Shelf Positions
• Please see the following table for the shelf positions to use.
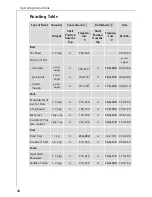
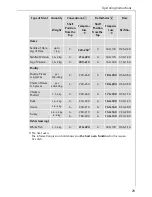
Notes on the Roasting Tables
Information is given in the table on suitable oven functions, tempera-
ture settings, cooking times and shelf positions for various types of
meat. The cooking times are only for guidance.
• We recommend roasting meat and fish
in the oven from a weight of
1 kg
.
• In general the conventional
O
function is suitable for very lean meat,
fish and game. For all other types of meat (particularly poultry) we
recommend the rothitherm
I
function.
• The cooking time required is dependent on the type and quality of the meat.
• To stop juices that exude from the meat burning onto dishes, we
recommend adding a little liquid in the roasting dish.
• Turn the roast after approx. 2/3 of the cooking time.
2
Switch off the oven 10-15 minutes before the end of the cooking time
to make use of the residual heat.


