background image

English

48

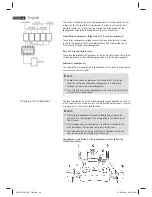
Arranging the Loudspeakers

The correct confi guration and arrangement of a surround sound system 
is decisive for the sound that is produced. In order to achieve the best 
possible sound, the instructions concerning the arrangement of the 
loudspeakers should be followed before they are connected.

Front/Main Loudspeakers (Right and Left, Centre Loudspeakers)

These three loudspeakers produce excellent sound characteristics and 
increase the dynamic eff ect of audio playback. The main dialogue of a 
fi lm is heard through these loudspeakers.

Rear or Surround Loudspeakers

These two loudspeakers off er dynamic 3-D sound eff ects and create spati-
al sound playback as they add background noises to the main speakers.

Subwoofer Loudspeaker

The subwoofer is a powerful bass loudspeaker which gives the sound even 
more realistic characteristics.


NOTE:

  In order to achieve an optimum 3-D sound eff ect, the output 

from the centre and subwoofer loudspeaker is is also heard 
through the front and rear loudspeakers.

  The surround and centre loudspeakers only work when the system 

is turned to surround sound.

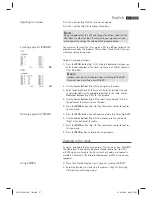
The ideal confi guration of the surroundsound system depends on the size 
of the room and the wall materials. The illustration below shows a typical 
arrangement of the various loudspeakers.


NOTE:

  Front/main loudspeakers and centre loudspeakers should be 

placed at the same height. They are pointed in the direction of 
the listeners.

  3-D surround and rear loudspeakers should be attached to the 

wall behind the listeners above the level of their ears.

  The subwoofer can be set up anywhere in the room as the bass 

sounds cannot be localised by the human ear.

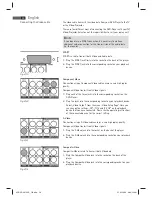
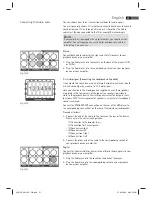
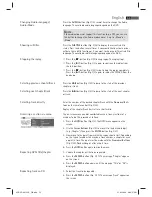
For optimum installation of the loudspeakers, please follow the 
instructions below:

05-DVD 4615 HC_GB.indd   48

05-DVD 4615 HC_GB.indd   48

21.05.2008   8:08:24 Uhr

21.05.2008   8:08:24 Uhr

Summary of Contents for DVD 4615 HC

Page 1: ...15 HC Home Cinema DVD Receiver Kombination Home Cinema DVD Receiver Combination Bedienungsanleitung Garantie Instruction Manual 05 DVD 4615 HC_Titel indd 1 05 DVD 4615 HC_Titel indd 06 08 2008 14 20 00 Uhr_TH ...

Page 2: ...e 4 Technische Daten Seite 6 Garantie Seite 37 English Contents Overview of the Components Page 3 Instruction Manual Page 40 Technical Data Page 42 Inhalt Contents 05 DVD 4615 HC_Titel indd 2 05 DVD 4615 HC_Titel indd 2 21 05 2008 8 08 01 Uhr 21 05 2008 8 08 01 Uhr bedin ungen g ...

Page 3: ...Übersicht der Bedienelemente 3 Overview of the Components Abb Fig 1 Abb Fig 2 Abb Fig 3 05 DVD 4615 HC_Titel indd 3 05 DVD 4615 HC_Titel indd 3 21 05 2008 8 08 01 Uhr 21 05 2008 8 08 01 Uhr I I ...

Page 4: ...llen EFFECT 14 Taste Funktionsauswahl SOURCE Zur Auswahl zwischen DVD und TUNER 15 POWER ON OFF Schalter Netz Ein Aus 16 FM Antenneneingang 17 AM Antenneneingang 18 Composite Video Ausgang 19 SCART Ausgang 20 Komponenten Video Ausgang 21 Digitaler Audio Ausgang 22 Flachbandkabel Anschluss 23 SPEAKERS OUT Lautsprecher Anschlüsse 24 2CH Audio Eingänge 25 S Video Ausgang 26 2CH Audio Ausgänge Gerätet...

Page 5: ...ahl der zu wiederholenden Passage 19 OPEN CLOSE CD DVD Fach öffnen bzw schießen 20 Zifferntasten Direkte Anwahl der Kapitel oder Lied Nummer 21 10 Zur Auswahl der Kapitel Tracks über 9 Erneuter Druck erhöht um jeweils 10 22 Stummschalten 23 I RADIO Sprung zum nächsten Kapitel oder Lied Im Radiomodus zum Durchschalten der gespeicherten Radiosender 24 Lautstärke erhöhen 25 I RADIO Sprung zum vorheri...

Page 6: ...g 0 C bis 40 C ebener Untergrund Kompatible Medien DVD Video DVD Disc DVD R RW MPEG 4 Video von CD DVD Disc DVD R RW CD R RW Audio CD von CD Disc CD R RW Video CD von CD Disc CD R RW MP3 files von CD DVD Disc DVD R RW CD R RW Regionalcode 2 Europa Grönland Südafrika Ägypten und Naher Osten Japan Total Surround Sound 500 W PMPO Subwoofer 200 W PMPO Center Lautsprecher 60 W PMPO Front Lautsprecher 2...

Page 7: ...17 Medien wiedergeben 18 Im Dateimodus arbeiten 22 Voreinstellungen ändern 25 Radioprogramme einstellen 34 Fehlerbehebung 35 Entsorgung 36 ETV Garantiebedingungen 37 ETV Garantieabwicklung 37 Konformitätserklärung 38 OSD Menü Übersicht 39 Inhaltsverzeichnis 05 DVD 4615 HC_D indd 7 05 DVD 4615 HC_D indd 7 21 05 2008 8 06 58 Uhr 21 05 2008 8 06 58 Uhr ...

Page 8: ... Verlet zungsrisiken auf ACHTUNG Weist auf mögliche Gefährdungen für das Gerät oder andere Gegen stände hin HINWEIS Hebt Tipps und Informationen für Sie hervor Bei technischen Fragen oder Problemen mit dem Gerät die Sie mit Hilfe dieser Bedienungsanleitung nicht lösen können wenden Sie sich bitte an unsere Service Hotline Telefon 4921522006666 ETV Elektro technische Vertriebsgesellschaft mbH Indus...

Page 9: ...rund sätzlich die Gefahr eines elektrischen Schlags Achten Sie daher besonders auf Folgendes Fassen Sie den Stecker niemals mit nassen Händen an Wenn Sie den Stecker aus der Steckdose herausziehen wollen ziehen Sie immer direkt am Stecker Ziehen Sie niemals am Kabel es könnte reißen Achten Sie darauf dass das Stromkabel nicht geknickt eingeklemmt überfahren wird oder mit Hitzequellen in Berührung ...

Page 10: ...hende Luftzufuhr gewährleistet ist So vermeiden Sie einen Wärmestau im Inneren des Gerätes Achten Sie dazu darauf dass die Lüftungsschlitze nicht blockiert werden Schützen Sie das Gerät vor mechanischen Erschütterungen Stellen Sie das Gerät immer auf eine feste ebene Unterlage Schützen Sie die Fernbedienung vor Witterungseinflüssen Feuchtig keit und hohen Temperaturen z B durch direktes Sonnenlich...

Page 11: ...chhänd ler in Verbindung Setzen Sie sich mit der Service Hotline in Verbindung Seite 8 Service Hotline Viele Probleme können über diesen Weg gelöst werden Aufstellen und Anschließen Packen Sie das Gerät und alle Zubehörteile aus und überprüfen Sie den Inhalt auf Vollständigkeit ACHTUNG Transportieren versenden Sie das Gerät grundsätzlich immer in der Originaverpackung damit es keinen Schaden nimmt...

Page 12: ...ungen bezüglich der Anordnung der Lautsprecher befolgt werden Front Hauptlautsprecher rechts und links Center Lautsprecher Diese drei Lautsprecher liefern ein exzellentes Klangbild und erhöhen den dynamischen Effekt der Audiowiedergabe Der Hauptdialog eines Films wird über diese Lautsprecher wiedergegeben Rear oder Surround Lautsprecher Diese beiden Lautsprecher bieten dynamische 3 D Klageffekte u...

Page 13: ...ussichtlich längere Zeit nicht benutzt wird Austretende Batteriesäure sofort mit einem Tuch entfernen Bei Hautkontakt betroffene Stelle sofort waschen Bei Verschlucken sofort Arzt aufsuchen Bei Augenkontakt Augen auswaschen und Arzt aufsuchen ACHTUNG Ungleiche Batterietypen oder neue und gebrauchte Batterien dürfen nicht zusammen verwendet werden Unterschiedliche Batterietypen weisen unterschiedli...

Page 14: ...reiten Der Winkel der Fernbedienung zum Fernbedienungssensor sollte nach rechts links oben und unten 30 nicht überschreiten Verbinden Sie die beiden Gerätekomponenten mit dem Flachbandkabel Stecken Sie die Kabelenden des Flachbandkabels in die entspre chenden Buchen auf der Rückseite der Geräte Mit dem Videokabel werden die Bilddaten von Ihrem DVD Player zu ihrem Fernsehgerät oder Video Projektor ...

Page 15: ...Wiedergabegerätes Composite Video Mit Composite Video werden nur Video Daten übertragen 1 Stecken Sie den Composite Video Stecker in die Buchse auf der Rück seite des Gerätes 2 Stecken Sie den Composite Stecker in die entsprechende Buchse Ihres Wiedergabegerätes Sie können zwischen drei Übertragungsverfahren für die Ton Signale wählen Grundsätzlich müssen Sie zunächst wählen ob der Ton über Ihr Fe...

Page 16: ...chts hinten 4 Lautsprecher links hinten 5 Lautsprecher rechts vorne 6 Lautsprecher links vorne 2 Schließen Sie das andere Kabelende an die entsprechenden Buchsen ihres Wiedergabegerätes oder Ihres Verstärkers Digital Verbinden Sie das Koaxial Kabel zur Übertragung des digitalen Audiosi gnals mit Ihrem Wiedergabegerät oder Ihrem Verstärker 1 Stecken Sie den Audio Stecker in die Buchse auf der Rücks...

Page 17: ...onalcode 2 hingegen kennzeichnet DVD die für Europa bestimmt sind HINWEIS Sie können mit dem DVD Player nur solche DVDs abspielen die mit dem Regionalcode 2 gekennzeichnet sind Es gibt sowohl eine Vielzahl von Brenn und Komprimierungsverfahren als auch große Qualitätsunterschiede bei gebrannten CDs DVDs Darüber hinaus hält die Musikindustrie keine festen Standards beim Kopierschutz ein Aus diesen ...

Page 18: ...dergeben Sie übermitteln dem DVD Player Befehle mit der Fernbedienung Es ist dabei wichtig dass das Ende der Fernbedienung in Richtung des DVD Players zeigt 1 Drücken Sie auf die Fernbedienungs Taste OPEN CLOSE Abb 3 19 Das CD DVD Fach öffnet sich 2 Legen Sie die CD DVD in das Fach 3 Drücken Sie noch einmal auf die Taste OPEN CLOSE Abb 3 19 Das CD DVD Fach wird geschlossen Auf dem Display Abb 1 2 ...

Page 19: ...e Voreinstellungen des DVD Players überprüfen 1 Drücken Sie auf die Taste II Abb 3 3 der Fernbedienung Die Wie dergabe wird unterbrochen das aktuell sichtbare Bild wird eingefro ren 2 Drücken Sie auf die Taste II Abb 3 3 der Fernbedienung um die normale Wiedergabe wieder zu starten Drücken Sie mehrfach auf die Taste AUDIO Abb 3 10 um die Audio Sprache zu ändern Die zur Auswahl stehenden Audio Spra...

Page 20: ...ach kurzer Zeit beginnt die Wiedergabe 4 Drücken Sie erneut auf die GOTO Taste um das Menü auszublenden 1 Wählen Sie das Kapitel oder den Titel aus der wiederholt werden soll 2 Drücken Sie auf die Taste REPEAT Abb 3 17 Auf dem Bildschirm erscheint die Meldung Kapitel 3 Drücken Sie erneut auf die Taste REPEAT bis Sie die Anzeige Titel oder Alle auf dem Bildschirm sehen 1 Wählen Sie den Track aus de...

Page 21: ...n digkeit zu verändern Die Geschwindigkeit kann um den Faktor 2 4 8 16 oder 32 beschleunigt erfolgen 3 Drücken Sie auf die Taste II Abb 3 3 um beim Erreichen der gesuchten Passage die normale Wiedergabe zu starten Sie können beim Betrachten von DVDs VCDs bzw Bildern den Bildaus schnitt verändern Drücken Sie auf die Taste ZOOM Abb 3 34 um den Bildausschnitt zu verändern Drücken Sie mehrfach auf die...

Page 22: ... Tabelle den Befehl Start auswählen 5 Bestätigen Sie den Befehl indem Sie auf die Taste ENTER Abb 3 27 der Fernbedienung drücken 1 Drücken Sie auf die Taste PROG Sie sehen nun eine Tabelle Abb CD bzw Abb DVD 2 Steuern Sie mit den Richtungstasten Abb 3 9 den Befehl Ende am unteren Ende der Tabelle an 3 Bestätigen Sie den Befehl indem Sie auf die Taste ENTER Abb 3 27 der Fernbedienung drücken 4 Drüc...

Page 23: ...r Digitalkameras Dieses Gerät ist nach den letzten Stand der technischen Entwicklungen im USB Bereich entwickelt worden Die große Anzahl von verschiedenen USB Speichermedien jeglicher Art die heute angeboten werden erlauben es leider nicht eine volle Kompatibilität mit allen USB Speichermedien zu gewährleisten Aus diesem Grund kann es in seltenen Fällen zu Problemen bei der Wiedergabe von USB Spei...

Page 24: ... Es gibt eine Vielzahl von Brenn und Komprimierungsverfahren sowie Qualitätsunterschiede bei CDs DVDs und gebrannten CDs DVDs Aus diesen Gründen kann es in seltenen Fällen zu Problemen bei der Wiedergabe von Dateien kommen Dateien werden z B angezeigt können aber nicht abgespielt werden Dies ist keine Fehlfunktion des Gerätes HINWEIS Mit der Taste Abb 3 9 können Sie aus den Dateien zu den Verzeich...

Page 25: ... auf die Taste SETUP Abb 3 4 der Fernbedienung drücken HINWEIS Viele der Voreinstellungen können Sie sowohl über die Fernbedienung als auch über das Menü ändern Der Unterschied ist Ändern Sie die Vorsteinstellungen über die Fernbedienung so haben die Änderungen nur bis zum Ausschalten des DVD Players oder bis zum Entfernen der DVD Bestand Änderungen die im Menü vorgenommen werden sind hingegen dau...

Page 26: ... von 16 9 auf deren Bild ist also zu breit für einen Fernseher Hier können Sie angeben wie die Wiedergabe des Films an Ihr Wiederga begerät angepasst wird 4 3 Panscan Sie sehen nur den mittleren Bereich des Films Die Ränder werden abgeschnitten 4 3 Letterbox Sie sehen den gesamten Bereich des Films Hierzu wird dieser verkleinert wodurch über und unter dem Film schwarze Balken erscheinen 16 9 Wide ...

Page 27: ...tare werden angezeigt Aus Es werden keine Kommentare angezeigt Bildschirmschoner Das Gerät kann ein Standbild beliebig lange auf dem Bildschirm anzeigen Hierbei können Schäden am Bildschirm entstehen Es ist daher sinnvoll den Bildschirmschoner zu aktivieren Folgende Optionen stehen zur Auswahl Ein Der Bildschirmschoner ist aktiviert Standardeinstellung Aus Der Bildschirmschoner ist deaktiviert Let...

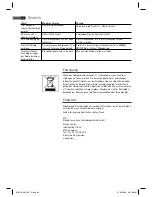
Page 28: ...precher einzu stellen Gross Der Lautsprecher gibt Bass und Höhen aus Klein Der Lautsprecher gibt nur die Höhen aus Aus Der Lautsprecher gibt keine Audiosignale aus Dialogpegel HINWEIS Das Menü Dialog ist nur anwählbar wenn im Menü Downmix die Option L R oder die Option Stereo aktiviert ist Im Menü Dialogpegel besteht die Möglichkeit die Lautsprecher der Dialoge einzustellen Erhöhen Sie die Lautstä...

Page 29: ...rfolgt die Tonausgabe als Stereo Ausgabe Hier haben Sie die Möglichkeit anstelle der Stereo Ausgabe eine Mono Ausgabe zu wählen Stereo Die Ausgabe erfolgt als Stereo Ausgabe Voreinstellung L Mono Die Ausgabe erfolgt als Mono Ausgabe Hierbei wird auf allen Lautsprechern das Signal des linken Stereo Kanals ausgegeben R Mono Die Ausgabe erfolgt als Mono Ausgabe Hierbei wird auf al len Lautsprechern d...

Page 30: ...r SVCDs in realitätsnahe und räumliche Fünf Kanal Klangerlebnisse um HINWEIS Das Menü Pro Logic II ist nur anwählbar wenn im Menü Down mix die Option 5 1 Kanal aktiviert ist Ein Pro Logic II ist aktiviert und Sie können das Fünf Kanal Klanger lebniss genießen Aus Pro Logic II ist deaktiviert Auto Pro Logic II wird automatisch aktiv wenn die Eigenschaften des abzuspielenden Mediums eine Pro Logic I...

Page 31: ... das angeschlossene und zu verwendende Wiedergabegerät aus Die Wahl des richtigen Signalformats ist vom verwendeten Anschluss und Wiedergabegerät abhängig vgl Sie hierzu bitte die Bedienungsanleitung des Wiedergabegerätes Aus Wählen Sie diese Option wenn Ihr Wiedergabegerät über den Composit Video und oder S Video Anschluss mit dem DVD Player verbunden ist YUV Wählen Sie diese Option wenn Ihr Wied...

Page 32: ...e diese Einstellung wenn es sich bei Ihrem Wieder gabegerät um ein Multisystemgerät handelt NTSC Primär in Nordamerika verbreitetes System PBC Durch PBC Playback Control werden die auf den DVD s bzw VCD s be findlichen vom Hersteller vorgegebenen interaktiven Menüs automatisch gestartet Wenn Sie die Option PBC auf Aus schalten werden die Tracks automatisch der Reihe nach von der DVD bzw VCD abgesp...

Page 33: ...der und Jugendliche unter 18 Jahren dürfen den Film nicht sehen Erwachsene Der Film darf nur von Erwachsenen gesehen werden Grundeinstellung Wählen Sie den Befehl Grundeinst Rückstellen wenn Sie das Gerät wieder auf die werkseitigen Voreinstellungen zurücksetzen möchten Alle Einstellungen die von Ihnen vorgenommen wurden gehen dabei verloren Möchten Sie den DVD Player mit einer Kindersicherung ver...

Page 34: ...SELECT Abb 3 31 den TUNER Modus aus 2 Wählen Sie mit der Taste FM AM Abb 3 8 das gewünschte Fre quenzband aus 3 Drücken Sie die Taste AUTO SUBTITLE Abb 3 26 Das Gerät sucht nun das aktuelle Frequenzband nach Sendern ab und speichert diese automatisch HINWEIS Eine Änderung der Senderreihenfolge ist nicht möglich Manueller Suchlauf 1 Wählen Sie mit der Taste SOURCE SELECT Abb 3 31 den TUNER Modus au...

Page 35: ...einstellungen falsch Überprüfen Sie die Voreinstellungen des DVD Players Kindersicherung ist aktiviert Deaktivieren Sie den Kinderschutz Jugendschutz Ein falscher TV Modus wurde ausgewählt Kein P SCAN fähiges Wiedergabegerät Drücken Sie die Taste V Mode Abb 3 29 um den TV Modus zu wechseln Zeilensprung Keine Reaktion auf Tastendruck Probleme mit der Stromversorgung oder statische Aufladung des Ger...

Page 36: ...ertriebsgesellschaft mbH Service Center Industriering Ost 40 47906 Kempen Tel 0 21 52 20 06 666 E Mail hotline etv de www etv de Fehler Mögliche Ursache Lösung Titel werden in falscher Reihenfolge gespielt Playlist wird verwendet Löschen Sie die Playlist Playlist löschen DVD kann nicht abgespielt werden DVD nicht finalisiert Verwenden Sie eine finalisierte DVD Kein Radioempfang Das Antennenkabel i...

Page 37: ...er normaler Abnutzung des Geräts beruhen Garantieansprüche sind ferner ausgeschlossen für leicht zerbrechliche Teile wie zum Beispiel Glas oder Kunststoff Schließlich sind Garantieansprüche ausgeschlossen wenn nicht von uns autorisierte Stellen Arbeiten an dem Gerät vornehmen 5 Durch Garantieleistungen wird die Garantiezeit nicht verlängert Es besteht auch kein Anspruch auf neue Garantieleistungen...

Page 38: ...ine kurze Fehlerbeschreibung bei Ohne den Garantienachweis Kaufbeleg kann Ihre Reklamation nicht kostenfrei bearbeitet werden Bitte nehmen Sie in keinem Fall eine unfreie Einsendung Ihres Gerätes vor Bei unfreien Lieferungen entfällt Ihr Anspruch auf Garantieleistungen Haben Sie Fragen zur Bedienung zur Inbetriebnahme oder zum An schluss Gern hilft Ihnen unser Serviceteam weiter Sie erreichen uns ...

Page 39: ... LEISE BASSVERSTÄRKUNG EIN AUS SUPER BASS EIN AUS VERSTÄRKUNG LÖSCHEN EIN AUS 3D VERARBEITUNG PRO LOGIC II PRO LOGIC II EIN AUS AUTO MODE MUSIC MOVIE PRO LOGI AUTO PANORAMA EIN AUS DIMENSION CENTER WIDTH HALLMODUS NORMAL KONZERTSAAL WOHNZIMMER HALLE BADEZIMMER HÖHLE ARENA KIRCHE HDCD FILTER AUS 1x 2x VIDEO SETUP VIDEO AUSGANG AUS YUV P_YUV RGB P_RGB FARBEINSTELLUNG SCHÄRFE HOCH MITTEL NIEDRIG HELL...

Page 40: ...tton 14 Function selection SOURCE button For selecting between DVD and TUNER 15 POWER ON OFF switch 16 FM antenna input 17 AM antenna input 18 Composite Video output 19 SCART output 20 Component Video output 21 Digital Audio output 22 Ribbon cable connection 23 SPEAKERS OUT Loudspeaker connections 24 2CH Audio input 25 S Video output 26 2CH Audio output Device parts Fig 1 Fig 2 05 DVD 4615 HC_GB i...

Page 41: ... etc 18 A B To select the section to be repeated 19 OPEN CLOSE To open or close the CD DVD tray 20 Numerical buttons For direct selection of chapter or song number 21 10 For selecting the chapters tracks above 9 Pressing again increases by a further 10 22 To switch of the sound 23 I RADIO To jump to the next chapter or song In radio mode for running through the stored radio stations 24 To increase...

Page 42: ...ironment 0 C bis 40 C level base Compatible media DVD Video DVD Disc DVD R RW MPEG 4 Video von CD DVD Disc DVD R RW CD R RW Audio CD from CD Disc CD R RW Video CD from CD Disc CD R RW MP3 files from CD DVD Disc DVD R RW CD R RW Regional 2 Europe Greenland South Africa Egypt and Middle East Japan Total Surround Sound 500 W PMPO Subwoofer 200 W PMPO Center loudspeaker 60 W PMPO Front loudspeaker 2 x...

Page 43: ... up 49 About the DVD Player 53 Playing media 54 Working in file mode 57 Changing the default settings 60 Radio Station Set up 68 Troubleshooting 69 Disposal 70 Declaration of conformity 70 OSD Menu overview 71 Table of Contents 05 DVD 4615 HC_GB indd 43 05 DVD 4615 HC_GB indd 43 21 05 2008 8 08 22 Uhr 21 05 2008 8 08 22 Uhr ...

Page 44: ...s to avoid accidents and damage to the machine WARNING Warns against dangers to your health and indicates potential risks of injury ATTENTION Indicates potential hazards for the player or other objects NOTE Highlights tips and information for you ETV Elektro technische Vertriebsgesellschaft mbH Industriering Ost 40 47906 Kempen We reserve the right to make technical and design related changes in t...

Page 45: ... this reason pay particular attention to the following Never touch the plug with wet hands If you want to pull the plug out of the plug socket always pull directly on the plug Never pull on the cable as it could tear Make sure that the power cable is not bent caught or run over and that it does not come into contact with heat sources Make sure that the power cable is not wound around the device wh...

Page 46: ...light Place the appliance so that a sufficient air supply is assured This is to avoid a build up of heat inside the appliance Make sure that the ventilation slots are not blocked Protect the appliance against the mechanical vibrations Always place the device on a firm even base Protect the remote control against weather influences moisture and high temperatures e g by direct sunlight The player is...

Page 47: ... Keep the packaging for this purpose Dispose of unnecessary packaging material in accordance with the regulati ons applicable in your country NOTE Get in touch with your dealer immediately if you notice damage caused by transport 1 Place the player on a stable heat resistant horizontal and level surface Keep a distance of at least 10 cm from walls and objects 2 Connect the device to a properly ins...

Page 48: ...re realistic characteristics NOTE In order to achieve an optimum 3 D sound effect the output from the centre and subwoofer loudspeaker is is also heard through the front and rear loudspeakers The surround and centre loudspeakers only work when the system is turned to surround sound The ideal configuration of the surroundsound system depends on the size of the room and the wall materials The illust...

Page 49: ...r country Do not throw batteries into fire NOTE The lifetime of the enclosed batteries may be shortened because of storage 1 Open and remove the battery compartment cover 2 Insert two batteries of type AAA R03 1 5 V ensure correct polarity and Start with the negative pole 3 Attach and close the battery compartment cover NOTE The signals from the remote control are transmitted to the DVD Player by ...

Page 50: ...ly Video signals 1 Plug each of the three jacks into the corresponding sockets on the DVD Player 2 Plug the jacks into the corresponding socket on your playback device Select Video Output from the menu Video Setup Page Here you can change the settings Off YUV and P YUV on the playback device that you have connected Please see the operating instructions of the connected device for the correct setti...

Page 51: ...ould use the 6 loudspeakers supplied Four of these speakers are placed in the four corners of the room One speaker is positioned close to the playback device The sixth speaker serves the output of very low tones With this arrangement of speakers a very natural stereophonic sound is achieved Connect the SPEAKERS OUT connection on the rear of the DVD player to the corresponding connections on the re...

Page 52: ...of your antenna system to the FM socket on the rear of the device AM reception Connect a medium wave aerial to the AM sockets on the back of the device USB Input Connect a USB cable for the transmission of audio and video data from an output device 1 Insert the plug into the socket on the left hand side of the device 2 Insert the plug into the corresponding plug of your output device Memory Card S...

Page 53: ...in particular make sure that the DVD has been finalized For further information on this matter please refer to the operating manual of your recorder Input Not Possible If a function or input selected by you is not possible the adjacent symbol is shown on the screen Track Track is the designation for sections on an Audio CD This may be a song the set of a symphony etc Title Chapter Video DVDs are d...

Page 54: ...e end of the track playback time of the CD so far time remaining to the end of the CD When playing DVDs you can view the on screen menu by pressing the OSD button Fig 3 30 DVD menu Current title total number of titles 1 Current chapter total number of chapters 2 Time 3 This provides information about the duration and the remaining play time By standard the play time expired of the current title is...

Page 55: ...Fig 3 25 to jump to the start of the previous chapter or track Press the I button Fig 3 23 to jump to the start of the next chapter or track Enter the number of the desired chapter track with the Numerical But tons on the remote control Fig 3 20 Replay of the chapter track starts after a short while The on screen menu enables comfortable access to any sections of a medium To do this proceed as fol...

Page 56: ...the Cur sor Buttons Fig 3 9 to navigate in the Menu Press the ENTER button Fig 3 27 to confirm If you are in a menu area for direct chapter selection you can enter the number of this chapter with the Numerical Buttons Fig 3 20 on the remote control The DVD Player has a fast forward and a fast reverse feature 1 Press the Fig 3 5 or button Fig 3 7 to start fast forward or fast reverse The current re...

Page 57: ...red title and chapter for DVDs at the appropriate position in the table Use the Numerical Buttons Fig 3 20 for this purpose 4 Use the Cursor Buttons Fig 3 9 to select the command Start at the bottom of the screen to save the input 5 Press the ENTER button Fig 3 27 on the remote control to confirm this command 1 Press the PROG button You will now see a table Fig CD or Fig DVD 2 Use the Cursor Butto...

Page 58: ...les of such devices are USB memory sticks or digital cameras This device has been developed in accordance with the latest techni cal developments in the USB field Unfortunately the large number of different types of USB storage media on offer today makes it impossible to guarantee full compatibility with all USB storage media For this reason there may be problems in rare cases with playing back fr...

Page 59: ...r this reason there may occasionally be problems when files are played back for example files are displayed but cannot be played back This is no malfunction of the player NOTE With the button Fig 3 9 you can return from the files to the directories Press the button Fig 3 35 on the remote control to stop the replay The DVD player is suitable for displaying your digital photographs These photos may ...

Page 60: ...DVD Player is switched off or the DVD is changed However any changes made in the menu are permanent The Setup menu has two menu levels Main menu The main level is represented by graphical symbols Sub menu The corresponding sub menu options can be found under each of the main menu options Navigation and selection Use the Cursor Buttons Fig 3 9 on the remote control to browse through the main menu I...

Page 61: ...is option if you use a wide screen TV for replay Please note that films that have been recorded with TV aspect 4 3 can still be replayed using aspect 4 3 This means that replaying this film will not require the complete wide screen area of the television Wide Squeeze Select this option if you use a wide screen TV for replay This setting is used to adapt films in 4 3 format to the aspect ratio of t...

Page 62: ...Setup Downmix Change the characteristics of the speaker output LT RT Choose this setting if you want to play the DVD with the Pro Logic Dolby stereo effect This produces a almost real 2 channel replay effect Stereo Choose this setting if you want to play a DVD that has been produced in the 5 1 Audio format as 2 channel stereo sound 3D SURROUND You may probably not have a 5 1 Audio system In this c...

Page 63: ...be set Digital Audio Digital Output Here you specify the settings for the digital Audio output SPDIF Off Output of an analogue Audio signal but no digital signal All Output of a digital Audio signal Use this setting if your amplifier is no two channel stereo amplifier PCM only Output of a digital Audio signal that is converted to a 2 channel signal Use this setting if your amplifier is a two chann...

Page 64: ...increase the volume to be able to hear also the very quiet passages however with the disadvan tage that loud passages will be unacceptably loud In this case it would make sense to compress the dynamic range i e reduce and increase the output volume at the same time FULL 1 8 The dynamic range is compressed slightly 1 8 to full FULL OFF The dynamic range is not compressed at all default Channel Dela...

Page 65: ...particularly suitable for the natural sur round playback of music programmes Movie The film mode is particularly suitable for the natural surround playback of films Pro Logic This mode is particularly suitable for decoding films and music recordings in Original Dolby Surround Auto If the Pro Logic II function is switched on a suitable mode is activated automatically Panorama The panorama mode prov...

Page 66: ... Component Video cable RGB Select this option if your playback device is connected to the DVD player via the SCART connection P RGB Select this option if your playback device supports progressive signals and it is connected to the DVD player with a scart cable NOTE If you would like to select the RGB setting please ensure that your playback device supports this setting If the P YUV or P RGB option...

Page 67: ...bly existing corre sponding information is read from the DVD and compared with the value pre set by you If a DVD is intended for an older age group than the one pre set by you the DVD cannot be played The following child lock options are available Kid Saf Suitable for children G Suitable for all age groups PG The presence of parents is recommended Some scenes may be unsuitable for children PG 13 T...

Page 68: ...20 of the remote control To prevent the password from being read by unauthorized persons only the characters XXXX X will appear on the screen 2 Enter the new password in the New Password line with the Numeri cal buttons of the remote control 3 Confirm the new password by entering it again in the Confirm line Confirm your entry with the ENTER button Fig 3 27 Radio Station Set up This device has a b...

Page 69: ...witch the player off Check the correct fit of the Video cable Connecting the Video cable Make sure that the jacks are tightly in the sockets no DVD CD inserted Insert a CD DVD DVD CD not compatible Use only compatible media see Technical data DVD CD incorrectly placed in CD DVD tray Turn the CD DVD around CD DVD is dirty Clean the CD DVD CD DVD is damaged Use a different CD DVD Incorrect settings ...

Page 70: ...on The remote control does not work wrong direction The remote control is not pointed towards the DVD Player too far away Make sure that the remote control is not further than 7 m away from the player Batteries empty Replace the batteries in the remote control Remote control battery installation Titles are played in wrong order Playlist is used Delete the playlist Deleting a Playlist DVD cannot be...

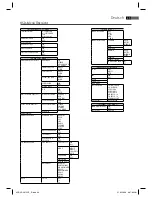
Page 71: ...UP PAGE ANALOG AUDIO SETUP DOWNMIX LT RT STEREO 3D SURROUND 5 1CH FRONT SPEAKER LARGE SMALL CENTER SPEAKER LARGE SMALL OFF REAR SPEAKER LARGE SMALL OFF SUBWOOFER ON OFF DIALOG D R C ON OFF AUTO DIGITAL AUDIO SETUP DIGITAL OUTPUT SPDIF OFF ALL PCM only LPCM OUTPUT 48K 96K DOLBY DIGITAL SETUP DUAL MONO STEREO L MONO R MONO MIX MONO DYNAMIC CHANNEL DELAY EQUALIZER SOUND MODE NORMAL ROCK POP LIVE DANC...

Page 72: ...05 DVD 4615 HC_GB indd 72 05 DVD 4615 HC_GB indd 72 21 05 2008 8 08 33 Uhr 21 05 2008 8 08 33 Uhr ...

Page 73: ...05 DVD 4615 HC_GB indd 73 05 DVD 4615 HC_GB indd 73 21 05 2008 8 08 33 Uhr 21 05 2008 8 08 33 Uhr ...

Page 74: ...TIE KARTE 24 Monate Garantie gemäß Garantie Erklärung Kaufdatum Händlerstempel Unterschrift Elektro technische Vertriebsgesellschaft mbH Industriering Ost 40 47906 Kempen DVD 4615 HC Stünings Medien Krefeld 05 08 05 DVD 4615 HC_Titel indd Abs1 74 05 DVD 4615 HC_Titel indd Abs1 74 21 05 2008 8 08 02 Uhr 21 05 2008 8 08 02 Uhr ...

Reviews: