background image

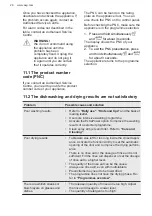
The function comes into operation

automatically:

• When the programme is completed.

• After 5 minutes if a programme was

not started.

8.10 End of the programme

When the programme is complete, the

display shows 0:00.

The Auto Off function switches the

appliance off automatically.
All buttons are inactive except for the

on/off button.

9. HINTS AND TIPS

9.1 General

Follow the hints below to ensure optimal

cleaning and drying results in daily use

and to protect the environment.
• Washing dishes in the dishwasher as

instructed in the user manual usually

consumes less water and energy than

washing dishes by hand.

• Load the dishwasher to its full

capacity to save water and energy.

For best cleaning results, arrange

items in the baskets as instructed in

the user manual and do not overload

the baskets.

• Do not pre-rinse dishes by hand. It

increases the water and energy

consumption. When needed, select a

programme with a prewash phase.

• Remove larger residues of food from

the dishes and empty cups and

glasses before putting them inside the

appliance.

• Soak or slightly scour cookware with

firmly cooked-on or baked-on food

before washing it in the appliance.

• Make sure that items in the baskets

do not touch or cover each other.

Only then can the water completely

reach and wash the dishes.

• You can use dishwasher detergent,

rinse aid and salt separately or you

can use the multi-tablets (e.g. ''All in

1''). Follow the instructions on the

packaging.

• Select a programme according to the

type of load and the degree of soil.

ECO offers the most efficient use of

water and energy consumption.

• To prevent limescale buildup inside

the appliance:

– Refill the salt container whenever

necessary.

– Use the recommended dosage of

the detergent and rinse aid.

– Make sure that the current level of

the water softener agrees with the

hardness of the water supply.

– Follow the instructions in the

chapter "Care and cleaning".

9.2 Using salt, rinse aid and

detergent

• Only use salt, rinse aid and detergent

designed for dishwasher. Other

products can cause damage to the

appliance.

• In areas with hard and very hard

water, we recommend to use basic

dishwasher detergent (powder, gel,

tablets containing no additional

agents), rinse aid and salt separately

for optimal cleaning and drying

results.

• Detergent tablets do not fully dissolve

with short programmes. To prevent

detergent residues on the tableware,

we recommend that you use tablets

with long programmes.

• Always use the correct quantity of

detergent. Insufficient dosage of

detergent can result in poor cleaning

results and hard-water filming or

spotting on the items. Using too much

detergent with soft or softened water

results in detergent residues on the

dishes. Adjust the amount of

detergent based on the water

hardness. Refer to the instructions on

the detergent packaging.

• Always use the correct quantity of

rinse aid. Insufficient dosage of rinse

aid decreases the drying results.

Using too much rinse aid results in

bluish layers on the items.

www.aeg.com

18

Summary of Contents for FAV55VI3P

Page 1: ...USER MANUAL EN User Manual Dishwasher FAV55VI3P ...

Page 2: ...t usage advice brochures trouble shooter service and repair information www aeg com support Register your product for better service www registeraeg com Buy Accessories Consumables and Original spare parts for your appliance www aeg com shop CUSTOMER CARE AND SERVICE Always use original spare parts When contacting our Authorised Service Centre ensure that you have the following data available Mode...

Page 3: ...supervised Children of less than 3 years of age should be kept away from the appliance unless continuously supervised Do not let children play with the appliance Keep detergents away from children Keep children and pets away from the appliance when the door is open Children shall not carry out cleaning and user maintenance of the appliance without supervision 1 2 General Safety This appliance is i...

Page 4: ...on must install this appliance Remove all the packaging Do not install or use a damaged appliance Do not use the appliance before installing it in the built in structure due to safety manner Follow the installation instructions supplied with the appliance Always take care when moving the appliance as it is heavy Always use safety gloves and enclosed footwear Do not install or use the appliance whe...

Page 5: ...n near or on the appliance Dishwasher detergents are dangerous Follow the safety instructions on the detergent packaging Do not drink and play with the water in the appliance Do not remove the dishes from the appliance until the programme is complete Some detergent may remain on the dishes Do not store items or apply pressure on the open door of the appliance The appliance can release hot steam if...

Page 6: ...mperature vibration humidity or are intended to signal information about the operational status of the appliance They are not intended to be used in other applications and are not suitable for household room illumination 2 7 Disposal WARNING Risk of injury or suffocation Disconnect the appliance from the mains supply Cut off the mains cable and discard it Remove the door catch to prevent children ...

Page 7: ...A ECOMETER B Indicators C Time indicator 4 2 ECOMETER The ECOMETER indicates how the programme selection impacts energy and water consumption The more bars are on the lower the consumption is indicates the most environmentally friendly programme selection for a normally soiled load 4 3 Indicators Indicator Description Rinse aid indicator It is on when the rinse aid dispenser needs refilling Refer ...

Page 8: ...ndard programme for test institutes 1 5 2 EXTRAS You can adjust the programme selection to your needs by activating EXTRAS ExtraSilent ExtraSilent allows to reduce the noise generated by the appliance When the option is activated the wash pump works quietly at a lower speed Due to the low speed the programme duration is longer ExtraPower ExtraPower improves the washing results of the selected prog...

Page 9: ...ed on Prewash Wash 60 C Intermediate rinse Final rinse 60 C Drying AirDry ExtraPower GlassCare ECO Crockery Cutlery Pots Pans Normal Lightly dried on Prewash Wash 50 C Intermediate rinse Final rinse 55 C Drying AirDry ExtraPower GlassCare ExtraSilent AUTO Sense Crockery Cutlery Pots Pans The pro gramme ad justs to all de grees of soil Prewash Wash 50 60 C Intermediate rinse Final rinse 60 C Drying...

Page 10: ...ter hardness in your area 2 Rinse aid level From level 0A to level 6A de fault 4A Adjust the level of the rinse aid according to the necessary dosage 3 End sound On Off default Activate or deactivate the acoustic signal for the end of a programme 4 Auto door open On default Off Activate or deactivate the AirDry 5 Key tones On default Off Activate or deactivate the sound of the but tons when presse...

Page 11: ...R dedicated to the chosen setting flashes The display shows the current setting value 2 Press OK to enter the setting The bar of the ECOMETER dedicated to the chosen setting is on The other bars are off The current setting value flashes 3 Press Previous or Next to change the value 4 Press OK to confirm the setting The new setting is saved The appliance returns to the basic settings list 5 Press an...

Page 12: ...nerated regularly This process is automatic and is the part of the normal dishwasher operation When the prescribed quantity of water see values in the table has been used since the previous regeneration process a new regeneration process will be initiated between the final rinse and the programme end Water softener lev el Amount of water l 1 250 2 100 3 62 Water softener lev el Amount of water l 4...

Page 13: ...ill rinse aid If the drying results are satisfactory while using multi tablets only it is possible to deactivate the dispenser and the indicator However for best drying performance always use rinse aid and keep the rinse aid indicator active To deactivate the rinse aid dispenser and indicator set the level of rinse aid to 0A 6 4 End sound You can activate an acoustic signal that sounds when the pr...

Page 14: ...nt level of the water softener agrees with the hardness of the water supply If not adjust the level of the water softener 2 Fill the salt container 3 Fill the rinse aid dispenser 4 Open the water tap 5 Start the programme Quick to remove any residuals from the manufacturing process Do not use detergent and do not put dishes in the baskets After starting the programme the appliance recharges the re...

Page 15: ...gramme to prevent corrosion Do not put dishes in the baskets 7 2 How to fill the rinse aid dispenser A B C CAUTION The compartment B is for rinse aid only Do not fill it with detergent CAUTION Only use rinse aid designed specifically for dishwashers 1 Open the lid C 2 Fill the dispenser B until the rinse aid reaches the marking MAX 3 Remove the spilled rinse aid with an absorbent cloth to prevent ...

Page 16: ...ith normal soil The upper ends of the two vertical ribs inside the compartment B indicate the maximum level for filling the dispenser with gel max 30ml 8 2 How to select and start a programme using MY TIME selection bar 1 Slide your finger across MY TIME selection bar to choose a suitable programme The light related to the selected programme is on The ECOMETER indicates the level of energy and wat...

Page 17: ...cel the delay start while the countdown operates Press and hold for about 3 seconds The appliance returns to the programme selection If you cancel the delay start you have to select the programme again 8 7 How to cancel a running programme Press and hold for about 3 seconds The appliance returns to the programme selection Make sure that there is detergent in the detergent dispenser before you star...

Page 18: ... in 1 Follow the instructions on the packaging Select a programme according to the type of load and the degree of soil ECO offers the most efficient use of water and energy consumption To prevent limescale buildup inside the appliance Refill the salt container whenever necessary Use the recommended dosage of the detergent and rinse aid Make sure that the current level of the water softener agrees ...

Page 19: ... whole space of the baskets Use the appliance to wash dishwasher safe items only Do not wash in the appliance items made of wood horn aluminium pewter and copper as they could crack warp get discoloured or pitted Do not wash in the appliance items that can absorb water sponges household cloths Put hollow items cups glasses and pans with the opening facing downwards Make sure that glass items do no...

Page 20: ...icals scourer or solvents Wipe clean the door including the rubber gasket once a week To maintain the performance of your appliance use a cleaning product designed specifically for dishwashers at least once every two months Carefully follow the instructions on the packaging of the product For optimal cleaning results start the programme Machine Care 10 3 Removal of foreign objects Check the filter...

Page 21: ... 2 guides 7 Reassemble the filters B and C 8 Put back the filter B in the flat filter A Turn it clockwise until it locks CAUTION An incorrect position of the filters can cause bad washing results and damage to the appliance 10 6 Cleaning the lower spray arm We recommend to clean the lower spray arm regularly to prevent soil from clogging the holes Clogged holes can cause unsatisfactory washing res...

Page 22: ...om clogging the holes Clogged holes can cause unsatisfactory washing results 1 Pull out the upper basket 2 To detach the spray arm from the basket press the spray arm upwards and simultaneously turn it clockwise 3 Wash the spray arm under running water Use a thin pointed tool e g a toothpick to remove particles of soil from the holes 4 To install the spray arm back press the spray arm upwards and ...

Page 23: ... Wash the spray arm under running water Use a thin pointed tool e g a toothpick to remove particles of soil from the holes Run the water through the holes to wash soil particles away from the inside 5 To install the spray arm C back insert the mounting element B in the spray arm and fix it in the delivery tube A by turning it clockwise Make sure that the mounting element locks into place 6 Install...

Page 24: ...o kinks or bends The appliance does not drain the water The display shows i20 Make sure that the sink spigot is not clogged Make sure that the interior filter system is not clogged Make sure that the drain hose has no kinks or bends The anti flood device is on The display shows i30 Close the water tap Make sure that the appliance is correctly installed Make sure the baskets are loaded as instructe...

Page 25: ...appliance door is not centred on the tub Adjust the rear foot if applicable The appliance door is diffi cult to close The appliance is not levelled Loosen or tighten the ad justable feet if applicable Parts of the tableware are protruding from the baskets The appliance door opens during the wash cycle The AirDry function is activated You can deactivate the function Refer to Basic settings Rattling...

Page 26: ... to the programme selection 11 2 The dishwashing and drying results are not satisfactory Problem Possible cause and solution Poor washing results Refer to Daily use Hints and tips and the basket loading leaflet Use more intensive washing programme Activate the ExtraPower option to improve the washing results of a selected programme Clean spray arm jets and filter Refer to Care and Cleaning Poor dr...

Page 27: ...e sure that the spray arms are not blocked or clogged Make sure that items in the baskets do not impede the lid of the detergent dispenser from opening Odours inside the appliance Refer to Internal cleaning Start the Machine Care programme with a descaler or a cleaning product designed for dishwashers Limescale deposits on the ta bleware on the tub and on the inside of the door The level of salt i...

Page 28: ...ance in the EU EPREL database Keep the energy label for reference together with the user manual and all other documents provided with this appliance It is possible to find information related to the performance of the product in the EU EPREL database using the link https eprel ec europa eu and the model name and product number that you can find on the rating plate of the appliance Refer to the cha...

Page 29: ......

Page 30: ......

Page 31: ......

Page 32: ...www aeg com shop 117847560 A 172021 ...

Reviews: