background image

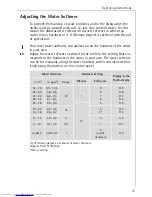
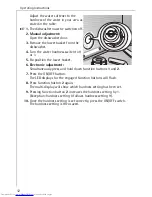
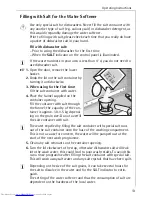
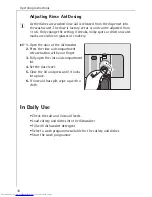
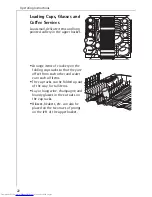
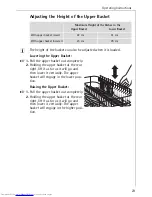
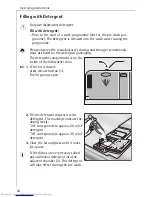
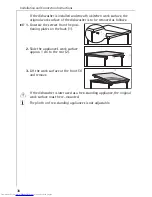
Operating Instructions

25

Use of "3 in 1"/ Combi Detergent Tablets

General Advice

These products are tablets with combined detergent/rinse-aid and salt 
functions.

0

1.

Before using these products you should first check that the water hard-
ness in your supply is compatible with the use of these products as per 
the detergent manufacturers instructions (on the product packaging).

2.

These products should be strictly used according to the detergent 
manufacturers instructions.  

1

Do not place the tablets in the tub or the cutlery basket as this will 
result in poorer wash results. The tablets should be placed in the 
detergent doser.

3.

If you encounter problems when using "3 in1" products for the first 
time then please contact the detergent manufacturers care line (the 
telephone number is given on the product packaging).

Special Advice

When using combination products, the rinse-aid and salt lights are no 
longer useful. It may be helpful therefore to switch the rinse aid off - 
please note that only some dishwashers have this facility - and selec-
ting the lowest possible setting for water hardness.

For more information please refer to your instruction manual.

If you decide to switch to the use of a standard detergent system we 
advise that you:

• Refill both the salt and rinse aid compartments.

• Switch the waterhardness  setting to the highest possible position 

and run for three normal cycles without a load.

• Readjust the waterhardness setting again according to the conditions 

for your region (as per the instruction manual). 

Summary of Contents for FAVORIT FAVORIT 60870

Page 1: ...FAVORIT 60870 Dishwasher User Instructions ...

Page 2: ...r numbered instruction steps lead you step by step through the operation of the appliance 3 Next to this symbol you receive additional information and practical tips on using the appliance 2 Tips and instructions for the economical and environmentally conscious use of the appliance are marked with a clover leaf In the event of a malfunction these operating instructions contain information on how t...

Page 3: ...utlery and Dishes 17 Loading Cutlery 18 Loading Pans Frying Pans and Large Plates 20 Loading Cups Glasses and Coffee Services 22 Adjusting the Height of the Upper Basket 23 Filling with Detergent 24 Use of 3 in 1 Combi Detergent Tablets 25 Concentrated Detergent 26 Detergent tablets 26 Automatic Wash Programmes 26 Selecting the Wash Programme Programme Table 27 Start the Wash Programme 28 Changing...

Page 4: ...st Institutes 36 Installation and Connection Instructions 37 Installing the Dishwasher 37 Built Under Dishwasher 37 Free Standing Appliances 37 Connecting the Dishwasher 39 Water Connection 39 Permitted water pressure 39 Connect the inlet hose 39 Water drain 41 Leak Prevention System 42 Electrical Connection 43 Connections 44 Guarantee Conditions 45 Service and Spare parts 47 ...

Page 5: ... on the rating plate For information on how to correctly install and connect up your dish washer please read the Installation section Adaptors connectors and extension cables must not be used Child Safety This appliance is designed to be operated by adults Children should not be allowed to tamper with the controls or play with the product Keep all packaging away from children Keep all detergents i...

Page 6: ... of cutlery with sharp edges must be placed in the cutlery tray or in the upper basket Warning When the door is opened the lower section of it swings into the housing A danger of crushing exists When finished loading or unloading close the door as an open door can be a hazard Correct Use Only wash household dishes using the dishwasher If the appliance is used for other purposes or is used incorrec...

Page 7: ...ps Cardboard packaging is manufactured from recycled paper and should be deposited in the waste paper collection for recycling Disposal of Old Appliances When disposing of old appliances remove the plug and ensure that any locks or catches are removed to prevent young children becoming trapped inside Use an authorised disposal site 2 Economical and Ecological Dishwashing Ensure that the water soft...

Page 8: ...pliance Features and Control Panel Top Spray Arm Container for Salt Rating Plate Container for Rinse Aid Filters Rubber Seal for Connecting the Water Feed to the Spray Arm Spray Arms Container for Detergent Water hardness switch ...

Page 9: ...on off the start delay that is set how long the current wash programme can be expected to last which fault has occurred on the dishwasher Indicators have the following significance Function Button 1 is not occupied Function Button 2 Adjust the water softener Function Button 3 Switch rinse aid supply on and off Function Button 4 is not occupied SALT Refill with special salt RINSE AID Refill with ri...

Page 10: ... The indicator illuminates at regular intervals independent of the amount of soiling of the filters Prior to using for the first time Prior to using for the first time remove all the clips with which the baskets are secured for transport Then perform the following steps 0 1 Adjust the water softener 2 Fill with Salt for the Water Softener 3 Fill with Rinse Aid ...

Page 11: ...s stated in the table to the setting that cor responds to the hardness of the water in your area The water softener can be set manually using the water hardness switch and also electron ically using the buttons on the control panel Water Hardness Hardness Setting Display in the Multi display in d1 in ppm2 Range 1 d German degrees a measure of water hardness 2 ppm Parts Per Million factory setting ...

Page 12: ...he lower basket 6 Electronic adjustment Simultaneously press and hold down function buttons 1 and 2 7 Press the ON OFF button The LED displays for the engaged function buttons will flash 8 Press function button 2 again The multi display will show which hardness setting has been set 9 Pressing function button 2 increases the hardness setting by 1 Exception hardness setting 0 follows hardness settin...

Page 13: ... the container with salt through the funnel the capacity of the con tainer is approx 1 0 1 5 kg depend ing on the grain size Do not overfill the salt container with salt 3 The water expelled by filling the salt container with special salt runs out of the salt container onto the base of the washing compartment This is not a cause for concern the water will be pumped out at the start of the next was...

Page 14: ...inse aid dosing levels need to be set 1 Only use rinse aid specifically designed for domestic dishwashers Never fill the rinse aid container with any other substance e g vinegar con centrate or dishwasher cleaning agent as this would damage the appli ance Switching Rinse Aid Supply On and Off 0 1 The appliance must be switched off 2 Simultaneously press and hold down function buttons 1 and 2 3 Pre...

Page 15: ...e aid compartment is on the inside of the dishwasher door 0 1 Open the door 2 Press the rinse aid compartment release button with your finger 3 Fully open the rinse aid compartment lid 4 Fill with rinse aid exactly up to the level marked max this corresponds to a quantity of approx 140 ml 5 Close the lid and press until it locks into place 6 Wipe up any spilt rinse aid with a cloth Otherwise too m...

Page 16: ...lasses or crockery 0 1 Open the door of the dishwasher 2 Press the rinse aid compartment release button with your finger 3 Fully open the rinse aid compartment lid 4 Set the dose level 5 Close the lid and press until it locks into place 6 If rinse aid has spilt wipe up with a cloth In Daily Use Check the salt and rinse aid levels Load cutlery and dishes into the dishwasher Fill with dishwasher det...

Page 17: ...he dishwasher the following cutlery dishes are not suitable are of limited suitability Cutlery with wooden horn china or mother of pearl handles Plastic items that are not heat resistant Older cutlery with glued parts that is not temperature resistant Bonded cutlery items or dishes Pewter or copper items Lead crystal glass Steel items subject to rusting Wooden platters Items made from synthetic fi...

Page 18: ...uch as knives 0 Place knives small spoons and small forks in the cutlery tray Place forks and spoons that do not fit in the cutlery tray in the cutlery basket To ensure that all items of cutlery in the cutlery basket are properly washed you should 0 1 Place the grid insert on the cutlery rack 2 Place forks and spoons in the grid insert on the cutlery basket with the handle downwards 3 For larger i...

Page 19: ...he cutlery basket 1 To ensure that the cutlery basket cannot open on removal from the appliance you should always hold both parts of the two part handle 0 1 Place the cutlery basket on a table or work surface 2 Open the two part handle 3 Remove cutlery 4 Close the two part handle ...

Page 20: ...ypes of lower basket Type 1 None of the plate inserts in the lower basket can be removed Type 2 The right hand plate inserts in the lower basket can be folded over to the left 3 To ease the loading of large items the two right hand plate inserts in the lower basket can be folded over to the left 1 Slightly lift the right plate inserts 2 Fold the plate inserts to the left ...

Page 21: ...ease the loading of large items the two right hand plate inserts in the lower basket can be folded across one another Type 4 The two rear plate inserts in the lower basket can be folded across one another 3 To ease the loading of large items the two rear plate inserts in the lower baskets can be folded across one another ...

Page 22: ...tems of crockery on the folding cups racks so that they are offset from each other and water can reach all items The cup racks can be folded up out of the way for tall items Lay or hang wine champagne and brandy glasses in the cut outs on the cup racks Glasses beakers etc can also be placed on the two rows of prongs on the left of the upper basket ...

Page 23: ...far as it will go and then lower it vertically The upper basket will engage in the lower posi tion Raising the Upper Basket 0 1 Pull the upper basket out completely 2 Holding the upper basket at the rear right lift it as far as it will go and then lower it vertically The upper basket will engage in the higher posi tion Maximum Height of the Dishes in the Upper Basket Lower Basket With upper basket...

Page 24: ...e detergent packaging The detergent compartment is on the inside of the dishwasher door 0 1 If the lid is closed press release button 1 The lid springs open 2 Fill the detergent dispenser with detergent The markings indicate the dosing levels 20 corresponds to approx 20 ml of detergent 30 corresponds to approx 30 ml of detergent 3 Close the lid and press until it locks into place 3 If the dishes a...

Page 25: ...hen using 3 in1 products for the first time then please contact the detergent manufacturers care line the telephone number is given on the product packaging Special Advice When using combination products the rinse aid and salt lights are no longer useful It may be helpful therefore to switch the rinse aid off please note that only some dishwashers have this facility and selec ting the lowest possi...

Page 26: ... power during short programmes Therefore please use wash pro grammes with pre wash when using detergent tablets Automatic Wash Programmes During the AUTOMATIC programmes the amount of soiling on the dishes is determined by how cloudy the water is If the appliance is partially loaded and the dishes lightly soiled the pre wash main wash and rinsing elements of the programme are shorter and the water...

Page 27: ...rogramme is not suitable when left overs have dried on 5 Test programme for test institutes Type of Dishes Dinner Service and Cooking Utensils Dishes without Pans Coffee Service and Dessert Dishes In Addition with delicate glasses Type of Soiling heavily soiled dried on left overs particu larly egg white and thickeners average soiling dried on left overs just used average to slightly soiled averag...

Page 28: ... necessary load quantity degree of dirtiness etc using the dishwasher control 3 If fault messages are displayed on the multi display after the start of the programme please read the What to do if section Changing Interrupting Cancelling the Wash Programme 3 Only change or interrupt a wash programme in progress if it is abso lutely necessary to do so Changing the wash programme 3 If you want to cha...

Page 29: ...ase the programme button the wash programme is cancelled 3 A selected programme is only interrupted by switching off the dish washer it is not cancelled The wash programme is continued when the dishwasher is switched on again Setting or Changing the Delay Start Timer Using the delay start timer you can 1 Press the ON OFF button 2 Press the DELAY TIMER button until the required delay in hours is fl...

Page 30: ...he appliance when opening the door immediately after the end of the programme 2 Open the door carefully as steam may escape Emptying the Dishwasher 3 The dishes should be allowed to cool down before removing them from the appliance as hot dishes can be sensitive to knocks Leave the dishes in the dishwasher for approx 15 minutes after the end of the programme so that they dry better and can cool do...

Page 31: ...ne filter 1 2 by the handle with the hole and remove from the microfilter 3 5 Clean all filters thoroughly under running water 6 Remove the flat filter 4 from the base of the washing compartment and clean both faces thoroughly 7 Put the flat filter back in the base of the washing compartment 8 Place the coarse fine filter in the microfilter and press together 9 Put the filter combination in place ...

Page 32: ...ce For all other faults please contact AEG Sevice Force stating the fault code Symptom Possible Cause Solution The programme indica tor for the selected programme is flashing and the WATER indica tor is illuminated there is no water run ning into the dish washer Tap is blocked or furred with lime scale Clean tap The filter where present in the threaded hose fitting is blocked Clean the filter in t...

Page 33: ...ed in Insert mains plug House fuse is defective Replace fuse A start delay is selected If dishes are to be washed immediately cancel delay start timer Rust spots are visible in the washing compart ment The washing compartment is made from rust free stainless steel Rust spots in the wash ing compartment are due to rust particles from external sources rust particles from water pipes pans cutlery etc...

Page 34: ...tergent was not used or too little was used In the case of scale deposits on the dishes The special salt container is empty or the water softener is incorrectly adjusted The drain hose is incorrectly laid The dishes are wet and dull Rinse aid was not used The rinse aid container is empty There are streaks milky spots or a bluish coating on glasses and dishes Lower rinse aid dosing There are dried ...

Page 35: ...e 1 10 bar 10 100 N cm2 0 1 1 0 MPa Electrical Connection Information on the electrical connection is given on the rating plate on the inner edge of the dishwasher door on the right Dishwasher Free Standing Appliances Dimensions 850 x 600 x 600 H x W x D in mm Max Weight 54 Kg Dishwashers that Can Be Integrated Built In Dishwashers Dimensions 820 880 x 596 x 570 H x W x D in mm Max Weight 50 Kg Di...

Page 36: ...rinse aid container have been filled with salt and rinse aid respectively and using the test programme see Programme Table Sample loading arrangements Upper basket without cutlery tray Upper basket with cutlery tray Lower basket with cutlery basket Cutlery basket Full Load 12 place settings incl serving dishes Half Load 6 place settings incl serving dishes leaving alternate positions free Detergen...

Page 37: ...from the front of the appliance using a screwdriver The drain hose inlet hose and mains cable must be laid such that they are free to move in the rear of the plinth recess so that they cannot be kinked or crushed Built Under Dishwasher see enclosed installation instructions Free Standing Appliances can be set up as stand alone without additional installation 1 If the dishwasher is set up next to a...

Page 38: ...removed as follows 0 1 Unscrew the screws from the posi tioning plates on the back 1 2 Slide the appliance s work surface approx 1 cm to the rear 2 3 Lift the work surface at the front 3 and remove 1 If the dishwasher is later used as a free standing appliance the original work surface must be re mounted 3 The plinth on free standing appliances is not adjustable ...

Page 39: ...ose to a tap with an external thread inch Tighten the threaded hose fitting hand tight only 3 In order that access to the tap in the kitchen is not limited by the use of the dishwasher we recommend the installation of an additional tap or fitting a two way adapter to the existing tap If you need a longer water inlet hose than that supplied VDE approved complete hose sets are to be used These are a...

Page 40: ... and the draining pump in the dishwasher is switched on 1 Please take care when installing the water inlet hose The distance between the bottom edge of the safety value and the floor on which the dishwasher is standing must be at least 30 cm The electrical cable for the safety valve is in the double walled water inlet hose Do not immerse the water inlet hose or the safety valve in water If the wat...

Page 41: ...The outlet of the drain hose ø 19 mm fits all commonly available sink outlet spigot types The outer diameter of the spigot connection must be at least 15 mm The drain hose must be fixed to the sink outlet connection using the hose clamp supplied If the dishwasher is fitted at a high position If the dishwasher is installed at a high level and the drainhose connec tion is less than 30 cm from the bo...

Page 42: ...YSTEM In the event of a fault the safety valve immediately interrupts the sup ply of water to the appliance and the drain pump switches on By this means water can neither escape nor overflow The remaining water in the appliance is automatically pumped out 1 The AQUA CONTROL SYSTEM also works when the appliance is switched off the appliance must however not be disconnected from the mains ...

Page 43: ...supplied a 13amp ASTA approved BS 1363A fuse must be used Should the plug need to be replaced for any reason proceed as described below The wires on the mains lead are coloured in accordance with the following code Green and Yellow Earth Blue Neutral Brown Live The wire coloured green and yellow must be connected to the termi nal marked with the letter E or by the earth symbol or coloured green an...

Page 44: ...ed beside the dishwasher as there is insufficient space behind the appliance The plumbing and electrical installation example given below can only be regarded as a recommendation Two 45 or Straight Connections Outer ø 19 mm Length 30 mm Double tap Water drain Water inlet Water drain Water inlet Mains cable Mains cable Mains socket ...

Page 45: ...h labour and materials 5 Repairs carried out under guarantee do not extend the guarantee period for the appli ance Parts removed during guarantee repairs become the property of AEG 6 The purchaser s statutory rights are not affected by this guarantee European Guarantee If you should move to another country within Europe then your guarantee moves with you to your new home subject to the following q...

Page 46: ...46 ...

Page 47: ...tact the Service Force Centre you will need to give the following details 1 Your name address and post code 2 Your telephone number 3 Clear and concise details of the fault 4 The model and serial number of the appliance found on the rat ing plate 5 The purchase date Please note that a valid purchase receipt or guarantee documentation is required for in guarantee service calls Customer Care For gen...

Page 48: ...55 million Electrolux Group products such as refrigerators cookers washing machines vacuum cleaners chain saws and lawn mowers are sold each year to a value of approx USD 14 billion in more than 150 countries around the world AEG Hausgeräte GmbH Postfach 1036 D 90327 Nürnberg http www aeg hausgeraete de Copyright by AEG 822 960 277 00 1102 Subject to change without notice ...

Reviews: