background image

be replaced, this must be carried out

by our Authorised Service Centre.

• Connect the mains plug to the mains

socket only at the end of the

installation. Make sure that there is

access to the mains plug after the

installation.

• Do not pull the mains cable to

disconnect the appliance. Always pull

the mains plug.

• This appliance is fitted with a 13 A

mains plug. If it is necessary to

change the mains plug fuse, use only

a 13 A ASTA (BS 1362) fuse (UK and

Ireland only).

2.3 Water connection

• Do not cause damage to the water

hoses.

• Before connection to new pipes, pipes

not used for a long time, where repair

work has been carried out or new

devices fitted (water meters, etc.), let

the water flow until it is clean and

clear.

• Ensure that there are no visible water

leaks during and after the first use of

the appliance.

• If the water inlet hose is damaged,

immediately close the water tap and

disconnect the mains plug from the

mains socket. Contact the Authorised

Service Centre to replace the water

inlet hose.

• Without electrical power, the water

protection system is not active. In this

case there is a risk of flooding.

• The water inlet hose has a safety

valve and a sheath with an inner

mains cable.

WARNING!

Dangerous voltage.

2.4 Use

• Do not put flammable products or

items that are wet with flammable

products in, near or on the appliance.

• Dishwasher detergents are

dangerous. Follow the safety

instructions on the detergent

packaging.

• Do not drink and play with the water in

the appliance.

• Do not remove the dishes from the

appliance until the programme is

complete. Some detergent may

remain on the dishes.

• Do not store items or apply pressure

on the open door of the appliance.

• The appliance can release hot steam

if you open the door while a

programme operates.

2.5 Service

• To repair the appliance contact the

Authorised Service Centre. Use

original spare parts only.

• Please note that self-repair or non-

professional repair can have safety

consequences and might void the

guarantee.

• The following spare parts will be

available for 7 years after the model

has been discontinued: motor,

circulation and drain pump, heaters

and heating elements, including heat

pumps, piping and related equipment

including hoses, valves, filters and

aquastops, structural and interior

parts related to door assemblies,

printed circuit boards, electronic

displays, pressure switches,

thermostats and sensors, software

and firmware including reset software.

Please note that some of these spare

parts are only available to

professional repairers, and that not all

spare parts are relevant for all

models.

• The following spare parts will be

available for 10 years after the model

has been discontinued: door hinge

and seals, other seals, spray arms,

drain filters, interior racks and plastic

peripherals such as baskets and lids.

• Concerning the lamp(s) inside this

product and spare part lamps sold

ENGLISH

5

Summary of Contents for FFB53627ZM

Page 1: ...USER MANUAL EN User Manual Dishwasher FFB53627ZM ...

Page 2: ...e very best from it Visit our website to Get usage advice brochures trouble shooter service and repair information www aeg com support Register your product for better service www registeraeg com Buy Accessories Consumables and Original spare parts for your appliance www aeg com shop CUSTOMER CARE AND SERVICE Always use original spare parts When contacting our Authorised Service Centre ensure that...

Page 3: ...iance unless continuously supervised Children of less than 3 years of age should be kept away from the appliance unless continuously supervised Children should be supervised to ensure that they do not play with the appliance Keep detergents away from children Keep children and pets away from the appliance when the door is open Children shall not carry out cleaning and user maintenance of the appli...

Page 4: ...he new supplied hose sets Old hose sets must not be reused 2 SAFETY INSTRUCTIONS 2 1 Installation WARNING Only a qualified person must install this appliance Remove all the packaging Do not install or use a damaged appliance Follow the installation instructions supplied with the appliance Always take care when moving the appliance as it is heavy Always use safety gloves and enclosed footwear Do no...

Page 5: ...hwasher detergents are dangerous Follow the safety instructions on the detergent packaging Do not drink and play with the water in the appliance Do not remove the dishes from the appliance until the programme is complete Some detergent may remain on the dishes Do not store items or apply pressure on the open door of the appliance The appliance can release hot steam if you open the door while a pro...

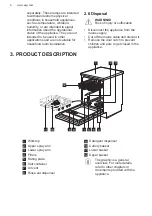
Page 6: ... injury or suffocation Disconnect the appliance from the mains supply Cut off the mains cable and discard it Remove the door catch to prevent children and pets to get closed in the appliance 3 PRODUCT DESCRIPTION 5 4 8 10 9 11 6 7 12 2 3 1 1 Worktop 2 Upper spray arm 3 Lower spray arm 4 Filters 5 Rating plate 6 Salt container 7 Air vent 8 Rinse aid dispenser 9 Detergent dispenser 10 Cutlery basket...

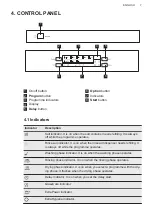
Page 7: ...s Rinse aid indicator It is on when the rinse aid dispenser needs refilling It is always off while the programme operates Washing phase indicator It is on when the washing phase operates Rinsing phase indicator It is on when the rinsing phase operates Drying phase indicator It is on when you select a programme with the dry ing phase It flashes when the drying phase operates Delay indicator It is o...

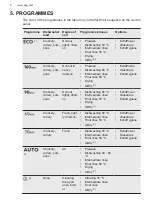
Page 8: ... ExtraPower GlassCare ExtraHygiene Crockery cutlery pots pans Normal lightly dried on Dishwashing 60 C Intermediate rinse Final rinse 55 C Drying AirDry 2 ExtraPower GlassCare ExtraHygiene Crockery cutlery Fresh light ly dried on Dishwashing 60 C Intermediate rinse Final rinse 50 C AirDry 2 ExtraPower GlassCare ExtraHygiene Crockery cutlery Fresh Dishwashing 50 C Intermediate rinse Final rinse 50 ...

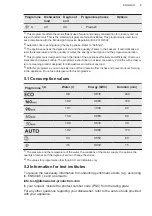
Page 9: ...h a desca ler or a cleaning product designed for dishwashers and without any load 5 With this programme you can quickly rinse off food remains from dishes and prevent odours forming in the appliance Do not use detergent with this programme 5 1 Consumption values Programme 1 2 Water l Energy kWh Duration min 9 9 0 835 240 10 2 0 980 160 10 1 1 030 90 10 4 0 860 60 10 4 0 630 30 10 2 0 980 170 9 3 0...

Page 10: ...s Option until the indicator is on The display shows the updated programme duration 6 2 ExtraPower This option improves the dishwashing results of the selected programme It increases the wash temperature and duration How to activate ExtraPower Press Option until the indicator is on The display shows the updated programme duration 6 3 ExtraHygiene This option provides better cleaning results by kee...

Page 11: ... your water is Water hardness is measured in equivalent scales The water softener should be adjusted according to the hardness of the water in your area Your local water authority can advise you on the hardness of the water in your area Set the right level of the water softener to assure good washing results Water hardness German de grees dH French de grees fH mmol l mg l ppm Clarke degrees Water ...

Page 12: ... a complete drain Each performed softener rinse possible more than one in the same cycle may prolong the programme duration by another 5 minutes when it occurs at any point at the beginning or in the middle of a programme All the consumption values mentioned in this section are determined in line with the currently applicable standard in laboratory conditions with water hardness 2 5mmol L water so...

Page 13: ...minutes after automatic opening This can cause damage to the appliance If afterwards the door is closed for at least 3 minutes the running programme ends CAUTION If children have access to the appliance we advise to deactivate AirDry The automatic opening of the door may pose a danger How to deactivate AirDry Make sure the appliance is in user mode 1 Press Delay The indicator still flashes The rem...

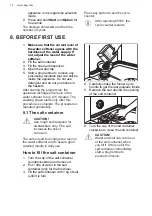
Page 14: ... washing phase starts only after this procedure is complete The procedure is repeated periodically 8 1 The salt container CAUTION Use rough salt designed for dishwashers only Fine salt increases the risk of corrosion The salt is used to recharge the resin in the water softener and to assure good washing results in daily use How to fill the salt container 1 Turn the cap of the salt container counte...

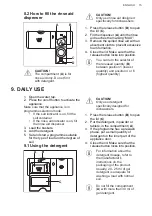
Page 15: ...ogramme selection mode If the salt indicator is on fill the salt container If the rinse aid indicator is on fill the rinse aid dispenser 3 Load the baskets 4 Add the detergent 5 Set and start a programme suitable for the type of load and the degree of soil 9 1 Using the detergent 20 30 A B C CAUTION Only use detergent specifically designed for dishwashers 1 Press the release button B to open the l...

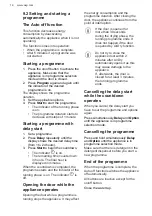
Page 16: ...hase is on The indicator is off Opening the door while the appliance operates Opening the door while a programme is running stops the appliance It may affect the energy consumption and the programme duration After closing the door the appliance continues from the point of interruption If the door is opened for more than 30 seconds during the drying phase the running programme ends It does not happ...

Page 17: ...of the water supply Follow the instructions in the chapter Care and cleaning 10 2 Using salt rinse aid and detergent Only use salt rinse aid and detergent designed for dishwasher Other products can cause damage to the appliance In areas with hard and very hard water we recommend to use basic dishwasher detergent powder gel tablets containing no additional agents rinse aid and salt separately for o...

Page 18: ...se aid unless you use multi tablets The arrangement of the items in the baskets is correct The programme is suitable to the type of load and the degree of soil The correct quantity of detergent is used 10 6 Unloading the baskets 1 Let the tableware cool down before you remove it from the appliance Hot items can be easily damaged 2 First remove items from the lower basket then from the upper basket...

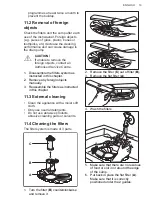
Page 19: ...ove any foreign objects manually 3 Reassemble the filters as instructed in this chapter 11 3 External cleaning Clean the appliance with a moist soft cloth Only use neutral detergents Do not use abrasive products abrasive cleaning pads or solvents 11 4 Cleaning the filters The filter system is made of 3 parts C B A 1 Turn the filter B counterclockwise and remove it 2 Remove the filter C out of filt...

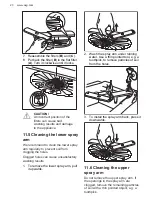
Page 20: ...il from clogging the holes Clogged holes can cause unsatisfactory washing results 1 To remove the lower spray arm pull it upwards 2 Wash the spray arm under running water Use a thin pointed tool e g a toothpick to remove particles of soil from the holes 3 To install the spray arm back press it downwards 11 6 Cleaning the upper spray arm Do not remove the upper spray arm If the openings in the spra...

Page 21: ...tely 5 minutes The appliance does not fill with water The display shows i10 or i11 Make sure that the water tap is open Make sure that the pressure of the water supply is not too low For this information contact your local water authority Make sure that the water tap is not clogged Make sure that the filter in the inlet hose is not clogged Make sure that the inlet hose has no kinks or bends The ap...

Page 22: ...layed programme duration is different than the duration in the consumption values table The pressure and the temperature of the water the var iations of the mains supply the options the quantity of dishes and the degree of soil can change the pro gramme duration The remaining time in the display increases and skips nearly to the end of pro gramme time This is not a defect The appliance is working ...

Page 23: ...lts are not satisfactory Problem Possible cause and solution Poor washing results Refer to Daily use Hints and tips and the basket loading leaflet Use more intensive washing programme Activate the ExtraPower option to improve the washing results of a selected programme Clean spray arm jets and filter Refer to Care and Cleaning Poor drying results Tableware was left for too long inside the closed a...

Page 24: ... penser Make sure that the spray arms are not blocked or clogged Make sure that items in the baskets do not impede the lid of the detergent dispenser from opening Odours inside the appliance Refer to Internal cleaning Start the programme with a descaler or a cleaning product designed for dishwashers Limescale deposits on the ta bleware on the tub and on the inside of the door The level of salt is ...

Page 25: ... EPREL database Keep the energy label for reference together with the user manual and all other documents provided with this appliance It is possible to find information related to the performance of the product in the EU EPREL database using the link https eprel ec europa eu and the model name and product number that you can find on the rating plate of the appliance Refer to the chapter Product d...

Page 26: ......

Page 27: ......

Page 28: ...www aeg com shop 156813621 A 022023 ...

Reviews: