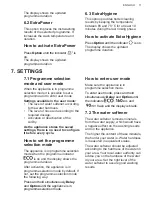
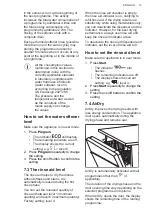
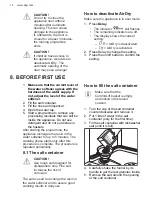
background image

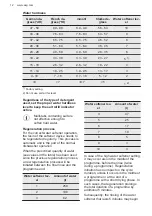
Water hardness

German de‐

grees (°dH)

French de‐

grees (°fH)

mmol/l

Clarke de‐

grees

Water softener lev‐

el

47 - 50

84 - 90

8.4 - 9.0

58 - 63

10

43 - 46

76 - 83

7.6 - 8.3

53 - 57

9

37 - 42

65 - 75

6.5 - 7.5

46 - 52

8

29 - 36

51 - 64

5.1 - 6.4

36 - 45

7

23 - 28

40 - 50

4.0 - 5.0

28 - 35

6

19 - 22

33 - 39

3.3 - 3.9

23 - 27

1)

15 - 18

26 - 32

2.6 - 3.2

18 - 22

4

11 - 14

19 - 25

1.9 - 2.5

13 - 17

3

4 - 10

7 - 18

0.7 - 1.8

5 - 12

2

<4

<7

<0.7

< 5

2)

1) Factory setting.
2) Do not use salt at this level.

Regardless of the type of detergent

used, set the proper water hardness

level to keep the salt refill indicator

active.

Multi-tabs containing salt are

not effective enough to

soften hard water.

Regeneration process

For the correct water softener operation,

the resin of the softener device needs to

be regenerated regularly. This process is

automatic and is the part of the normal

dishwasher operation.
When the prescribed quantity of water

(see values in the table) has been used

since the previous regeneration process,

a new regeneration process will be

initiated between the final rinse and the

programme end.

Water softener lev‐

el

Amount of water

(l)

1

250

2

100

3

62

Water softener lev‐

el

Amount of water

(l)

4

47

5

25

6

17

7

10

8

5

9

3

10

3

In case of the high water softener setting,

it may occur also in the middle of the

programme, before the rinse (twice

during a programme). Regeneration

initiation has no impact on the cycle

duration, unless it occurs in the middle of

a programme or at the end of a

programme with a short drying phase. In

such cases, the regeneration prolongs

the total duration of a programme by

additional 5 minutes.
Subsequently, the rinsing of the water

softener that lasts 5 minutes may begin

www.aeg.com

12

Summary of Contents for FFB93807PM

Page 1: ...USER MANUAL EN User Manual Dishwasher FFB93807PM ...

Page 2: ...e very best from it Visit our website to Get usage advice brochures trouble shooter service and repair information www aeg com support Register your product for better service www registeraeg com Buy Accessories Consumables and Original spare parts for your appliance www aeg com shop CUSTOMER CARE AND SERVICE Always use original spare parts When contacting our Authorised Service Centre ensure that...

Page 3: ...iance unless continuously supervised Children of less than 3 years of age should be kept away from the appliance unless continuously supervised Children should be supervised to ensure that they do not play with the appliance Keep detergents away from children Keep children and pets away from the appliance when the door is open Children shall not carry out cleaning and user maintenance of the appli...

Page 4: ...he new supplied hose sets Old hose sets must not be reused 2 SAFETY INSTRUCTIONS 2 1 Installation WARNING Only a qualified person must install this appliance Remove all the packaging Do not install or use a damaged appliance Follow the installation instructions supplied with the appliance Always take care when moving the appliance as it is heavy Always use safety gloves and enclosed footwear Do no...

Page 5: ...n near or on the appliance Dishwasher detergents are dangerous Follow the safety instructions on the detergent packaging Do not drink and play with the water in the appliance Do not remove the dishes from the appliance until the programme is complete Some detergent may remain on the dishes Do not store items or apply pressure on the open door of the appliance The appliance can release hot steam if...

Page 6: ...re intended to signal information about the operational status of the appliance They are not intended to be used in other applications and are not suitable for household room illumination 2 7 Disposal WARNING Risk of injury or suffocation Disconnect the appliance from the mains supply Cut off the mains cable and discard it Remove the door catch to prevent children and pets to get closed in the app...

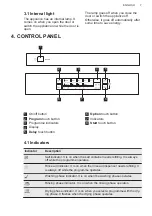
Page 7: ... button 6 Option touch button 7 Indicators 8 Start touch button 4 1 Indicators Indicator Description Salt indicator It is on when the salt container needs refilling It is always off while the programme operates Rinse aid indicator It is on when the rinse aid dispenser needs refilling It is always off while the programme operates Washing phase indicator It is on when the washing phase operates Rins...

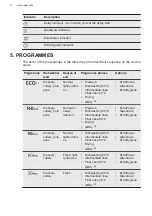
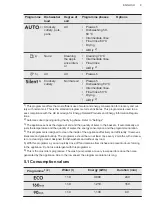
Page 8: ...ng AirDry 2 ExtraPower GlassCare ExtraHygiene Crockery cutlery pots pans Normal to heavy dried on Prewash Dishwashing 60 C Intermediate rinse Final rinse 60 C Drying AirDry 2 ExtraPower GlassCare ExtraHygiene Crockery cutlery pots pans Normal lightly dried on Dishwashing 60 C Intermediate rinse Final rinse 55 C Drying AirDry 2 ExtraPower GlassCare ExtraHygiene Crockery cutlery Fresh light ly dried...

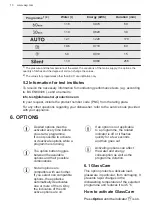
Page 9: ...e Refer to Settings 3 The appliance senses the degree of soil and the quantity of items in the baskets It automatically ad justs the temperature and the quantity of water the energy consumption and the programme duration 4 This programme is designed to clean the inside of the appliance effectively and efficiently It removes limescale and grease buildup The programme should be run at least once eve...

Page 10: ...d options must be activated every time before you start a programme It is not possible to activate or deactivate options while a programme is running The option button toggles between the available options and their possible combinations Not all options are compatible with each other If you select non compatible options the appliance automatically deactivates one or more of them Only the indicator...

Page 11: ...here is no need to configure it before every cycle How to set the programme selection mode The appliance is in programme selection mode when the programme indicator is on and the display shows the programme duration After activation the appliance is in programme selection mode by default If not set the programme selection mode the following way Press and hold simultaneously Delay and Option until ...

Page 12: ...nerated regularly This process is automatic and is the part of the normal dishwasher operation When the prescribed quantity of water see values in the table has been used since the previous regeneration process a new regeneration process will be initiated between the final rinse and the programme end Water softener lev el Amount of water l 1 250 2 100 3 62 Water softener lev el Amount of water l 4...

Page 13: ... to dry the dishes without streaks and stains It is automatically released during the hot rinse phase You can set the released quantity of rinse aid between level 1 minimum quantity and level 6 maximum quantity Factory setting level 4 When the rinse aid chamber is empty the rinse aid indicator is on notifying to refill rinse aid If the drying results are satisfactory while using multi tablets only...

Page 14: ...r 4 Open the water tap 5 Start a programme to remove any processing residuals that can still be inside the appliance Do not use detergent and do not put dishes in the baskets After starting the programme the appliance recharges the resin in the water softener for up to 5 minutes The washing phase starts only after this procedure is complete The procedure is repeated periodically 8 1 The salt conta...

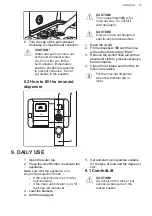
Page 15: ...se aid reaches the marking MAX 3 Remove the spilled rinse aid with an absorbent cloth to prevent excessive foam formation 4 Close the lid Make sure that the lid locks into position Fill the rinse aid dispenser when the indicator A is clear 9 DAILY USE 1 Open the water tap 2 Press the on off button to activate the appliance Make sure that the appliance is in programme selection mode If the salt ind...

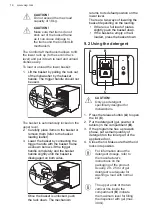
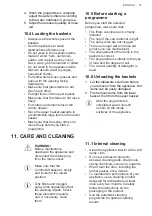
Page 16: ...he basket is unlocked push the rack down The mechanism returns to its default position on the lower level There are two ways of lowering the basket depending on the loading If there is a full load of plates slightly push the basket down If the basket is empty or half loaded press the basket down 9 2 Using the detergent A B C CAUTION Only use detergent specifically designed for dishwashers 1 Press ...

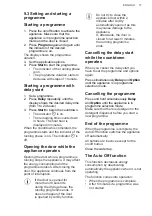
Page 17: ... continues from the point of interruption If the door is opened for more than 30 seconds during the drying phase the running programme ends It does not happen if the door is opened by AirDry function Do not try to close the appliance door within 2 minutes after AirDry automatically opens it as this may cause damage to the appliance If afterwards the door is closed for at least 3 minutes the runnin...

Page 18: ... the water supply Follow the instructions in the chapter Care and cleaning 10 2 Using salt rinse aid and detergent Only use salt rinse aid and detergent designed for dishwasher Other products can cause damage to the appliance In areas with hard and very hard water we recommend to use basic dishwasher detergent powder gel tablets containing no additional agents rinse aid and salt separately for opt...

Page 19: ...less you use multi tablets The arrangement of the items in the baskets is correct The programme is suitable to the type of load and the degree of soil The correct quantity of detergent is used 10 6 Unloading the baskets 1 Let the tableware cool down before you remove it from the appliance Hot items can be easily damaged 2 First remove items from the lower basket then from the upper basket After th...

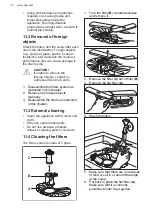
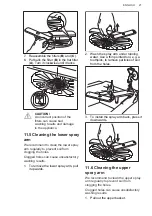
Page 20: ...ble the filters system as instructed in this chapter 2 Remove any foreign objects manually 3 Reassemble the filters as instructed in this chapter 11 3 External cleaning Clean the appliance with a moist soft cloth Only use neutral detergents Do not use abrasive products abrasive cleaning pads or solvents 11 4 Cleaning the filters The filter system is made of 3 parts C B A 1 Turn the filter B counte...

Page 21: ...om clogging the holes Clogged holes can cause unsatisfactory washing results 1 To remove the lower spray arm pull it upwards 2 Wash the spray arm under running water Use a thin pointed tool e g a toothpick to remove particles of soil from the holes 3 To install the spray arm back press it downwards 11 6 Cleaning the upper spray arm We recommend to clean the upper spray arm regularly to prevent soi...

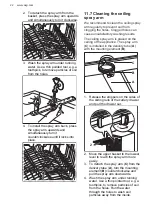
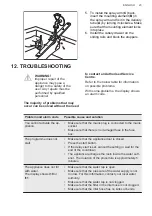
Page 22: ...e unsatisfactory washing results The ceiling spray arm is placed on the ceiling of the appliance The spray arm C is installed in the delivery tube A with the mounting element B C B A 1 Release the stoppers on the sides of the sliding rails of the cutlery drawer and pull the drawer out 1 2 2 Move the upper basket to the lowest level to reach the spray arm more easily 3 To detach the spray arm C fro...

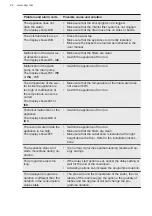
Page 23: ...e Possible cause and solution You cannot activate the ap pliance Make sure that the mains plug is connected to the mains socket Make sure that there is no damaged fuse in the fuse box The programme does not start Make sure that the appliance door is closed Press the start button If the delay start is set cancel the setting or wait for the end of the countdown The appliance recharges the resin insi...

Page 24: ...Make sure that the temperature of the inlet water does not exceed 60 C Switch the appliance off and on Technical malfunction of the appliance The display shows iC0 or iC3 Switch the appliance off and on The level of water inside the appliance is too high The display shows iF1 Switch the appliance off and on Make sure that the filters are clean Make sure that the outlet hose is installed at the rig...

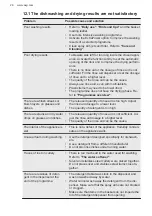
Page 25: ...cuit beaker The amperage is insufficient to supply simultaneously all the appliances in use Check the socket amperage and the capacity of the meter or turn off one of the applian ces in use Internal electrical fault of the appliance Contact an Au thorised Service Centre The appliance is switched on but does not operate The display shows PF Power supply is out of the operating range The wash cycle ...

Page 26: ...d is too high Adjust the rinse aid dosage to a lower level The quantity of detergent is too high There are stains and dry water drops on glasses and dishes The released quantity of rinse aid is not sufficient Ad just the rinse aid dosage to a higher level The quality of the rinse aid can be the cause The interior of the appliance is wet This is not a defect of the appliance Humidity conden sates o...

Page 27: ...the detergent manufacturer Dull discoloured or chipped tableware Make sure that only dishwasher safe items are wash ed in the appliance Load and unload the basket carefully Refer to the basket loading leaflet Place delicate items in the upper basket Activate the GlassCare option to ensure special care for glassware and delicate items Refer to Before first use Daily use or Hints and tips for other ...

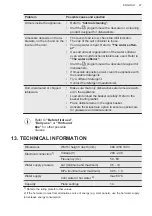
Page 28: ...For more detailed information about the energy label visit www theenergylabel eu 14 ENVIRONMENTAL CONCERNS Recycle materials with the symbol Put the packaging in relevant containers to recycle it Help protect the environment and human health by recycling waste of electrical and electronic appliances Do not dispose of appliances marked with the symbol with the household waste Return the product to ...

Page 29: ......

Page 30: ......

Page 31: ......

Page 32: ...www aeg com shop 117841990 A 142022 ...

Reviews: