background image

Problem and alarm code

Possible cause and solution

The temperature of the wa‐

ter inside the appliance is

too high or malfunction of

the temperature sensor oc‐

curred.

The display shows i61 or 

i69.

• Make sure that the temperature of the inlet water does

not exceed 60°C.

• Switch the appliance off and on.

Technical malfunction of the

appliance.

The display shows iC0 or 

iC3.

• Switch the appliance off and on.

The level of water inside the

appliance is too high.

The display shows iF1.

• Switch the appliance off and on.

• Make sure that the filters are clean.

• Make sure that the outlet hose is installed at the right

height above the floor. Refer to the installation instruc‐

tions.

The appliance stops and

starts more times during op‐

eration.

• It is normal. It provides optimal cleaning results and en‐

ergy savings.

The programme lasts too

long.

• If the delay start option is set, cancel the delay setting or

wait for the end of the countdown.

• Activating options can increase the programme duration.

The remaining time in the

display increases and skips

nearly to the end of the pro‐

gramme duration.

• This is not a defect. The appliance is working correctly.

Small leak from the appli‐

ance door.

• The appliance is not levelled. Loosen or tighten the ad‐

justable feet (if applicable).

• The appliance door is not centred on the tub. Adjust the

rear foot (if applicable).

The appliance door is diffi‐

cult to close.

• The appliance is not levelled. Loosen or tighten the ad‐

justable feet (if applicable).

• Parts of the tableware are protruding from the baskets.

Rattling or knocking sounds

from the inside of the appli‐

ance.

• The tableware is not properly arranged in the baskets.

Refer to basket loading leaflet.

• Make sure that the spray arms can rotate freely.

The appliance trips the cir‐

cuit-beaker.

• The amperage is insufficient to supply simultaneously all

the appliances in use. Check the socket amperage and

the capacity of the meter or turn off one of the applian‐

ces in use.

• Internal electrical fault of the appliance. Contact an Au‐

thorised Service Centre.

www.aeg.com

24

Summary of Contents for FSB53637P

Page 1: ...USER MANUAL EN User Manual 2 Dishwasher FR Notice d utilisation 28 Lave vaisselle FSB53637P ...

Page 2: ...t usage advice brochures trouble shooter service and repair information www aeg com support Register your product for better service www registeraeg com Buy Accessories Consumables and Original spare parts for your appliance www aeg com shop CUSTOMER CARE AND SERVICE Always use original spare parts When contacting our Authorised Service Centre ensure that you have the following data available Mode...

Page 3: ...supervised Children of less than 3 years of age should be kept away from the appliance unless continuously supervised Do not let children play with the appliance Keep detergents away from children Keep children and pets away from the appliance when the door is open Children shall not carry out cleaning and user maintenance of the appliance without supervision 1 2 General Safety This appliance is i...

Page 4: ...fied person must install this appliance Remove all the packaging Do not install or use a damaged appliance Do not use the appliance before installing it in the built in structure due to safety manner Follow the installation instructions supplied with the appliance Always take care when moving the appliance as it is heavy Always use safety gloves and enclosed footwear Do not install or use the appl...

Page 5: ...on the appliance Dishwasher detergents are dangerous Follow the safety instructions on the detergent packaging Do not drink and play with the water in the appliance Do not remove the dishes from the appliance until the programme is complete Some detergent may remain on the dishes Do not store items or apply pressure on the open door of the appliance The appliance can release hot steam if you open ...

Page 6: ...er the model has been discontinued door hinge and seals other seals spray arms drain filters interior racks and plastic peripherals such as baskets and lids 2 7 Disposal WARNING Risk of injury or suffocation Disconnect the appliance from the mains supply Cut off the mains cable and discard it Remove the door catch to prevent children and pets to get closed in the appliance 3 PRODUCT DESCRIPTION 5 ...

Page 7: ...2 3 4 5 6 1 On Off button Reset button 2 Delay Start button 3 Display 4 MY TIME selection bar 5 EXTRAS buttons 6 AUTO Sense program button 4 1 Display A C B B A ECOMETER B Indicators C Time indicator 4 2 ECOMETER The ECOMETER indicates how the programme selection impacts energy and water consumption The more bars are on the lower the consumption is indicates the most environmentally friendly progr...

Page 8: ...ogramme suitable for washing and drying heavily soiled items E ECO is the longest programme 4h offering the most efficient use of energy and water consumption for crockery and cutlery with normal soil This is the standard programme for test institutes 1 5 2 EXTRAS You can adjust the programme selection to your needs by activating EXTRAS ExtraPower ExtraPower improves the washing results of the sel...

Page 9: ...ied on Prewash Wash 60 C Intermediate rinse Final rinse 60 C Drying AirDry ExtraPower GlassCare ECO Crockery Cutlery Pots Pans Normal Lightly dried on Prewash Wash 50 C Intermediate rinse Final rinse 55 C Drying AirDry ExtraPower GlassCare AUTO Sense Crockery Cutlery Pots Pans The pro gramme ad justs to all de grees of soil Prewash Wash 50 60 C Intermediate rinse Final rinse 60 C Drying AirDry EXT...

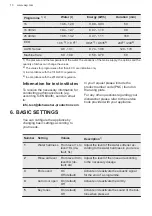
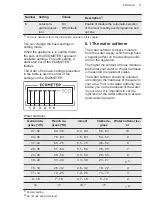
Page 10: ...fo test dishwasher production com In your request please include the product number code PNC found on the rating plate For any other questions regarding your dishwasher please refer to the service book provided with your appliance 6 BASIC SETTINGS You can configure the appliance by changing basic settings according to your needs Number Setting Values Description1 1 Water hardness From level 1L to ...

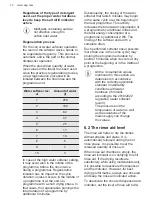
Page 11: ...ative effect on the washing results and on the appliance The higher the content of these minerals the harder your water is Water hardness is measured in equivalent scales The water softener should be adjusted according to the hardness of the water in your area Your local water authority can advise you on the hardness of the water in your area It is important to set the right level of the water sof...

Page 12: ...f the next programme This activity increases the total water consumption of a programme by additional 4 litres and the total energy consumption of a programme by additional 2 Wh The rinsing of the softener ends with a complete drain Each performed softener rinse possible more than one in the same cycle may prolong the programme duration by another 5 minutes when it occurs at any point at the begin...

Page 13: ...lete look at the control panel 6 5 Key tones The buttons on the control panel make a click sound when you press them You can deactivate this sound 6 6 Latest programme selection You can set the automatic selection of the most recently used programme and options The latest programme that was completed before the appliance deactivation is saved It is then selected automatically after you activate th...

Page 14: ...rdness of the water supply If not adjust the level of the water softener 2 Fill the salt container 3 Fill the rinse aid dispenser 4 Open the water tap 5 Start the programme Quick to remove any residuals from the manufacturing process Do not use detergent and do not put dishes in the baskets After starting the programme the appliance recharges the resin in the water softener for up to 5 minutes The...

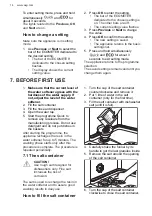
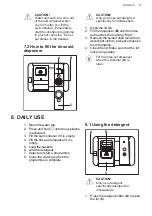
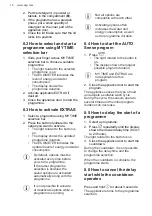
Page 15: ...aid with an absorbent cloth to prevent excessive foam formation 4 Close the lid Make sure that the lid locks into position Fill the rinse aid dispenser when the indicator A is clear 8 DAILY USE 1 Open the water tap 2 Press and hold until the appliance is activated 3 Fill the salt container if it is empty 4 Fill the rinse aid dispenser if it is empty 5 Load the baskets 6 Add the detergent 7 Select ...

Page 16: ... saved options are activated automatically along with the programme It is not possible to activate or deactivate options while a programme is running Not all options are compatible with each other Activating options often increases the water and energy consumption as well as the programme duration 8 4 How to start the AUTO Sense program 1 Press The light related to the button is on The display sho...

Page 17: ...use and to protect the environment Washing dishes in the dishwasher as instructed in the user manual usually consumes less water and energy than washing dishes by hand Load the dishwasher to its full capacity to save water and energy For best cleaning results arrange items in the baskets as instructed in the user manual and do not overload the baskets Do not pre rinse dishes by hand It increases t...

Page 18: ...e following steps 1 Set the highest level of the water softener 2 Make sure that the salt and rinse aid containers are full 3 Start the Quick programme Do not add detergent and do not put dishes in the baskets 4 When the programme is completed adjust the water softener according to the water hardness in your area 5 Adjust the released quantity of rinse aid 9 4 Before starting a programme Before yo...

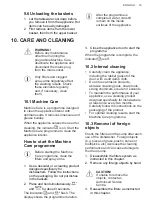
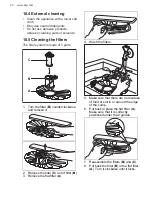
Page 19: ...hwashers Follow the instructions on the packaging Do not put dishes in the baskets 2 Press and hold simultaneously and for about 3 seconds The indicators and flash The display shows the programme duration 3 Close the appliance door to start the programme When the programme is complete the indicator is off 10 2 Internal cleaning Carefully clean the appliance including the rubber gasket of the door ...

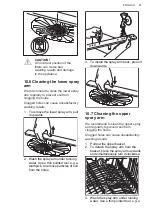
Page 20: ...e filter B counterclockwise and remove it 2 Remove the filter C out of filter B 3 Remove the flat filter A 4 Wash the filters 5 Make sure that there are no residues of food or soil in or around the edge of the sump 6 Put back in place the flat filter A Make sure that it is correctly positioned under the 2 guides 7 Reassemble the filters B and C 8 Put back the filter B in the flat filter A Turn it ...

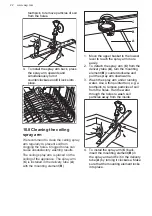
Page 21: ...m under running water Use a thin pointed tool e g a toothpick to remove particles of soil from the holes 3 To install the spray arm back press it downwards 10 7 Cleaning the upper spray arm We recommend to clean the upper spray arm regularly to prevent soil from clogging the holes Clogged holes can cause unsatisfactory washing results 1 Pull out the upper basket 2 To detach the spray arm from the ...

Page 22: ...e delivery tube A with the mounting element B C B A 1 Move the upper basket to the lowest level to reach the spray arm more easily 2 To detach the spray arm C from the delivery tube A turn the mounting element B counterclockwise and pull the spray arm downwards 3 Wash the spray arm under running water Use a thin pointed tool e g a toothpick to remove particles of soil from the holes Run the water ...

Page 23: ...tes The appliance does not fill with water The display shows i10 or i11 Make sure that the water tap is open Make sure that the pressure of the water supply is not too low For this information contact your local water authority Make sure that the water tap is not clogged Make sure that the filter in the inlet hose is not clogged Make sure that the inlet hose has no kinks or bends The appliance doe...

Page 24: ...ountdown Activating options can increase the programme duration The remaining time in the display increases and skips nearly to the end of the pro gramme duration This is not a defect The appliance is working correctly Small leak from the appli ance door The appliance is not levelled Loosen or tighten the ad justable feet if applicable The appliance door is not centred on the tub Adjust the rear f...

Page 25: ...the programme selection 11 2 The washing and drying results are not satisfactory Problem Possible cause and solution Poor washing results Refer to Daily use Hints and tips and the basket loading leaflet Use more intensive washing programme Activate the ExtraPower option to improve the washing results of a selected programme Clean spray arm jets and filter Refer to Care and Cleaning Poor drying res...

Page 26: ...arms are not blocked or clogged Make sure that items in the baskets do not impede the lid of the detergent dispenser from opening Odours inside the appliance Refer to Internal cleaning Start the Machine Care programme with a descaler or a cleaning product designed for dishwashers Limescale deposits on the ta bleware on the tub and on the inside of the door The level of salt is low check the refill...

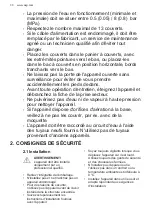
Page 27: ... registration of this appliance in the EU EPREL database Keep the energy label for reference together with the user manual and all other documents provided with this appliance It is possible to find information related to the performance of the product in the EU EPREL database using the link https eprel ec europa eu and the model name and product number that you can find on the rating plate of the...

Page 28: ...re appareil Visitez notre site Web pour Obtenir des conseils d utilisation des brochures un dépanneur des informations sur le service et les réparations www aeg com support Enregistrer votre produit pour un meilleur service www registeraeg com Acheter des accessoires des consommables et des pièces de rechange d origine pour votre appareil www aeg com shop SERVICE ET ASSISTANCE À LA CLIENTÈLE Utili...

Page 29: ...es ayant un handicap très important et complexe doivent être tenus à l écart de l appareil à moins d être surveillés en permanence Les enfants de moins de 3 ans doivent être tenus à l écart de l appareil à moins d être surveillés en permanence Ne laissez pas les enfants jouer avec l appareil Ne laissez pas les détergents à la portée des enfants Tenez les enfants et les animaux éloignés de l appare...

Page 30: ...areil dispose d orifices d aération à la base veillez à ne pas les couvrir par ex avec de la moquette L appareil doit être raccordé au circuit d eau à l aide des tuyaux neufs fournis N utilisez pas de tuyaux provenant d anciens appareils 2 CONSIGNES DE SÉCURITÉ 2 1 Installation AVERTISSEMENT L appareil doit être installé uniquement par un professionnel qualifié Retirez l intégralité de l emballage...

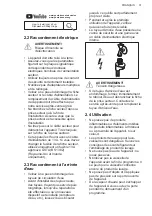
Page 31: ... circulation d eau Avant d installer des tuyaux neufs des tuyaux n ayant pas servi depuis longtemps lorsqu une réparation a été effectuée ou qu un nouveau dispositif a été installé compteurs d eau etc laissez l eau s écouler jusqu à ce qu elle soit parfaitement propre et claire Pendant et après la première utilisation de l appareil vérifiez qu aucune fuite n est visible Le tuyau d arrivée d eau po...

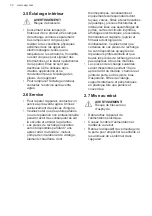
Page 32: ...arrêt du modèle moteur pompe de circulation et de vidange éléments chauffants dont thermopompes canalisations et équipements correspondants dont tuyaux valves filtres et électrovannes aquastops pièces structurelles et intérieures liées aux assemblages de portes cartes de circuits imprimés affichages électroniques pressostats thermostats et capteurs logiciel et firmware dont logiciel de réinitialis...

Page 33: ...e 10 Panier à couverts 11 Panier inférieur 12 Panier supérieur 3 1 Beam on Floor Le faisceau Beam on Floor est une lumière projetée sur le sol sous la porte de l appareil Une lumière rouge apparaît lorsque le programme démarre Elle reste allumée pendant toute la durée du programme La lumière devient verte une fois le programme est terminé La lumière rouge clignote lorsque l appareil rencontre une ...

Page 34: ...teur Description Voyant du réservoir de liquide de rinçage Il s allume lorsque le distributeur de liquide de rinçage doit être rempli Reportez vous au chapitre Avant la première utilisation Voyant du réservoir de sel régénérant Il s allume lorsque le réservoir de sel régénérant doit être rempli Reportez vous au chapitre Avant la pre mière utilisation Voyant Machine Care Il s allume lorsque l appar...

Page 35: ...ction de vos besoins en activant EXTRAS ExtraPower ExtraPower améliore les résultats de lavage du programme sélectionné Cette option augmente la durée et la température de lavage GlassCare GlassCare offre un soin spécial à la vaisselle délicate L option empêche les changements rapides de température de lavage du programme sélectionné et la réduit à 45 C Ainsi les verres sont protégés contre les do...

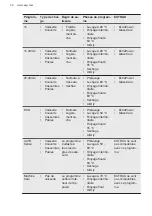
Page 36: ...intermé diaire Rinçage final à 60 C Séchage AirDry ExtraPower GlassCare ECO Vaisselle Couverts Casseroles Poêles Normale Légère ment sè che Prélavage Lavage à 50 C Rinçage intermé diaire Rinçage final à 55 C Séchage AirDry ExtraPower GlassCare AUTO Sense Vaisselle Couverts Casseroles Poêles Le programme s adapte à tous les de grés de salis sure Prélavage Lavage à 50 60 C Rinçage intermé diaire Rin...

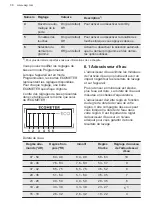
Page 37: ...ions relatives aux performances de test par ex conformément à la norme EN60436 envoyez un courrier électronique à l adresse info test dishwasher production com Dans votre demande notez la référence du produit PNC située sur la plaque signalétique Pour toute autre question concernant votre lave vaisselle veuillez vous reporter au manuel d utilisation fourni avec votre appareil 6 RÉGLAGES DE BASE Vo...

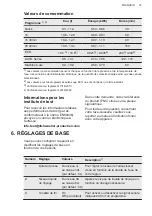
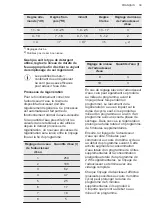
Page 38: ...bleau est le même que celui de l ECOMETER 1 2 3 4 5 6 6 1 Adoucisseur d eau L adoucisseur d eau élimine les minéraux de l arrivée d eau qui pourraient avoir un impact négatif sur les résultats de lavage et sur l appareil Plus la teneur en minéraux est élevée plus l eau est dure La dureté de l eau est mesurée en échelles d équivalence L adoucisseur doit être réglé en fonction du degré de dureté de ...

Page 39: ...ur d eau Quantité d eau l 1 250 2 100 3 62 4 47 5 25 6 17 7 10 8 5 Réglage du niveau de l adoucisseur d eau Quantité d eau l 9 3 10 3 En cas de réglage élevé de l adoucisseur d eau cela peut également se produire au milieu du programme avant le rinçage deux fois pendant un programme Le lancement de la régénération n a aucun impact sur la durée du cycle sauf s il se produit au milieu d un programme...

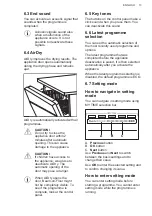
Page 40: ... et veillez à maintenir la notification activée Pour désactiver le distributeur de liquide de rinçage et son voyant réglez le niveau de liquide de rinçage sur 0A 6 3 Tonalité de fin Vous pouvez activer le signal sonore déclenché lorsque le programme est terminé Des signaux sonores retentissent lorsqu une anomalie de fonctionnement s est produite Il est impossible de désactiver ces signaux sonores ...

Page 41: ...ées pendant environ 3 secondes Les voyants correspondant aux touches Précédent OK et Suivant sont allumés Comment modifier le réglage Assurez vous que l appareil est en Mode réglage 1 Utilisez les touches Précédent ou Suivant pour sélectionner la barre ECOMETER correspondant au réglage souhaité La barre ECOMETER correspondant au réglage souhaité clignote L affichage indique le réglage actuel 2 App...

Page 42: ... de lavage au quotidien Comment remplir le réservoir de sel régénérant 1 Tournez le couvercle du réservoir de sel régénérant vers la gauche et retirez le 2 Mettez 1 litre d eau dans le réservoir de sel régénérant uniquement la première fois 3 Remplissez le réservoir avec du sel régénérant jusqu à ce qu il soit rempli 4 Secouez doucement l entonnoir par la poignée pour faire tomber les derniers gra...

Page 43: ...N Utilisez uniquement un produit de lavage spécial pour lave vaisselle 1 Appuyez sur la touche de déverrouillage A pour ouvrir le couvercle C 2 Versez le produit de lavage sous forme de poudre ou tablette dans le compartiment approprié B 3 Si le programme comporte une phase de prélavage versez une petite quantité de produit de lavage à l intérieur de la porte de l appareil 4 Fermez le couvercle As...

Page 44: ...s et la durée initiale du programme peut être diminuée 8 5 Comment différer le départ d un programme 1 Sélectionnez un programme 2 Appuyez sur la touche à plusieurs reprises jusqu à ce que l affichage indique le délai choisi pour le départ différé de 1 à 24 heures Le voyant correspondant à la touche est allumé 3 Fermez la porte de l appareil pour démarrer le décompte Pendant un décompte il n est p...

Page 45: ... de nettoyage disposez les articles dans les paniers comme indiqué dans la notice d utilisation et ne surchargez pas les paniers Ne rincez pas vos plats à la main au préalable Cela augmente la consommation d eau et d énergie Si nécessaire sélectionnez un programme avec une phase de prélavage Enlevez les plus gros résidus d aliments des plats et videz les tasses et les verres avant de les mettre da...

Page 46: ...Assurez vous que le niveau d adoucisseur d eau est correct Si le niveau est trop élevé la quantité accrue de sel régénérant dans l eau peut entraîner la formation de rouille sur les couverts 9 3 Que faire si vous ne voulez plus utiliser de pastilles tout en 1 Avant de commencer à utiliser le produit de lavage le sel régénérant et le liquide de rinçage séparément suivez les étapes suivantes 1 Régle...

Page 47: ...he de la prise secteur Les filtres sales et les bras d aspersion obstrués ont un impact négatif sur les résultats de lavage Contrôlez les régulièrement et nettoyez les si nécessaire 10 1 Machine Care Machine Care est un programme conçu pour laver l intérieur de l appareil pour des résultats optimaux Il élimine le tartre et l accumulation de graisses Lorsque l appareil détecte qu il a besoin d être...

Page 48: ...es cure dents etc réduisent les performances de nettoyage et peuvent endommager la pompe de vidange 1 Démontez le système de filtres comme indiqué dans ce chapitre 2 Retirez les corps étrangers à la main ATTENTION Si vous ne pouvez pas retirer les corps étrangers contactez un service après vente agréé 3 Remontez les filtres comme indiqué dans ce chapitre 10 4 Nettoyage extérieur Nettoyez l apparei...

Page 49: ...ésultats de lavage et endommager l appareil 10 6 Nettoyage du bras d aspersion inférieur Nous vous conseillons de nettoyer régulièrement le bras d aspersion inférieur afin d éviter que ses orifices ne se bouchent Si les orifices sont bouchés les résultats de lavage peuvent ne pas être satisfaisants 1 Pour retirer le bras d aspersion inférieur tirez le vers le haut 2 Nettoyez le bras d aspersion à ...

Page 50: ...e Utilisez un outil pointu comme un cure dent pour extraire toutes les particules de saleté incrustées dans les orifices 4 Pour réinstaller le bras d aspersion pousser le bras vers le haut tout en le tournant vers la gauche jusqu à ce qu il se verrouille en place 10 8 Nettoyage du bras d aspersion de plafond Nous vous conseillons de nettoyer régulièrement le bras d aspersion de plafond afin d évit...

Page 51: ...uyau d alimentation A en le tournant vers la droite Assurez vous que la fixation se verrouille correctement dans la bonne position 11 DÉPANNAGE AVERTISSEMENT Une mauvaise réparation de l appareil peut entraîner un danger pour la sécurité de l utilisateur Toute réparation ne doit être effectuée que par un technicien qualifié La plupart des problèmes peuvent être résolus sans avoir recours au servic...

Page 52: ...st pas obstrué Assurez vous que le système du filtre intérieur n est pas obstrué Assurez vous que le tuyau de vidange ne présente ni plis ni coudes Le dispositif anti inondation est activé L affichage indique i30 Fermez le robinet d eau Vérifiez que l appareil est correctement installé Assurez vous que les paniers sont chargés comme indi qué dans le manuel d utilisation Dysfonctionnement du cap te...

Page 53: ...Réglez le pied arrière si disponible La porte de l appareil est dif ficile à fermer L appareil n est pas d aplomb Desserrez ou serrez les pieds réglables si disponibles De la vaisselle dépasse des paniers Bruit de cliquetis ou de bat tement à l intérieur de l ap pareil La vaisselle n est pas correctement rangée dans les pa niers Reportez vous au manuel de chargement du pa nier Assurez vous que les...

Page 54: ...ogramme sélectionné Nettoyez les jets des bras d aspersion et le filtre Re portez vous au chapitre Entretien et nettoyage Résultats de séchage insatis faisants La vaisselle est restée trop longtemps à l intérieur de l appareil porte fermée Activez l option AirDry pour définir l ouverture automatique de la porte et améliorer les performances de séchage Il n y a pas de liquide de rinçage ou le dosag...

Page 55: ...s l eau utilisée pour le lavage Reportez vous au chapitre Adoucisseur d eau Les couverts en argent et en acier inoxydable ont été placés ensemble Évitez de placer les couverts en ar gent et en acier inoxydable les uns à côté des autres Il y a des résidus de détergent dans le distributeur de produit de lavage à la fin du program me La pastille de détergent est restée coincée dans le dis tributeur d...

Page 56: ...nts produits de lavage Contactez le fabricant du produit de lavage Vaisselle ternie décolorée ou ébréchée Assurez vous de ne placer dans l appareil que des ar ticles adaptés au lave vaisselle Chargez et déchargez le panier avec précautions Re portez vous au manuel de chargement du panier Placez les objets délicats dans le panier supérieur Activez l option GlassCare pour garantir un soin spé cial a...

Page 57: ... appareil Il est possible de trouver des informations relatives aux performances du produit dans la base de données EPREL de l EU grâce au lien https eprel ec europa eu avec le nom du modèle et le numéro de produit se trouvant sur la plaque signalétique de l appareil Reportez vous au chapitre Description du produit Pour des informations plus détaillées sur l étiquette énergétique consultez le site...

Page 58: ......

Page 59: ......
Page 60: ...www aeg com shop 117859611 A 292020 ...

Reviews: