background image

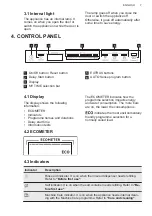
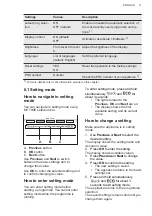
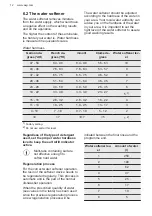
• The ECOMETER indicates the

updated level of energy and water

consumption.

By default, options must be

activated every time before

you start a programme.

If the latest programme

selection is enabled, the

saved options are activated

automatically along with the

programme.

It is not possible to activate

or deactivate options while a

programme is running.

Not all options are

compatible with each other.

Activating options often

increases the water and

energy consumption as well

as the programme duration.

8.4 How to start the AUTO

Sense program

1. Press 

.

• The light related to the button is

on.

• The display shows the longest

possible program duration.

2. Close the appliance door to start the

program.

The appliance senses the type of load

and adjusts a suitable wash cycle.

During the cycle, the sensors operate

several times and the initial program

duration can decrease.

8.5 How to delay the start of a

programme

1. Select a programme.
2. Press   repeatedly until the display

shows the desired delay time (from 1

to 24 hours).

The light related to the button is on.

3. Close the appliance door to start the

countdown.

During the countdown, you cannot

change the delay time and the

programme selection.

When the countdown is complete, the

programme starts.

8.6 Opening the door while

the appliance operates

Opening the door while a programme is

running pauses the wash cycle. The

display shows the remaining duration of

the programme. The programme bar at

the bottom of the display indicates the

current progress of the wash cycle. The

length of the bar decreases along with

the programme duration. After closing

the door, the wash cycle resumes from

the point of interruption.
If you open the door during the delay

start countdown, the countdown is

paused. The display shows the current

countdown status. After closing the door,

the countdown resumes.

Opening the door while the

appliance operates may

affect the energy

consumption and the

programme duration.

If the door is opened for

more than 30 seconds

during the drying phase, the

running programme ends. It

does not happen if the door

is opened by the AirDry

function.

8.7 How to cancel the delay

start while the countdown

operates

Press and hold   for about 3 seconds.

The appliance returns to the programme

selection.

If you cancel the delay start,

you have to select the

programme again.

8.8 How to cancel a running

programme

Press and hold   for about 3 seconds.

The appliance returns to the programme

selection.

ENGLISH

17

Summary of Contents for FSK73677P

Page 1: ...USER MANUAL EN User Manual Dishwasher FSK73677P ...

Page 2: ...he very best from it Visit our website to Get usage advice brochures trouble shooter service and repair information www aeg com support Register your product for better service www registeraeg com Buy Accessories Consumables and Original spare parts for your appliance www aeg com shop CUSTOMER CARE AND SERVICE Always use original spare parts When contacting our Authorised Service Centre ensure tha...

Page 3: ...ppliance unless continuously supervised Children of less than 3 years of age should be kept away from the appliance unless continuously supervised Do not let children play with the appliance Keep detergents away from children Keep children and pets away from the appliance when the door is open Children shall not carry out cleaning and user maintenance of the appliance without supervision 1 2 Gener...

Page 4: ...on must install this appliance Remove all the packaging Do not install or use a damaged appliance Do not use the appliance before installing it in the built in structure due to safety manner Follow the installation instructions supplied with the appliance Always take care when moving the appliance as it is heavy Always use safety gloves and enclosed footwear Do not install or use the appliance whe...

Page 5: ...n near or on the appliance Dishwasher detergents are dangerous Follow the safety instructions on the detergent packaging Do not drink and play with the water in the appliance Do not remove the dishes from the appliance until the programme is complete Some detergent may remain on the dishes Do not store items or apply pressure on the open door of the appliance The appliance can release hot steam if...

Page 6: ...mperature vibration humidity or are intended to signal information about the operational status of the appliance They are not intended to be used in other applications and are not suitable for household room illumination 2 7 Disposal WARNING Risk of injury or suffocation Disconnect the appliance from the mains supply Cut off the mains cable and discard it Remove the door catch to prevent children ...

Page 7: ...ETER Indicators Programme names and durations Delay start time Information texts 4 2 ECOMETER The ECOMETER indicates how the programme selection impacts energy and water consumption The more bars are on the lower the consumption is indicates the most environmentally friendly programme selection for a normally soiled load 4 3 Indicators Indicator Description Rinse aid indicator It is on when the ri...

Page 8: ... 40min is a programme suitable for washing and drying heavily soiled items E ECO is the longest programme 4h offering the most efficient use of energy and water consumption for crockery and cutlery with normal soil This is the standard programme for test institutes 1 5 2 EXTRAS You can adjust the programme selection to your needs by activating EXTRAS ExtraSilent ExtraSilent allows to reduce the no...

Page 9: ...mediate rinse Final rinse 55 C Drying AirDry ExtraPower GlassCare 2h 40min Crockery Cutlery Pots Pans Normal to heavy Dried on Prewash Wash 60 C Intermediate rinse Final rinse 60 C Drying AirDry ExtraPower GlassCare ECO Crockery Cutlery Pots Pans Normal Lightly dried on Prewash Wash 50 C Intermediate rinse Final rinse 55 C Drying AirDry ExtraPower GlassCare ExtraSilent AUTO Sense Crockery Cutlery ...

Page 10: ...m In your request include the product number code PNC from the rating plate For any other questions regarding your dishwasher refer to the service book provided with your appliance 6 BASIC SETTINGS You can configure the appliance by changing basic settings according to your needs Settings Values Description Water hardness From level 1 to level 10 default 5 Adjust the level of the water softener ac...

Page 11: ...e Use OK to enter the selected setting and to confirm changing its value How to enter setting mode You can enter setting mode before starting a programme You cannot enter setting mode while the programme is running To enter setting mode press and hold simultaneously and for about 3 seconds The lights related to the Previous OK and Next are on The display shows the first available setting and its c...

Page 12: ...36 51 64 5 1 6 4 36 45 7 23 28 40 50 4 0 5 0 28 35 6 19 22 33 39 3 3 3 9 23 27 5 1 15 18 26 32 2 6 3 2 18 22 4 11 14 19 25 1 9 2 5 13 17 3 4 10 7 18 0 7 1 8 5 12 2 4 7 0 7 5 1 2 1 Factory setting 2 Do not use salt at this level Regardless of the type of detergent used set the proper water hardness level to keep the salt refill indicator active Multi tabs containing salt are not effective enough to...

Page 13: ...nce with the currently applicable standard in laboratory conditions with water hardness 2 5mmol L according to the 2019 2022 regulation water softener level 3 The pressure and the temperature of water as well as the variations of the mains supply can change the values 6 3 Rinse aid level The rinse aid helps to dry the dishes without streaks and stains It is automatically released during the hot ri...

Page 14: ... the default programme is ECO 6 7 TimeBeam TimeBeam displays the following information on the floor below the appliance door The programme duration when the programme begins 0 00 and CLEAN when the programme is completed DELAY and the countdown duration when the delay start begins An alarm code when the appliance has a malfunction When AirDry opens the door TimeBeam is off To check the remaining t...

Page 15: ... it 2 Put 1 litre of water in the salt container only for the first time 3 Fill the salt container with dishwasher salt until it is full 4 Carefully shake the funnel by its handle to get the last granules inside 5 Remove the salt around the opening of the salt container 6 Turn the cap of the salt container clockwise to close the salt container CAUTION Water and salt can come out of the salt contai...

Page 16: ... position For information about the detergent dosage refer to the manufacturer s instructions on the packaging of the product Usually 20 25 ml of gel detergent is adequate for washing a load with normal soil The upper ends of the two vertical ribs inside the compartment B indicate the maximum level for filling the dispenser with gel max 30ml 8 2 How to select and start a programme using MY TIME se...

Page 17: ...you cannot change the delay time and the programme selection When the countdown is complete the programme starts 8 6 Opening the door while the appliance operates Opening the door while a programme is running pauses the wash cycle The display shows the remaining duration of the programme The programme bar at the bottom of the display indicates the current progress of the wash cycle The length of t...

Page 18: ...at items in the baskets do not touch or cover each other Only then can the water completely reach and wash the dishes You can use dishwasher detergent rinse aid and salt separately or you can use the multi tablets e g All in 1 Follow the instructions on the packaging Select a programme according to the type of load and the degree of soil ECO offers the most efficient use of water and energy consum...

Page 19: ...d There is enough salt and rinse aid unless you use multi tablets The arrangement of the items in the baskets is correct The programme is suitable to the type of load and the degree of soil The correct quantity of detergent is used 9 5 Loading the baskets Always use the whole space of the baskets Use the appliance to wash dishwasher safe items only Do not wash in the appliance items made of wood h...

Page 20: ...me When the programme is complete the reminder message is disabled 10 2 Internal cleaning Clean the appliance interior with a soft damp cloth Do not use abrasive products abrasive cleaning pads sharp tools strong chemicals scourer or solvents Wipe clean the door including the rubber gasket once a week To maintain the performance of your appliance use a cleaning product designed specifically for di...

Page 21: ...ues of food or soil in or around the edge of the sump 6 Put back in place the flat filter A Make sure that it is correctly positioned under the 2 guides 7 Reassemble the filters B and C 8 Put back the filter B in the flat filter A Turn it clockwise until it locks CAUTION An incorrect position of the filters can cause bad washing results and damage to the appliance ENGLISH 21 ...

Page 22: ... downwards 10 7 Cleaning the upper spray arm We recommend to clean the upper spray arm regularly to prevent soil from clogging the holes Clogged holes can cause unsatisfactory washing results 1 Pull out the upper basket 2 To detach the spray arm from the basket press the spray arm upwards and simultaneously turn it clockwise 3 Wash the spray arm under running water Use a thin pointed tool e g a to...

Page 23: ...rm under running water Use a thin pointed tool e g a toothpick to remove particles of soil from the holes Run the water through the holes to wash soil particles away from the inside 4 To install the spray arm C back insert the mounting element B in the spray arm and fix it in the delivery tube A by turning it clockwise Make sure that the mounting element locks into place 11 TROUBLESHOOTING WARNING...

Page 24: ...lter in the inlet hose is not clogged Make sure that the inlet hose has no kinks or bends The appliance does not drain the water The display shows Error i20 and Water is not drain ing Make sure that the sink spigot is not clogged Make sure that the interior filter system is not clogged Make sure that the drain hose has no kinks or bends The anti flood device is on The display shows Error i30 and R...

Page 25: ...me duration The remaining time in the display increases and skips nearly to the end of the pro gramme duration This is not a defect The appliance is working correctly Small leak from the appli ance door The appliance is not levelled Loosen or tighten the ad justable feet if applicable The appliance door is not centred on the tub Adjust the rear foot if applicable The appliance door is diffi cult t...

Page 26: ... correctly 11 1 The dishwashing and drying results are not satisfactory Problem Possible cause and solution Poor washing results Refer to Daily use Hints and tips and the basket loading leaflet Use more intensive washing programme Activate the ExtraPower option to improve the washing results of a selected programme Clean spray arm jets and filter Refer to Care and Cleaning Poor drying results Tabl...

Page 27: ...e sure that the spray arms are not blocked or clogged Make sure that items in the baskets do not impede the lid of the detergent dispenser from opening Odours inside the appliance Refer to Internal cleaning Start the Machine Care programme with a descaler or a cleaning product designed for dishwashers Limescale deposits on the ta bleware on the tub and on the inside of the door The level of salt i...

Page 28: ...ance in the EU EPREL database Keep the energy label for reference together with the user manual and all other documents provided with this appliance It is possible to find information related to the performance of the product in the EU EPREL database using the link https eprel ec europa eu and the model name and product number that you can find on the rating plate of the appliance Refer to the cha...

Page 29: ......

Page 30: ......

Page 31: ......

Page 32: ...www aeg com shop 117847860 A 242021 ...

Reviews: