background image

window, or more effective ventilation,

for example increasing the level of

mechanical ventilation where present.

• This appliance is for cooking

purposes only. It must not be used for

other purposes, for example room

heating.

• Do not let acid liquids, for example

vinegar, lemon juice or limescale

remover, touch the hob. This can

cause matt patches.

• Discoloration of the enamel or

stainless steel has no effect on the

performance of the appliance.

2.5 

Care and cleaning

WARNING!

Do not remove the buttons,

knobs or gaskets from the

control panel. Water may

get inside the appliance and

cause damage.

• Clean the appliance regularly to

prevent the deterioration of the

surface material.

• Deactivate the appliance and let it

cool down before you clean it.

• Disconnect the appliance from the

electrical supply before maintenance.

• Do not use water spray and steam to

clean the appliance.

• Clean the appliance with a moist soft

cloth. Use only neutral detergents. Do

not use abrasive products, abrasive

cleaning pads, solvents or metal

objects.

• Do not clean the burners in the

dishwasher.

2.6 

Service

• To repair the appliance contact the

Authorised Service Centre.

• Use original spare parts only.

2.7 

Disposal

WARNING!

Risk of injury or suffocation.

• Contact your municipal authority for

information on how to discard the

appliance correctly.

• Disconnect the appliance from the

mains supply.

• Cut off the mains electrical cable

close to the appliance and dispose of

it.

• Flat the external gas pipes.

3. 

INSTALLATION

WARNING!

Refer to Safety chapters.

3.1 

Before the installation

Before you install the hob, write down

the information below from the rating

plate. The rating plate is on the bottom

of the hob.

Model .......................................
PNC .........................................
Serial number ...........................

3.2 

Gas Connection

WARNING!

The following instructions

about installation,

maintenance and ventilation

must be carried out by

qualified personnel in

compliance with the

regulation in force (UNI-CIG

7129 - 7131). Make sure that

the kitchen is well ventilated:

keep natural ventilation

holes open (at least 100 cm²)

or install a mechanical

extractor hood.

Choose fixed connections or use a

flexible pipe in stainless steel in

compliance with the regulation in force.

If you use flexible metallic pipes, be

careful they do not come in touch with

ENGLISH

7

Summary of Contents for HGB64400SM

Page 1: ...USER MANUAL EN User Manual 2 Hob IT Istruzioni per l uso 19 Piano cottura HGB64400SM ...

Page 2: ... service and repair information www aeg com support Register your product for better service www registeraeg com Buy Accessories Consumables and Original spare parts for your appliance www aeg com shop CUSTOMER CARE AND SERVICE Always use original spare parts When contacting our Authorised Service Centre ensure that you have the following data available Model PNC Serial Number The information can ...

Page 3: ...uld be kept away from the appliance unless continuously supervised Do not let children play with the appliance Keep all packaging away from children and dispose of it appropriately Keep children and pets away from the appliance when it operates or when it cools down Accessible parts may become hot during use If the appliance has a child safety device it should be activated Children shall not carry...

Page 4: ...ufacturer an authorized Service or similarly qualified persons in order to avoid a hazard Where the appliance is directly connected to the power supply an all pole isolating switch with a contact gap is required Complete disconnection in compliance with the conditions specified in overvoltage category III must be guaranteed The earth cable is excluded from this When you route the mains cable make ...

Page 5: ...ce is disconnected from the power supply Make sure that the parameters on the rating plate are compatible with the electrical ratings of the mains power supply Make sure the appliance is installed correctly Loose and incorrect electricity mains cable or plug if applicable can make the terminal become too hot Use the correct electricity mains cable Do not let the electricity mains cable tangle Make...

Page 6: ...h WARNING Risk of fire and explosion Fats and oil when heated can release flammable vapours Keep flames or heated objects away from fats and oils when you cook with them The vapours that very hot oil releases can cause spontaneous combustion Used oil that can contain food remnants can cause fire at a lower temperature than oil used for the first time Do not put flammable products or items that are...

Page 7: ...s Do not clean the burners in the dishwasher 2 6 Service To repair the appliance contact the Authorised Service Centre Use original spare parts only 2 7 Disposal WARNING Risk of injury or suffocation Contact your municipal authority for information on how to discard the appliance correctly Disconnect the appliance from the mains supply Cut off the mains electrical cable close to the appliance and ...

Page 8: ...teel UNI CIG 9891 with a maximum length 2 m WARNING When installation is complete make sure that the seal of each pipe fitting is correct Use a soapy solution not a flame 3 3 Injectors replacement 1 Remove the pan supports 2 Remove the caps and crowns of the burner 3 With a socket spanner 7 remove the injectors and replace them with the ones which are necessary for the type of gas you use see tabl...

Page 9: ...correct socket Always use a correctly installed shockproof socket Make sure that there is an access to the mains plug after the installation Do not pull the mains cable to disconnect the appliance Always pull the mains plug There is a risk of fire when the appliance is in connection with an extension cable an adapter or a multiple connection Make sure that the ground connection agrees with the sta...

Page 10: ...he blue neutral wire to the terminal which is marked with the letter N or coloured blue 3 Connect the brown live wire to the terminal which is marked with the letter L It must always be connected to the network phase 3 7 Assembly 1 2 3 min 55 mm min 650 mm 560 mm 2 0 480 mm 2 0 min 100 mm 30 mm 4 5 6 7 A B A Supplied seal B Supplied bracket www aeg com 10 ...

Page 11: ...ance intervention is necessary Kitchen unit with door min 20 mm max 150 mm 30 mm 60 mm B A A Removable panel B Space for connections Kitchen unit with oven The electrical connection of the hob and the oven must be installed separately for safety reasons and to let easy remove oven from the unit 4 PRODUCT DESCRIPTION 4 1 Cooking surface layout 3 4 2 1 1 Semi rapid burner 2 Multi Crown burner 3 Auxi...

Page 12: ...warm up If not the gas supply is interrupted 3 Adjust the flame after it is regular If after some tries the burner does not light check if the crown and its cap are in correct positions WARNING Do not keep the control knob pushed for more than 15 seconds If the burner does not light after 15 seconds release the control knob turn it into off position and try to light the burner again after minimum ...

Page 13: ...es or toaster plates The stainless steel can become tarnished if it is too much heated WARNING Do not put the same pan on two burners WARNING Do not put unstable or damaged pots on the burner to prevent spills and injuries CAUTION Make sure that the bottoms of pots do not stand too close to the control knob otherwise the flame heats the control knob up CAUTION Make sure that pot handles are not ab...

Page 14: ... careful when you wash the pan supports by hand and dry them If necessary remove stubborn stains with a paste cleaner 3 After you clean the pan supports make sure that they are in correct positions 4 For the burner to operate correctly make sure that the arms of the pan supports are aligned with the centre of the burner 7 3 Cleaning the hob Remove immediately melted plastic plastic foil sugar and ...

Page 15: ...r cap and crown correctly The flame extinguishes im mediately after ignition Thermocouple is not heated up sufficiently After lightning the flame keep the knob pushed for equal or less than 10 sec onds The flame ring is uneven Burner crown is blocked with food residues Make sure that the injector is not blocked and the burner crown is clean 8 2 If you cannot find a solution If you cannot find a so...

Page 16: ... IT MADE IN ITALY TYPE IP20 0049 A B C A Stick it on Guarantee Card and send this part if applicable B Stick it on Guarantee Card and keep this part if applicable C Stick it on instruction booklet 9 TECHNICAL DATA 9 1 Hob dimensions Width 594 mm Depth 510 mm 9 2 Bypass diameters BURNER Ø BYPASS 1 100 mm Multi Crown 57 Semi rapid 35 Auxiliary 28 www aeg com 16 ...

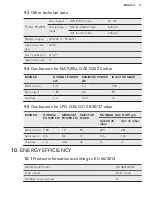
Page 17: ...kW MINIMUM POWER kW INJECTOR MARK Multi Crown 4 0 1 4 146 Semi rapid 1 85 0 6 92 Auxiliary 1 0 0 33 70 9 5 Gas burners for LPG G30 G31 28 30 37 mbar BURNER NORMAL POWER kW MINIMUM POWER kW INJECTOR MARK NOMINAL GAS FLOW g h G30 28 30 mbar G31 37 mbar Multi Crown 3 65 1 4 95 265 261 Semi rapid 2 0 0 6 71 145 143 Auxiliary 1 0 0 33 50 73 71 10 ENERGY EFFICIENCY 10 1 Product information according to ...

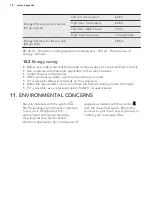
Page 18: ...er the pot on the burner When you heat up water use only the amount you need If it is possible always put the lids on the cookware When the liquid starts to boil turn down the flame to barely simmer the liquid If it is possible use a pressure cooker Refer to its user manual 11 ENVIRONMENTAL CONCERNS Recycle materials with the symbol Put the packaging in relevant containers to recycle it Help prote...

Page 19: ...i eliminare eventuali anomalie ottenere informazioni sull assistenza e la riparazione www aeg com support Per registrare il vostro prodotto e ricevere un servizio migliore www registeraeg com Acquistare accessori materiali di consumo e ricambi originali per la vostra apparecchiatura www aeg com shop SERVIZIO CLIENTI E MANUTENZIONE Consigliamo sempre l impiego di ricambi originali Quando si contatt...

Page 20: ... supervisione continua Tenere lontani dall apparecchiatura i bambini al di sotto dei 3 anni se non costantemente supervisionati Non consentire ai bambini di giocare con l apparecchiatura Tenere gli imballaggi lontano dai bambini e smaltirli in modo adeguato Tenere i bambini e gli animali domestici lontano dall apparecchiatura durante il funzionamento o raffreddamento Alcune parti accessibili posso...

Page 21: ...te cucchiai e coperchi non dovrebbero essere posti sulla superficie del piano di cottura in quanto possono diventare caldi Non usare l apparecchiatura prima di installarla nella struttura a incasso Non usare una pulitrice a vapore per pulire l apparecchiatura Se il cavo di alimentazione è danneggiato deve essere sostituito dal produttore da un tecnico autorizzato o da una persona qualificata per e...

Page 22: ...allare l apparecchiatura accanto ad una porta o sotto una finestra per evitare che pentole calde cadano dall apparecchiatura quando la porta o la finestra sono aperte Se l apparecchiatura viene installata sopra dei cassetti assicurarsi che lo spazio tra la base dell apparecchiatura e il cassetto superiore sia sufficiente per il ricircolo d aria La base dell apparecchiatura può surriscaldarsi Si co...

Page 23: ...ere con l installazione verificare che le condizioni di distribuzione locale pressione e tipo di gas e i valori preimpostati dell apparecchiatura siano compatibili Adottare le misure necessarie per garantire una corretta circolazione d aria intorno all apparecchiatura Le informazioni relative all alimentazione del gas si trovano sulla targhetta dei dati La presente apparecchiatura non è collegata ...

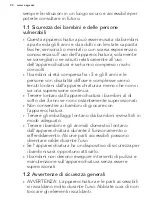
Page 24: ...ad un adeguata ventilazione nell ambiente in cui si trova l apparecchiatura Se si prevede un impiego prolungato e intenso dell apparecchiatura può essere necessaria un ulteriore fonte di aerazione per esempio l apertura di una finestra o un sistema più efficace come l aumento del livello di ventilazione meccanica ove presente L apparecchiatura è destinata solo alla cottura Non deve essere utilizza...

Page 25: ...sibile in acciaio inossidabile conforme alle disposizioni vigenti Se si utilizzano tubi in metallo flessibili fare attenzione che non entrino in contatto con parti mobili o non siano schiacciati Ulteriore attenzione è richiesta qualora al piano di cottura fosse abbinato il forno Accertarsi che la pressione del gas di alimentazione dell apparecchiatura sia conforme ai valori consigliati Se la press...

Page 26: ... con l apparecchiatura Se la pressione del gas di alimentazione è variabile o differente da quella prevista montare un adattatore di pressione adeguato nel tubo di alimentazione del gas 3 4 Regolazione del livello minimo Per regolare il livello minimo dei bruciatori 1 Accendere il bruciatore 2 Ruotare la manopola sulla posizione minima 3 Rimuovere la manopola e la guarnizione AVVERTENZA Prestare a...

Page 27: ...pla esiste il rischio di incendio Accertarsi che il collegamento di messa a terra sia in linea con le disposizioni e le norme in vigore Il cavo di alimentazione non deve riscaldarsi ad una temperatura superiore a 90 C Per evitare il contatto tra il cavo e l apparecchiatura al di sotto del piano di cottura utilizzare dei morsetti sul lato dell unità A A Condotto rigido in rame o tubo flessibile in ...

Page 28: ... min 650 mm 560 mm 2 0 480 mm 2 0 min 100 mm 30 mm 4 5 6 7 A B A Guarnizione in dotazione B Staffa in dotazione 8 ATTENZIONE Installare l apparecchiatura esclusivamente su un piano di lavoro dalla superficie piatta www aeg com 28 ...

Page 29: ...mm max 150 mm 30 mm 60 mm B A A Pannello rimovibile B Spazio per gli allacciamenti Mobile da incasso con forno Il collegamento elettrico del piano di cottura e del forno deve essere eseguito separatamente per questioni di sicurezza oltre che per consentire una facile rimozione del forno dall unità 4 DESCRIZIONE DEL PRODOTTO 4 1 Disposizione della superficie di cottura 3 4 2 1 1 Bruciatore semirapi...

Page 30: ...e ruotarla in senso antiorario fino alla posizione massima 2 Tenere premuta la manopola di regolazione per circa 10 secondi Questo consentirà il riscaldamento della termocoppia In caso contrario l alimentazione del gas verrà interrotta 3 Regolare la fiamma dopo che si è stabilizzata Se il bruciatore non si accende dopo alcuni tentativi controllare che la corona e lo spartifiamma siano correttament...

Page 31: ... precisa 5 3 Spegnimento del bruciatore Per spegnere la fiamma ruotare la manopola in posizione di spento AVVERTENZA Ridurre o spegnere sempre la fiamma prima di rimuovere le pentole dal bruciatore 6 CONSIGLI E SUGGERIMENTI UTILI AVVERTENZA Fare riferimento ai capitoli sulla sicurezza 6 1 Pentole ATTENZIONE Non usare pentole in ghisa teglie in terracotta o coccio accessori per il grill o piastre t...

Page 32: ...ettati appositamente per pulire l acciaio inox e proteggere le superfici in acciaio Non usare prodotti detergenti contenenti agenti chimici corrosivi quali ad esempio cloruro non pulire la superficie con disinfettanti prodotti per la rimozione di macchie o ruggine e detergenti a immersione 7 2 Supporti pentole I supporti pentole non possono essere lavati in lavastoviglie Devono essere lavati a man...

Page 33: ... una candela ceramica ed un elettrodo di metallo Tenere questi componenti ben puliti per evitare difficoltà di accensione e controllare che i fori spartifiamma non siano ostruiti 7 5 Manutenzione periodica Consultare periodicamente il Centro di Assistenza autorizzato locale per verificare le condizioni del tubo della fornitura di gas e del regolatore di pressione se presente 8 RISOLUZIONE DEI PROB...

Page 34: ...za Autorizzato Fornire i dati riportati sulla targhetta dei dati Assicurarsi di aver acceso il piano di cottura correttamente In caso di azionamento errato dell apparecchiatura l intervento del tecnico del Centro di Assistenza o del rivenditore potrà essere effettuato a pagamento anche durante il periodo di garanzia Le istruzioni relative al Centro di Assistenza e alle condizioni di garanzia sono ...

Page 35: ...rigina le G20 2H 20 mbar 8 7 kW Gas sostitu zione G30 3 28 30 mbar 629 g h G31 3 37 mbar 618 g h Alimentazione elettrica 220 240 V 50 60 Hz Categoria del l apparecchiatu ra II2H3 Collegamento gas G 1 2 Classe dell ap parecchiatura 3 9 4 Bruciatori a GAS NATURALE G20 a 20 mbar BRUCIATORE POTENZA NOR MALE kW POTENZA MINIMA kW SEGNO INIETTORE Multi corona 4 0 1 4 146 Semi rapido 1 85 0 6 92 Ausiliari...

Page 36: ...ti Corona 55 3 Anteriore destro Ausiliario non applicabile Efficienza energetica per il piano di cottura a gas EE gas hob 59 6 EN 30 2 1 Gas combustibile per elettrodomestici di cottura Parte 2 1 Impiego razionale dell energia Informazioni generali 10 2 Risparmio energetico Prima dell uso assicurarsi che i bruciatori e i supporti pentole siano assemblati correttamente Usare pentole con diametro ad...

Page 37: ...laggio Aiutare a proteggere l ambiente e la salute umana e a riciclare rifiuti derivanti da apparecchiature elettriche ed elettroniche Non smaltire le apparecchiature che riportano il simbolo insieme ai normali rifiuti domestici Portare il prodotto al punto di riciclaggio più vicino o contattare il comune di residenza ITALIANO 37 ...

Page 38: ...www aeg com 38 ...

Page 39: ...ITALIANO 39 ...

Page 40: ...www aeg com shop 867356595 A 092020 ...

Reviews: