background image

2.1 

Installation

WARNING!

Only a qualified person must

install this appliance.

WARNING!

Risk of injury or damage to

the appliance.

• Remove all the packaging.

• Do not install or use a damaged

appliance.

• Follow the installation instructions

supplied with the appliance.

• Keep the minimum distance from

other appliances and units.

• Always take care when moving the

appliance as it is heavy. Always use

safety gloves and enclosed footwear.

• Seal the cut surfaces with a sealant to

prevent moisture to cause swelling.

• Protect the bottom of the appliance

from steam and moisture.

• Do not install the appliance adjacent

to a door or under a window. This

prevents hot cookware falling from

the appliance when the door or the

window is opened.

• If the appliance is installed above

drawers make sure that the space,

between the bottom of the appliance

and the upper drawer, is sufficient for

air circulation.

• The bottom of the appliance can get

hot. Make sure to install a non-

combustible separation panel under

the appliance to prevent access to the

bottom.

2.2 

Electrical Connection

WARNING!

Risk of fire and electric

shock.

• All electrical connections should be

made by a qualified electrician.

• The appliance must be earthed.

• Before carrying out any operation

make sure that the appliance is

disconnected from the power supply.

• Make sure that the parameters on the

rating plate are compatible with the

electrical ratings of the mains power

supply.

• Make sure the appliance is installed

correctly. Loose and incorrect

electricity mains cable or plug (if

applicable) can make the terminal

become too hot.

• Use the correct electricity mains

cable.

• Do not let the electricity mains cable

tangle.

• Make sure that a shock protection is

installed.

• Use the strain relief clamp on the

cable.

• Make sure the mains cable or plug (if

applicable) does not touch the hot

appliance or hot cookware, when you

connect the appliance to the near

sockets.

• Do not use multi-plug adapters and

extension cables.

• Make sure not to cause damage to

the mains plug (if applicable) or to the

mains cable. Contact our Authorised

Service Centre or an electrician to

change a damaged mains cable.

• The shock protection of live and

insulated parts must be fastened in

such a way that it cannot be removed

without tools.

• Connect the mains plug to the mains

socket only at the end of the

installation. Make sure that there is

access to the mains plug after the

installation.

• If the mains socket is loose, do not

connect the mains plug.

• Do not pull the mains cable to

disconnect the appliance. Always pull

the mains plug.

• Use only correct isolation devices: line

protecting cut-outs, fuses (screw type

fuses removed from the holder), earth

leakage trips and contactors.

• The electrical installation must have

an isolation device which lets you

disconnect the appliance from the

mains at all poles. The isolation

device must have a contact opening

width of minimum 3 mm.

2.3 

Gas connection

• All gas connections should be made

by a qualified person.

• Before installation, make sure that the

local distribution conditions (nature of

ENGLISH

5

Summary of Contents for HGB75301UM

Page 1: ...USER MANUAL EN User Manual 2 Hob IT Istruzioni per l uso 21 Piano cottura HGB75301UM ...

Page 2: ...r service information www aeg com webselfservice Register your product for better service www registeraeg com Buy Accessories Consumables and Original spare parts for your appliance www aeg com shop CUSTOMER CARE AND SERVICE Always use original spare parts When contacting our Authorised Service Centre ensure that you have the following data available Model PNC Serial Number The information can be ...

Page 3: ...s than 3 years of age should be kept away from the appliance unless continuously supervised Do not let children play with the appliance Keep all packaging away from children and dispose of it appropriately Keep children and pets away from the appliance when it operates or when it cools down Accessible parts are hot If the appliance has a child safety device it should be activated Children shall no...

Page 4: ...in order to avoid a hazard Where the appliance is directly connected to the power supply an all pole isolating switch with a contact gap is required Complete disconnection in compliance with the conditions specified in overvoltage category III must be guaranteed The earth cable is excluded from this When you route the mains cable make sure that the cable doesn t come into direct contact for exampl...

Page 5: ...ake sure the appliance is installed correctly Loose and incorrect electricity mains cable or plug if applicable can make the terminal become too hot Use the correct electricity mains cable Do not let the electricity mains cable tangle Make sure that a shock protection is installed Use the strain relief clamp on the cable Make sure the mains cable or plug if applicable does not touch the hot applia...

Page 6: ... fire at a lower temperature than oil used for the first time Do not put flammable products or items that are wet with flammable products in near or on the appliance WARNING Risk of damage to the appliance Do not keep hot cookware on the control panel Do not let cookware to boil dry Be careful not to let objects or cookware fall on the appliance The surface can be damaged Do not activate the cooki...

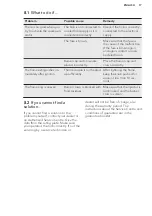
Page 7: ...nicipal authority for information on how to discard the appliance correctly Disconnect the appliance from the mains supply Cut off the mains electrical cable close to the appliance and dispose of it Flat the external gas pipes 3 INSTALLATION WARNING Refer to Safety chapters 3 1 Before the installation Before you install the hob write down the information bellow from the rating plate The rating pla...

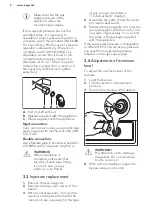
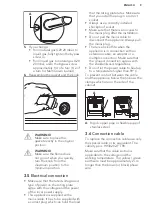
Page 8: ...allation is complete make sure that the seal of each pipe fitting is correct Use a soapy solution not a flame 3 3 Injectors replacement 1 Remove the pan supports 2 Remove the caps and crowns of the burner 3 With a socket spanner 7 remove the injectors and replace them with the ones which are necessary for the type of gas you use see table in Technical Data chapter 4 Assemble the parts follow the s...

Page 9: ...correct socket Always use a correctly installed shockproof socket Make sure that there is an access to the mains plug after the installation Do not pull the mains cable to disconnect the appliance Always pull the mains plug There is a risk of fire when the appliance is in connection with an extension cable an adapter or a multiple connection Make sure that the ground connection agrees with the sta...

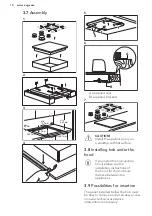
Page 10: ...p with flat surface 3 8 Installing hob under the hood If you install the hob under a hood please see the installation instructions of the hood for the minimum distance between the appliances 3 9 Possibilities for insertion The panel installed below the hob must be easy to remove and let an easy access in case a technical assistance intervention is necessary www aeg com 10 ...

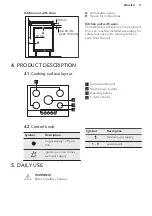
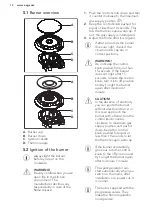
Page 11: ...for safety reasons and to let easy remove oven from the unit 4 PRODUCT DESCRIPTION 4 1 Cooking surface layout 1 4 3 2 1 Semi rapid burner 2 Multi Crown burner 3 Auxiliary burner 4 Control knobs 4 2 Control knob Symbol Description no gas supply off posi tion ignition position maxi mum gas supply Symbol Description minimum gas supply 1 9 power levels 5 DAILY USE WARNING Refer to Safety chapters ENGL...

Page 12: ... not keep the control knob pushed for more than 15 seconds If the burner does not light after 15 seconds release the control knob turn it into off position and try to light the burner again after minimum 1 minute CAUTION In the absence of electricity you can ignite the burner without electrical device in this case approach the burner with a flame turn the control knob counter clockwise to maximum ...

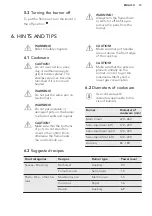
Page 13: ...d too close to the control knob otherwise the flame heats the control knob up CAUTION Make sure that pot handles are not above the front edge of the cooktop CAUTION Make sure that the pots are placed centrally on the burner in order to get the maximum stability and a lower gas consumption 6 2 Diameters of cookware Use cookware with diameters applicable to the size of burners Burner Diameter of coo...

Page 14: ...Caponata with vegeta bles Multi Crown 4 8 Frozen spinach with butter Rapid 1 4 Fried dishes French fries Multi Crown 5 9 Donuts Multi Crown 3 7 Snacks cooked with pan Roasting nuts Semi rapid 2 5 Croutons of bread Multi Crown 2 7 Pancakes Semi rapid 3 9 Desserts Caramel Auxiliary 1 5 Custard Auxiliary 1 5 Panna cotta Auxiliary 1 5 All recipes for approximately 4 portions The settings suggested in ...

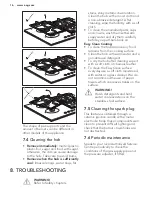
Page 15: ...he pan supports are not resistant to washing in a dishwasher They must be washed by hand 1 Remove the pan supports to easily clean the hob Be very careful when you replace the pan supports to prevent the hob top from damage 2 The enamel coating occasionally can have rough edges so be careful when you wash the pan supports by hand and dry them If necessary remove stubborn stains with a paste cleane...

Page 16: ...he cooking surface Clean the hob with warm water and a non abrasive detergent To dry the hob after cleaning wipe it with a soft cloth or chamois leather To clean the Easy Clean surface everyday use a soft cloth moistened with water or a glass cleaner We do not recommend the use of paper towels which can leave streaks on the surface WARNING Harsh detergents and hard water can leave stains on the st...

Page 17: ... after ignition Thermocouple is not heated up sufficiently After lightning the flame keep the knob pushed for equal or less than 10 sec onds The flame ring is uneven Burner crown is blocked with food residues Make sure that the injector is not blocked and the burner crown is clean 8 2 If you cannot find a solution If you cannot find a solution to the problem yourself contact your dealer or an Auth...

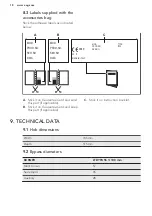
Page 18: ... IT MADE IN ITALY TYPE IP20 0049 A B C A Stick it on Guarantee Card and send this part if applicable B Stick it on Guarantee Card and keep this part if applicable C Stick it on instruction booklet 9 TECHNICAL DATA 9 1 Hob dimensions Width 745 mm Depth 515 mm 9 2 Bypass diameters BURNER Ø BYPASS 1 100 mm Multi Crown 57 Semi rapid 35 Auxiliary 28 www aeg com 18 ...

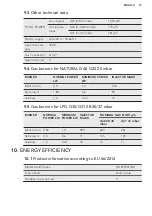
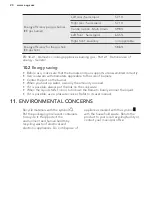
Page 19: ...kW MINIMUM POWER kW INJECTOR MARK Multi Crown 4 0 1 4 146 Semi rapid 1 85 0 6 92 Auxiliary 1 0 0 33 70 9 5 Gas burners for LPG G30 G31 28 30 37 mbar BURNER NORMAL POWER kW MINIMUM POWER kW INJECTOR MARK NOMINAL GAS FLOW g h G30 28 30 mbar G31 37 mbar Multi Crown 3 65 1 4 095 265 261 Semi rapid 2 0 0 6 71 145 143 Auxiliary 1 0 0 33 50 73 71 10 ENERGY EFFICIENCY 10 1 Product information according to...

Page 20: ...of burners Center the pot on the burner When you heat up water use only the amount you need If it is possible always put the lids on the cookware When the liquid starts to boil turn down the flame to barely simmer the liquid If it is possible use a pressure cooker Refer to its user manual 11 ENVIRONMENTAL CONCERNS Recycle materials with the symbol Put the packaging in relevant containers to recycl...

Page 21: ...caricare i nostri opuscoli eliminare eventuali anomalie ottenere informazioni sull assistenza www aeg com webselfservice Registrare il vostro prodotto e ricevere un servizio migliore www registeraeg com Acquistare accessori materiali di consumo e ricambi originali per la vostra apparecchiatura www aeg com shop SERVIZIO CLIENTI E MANUTENZIONE Consigliamo sempre l impiego di ricambi originali Quando...

Page 22: ...ecchiatura a meno che non vi sia una supervisione continua Tenere lontani dall apparecchiatura i bambini al di sotto dei 3 anni se non costantemente supervisionati Non consentire ai bambini di giocare con l apparecchiatura Tenere gli imballaggi lontano dai bambini e smaltirli in modo adeguato Tenere i bambini e gli animali domestici lontano dall apparecchiatura durante il funzionamento o raffredda...

Page 23: ...dovrebbero essere posti sulla superficie del piano di cottura in quanto possono diventare caldi Non usare l apparecchiatura prima di installarla nella struttura a incasso Non usare una pulitrice a vapore per pulire l apparecchiatura Se il cavo di alimentazione è danneggiato deve essere sostituito dal produttore da un tecnico autorizzato o da una persona qualificata per evitare situazioni di perico...

Page 24: ...allare l apparecchiatura accanto ad una porta o sotto una finestra per evitare che pentole calde cadano dall apparecchiatura quando la porta o la finestra sono aperte Se l apparecchiatura viene installata sopra dei cassetti assicurarsi che lo spazio tra la base dell apparecchiatura e il cassetto superiore sia sufficiente per il ricircolo d aria La base dell apparecchiatura può surriscaldarsi Si co...

Page 25: ...re con l installazione verificare che le condizioni di distribuzione locale pressione e tipo di gas e i valori preimpostati dell apparecchiatura siano compatibili Adottare le misure necessarie per garantire una corretta circolazione d aria intorno all apparecchiatura Le informazioni relative all alimentazione del gas si trovano sulla targhetta dei dati La presente apparecchiatura non è collegata a...

Page 26: ...ere ad un adeguata ventilazione nell ambiente in cui si trova l apparecchiatura Se si prevede un impiego prolungato e intenso dell apparecchiatura può essere necessaria un ulteriore fonte di aerazione per esempio l apertura di una finestra o un sistema più efficace come l aumento del livello di ventilazione meccanica ove presente L apparecchiatura è destinata solo alla cottura Non deve essere util...

Page 27: ...sibile in acciaio inossidabile conforme alle disposizioni vigenti Se si utilizzano tubi in metallo flessibili fare attenzione che non entrino in contatto con parti mobili o non siano schiacciati Ulteriore attenzione è richiesta qualora al piano di cottura fosse abbinato il forno Accertarsi che la pressione del gas di alimentazione dell apparecchiatura sia conforme ai valori consigliati Se la press...

Page 28: ...ll imballo fornito con l apparecchiatura Se la pressione del gas di alimentazione è variabile o differente da quella prevista montare un adattatore di pressione adeguato nel tubo di alimentazione del gas 3 4 Regolazione del livello minimo Per regolare il livello minimo dei bruciatori 1 Accendere il bruciatore 2 Ruotare la manopola sulla posizione minima 3 Rimuovere la manopola e la guarnizione AVV...

Page 29: ...ibile dopo l installazione Non tirare il cavo di alimentazione per scollegare l apparecchiatura Tirare sempre dalla spina Collegando l apparecchiatura a una prolunga adattatore o presa multipla esiste il rischio di incendio Accertarsi che il collegamento di messa a terra sia in linea con le disposizioni e le norme in vigore Il cavo di alimentazione non deve riscaldarsi ad una temperatura superiore...

Page 30: ...la il piano di cottura sotto a una cappa da cucina fare riferimento alle istruzioni per l installazione della cappa per la distanza minima tra le apparecchiature 3 9 Possibilità di inserimento Il pannello installato sotto il piano di cottura deve essere facilmente rimovibile e altrettanto facilmente deve consentire l accesso in caso di interventi dell assistenza tecnica Unità da cucina con porta m...

Page 31: ...la superficie di cottura 1 4 3 2 1 Bruciatore semirapido 2 Bruciatore multi corona 3 Bruciatore ausiliario 4 Manopole di regolazione 4 2 Manette de commande Simbolo Description alimentazione gas assen te posizione di spento posizione di accensione alimentazione massima del gas Simbolo Description alimentazione minima del gas 1 9 livelli di potenza 5 UTILIZZO QUOTIDIANO AVVERTENZA Fare riferimento ...

Page 32: ...Se il bruciatore non si accende dopo 15 secondi rilasciare la manopola di regolazione ruotarla in posizione di spento e attendere almeno 1 minuto prima di tentare di riaccendere il bruciatore ATTENZIONE In assenza di elettricità è possibile accendere il bruciatore senza utilizzare il dispositivo elettrico in tal caso sarà sufficiente avvicinarsi al bruciatore con una fiamma premere verso il basso ...

Page 33: ...nstabili o deformate per prevenire versamenti e lesioni ATTENZIONE Assicurarsi che i basamenti delle pentole non siano poggiati troppo vicini alla manopola di regolazione altrimenti la fiamma potrebbe surriscaldarla ATTENZIONE Assicurarsi che i manici delle pentole non si trovino al di sopra del bordo anteriore del piano di cottura ATTENZIONE Assicurarsi che le pentole siano ben centrate sul bruci...

Page 34: ...tto o arrosto di maiale Multi corona 4 9 Burger di manzo al gra tin Ausiliario 1 5 Pesce Seppia con piselli Multi corona 1 5 Filetto di tonno arrosto Rapido 5 8 Pasti a base di uova Omelette Multi corona 1 5 Verdure Funghi con condimenti Semi rapido 2 6 Caponata con verdure Multi corona 4 8 Spinaci surgelati con burro Rapido 1 4 Piatti fritti Patatine fritte Multi corona 5 9 Ciambelle Multi corona...

Page 35: ...rima di eseguire le operazioni di pulizia Usare prodotti detergenti progettati appositamente per pulire l acciaio inox e proteggere le superfici in acciaio Non usare prodotti detergenti contenenti agenti chimici corrosivi quali ad esempio cloruro non pulire la superficie con disinfettanti prodotti per la rimozione di macchie o ruggine e detergenti a immersione 7 2 Supporti pentole I supporti pento...

Page 36: ... potrebbe danneggiare i perni e causarne la rottura La forma dei supporti pentole e il numero di bruciatori possono variare in altri modelli dell apparecchiatura 7 4 Pulizia del piano di cottura Togliere immediatamente plastica sciolta pellicola in plastica zucchero e alimenti con zucchero in caso contrario la sporcizia potrebbe causare danni al piano cottura Attenzione a evitare le ustioni Quando...

Page 37: ... un elettrodo di metallo Tenere questi componenti ben puliti per evitare difficoltà di accensione e controllare che i fori spartifiamma non siano ostruiti 7 6 Manutenzione periodica Consultare periodicamente il Centro di Assistenza autorizzato locale per verificare le condizioni del tubo della fornitura di gas e del regolatore di pressione se presente 8 RISOLUZIONE DEI PROBLEMI AVVERTENZA Fare rif...

Page 38: ...ta dei dati Assicurarsi di aver acceso il piano di cottura correttamente In caso di azionamento errato dell apparecchiatura l intervento del tecnico del Centro di Assistenza o del rivenditore potrà essere effettuato a pagamento anche durante il periodo di garanzia Le istruzioni relative al Centro di Assistenza e alle condizioni di garanzia sono contenute nel libretto della garanzia 8 3 Etichette f...

Page 39: ...igina le G20 2H 20 mbar 10 55 kW Gas sostitu zione G30 3 28 30 mbar 774 g h G31 3 37 mbar 761 g h Alimentazione elettrica 220 240 V 50 60 Hz Categoria del l apparecchiatu ra II2H3 Collegamento gas G 1 2 Classe dell ap parecchiatura 3 9 4 Bruciatori a GAS NATURALE G20 a 20 mbar BRUCIATORE POTENZA NOR MALE kW POTENZA MINIMA kW SEGNO INIETTORE Multi corona 4 0 1 4 146 Semi rapido 1 85 0 6 92 Ausiliar...

Page 40: ...Anteriore sinistro Semirapido 60 5 Anteriore destro Ausiliario non applicabile Efficienza energetica per il piano di cottura a gas EE gas hob 58 6 EN 30 2 1 Gas combustibile per elettrodomestici di cottura Parte 2 1 Impiego razionale dell energia Informazioni generali 10 2 Risparmio energetico Prima dell uso assicurarsi che i bruciatori e i supporti pentole siano assemblati correttamente Usare pen...

Page 41: ...laggio Aiutare a proteggere l ambiente e la salute umana e a riciclare rifiuti derivanti da apparecchiature elettriche ed elettroniche Non smaltire le apparecchiature che riportano il simbolo insieme ai normali rifiuti domestici Portare il prodotto al punto di riciclaggio più vicino o contattare il comune di residenza ITALIANO 41 ...

Page 42: ...www aeg com 42 ...

Page 43: ...ITALIANO 43 ...

Page 44: ...www aeg com shop 867356160 B 272019 ...

Reviews: