background image

The appliance does

not drain the water.

• Make sure that the sink spigot is not clogged.

• Make sure that the drain hose has no kinks or bends.

• Make sure that the drain filter is not clogged. Clean the filter, if

necessary. Refer to "Care and cleaning".

• Make sure that the connection of the drain hose is correct.

• Set the drain programme if you set a programme without drain

phase.

• Set the drain programme if you set an option which ends with

water in the tub.

The appliance door is

open or not closed

correctly.

• Make sure that the door is properly closed.

Internal fail. No com‐

munication between

electronic elements of

the appliance.

• The programme was not finished properly or the appliance

stopped too early. Switch the appliance off and on again.

• If the alarm code appears again, contact the Authorised Serv‐

ice Centre.

The mains supply is

unstable.

• Wait until mains supply is stable.

If the display shows other alarm codes, deactivate and activate the

appliance. If the problem continues, contact the Authorised Service

Centre.

In case of different problem with the washing machine check the

table below for possible solutions.

Problem

Possible solution

The programme does

not start.

• Make sure that the mains plug is connected to the mains

socket.

• Make sure that the appliance door is closed.

• Make sure that there is no damaged fuse in the fuse box.

• Make sure that the Start/Pause has been touched.

• If the delay start is set, cancel the setting or wait for the end of

countdown.

• Deactivate the Child Lock function if it is on.

• Check the position of the knob on the selected programme.

The appliance fills with

water and drains im‐

mediately.

• Make sure that the drain hose is in the correct position. The

hose may be positioned too low. Refer to "Installation instruc‐

tion".

The spin phase does

not operate or the

washing cycle lasts

longer than usual.

• Set the spin programme.

• Make sure that the drain filter is not clogged. Clean the filter, if

necessary. Refer to "Care and cleaning".

• Adjust manually the items in the tub and start the spin phase

again. This problem may be caused by balance problems.

www.aeg.com

34

Summary of Contents for L6FBG142R

Page 1: ...USER MANUAL EN User Manual Washing Machine L6FBG142R ...

Page 2: ...eatures you might not find on ordinary appliances Please spend a few minutes reading to get the very best from it Visit our website to Get usage advice brochures trouble shooter service and repair information www aeg com support Register your product for better service www registeraeg com Buy Accessories Consumables and Original spare parts for your appliance www aeg com shop CUSTOMER CARE AND SER...

Page 3: ...nd the hazards involved Children between 3 and 8 years of age and persons with very extensive and complex disabilities shall be kept away from the appliance unless continuously supervised Children of less than 3 years of age should be kept away from the appliance unless continuously supervised Do not let children play with the appliance Keep all packaging away from children and dispose of it appro...

Page 4: ... the manufacturer its Authorised Service Centre or similarly qualified persons to avoid an electrical hazard Before any maintenance operation deactivate the appliance and disconnect the mains plug from the socket Do not use high pressure water sprays and or steam to clean the appliance Clean the appliance with a moist cloth Use only neutral detergents Do not use abrasive products abrasive cleaning...

Page 5: ...on Make sure that there is access to the mains plug after the installation Do not touch the mains cable or the mains plug with wet hands Do not pull the mains cable to disconnect the appliance Always pull the mains plug This appliance is fitted with a 13 A mains plug If it is necessary to change the mains plug fuse use only a 13 A ASTA BS 1362 fuse UK and Ireland only 2 3 Water connection Do not c...

Page 6: ...ted circuit boards electronic displays pressure switches thermostats and sensors software and firmware including reset software door door hinge and seals other seals door locking assembly plastic peripherals such as detergent dispensers Please note that some of these spare parts are only available to professional repairers and that not all spare parts are relevant for all models 2 7 Disposal WARNI...

Page 7: ...liance 8 Drain hose 9 Inlet hose connection 10 Mains cable 11 Transit bolts 12 Hose support 00000000 00A Mod xxxxxxxxx 000V 00Hz 0000 W 910000000 00 A B C Prod No D The rating plate reports the model name A product number B electrical ratings C and serial number D 4 TECHNICAL DATA Dimension Width Height Total depth 59 7 cm 84 7 cm 66 0 cm Electrical connection Voltage Overall power Fuse Frequency ...

Page 8: ...ur do mestic cold water storage system Make sure not to exceed a distance of 5 02 m 16 5 ft between the appliance inlet hose and the bottom of the water storage tank 2 Connect the water inlet hose to a water tap with a 3 4 thread 5 INSTALLATION WARNING Refer to Safety chapters 5 1 Unpacking 1 Open the door Remove all the items from the drum Accessories delivered with the appliance may vary dependi...

Page 9: ...ain hose This is due to the testing the appliance with water in factory 7 Remove the three transit bolts and pull out the plastic spacers We recommend that you keep the packaging and the transit bolts for any transport of the appliance 8 Put the plastic caps that you find in the user manual bag in the holes 5 2 Installation on suspended flooring Suspended wooden floors are particularly susceptible...

Page 10: ...cessories described in chapter Accessories Read carefully the instructions supplied with the appliance and with the accessory 5 4 The inlet hose 1 Connect the water inlet hose to the back of the appliance 2 Position it toward left or right depending on the position of the water tap 20º 20º 45º 45º Make sure that the inlet hose is not in vertical position 3 If necessary loose the ring nut to set it...

Page 11: ...water There may be a return of dirty water into the appliance 3 To a stand pipe with vent hole Insert the drain hose directly into a drain pipe Refer to the illustration The end of the drain hose must always be ventilated i e the inner diameter of the drain pipe min 38 mm min 1 5 must be larger than the external diameter of the drain hose 4 If the end of the drain hose looks like this see the pict...

Page 12: ...ical work required to install this appliance contact our Authorised Service Centre The manufacturer does not accept any responsibility for damage or injury through failure to comply with the above safety precaution 6 ACCESSORIES 6 1 Available in www aeg com shop or from authorised dealer Read carefully the instructions supplied with the accessory Only appropriate accessories approved by AEG ensure...

Page 13: ...tra Rinse option Only Rinse option 6 Start Pause touch button 7 Stains Prewash skipping touch button Stains option Prewash option 8 Anti Allergy touch button 9 Soft Plus touch button 10 Spin reduction touch button 11 Temp touch button 12 On Off push button 7 2 Display MIX Maximum load indicator The indicator flashes during the laundry load estimation Door locked indicator ENGLISH 13 ...

Page 14: ...r Temperature indicator The indicator appears when a cold wash is set Spin speed indicator No spin speed indicator Spin phase is off Rinse hold indicator Extra silent indicator Time saving indicator 8 DIAL AND BUTTONS 8 1 On Off Pressing this button for a few seconds allows to activate or deactivate the appliance Two different tunes sound while switching the appliance on or off As the Stand by fun...

Page 15: ...to reduce creasing You must drain the water to unlock the door If you touch the Start Pause button the appliance performs the spinning phase and drains the water The appliance empties the water out automatically after 18 hours approximately Activate the Extra Silent option The intermediate and the final spinning phases are suppressed and the programme ends with water in the drum This helps to redu...

Page 16: ...ature maintained above 60 C for several minutes This helps in removing germs bacteria micro organism and particles The addition of vapour together with an additional rinsing phase ensures a proper removal of detergent residues and pollens allergenic items making it suitable for delicate and sensitive skins 8 8 Time Save With this option you can decrease the programme duration If your laundry is no...

Page 17: ... not use fabric softener and make sure that there is no softener residue in the detergent dispenser Outdoor clothing technical sport fabrics waterproof and breathable jackets shell jackets with a removable fleece or inner insulation The recommended laundry load is 2 kg This programme can also be used as water repellent restoring cycle specifically tailored for treating clothes with a hydropho bic ...

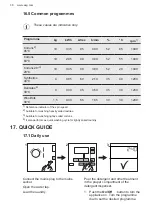
Page 18: ...iance adds some rinses Programme temperature maximum spin speed and maximum load Programme Default tempera ture Temperature range Reference spin speed Spin speed range Maximum load Washing programmes Eco 40 60 40 C 1 60 C 30 C2 1400 rpm 1400 rpm 400 rpm 10 kg Cottons 40 C 95 C Cold 1400 rpm 1400 rpm 400 rpm 10 kg Synthetics 40 C 60 C Cold 1200 rpm 1200 rpm 400 rpm 4 kg Delicates 30 C 40 C Cold 120...

Page 19: ...y Label consumption values According to EU regulation 1061 2010 this programme at 60 C is the Standard 60 C cotton programme and at 30 C is the Standard 40 C cotton programme They are the most efficient programmes in terms of combined ener gy and water consumption for washing normally soiled cotton laundry The water temperature of the washing phase may differ from the temperature declared for the ...

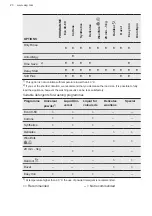
Page 20: ...commend that you decrease the load size It is possible to fully load the appliance however the washing results can be less satisfactory Suitable detergents for washing programmes Programme Universal powder1 Liquid Uni versal Liquid for coloureds Delicates woollens Special Eco 40 60 Cottons Synthetics Delicates Wool Silk 20 min 3kg Outdoor Duvet Easy Iron 1 At temperature higher than 60 C the use o...

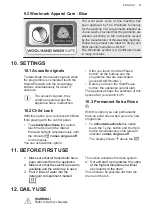
Page 21: ... the indicator comes on goes off on the display You can activate this option After you touch the Start Pause button all the buttons and the programme dial are deactivated except On Off button Before you touch the Start Pause button the appliance cannot start The appliance keeps the selection of this option after you switch it off 10 3 Permanent Extra Rinse With this option you can permanently have...

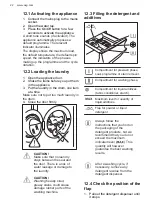
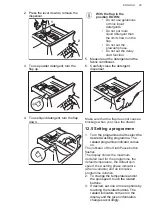
Page 22: ... that no laundry stays between the seal and the door There is a risk of water leakage or damage to the laundry CAUTION Washing heavily oiled greasy stains could cause damage rubber parts of the washing machine 12 3 Filling the detergent and additives Compartment for prewash phase soak programme or stain remover Compartment for washing phase Compartment for liquid additives fabric conditioner starc...

Page 23: ...lap does not cause a blockage when you close the drawer 12 5 Setting a programme 1 Turn the programme dial to select the desired washing programme The related programme indicator comes on The indicator of the Start Pause button flashes The display shows the maximum declared load for the programme the default temperature the default spin speed the washing phase indicators when available and an indi...

Page 24: ...down 12 7 Starting a programme Touch the Start Pause button to start the programme The related indicator stops flashing and stays on The programme starts the door is locked The display shows the indicator The drain pump can operate shortly before the appliance fills water 12 8 The ProSense load detection After touching the Start Pause button 1 The indicator flashes 2 The ProSense starts the laundr...

Page 25: ...gh and or the drum still rotates you cannot open the door 1 Touch the Start Pause button In the display the related door lock indicator goes off 2 Open the appliance door If necessary add or remove the items 3 Close the door and touch the Start Pause button The programme or the delay start continues 4 The door can be opened when the programme is complete or set spinning or draining programme optio...

Page 26: ...Stand by function automatically deactivates the appliance to decrease the energy consumption when You do not use the appliance for 5 minutes before you touch the Start Pause button Press the button On Off to activate the appliance again After 5 minutes from the end of the washing programme Press the On Off button to activate the appliance again The display shows the end of the last set programme T...

Page 27: ... excluding delicate Prefer powder detergents containing bleach for whites and laundry sanitization liquid detergents preferably for low temperature wash programmes 60 C max for all types of fabric or special ones for woollens only The choice and quantity of detergent will depend on type of fabric delicates woollens cottons etc the colour of clothes size of the load degree of soiling wash temperatu...

Page 28: ...each cycle keep the door and the detergent dispenser slightly ajar to get air circulation and dry the humidity inside the appliance this will prevent mildew and odours If the appliance is not used for a long time close the water tap and unplug the appliance Indicative periodic cleaning schedule Descaling Twice a year Maintenance wash Once a month Clean door seal Every two months Clean drum Every t...

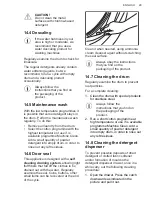
Page 29: ...eaning draining system allowing light fluff fibers that fall off the clothes to be drained out with the water Regularly examine the seal Coins buttons other small items can be recovered at the end of the cycle Clean it when needed using ammonia cream cleanser agent without scratching the seal surface Always obey the instructions that you find on the packaging of the product 14 7 Cleaning the drum ...

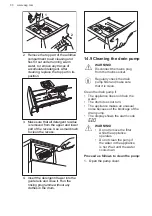
Page 30: ...g programme without any clothes in the drum 14 9 Cleaning the drain pump WARNING Disconnect the mains plug from the mains socket Regularly check the drain pump filter and make sure that it is clean Clean the drain pump if The appliance does not drain the water The drum does not turn The appliance makes an unusual noise because of the blockage of the drain pump The display shows the alarm code WARN...

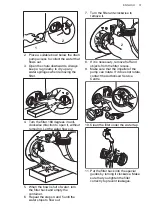
Page 31: ...f water turn the filter back and empty the container 6 Repeat the steps 4 and 5 until the water stops to flow out 7 Turn the filter anti clockwise to remove it 1 2 8 If it is necessary remove fluff and objects from the filter recess 9 Make sure that the impeller of the pump can rotate If it does not rotate contact the Authorised Service Centre 10 Clean the filter under the water tap 11 Put the fil...

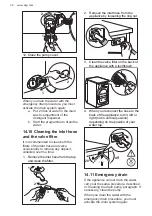
Page 32: ...Remove the inlet hose from the tap and clean the filter 1 2 3 2 Remove the inlet hose from the appliance by loosening the ring nut 3 Clean the valve filter on the back of the appliance with a toothbrush 4 When you reconnect the hose to the back of the appliance turn it left or right not in vertical position depending on the position of your water tap 45 20 14 11 Emergency drain If the appliance ca...

Page 33: ... damages caused by low temperatures 15 TROUBLESHOOTING WARNING Refer to Safety chapters 15 1 Alarm Codes and Possible failures The appliance does not start or it stops during operation First try to find a solution to the problem refer to the tables WARNING Deactivate the appliance before carrying out any check With some problems the display shows an alarm code and the Start Pause button may flash ...

Page 34: ...pliance If the problem continues contact the Authorised Service Centre In case of different problem with the washing machine check the table below for possible solutions Problem Possible solution The programme does not start Make sure that the mains plug is connected to the mains socket Make sure that the appliance door is closed Make sure that there is no damaged fuse in the fuse box Make sure th...

Page 35: ... The load may be too small The programme dura tion increases or de creases during pro gramme execution The ProSense System is able to adjust the programme dura tion according to the type and the laundry load size Refer to The ProSense System load detection in Daily Use chapter The washing results are not satisfactory Increase the detergent quantity or use a different detergent Use special products...

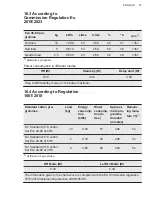
Page 36: ...reference together with the user manual and all other documents provided with this appliance It is also possible to find the same information in EPREL using the link https eprel ec europa eu and the model name and product number that you find on the rating plate of the appliance Refer to Product description chapter for the position of the rating plate 16 2 Legend kg Laundry load h mm Programme dur...

Page 37: ...ding to Regulation 1061 2010 Standard cotton pro grammes Load kg Energy consump tion kWh Water consump tion li tres Approxi mate pro gramme duration minutes Remain ing mois ture 1 For Standard 60 C cotton Set Eco 40 60 at 60 C 10 0 93 57 246 52 For Standard 60 C cotton Set Eco 40 60 at 60 C 5 0 70 45 206 52 For Standard 40 C cotton Set Eco 40 60 at 30 C 5 0 65 46 203 52 1 At the end of spin phase ...

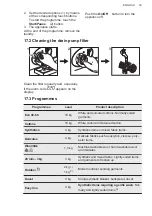
Page 38: ...30 1200 1 Reference indicator of the spin speed 2 Suitable for washing heavily soiled textiles 3 Suitable for washing lightly soiled cottons 4 It also performs as quick washing cycle for lightly soiled laundry 17 QUICK GUIDE 17 1 Daily use 1 2 1 2 3 Connect the mains plug to the mains socket Open the water tap Load the laundry Pour the detergent and other treatment in the proper compartment of the...

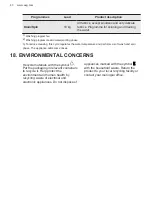
Page 39: ...ription Eco 40 60 10 kg White and coloured cottons Normally soiled garments Cottons 10 kg White cotton and coloured cotton Synthetics 4 kg Synthetic items or mixed fabric items Delicates 4 kg Delicate fabrics such as acrylics viscose poly ester items Wool Silk 1 5 kg Machine washable wool hand washable wool and delicates 20 min 3kg 3 kg Synthetic and mixed fabric Lightly soiled items and garments ...

Page 40: ...erature and performs a soft wash and spin phase The appliance adds some rinses 18 ENVIRONMENTAL CONCERNS Recycle materials with the symbol Put the packaging in relevant containers to recycle it Help protect the environment and human health by recycling waste of electrical and electronic appliances Do not dispose of appliances marked with the symbol with the household waste Return the product to yo...

Page 41: ......

Page 42: ......

Page 43: ......

Page 44: ...www aeg com shop 192947683 A 192020 ...

Reviews: