background image

• Pre-treat tough stains.

• Wash heavy soil stains with a special

detergent.

• Be careful with curtains. Remove the

hooks and put the curtains in a

washing bag or pillowcase.

• Do not wash laundry without hems or

with cuts. Use a washing bag to wash

small and/or delicate items (e.g.

underwired bras, belts, tights, etc. ).

• A very small load can cause balance

problems with the spin phase leading

to excessive vibration. If this occurs:

a.

interrupt the programme and

open the door (refer to

"Opening the door when a

programme or the delay start

operates");

b.

manually redistribute the load so

that the items are spaced evenly

around the tub;

c.

press the Inicio/Pausa button.

The spin phase continues.

11.2 

Stubborn stains

For some stains, water and detergent is

not sufficient.
We recommend that you pre-treat these

stains before you put the items in the

appliance.
Special stain removers are available. Use

the special stain remover that is

applicable to the type of stain and fabric.

11.3 

Detergents and other

treatments

• Only use detergents and other

treatments specially made for

washing machines:

– powder detergents for all types of

fabric,

– powder detergents for delicate

fabrics (40 °C max) and woollens,

– liquid detergents, preferably for

low temperature wash

programmes (60 °C max) for all

types of fabric, or special ones for

woollens only.

• Do not mix different types of

detergents.

• To help the environment, do not use

more than the recommended quantity

of detergent.

• Follow the instructions that you find

on packaging of the detergents or

other treatments without exceeding
the indicated maximum level (

).

• Use the recommended detergents for

the type and colour of the fabric, the

programme temperature and the

level of soil.

11.4 

Ecological hints

• Set a programme without the

prewash phase to wash laundry with

normal soil.

• Always start a washing programme

with the maximum load of laundry

allowed.

• If you pre-treat the stains, you can use

a stain remover when you set a

programme with a low temperature.

• To use the correct quantity of

detergent, check the water hardness

of your domestic system. Refer to

"Water hardness".

11.5 

Water hardness

If the water hardness in your area is high

or moderate, we recommend that you

additive for water softening. In areas

where the water hardness is soft it is not

necessary to use him.
To find out the water hardness in your

area, contact your local water authority.
Use the correct quantity of additive for

water softening. Follow the instructions

that you find on the packaging of the

product.

12. 

CARE AND CLEANING

WARNING!

Refer to Safety chapters.
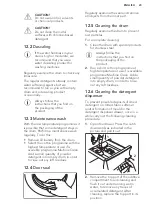
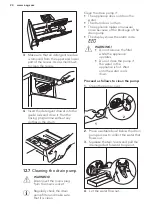
12.1 

External cleaning

Clean the appliance with mild soap and

warm water only. Fully dry all the

surfaces.

www.aeg.com

22

Summary of Contents for L6FBI821U

Page 1: ...USER MANUAL EN User Manual Washing Machine L6FBI821U ...

Page 2: ...s you might not find on ordinary appliances Please spend a few minutes reading to get the very best from it Visit our website for Get usage advice brochures trouble shooter service information www aeg com webselfservice Register your product for better service www registeraeg com Buy Accessories Consumables and Original spare parts for your appliance www aeg com shop CUSTOMER CARE AND SERVICE Alwa...

Page 3: ...afe way and understand the hazards involved Do not let children play with the appliance Children aged 3 years and under must be kept away from this appliance when it is in operation at all times Keep all packaging away from children and dispose of it appropriately Keep detergents away from children Keep children and pets away from the appliance when the door is open If the appliance has a child sa...

Page 4: ...more details in chapter Accessories Stacking kit 2 SAFETY INSTRUCTIONS 2 1 Installation Remove all the packaging and the transit bolts Keep the transit bolts in a safe place If the appliance is to be moved in future they must be reattached to lock the drum to prevent internal damage Always take care when moving the appliance as it is heavy Always use safety gloves and enclosed footwear Do not inst...

Page 5: ...water leaks during and after the first use of the appliance 2 4 Use WARNING Risk of injury electrical shock fire burns or damage to the appliance This appliance is for household use only Follow the safety instructions on the detergent packaging Do not put flammable products or items that are wet with flammable products in near or on the appliance Make sure that all metal objects are removed from t...

Page 6: ...d the polystyrene packaging materials 4 Open the door and remove the polystyrene piece from the door seal and all the items from the drum 5 Carefully put down the appliance with the rear side on it 6 Put the front polystyrene packaging element on the floor under the appliance Make sure not to damage the hoses 7 Remove the polystyrene protection from the bottom 1 2 8 Pull up the appliance in vertic...

Page 7: ...ser manual bag in the holes We recommend that you keep the packaging and the transit bolts for any movement of the appliance 3 2 Positioning and levelling 1 Install the appliance on a flat hard floor Make sure that carpets do not stop the air circulation below the appliance Make sure that the appliance does not touch the wall or other units 2 Loosen or tighten the feet to adjust the level WARNING ...

Page 8: ... water inlet hose to the cold water tap with 3 4 thread CAUTION Make sure that there are no leaks from the couplings Do not use an extension hose if the inlet hose is too short Contact the service centre for the replacement of the inlet hose 3 4 Water drainage The drain hose should stay at a height of not less than 60 cm and not more than 100 cm It is possible to connect the drain hose in differen...

Page 9: ...f the drain hose 4 If the end of the drain hose looks like this see the picture you can push it directly into the stand pipe 5 Without the plastic hose guide Put the drain hose in the spigot and tighten it with a clip Refer to the illustration Make sure that the drain hose makes a loop to prevent particles going into the appliance from the sink 6 Position the hose directly to a built in drain pipe...

Page 10: ...9 5 6 7 4 10 8 11 12 1 Worktop 2 Detergent dispenser 3 Control panel 4 Door handle 5 Rating plate 6 Drain pump filter 7 Feet for levelling the appliance 8 Drain hose 9 Inlet hose connection 10 Mains cable 11 Transit bolts 12 Hose support www aeg com 10 ...

Page 11: ...o Pausa 2 3 9 8 6 1 4 5 7 1 Programme dial 2 Display 3 Inicio Diferido touch button 4 Extra Rápido touch button 5 Inicio Pausa touch button 6 Opc touch button Manchas option Pre lav option Aclarado Enxag option 7 Spin Centrif reduction touch button No Spin option Rinse Hold option 8 Temp touch button 9 On Off push button 5 2 Display A B E D C ENGLISH 11 ...

Page 12: ...y between options functions and washing programmes in the Programme Chart An option function can exclude another one in this case the appliance doesn t allow you to set the incompatible options functions together 6 3 Temp When you select a washing programme the appliance automatically proposes a default temperature Set this option to change the default temperature The indicator cold water of the s...

Page 13: ...ed laundry especially if containing sand dust mud and other solid particles This option can increase the programme duration Aclarado Enxag The appliance performs only the rinsing phase the spinning and the draining phases of the selected programme The relevant indicator comes on 6 6 Inicio Diferido With this option you can delay the start of a programme in a more convenient time Touch repeatedly t...

Page 14: ...grammes in terms of combined ener gy and water consumption for washing normally soiled cotton laundry The water temperature of the washing phase may differ from the temperature declared for the selected programme Sintéticos Synthetic items or mixed fabric items Normal soil Delicados Delicate fabrics such as acrylics viscose polyester items Normal soil Lana Lãs Seda Machine washable wool hand washa...

Page 15: ...aximum load Programme Default tempera ture Temperature range Maximum spin speed Spin speed range Maximum load Washing programmes Algod 40 C 95 C Cold 1200 rpm 1200 rpm 800 rpm 8 kg Algod Eco 60 C 60 C 40 C 1200 rpm 1200 rpm 800 rpm 8 kg Sintéticos 40 C 60 C Cold 1200 rpm 1200 rpm 800 rpm 3 kg Delicados 40 C 40 C Cold 1200 rpm 1200 rpm 800 rpm 3 kg Lana Lãs Seda 40 C 40 C Cold 1200 rpm 1200 rpm 800...

Page 16: ...possible to fully load the appliance however the washing results can be less satisfactory 3 With these programmes you can set only the shorter duration 7 2 Woolmark Apparel Care Blue The wool wash cycle of this machine has been approved by The Woolmark Company for the washing of wool garments labelled as hand wash provided that the garments are washed according to the instructions issued by the ma...

Page 17: ...manently have an extra rinse when you set a new programme To activate deactivate this option touch the Temp button and the Centrif button simultaneously until relevant indicator comes on goes off on display 9 BEFORE FIRST USE 1 Make sure that all transit bolts have been removed from the appliance 2 Make sure that the electrical power is available and the water tap is open 3 Pour a small quantity o...

Page 18: ...uid additives Flap for powder or liquid detergent Always follow the instructions that you find on the packaging of the detergent products but we recommend that you do not exceed the maximum indicated level This quantity will however guarantee the best washing results After a washing cycle if necessary remove any detergent residue from the detergent dispenser 10 4 Check the position of the flap 1 P...

Page 19: ...on in the display and the given information changes accordingly In case a selection is not possible no indicator comes on and an acoustic signal sounds 10 6 Starting a programme with the delay start Touch the Inicio Pausa button The appliance starts the countdown of the delay start When the countdown is completed the programme starts The PROSENSE adapts starts at the end of the countdown Cancellin...

Page 20: ...y 3 Touch the button Inicio Pausa again The washing programme continues 10 10 Cancelling a running programme 1 Press the button On Off to cancel the programme and to deactivate the appliance 2 Press the button On Off again to activate the appliance Now you can set a new washing programme If the ProSense phase is already carried out and the water filling is already started the new programme starts ...

Page 21: ... the On Off button a few seconds to deactivate the appliance In any case the appliance empties the water out automatically after approximately 18 hours 10 14 Stand by option The Stand by function automatically deactivates the appliance to decrease the energy consumption when You do not use the appliance for 5 minutes before you touch the Inicio Pausa button Press the button On Off to activate the ...

Page 22: ... programmes 60 C max for all types of fabric or special ones for woollens only Do not mix different types of detergents To help the environment do not use more than the recommended quantity of detergent Follow the instructions that you find on packaging of the detergents or other treatments without exceeding the indicated maximum level Use the recommended detergents for the type and colour of the ...

Page 23: ... in order to rinse out any left residues 12 4 Door seal Regularly examine the seal and remove all objects from the inner part 12 5 Cleaning the drum Regularly examine the drum to prevent rust particles For a complete cleaning 1 Clean the drum with special products for stainless steel Always follow the instructions that you find on the packaging of the product 2 Run a short cotton programme at high...

Page 24: ...n the drain pump if The appliance does not drain the water The drum does not turn The appliance makes an unusual noise because of the blockage of the drain pump The display shows the alarm code WARNING Do not remove the filter while the appliance operates Do not clean the pump if the water in the appliance is hot Wait until the water cools down Proceed as follows to clean the pump 1 Open the pump ...

Page 25: ... remove it 1 2 8 If it is necessary remove fluff and objects from the filter recess 9 Make sure that the impeller of the pump can rotate If it does not rotate contact the Authorised Service Centre 10 Clean the filter under the water tap 11 Put the filter back into the special guides by turning it clockwise Make sure that you tighten the filter correctly to prevent leakages 1 2 12 Close the pump ac...

Page 26: ...drain the water carry out the same procedure described in Cleaning the drain filter paragraph If necessary clean the pump 12 10 Frost precautions If the appliance is installed in an area where the temperature can reach the values around 0 C or drop below remove the remaining water from the inlet hose and the drain pump 1 Disconnect the mains plug from the mains socket 2 Close the water tap 3 Put t...

Page 27: ...ems from the drum and or keep pressed the door while touching the Inicio Pausa button until the indicator stops flashing see the picture below The mains supply is unstable Wait until the mains supply is stable No communication between electronic elements of the appliance Switch it off and switch on again WARNING Deactivate the appliance before carrying out any check 13 2 Possible failures Problem ...

Page 28: ...rain phase Set the drain programme if you set an option which ends with water in the tub The spin phase does not operate or the washing cycle lasts longer than usual Set the spin programme Make sure that the drain filter is not clogged Clean the fil ter if necessary Refer to Care and cleaning Adjust manually the items in the tub and start the spin phase again This problem may be caused by balance ...

Page 29: ... foam in the drum during the washing cycle Reduce the quantity of detergent After the washing cycle there are some deter gent residues in the dis penser drawer Make sure that the flap is in the correct position UP for powder detergent DOWN for liquid detergent Make sure you have used the detergent dispenser accord ing the indications given in this user manual After the check activate the appliance...

Page 30: ...e Off Mode W Left On Mode W 0 48 0 48 The information given in the chart above is compliant with the EU Commission regulation 1015 2010 implementing directive 2009 125 EC 15 TECHNICAL DATA Dimension Width Height Depth Total depth 600 mm 850 mm 571 mm 600 mm Electrical connection Voltage Overall power Fuse Frequency 230 V 2200 W 10 A 50 Hz Level of protection against ingress of solid particles and ...

Page 31: ...he top of the washing machine only by using the correct stacking kit manufactured and approved by AEG Verify the compatible stacking kit by checking the depth of your appliances The stacking kit can be used only with the appliances specified in the leaflet provided with the accessory Read carefully the instructions supplied with the appliance and with the accessory WARNING Do not put the tumble dr...

Page 32: ...your local recycling facility or contact your municipal office www aeg com 32 ...

Page 33: ...ENGLISH 33 ...

Page 34: ...www aeg com 34 ...

Page 35: ...ENGLISH 35 ...

Page 36: ...www aeg com shop 192949541 A 032017 ...

Reviews: