background image

indicator   

comes on/goes off

 on

the display.

You can activate this option:
• After you touch the Start/Pause

button: all the buttons and the

programme dial are deactivated

(except On/Off button ).

• Before you touch the Start/Pause

button: the appliance cannot start.

The appliance keeps the selection of this

option after you switch it off.

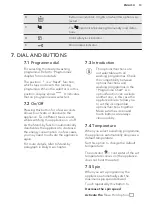
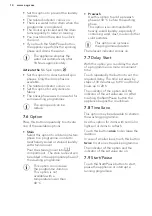
9.2 

Acoustic signals

The acoustic signals operate when the

programme is completed (sequence of

sounds for about 2 minutes).
To 

deactivate/activate

 the acoustic

signals, touch the Delay Start and the

Time Save buttons simultaneously for

about 6 seconds.

If you deactivate the

acoustic signals, they

continue operate when the

appliance has a malfunction.

9.3 

Permanent Extra Rinse 

With this option you can permanently

have an extra rinse when you set a new

programme.
• To 

activate/deactivate

 this option

touch the Temp. button and the Spin

button simultaneously until relevant
indicator   

comes on/goes off

 on

display.

10. 

BEFORE FIRST USE

1.

Make sure that all transit bolts have

been removed from the appliance.

2.

Make sure that the electrical power is

available and the water tap is open.

3.

Pour a small quantity of detergent

into the compartment marked 

.

4.

Set and start a programme for cotton

at the highest temperature without

any laundry in the drum.

This removes all possible dirt from the

drum and the tub.

11. 

DAILY USE

WARNING!

Refer to Safety chapters.

11.1 

Activating the appliance

1.

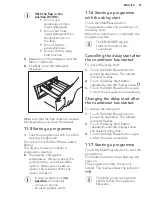
Connect the mains plug to the mains

socket.

2.

Open the water tap.

3.

Press the On/Off   button for a few

seconds to activate the appliance.

A short tune sounds.

11.2 

Loading the laundry

1.

Open the appliance door.

2.

Shake the items before you put them

in the appliance.

3.

Put the laundry in the drum, one item

at a time.

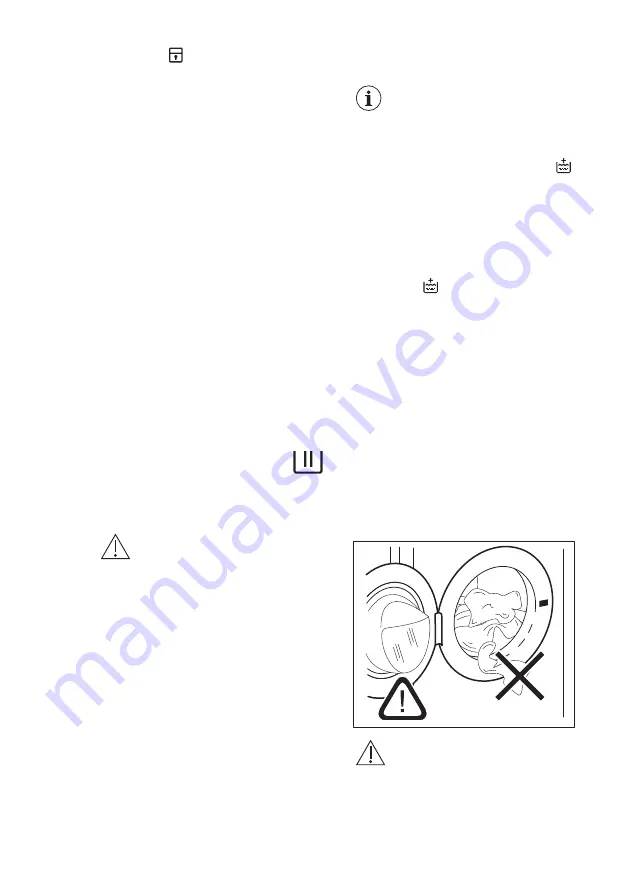
Make sure not to put too much laundry

in the drum.

4.

Close the door firmly.

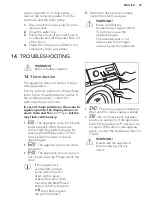
CAUTION!

Make sure that no laundry

stays between the seal and

the door. There is a risk of

water leakage or damage to

the laundry.

ENGLISH

19

Summary of Contents for L6FBK841N

Page 1: ...USER MANUAL EN User Manual Washing Machine L6FBK841N ...

Page 2: ...hnologies that help make life simpler features you might not find on ordinary appliances Please spend a few minutes reading to get the very best from it Visit our website for Get usage advice brochures trouble shooter service information www aeg com webselfservice Register your product for better service www registeraeg com Buy Accessories Consumables and Original spare parts for your appliance ww...

Page 3: ... involved Children between 3 and 8 years of age and persons with very extensive and complex disabilities shall be kept away unless continuously supervised Children of less than 3 years of age should be kept away unless continuously supervised Do not let children play with the appliance Keep all packaging away from children and dispose of it appropriately Keep detergents away from children Keep chi...

Page 4: ...e any maintenance operation deactivate the appliance and disconnect the mains plug from the socket Do not use high pressure water sprays and or steam to clean the appliance Clean the appliance with a moist cloth Use only neutral detergents Do not use abrasive products abrasive cleaning pads solvents or metal objects 2 SAFETY INSTRUCTIONS 2 1 Installation The installation must comply with relevant ...

Page 5: ...he mains cable to disconnect the appliance Always pull the mains plug UK and Ireland only This appliance is fitted with a 13 A mains plug If it is necessary to change the mains plug fuse use only a 13 A ASTA BS 1362 fuse This appliance complies with the E E C Directives 2 3 Water connection Do not cause damage to the water hoses Before connection to new pipes pipes not used for a long time where r...

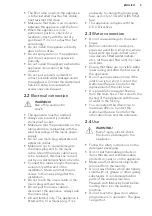
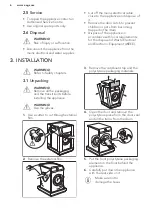
Page 6: ...disposal of Waste Electrical and Electronic Equipment WEEE 3 INSTALLATION WARNING Refer to Safety chapters 3 1 Unpacking WARNING Remove all the packaging and the transit bolts before installing the appliance WARNING Use the gloves 1 Use a cutter to cut through external film 2 Remove the external film 3 Remove the cardboard top and the polystyrene packaging materials 4 Open the door and remove the ...

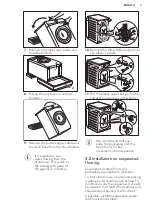
Page 7: ...acers 11 Put the plastic caps that you find in the user manual bag in the holes We recommend that you keep the packaging and the transit bolts for any movement of the appliance 3 2 Installation on suspended flooring Suspended wooden floors are particularly susceptible to vibration To limit vibration we recommend placing a waterproof wooden panel at least 15 mm thick under the appliance It should b...

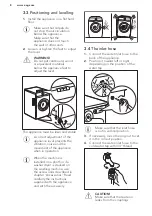
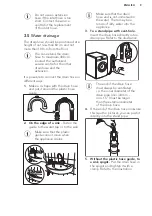
Page 8: ...e appliance when in operation When the machine is installed on a plinth or if a washer dryer is stacked on the washing machine use the accessories described in chapter Accessories Read carefully the instructions supplied with the appliance and with the accessory 3 4 The inlet hose 1 Connect the water inlet hose to the back of the appliance 2 Position it toward left or right depending on the positi...

Page 9: ...ide to the water tap or to the wall Make sure that the plastic guide cannot move when the appliance drains Make sure that the drain hose end is not immersed in the water There may be a return of dirty water into the appliance 3 To a stand pipe with vent hole Insert the drain hose directly into a drain pipe Refer to the illustration The end of the drain hose must always be ventilated i e the inner ...

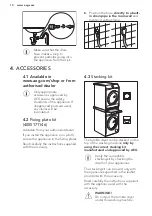
Page 10: ... from your authorised dealer If you install the appliance on a plinth secure the appliance in the fixing plates Read carefully the instructions supplied with the accessory 4 3 Stacking kit The tumble dryer can be stacked on the top of the washing machine only by using the correct stacking kit manufactured and approved by AEG Verify the compatible stacking kit by checking the depth of your applianc...

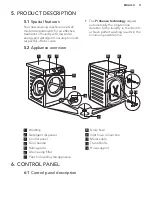
Page 11: ...tomatically the programme duration to the laundry in the drum to achieve perfect washing results in the minimum possible time 5 2 Appliance overview 1 2 3 9 5 6 7 4 10 8 11 12 1 Worktop 2 Detergent dispenser 3 Control panel 4 Door handle 5 Rating plate 6 Drain pump filter 7 Feet for levelling the appliance 8 Drain hose 9 Inlet hose connection 10 Mains cable 11 Transit bolts 12 Hose support 6 CONTR...

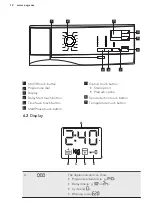
Page 12: ...n 5 Time Save touch button 6 Start Pause touch button 7 Option touch button Stain option Prewash option 8 Spin reduction touch button 9 Temperature touch button 6 2 Display A B E D C A The digital indicator can show Programme duration e g Delay time e g or Cycle end Warning code www aeg com 12 ...

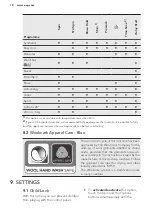
Page 13: ...cases you may need to activate the appliance again For more details refer to Stand by paragraph in Daily Use chapter 7 3 Introduction The options functions are not selectable with all washing programmes Check the compatibility between options functions and washing programmes in the Programme Chart An option function can exclude another one in this case the appliance doesn t allow you to set the in...

Page 14: ...gramme This option can increase the programme duration This option is not available with a temperature lower than 40 C Prewash Use this option to add a prewash phase at 30 C before the washing phase This option is recommended for heavily soiled laundry especially if containing sand dust mud and other solid particles This option can increase the programme duration The relevant indicator comes on 7 ...

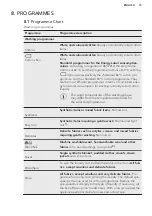
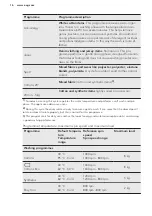
Page 15: ...d for the selected programme Synthetics Synthetic items or mixed fabric items Normal soil Easy Iron Synthetic items requiring a gentle wash Normal and light soil 1 Delicates Delicate fabrics such as acrylics viscose and mixed fabrics requiring gentler washing Normal soil Wool Silk Machine washable wool hand washable wool and other fabrics with hand washing care symbol2 Duvet Single synthetic blank...

Page 16: ...c cotton and synthetic items 3 20 min 3kg Cotton and synthetic items lightly soiled or once worn 1 To reduce creasing this cycle regulates the water temperature and performs a soft wash and spin phase The appliance adds some rinses 2 During this cycle the drum rotates slowly to ensure a gentle wash It can seem that the drum doesn t rotate or doesn t rotate properly but this is normal for this prog...

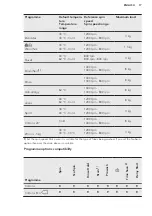
Page 17: ... Anti allergy 60 C 1400 rpm 1400 rpm 800 rpm 8 kg Jeans 40 C 60 C Cold 1200 rpm 1200 rpm 800 rpm 8 kg Sport 30 C 40 C Cold 1200 rpm 1200 rpm 800 rpm 3 kg Cottons 20 Cold 1400 rpm 1400 rpm 800 rpm 8 kg 20 min 3kg 30 C 40 C 30 C 1200 rpm 1200 rpm 800 rpm 3 kg 1 Set the spin speed Make sure it is suitable for the type of fabric being washed If you set the No Spin option then only the drain phase is a...

Page 18: ...lmark Apparel Care Blue The wool wash cycle of this machine has been approved by The Woolmark Company for the washing of wool garments labelled as hand wash provided that the garments are wash ed according to the instructions issued by the manufacturer of this washing machine Follow the garment care label for drying and other laundry instructions M1511 The Woolmark symbol is a Certification mark i...

Page 19: ...on simultaneously until relevant indicator comes on goes off on display 10 BEFORE FIRST USE 1 Make sure that all transit bolts have been removed from the appliance 2 Make sure that the electrical power is available and the water tap is open 3 Pour a small quantity of detergent into the compartment marked 4 Set and start a programme for cotton at the highest temperature without any laundry in the d...

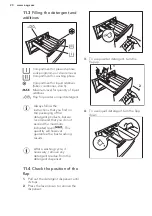
Page 20: ...ou find on the packaging of the detergent products but we recommend that you do not exceed the maximum indicated level This quantity will however guarantee the best washing results After a washing cycle if necessary remove any detergent residue from the detergent dispenser 11 4 Check the position of the flap 1 Pull out the detergent dispenser until it stops 2 Press the lever down to remove the dis...

Page 21: ...rt Pause button The appliance starts the countdown of the delay start When the countdown is completed the programme starts The PROSENSE adapts starts at the end of the countdown Cancelling the delay start after the countdown has started To cancel the delay start 1 Touch the Start Pause button to pause the appliance The related indicator flashes 2 Touch the Delay Start button repeatedly until the d...

Page 22: ...to activate the appliance Now you can set a new washing programme If the ProSense phase is already carried out and the water filling is already started the new programme starts without repeating the ProSense phase The water and the detergent are not drained out in order to avoid waste There is also an alternative way of cancelling 1 Rotate the selector knob to the Reset position 2 Wait for 1 secon...

Page 23: ...ce 2 Press Start Pause to continue the cycle 3 When the programme is completed and the door locked indicator goes off you can open the door 4 Press the On Off button a few seconds to deactivate the appliance In any case the appliance empties the water out automatically after approximately 18 hours 11 14 Stand by option The Stand by function automatically deactivates the appliance to decrease the e...

Page 24: ... types of fabric excluding delicate Prefer powder detergents containing bleach for whites and laundry sanitization liquid detergents preferably for low temperature wash programmes 60 C max for all types of fabric or special ones for woollens only Do not mix different types of detergents To help the environment do not use more than the recommended quantity of detergent Follow the instructions that ...

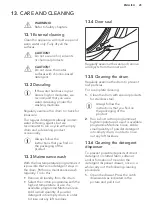
Page 25: ...ll laundry from the drum Select the cotton programme with the highest temperature or use if is available programme Machine Clean Add a small quantity of powder detergent into empty drum in order to rinse out any left residues 13 4 Door seal Regularly examine the seal and remove all objects from the inner part 13 5 Cleaning the drum Regularly examine the drum to prevent rust particles For a complet...

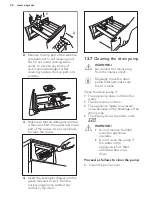
Page 26: ...g programme without any clothes in the drum 13 7 Cleaning the drain pump WARNING Disconnect the mains plug from the mains socket Regularly check the drain pump filter and make sure that it is clean Clean the drain pump if The appliance does not drain the water The drum does not turn The appliance makes an unusual noise because of the blockage of the drain pump The display shows the alarm code WARN...

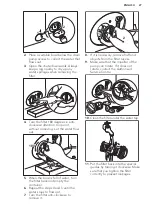
Page 27: ... of water turn the filter back and empty the container 6 Repeat the steps 4 and 5 until the water stops to flow out 7 Turn the filter anti clockwise to remove it 2 1 8 If it is necessary remove fluff and objects from the filter recess 9 Make sure that the impeller of the pump can rotate If it does not rotate contact the Authorised Service Centre 10 Clean the filter under the water tap 11 Put the f...

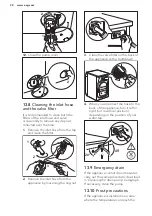
Page 28: ...osening the ring nut 3 Clean the valve filter on the back of the appliance with a toothbrush 4 When you reconnect the hose to the back of the appliance turn it left or right not in vertical position depending on the position of your water tap 45 20 13 9 Emergency drain If the appliance cannot drain the water carry out the same procedure described in Cleaning the drain pump paragraph If necessary c...

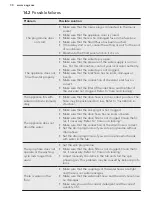
Page 29: ...ists contact the Authorised Service Centre In case of major problems the acoustic signals operate the display shows an alarm code and the Start Pause button may flash continuously The appliance does not fill with water properly After the proper check start the appliance again by pressing Start Pause button If the error persist the alarm code will appear again The appliance does not drain the water...

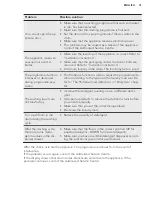
Page 30: ...sure that the drain hose is in the correct position The hose may be positioned too low Refer to Installation in struction The appliance does not drain the water Make sure that the sink spigot is not clogged Make sure that the drain hose has no kinks or bends Make sure that the drain filter is not clogged Clean the fil ter if necessary Refer to Care and cleaning Make sure that the connection of the...

Page 31: ...cording to the type and the laundry load size Re fer to The ProSense load detection in Daily Use chap ter The washing results are not satisfactory Increase the detergent quantity or use a different deter gent Use special products to remove the stubborn stains before you wash the laundry Make sure that you set the correct temperature Decrease the laundry load Too much foam in the drum during the wa...

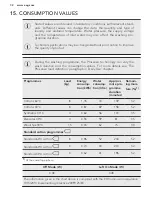
Page 32: ... more details see The Prosense load detection paragraph in Daily Use chapter Programmes Load kg Energy consump tion kWh Water consump tion litre Approxi mate pro gramme duration minutes Remain ing mois ture 1 Cottons 60 C 8 1 35 70 159 52 Cottons 40 C 8 0 87 69 158 52 Synthetics 40 C 3 0 60 56 103 35 Delicates 40 C 3 0 55 59 81 35 Wool Silk 30 C 1 5 0 45 62 75 30 Standard cotton programmes Standar...

Page 33: ... 0 05 MPa 0 5 bar If you cannot connect the water inlet hose to the cold water tap of the primary hydraulic system connect it to your domestic cold water storage system Make sure not to exceed a distance of 5 02 m 16 5 ft between the appliance inlet hose and the bottom of the water storage tank 2 Connect the water inlet hose to a water tap with a 3 4 thread 17 QUICK GUIDE 17 1 Daily use Connect th...

Page 34: ...ics 3 kg Synthetic items or mixed fabric items Easy Iron 2 kg Synthetic items requiring a gentle wash Nor mal and light soil 1 Delicates 3 kg Delicate fabrics such as acrylics viscose poly ester items Wool Silk 1 5 kg Machine washable wool hand washable wool and delicates Duvet 3 kg Single synthetic blanket padded clothes du vets down jackets Drain Spin 8 kg All fabrics except woollens and very de...

Page 35: ...on programmes at 60 C and 40 C at full and partial load and the consumption of the low power modes Actual energy consumption will depend on how the appliance is used 190 Energy consumption of the standard 60 C cotton pro gramme at full load in kWh 0 96 Energy consumption of the standard 60 C cotton pro gramme at partial load in kWh 0 73 Energy consumption of the standard 40 C cotton pro gramme at ...

Page 36: ... C cotton pro gramme at partial load in minutes 196 Duration of the left on mode in minutes 5 Airborne acoustical noise emission in db A washing 58 Airborne acoustical noise emission in db A spinning 78 Built in appliance Y N No The information given in the chart above is compliant with the EU Commission regulation 1015 2010 implementing directive 2009 125 EC 19 ENVIRONMENTAL CONCERNS Recycle mate...

Page 37: ...ENGLISH 37 ...

Page 38: ...www aeg com 38 ...

Page 39: ...ENGLISH 39 ...

Page 40: ...www aeg com shop 192931541 A 352018 ...

Reviews: