background image

USER 
MANUAL

EN

User Manual

Washer Dryer

L8WBE68SI

Summary of Contents for L8WBE68SI

Page 1: ...USER MANUAL EN User Manual Washer Dryer L8WBE68SI ...

Page 2: ...gies that help make life simpler features you might not find on ordinary appliances Please spend a few minutes reading to get the very best from it Visit our website for Get usage advice brochures trouble shooter service information www aeg com webselfservice Register your product for better service www registeraeg com Buy Accessories Consumables and Original spare parts for your appliance www aeg...

Page 3: ...n supervision or instruction concerning the use of the appliance in a safe way and understand the hazards involved Children between 3 and 8 years of age and persons with very extensive and complex disabilities shall be kept away unless continuously supervised Children of less than 3 years of age should be kept away unless continuously supervised Do not let children play with the appliance Keep all...

Page 4: ...ke sure that the mains plug is accessible after installation The ventilation opening in the base must not be covered by a carpet mat or any floor covering WARNING The appliance must not be supplied through an external switching device such as a timer or connected to a circuit that is regularly switched on and off by a utility Ensure good air ventilation in the room where the appliance is installed...

Page 5: ...e the appliance if items have been soiled with industrial chemicals Do not dry unwashed items in the wash dryer Items such as foam rubber latex foam shower caps waterproof textiles and rubber backed articles and clothes or pillows fitted with foam rubber pads should not be dried in the washer dryer Fabric softeners or similar products should only be used as specified by the product manufacturer s ...

Page 6: ...t install or use a damaged appliance Do not install the appliance where the appliance door cannot be fully opened Adjust the feet to have the necessary space between the appliance and the flooring When the appliance is in its permanent position check if it is levelled correctly with the aid of a spirit level If it is not adjust the feet accordingly 2 2 Electrical Connection WARNING Risk of fire an...

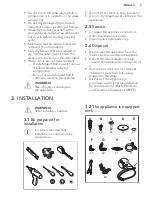
Page 7: ...jury or damage to the appliance Do not sit or stand on the open door Do not dry dripping wet clothes in the appliance 2 5 Service To repair the appliance contact an Authorised Service Centre Use original spare parts only 2 6 Disposal Disconnect the appliance from the mains electrical and water supplies Cut off the mains electrical cable close to the appliance and dispose of it Remove the door catc...

Page 8: ...s on the floor under the appliance WARNING It is strongly recommended that this action is carries out by two persons 2 Carefully put the appliance down on its rear side Make sure not to damage the hoses 1 2 3 Remove the polystyrene protection from the bottom 1 2 4 Return the appliance in vertical position and remove the socket polystyrene protection www aeg com 8 ...

Page 9: ...e in factory 6 Remove the three bolts the hose holders and plastic spacers by using the spanner supplied with the appliance F G 7 Close the holes with the plastic caps you find in the user manual bag Put the smallest cap F in upper hole and the two bigger caps G in lower holes We recommend that you keep the packaging and the transit bolts for any movement of the appliance ENGLISH 9 ...

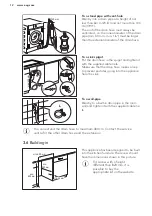
Page 10: ...Building in 2 Loosen or tighten the feet to adjust the level A correct adjustment of the appliance level prevents the vibration noise and the movement of the appliance when in operation The appliance must be level and stable CAUTION Do not put cardboard wood or equivalent materials below the appliance feet to adjust the level 3 5 Hose and cable connection 1100 mm 1450 mm 960 mm 1230 mm 900 mm 1360...

Page 11: ...o the back of the appliance Do not turn the inlet hose downwards but turn it left or right depending on the position of your water tap 4 Loosen the ring nut to fix it in the correct position 5 Connect the water inlet hose to the cold water tap with 3 4 thread WARNING Make sure that there are no leaks from the couplings Use the hose supplied with appliance Do not use an extension hose if the inlet ...

Page 12: ... the drain hose makes a loop to prevent particles going into the appliance from the sink L To a wall pipe Directly to a built in drain pipe in the room wall and tighten it with the supplied cable tie L You can extend the drain hose to maximum 400 cm Contact the service centre for the other drain hose and the extension 3 6 Building in 600 mm min 820 mm min 560 mm 16 22 mm min This appliance has bee...

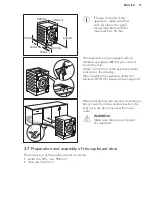
Page 13: ...n the top of the appliance where indicated in the drawing When levelling the appliance under the furniture DO NOT squeeze the sponge pad Before proceeding with appliance building in bring it near the recess and preposition the inlet hose the drain hose and the mains cable WARNING Make sure they are not kinked or squashed 3 7 Preparation and assembly of the cupboard door The dimensions of the cupbo...

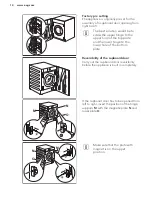
Page 14: ...d the lower hinge to the lower hole of the bottom plate Reversibility of the cupboard door Carry out the cupboard door reversibility before the appliance is built in completely M N O If the cupboard door has to be opened from left to right invert the position of the hinge supports M with the magnetic plate N and lower plate O M N O Make sure that the plate with magnet is on the upper position www ...

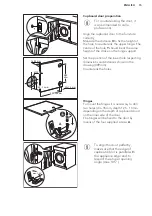
Page 15: ... 598 mm Ø 35 mm 12 5 14 mm Set the position of the lower hole respecting dimensions and distances shown in the drawing 449 mm Countersink the holes A Hinges To mount the hinges it is necessary to drill two holes dia 35 mm depth 12 5 14 mm depending on the depth of cupboard door on the inner side of the door The hinges will be fixed to the door by means of the four supplied screws A max 105 To alig...

Page 16: ...crew C and the counter magnet D on the magnetic plate N Lean the cupboard door against the screw until it leaves a mark 2 Open the cupboard door and screw the counter magnet D steel disk rubber ring E with the screw C in the inner side of the cupboard door where the screw left the mark as described in the first step 4 PRODUCT DESCRIPTION 4 1 Appliance overview 10 11 12 13 2 1 3 5 4 7 6 8 9 1 Hinge...

Page 17: ...andwash 1 13 10 9 8 11 12 14 7 2 3 4 5 6 The permanent options are set by holding pressed the relative button for at least 3 seconds 1 Programme dial 2 Spin touch button 3 Temperature touch button 4 Display 5 Time Dry touch button 6 Dry touch button 7 Start Pause touch button 8 Delay Start touch button 9 Mode Dry touch button and permanent Anti crease option 10 Time Save touch button and permanent...

Page 18: ...The digital indicator can show Programme duration e g washing and or drying phase Delay time e g Cycle end Warning code e g Error indicator Time Save indicator Time Dry indicator Steam phase indicator Dry indicator Iron dry Cupboard dry Extra dry Washing phase indicator Extra Rinse indicator Soft Plus indicator www aeg com 18 ...

Page 19: ...se the appliance doesn t allow you to set incompatible options functions 6 2 On Off Press this button for a few seconds to activate or deactivate the appliance Two different tunes sound while switching the appliance on or off As the Stand by function automatically deactivates the appliance after several minutes to reduce the energy consumption you may need to activate the appliance again For more ...

Page 20: ...avily soiled laundry especially if containing sand dust mud and other solid particles The options can increase the programme duration 6 7 Permanent Extra Rinse With this option you can permanently have an extra rinse when you set a new programme To activate deactivate this option hold the Prewash button pressed for 3 seconds until the indicator comes on goes off on the display When it is activated...

Page 21: ...medium minimum 6 11 Child Lock With this option you can prevent children from playing with the control panel To activate deactivate this option hold the Time Save button pressed until the indicator comes on goes off on the display When it is activated the appliance will default to this option after you switch it off or change reset the programme If you press any button the indicator blinks to indi...

Page 22: ...or above the touch button illuminates The display shows the selected delay time After touching the Start Pause button the appliance begins the countdown and the door is locked 6 17 Start Pause Touch the Start Pause button to start pause the appliance or interrupt a running programme 7 PROGRAMMES 7 1 Programme Chart Programme Default tem perature Temperature range Reference spin speed Spin speed ra...

Page 23: ...the following type of items Items that are not suitable for tumble drying All items with plastic metal wooden parts or alike Steam 1 kg Cottons Synthetics Delicates Short and gen tle steam programme to refresh even your very delicate garments including very delicate gar ments with sequins lace etc When treating smaller loads the programme duration can be further reduced by means of the Time Save o...

Page 24: ...leaning run a fur ther rinse cycle with empty drum and no detergent to remove any residue of bleach If you set this programme with the Mode Dry the appliance performs the anti fluff action Refer to chapter Fluff in the fabrics Anti allergy 60 C 1600 rpm 1600 400 rpm 8 kg White cotton items This programme removes micro organisms thanks to a washing phase with the temperature maintained above 60 C f...

Page 25: ...fading and marks For better care a reduced load size is recommended NonStop 60min 30 C 40 C 30 C 1200 rpm 1 kg Mixed fabrics cotton and synthetic items Complete short programme to wash and dry laundry loads up to 1 kg in one go It only lasts 1 hour Reset position The display shows dashes only 1 Cottons energy saving programme This programme at 60ºC with a load of 8 kg is the reference pro gramme f...

Page 26: ... Cottons Eco Synthetics Delicates Wool Handwash Steam Spin Drain 3 Rinse Machine Clean Anti allergy Sportswear Outdoor Denim NonStop 60min 1 This option excludes the option 2 Prewash and Stains cannot be selected together 3 If you set the No Spin option the appliance performs draining only www aeg com 26 ...

Page 27: ...o the instructions issued by the manufacturer M1381 In UK Eire Hong Kong and India the Woolmark symbol is a certification trademark 7 3 Automatic drying Dryness Level Type of fabric Load 1 Extra Dry For towelling materials Cottons and Linen bathrobes bath towels etc up to 4 kg Denim garments up to 3 kg 1 Cupboard Dry2 For items to be stored Cottons and Linen bathrobes bath towels etc up to 4 kg Sy...

Page 28: ... Anti allergy programme if available also 7 4 Timed drying Dryness Level Type of fabric Load kg Spin speed rpm Suggested duration mins Extra Dry For towelling materials Cottons and Linen bathrobes bath towels etc 4 1600 170 190 2 1600 110 120 1 1600 65 75 Denim garments 3 1200 155 Cupboard Dry For items to be stored Cottons and Linen bathrobes bath towels etc 4 1600 160 180 2 1600 100 110 1 1600 5...

Page 29: ...about 2 seconds The display shows On or Off If you deactivate the acoustic signals they continue to operate when the appliance has a malfunction 9 BEFORE FIRST USE 1 Make sure that the electrical power is available and the water tap is open 2 Pour 2 litres of water into the detergent compartment marked by This action activates the drain system 3 Pour a small quantity of detergent into the compartm...

Page 30: ...tener and other liquid treatments fabric conditioner starch Maximum level for quantity of liq uid additives Flap for powder or liquid deter gent Always follow the instructions that you find on the packaging of the detergent products but we recommend that you do not exceed the maximum indicated level This quantity will however guarantee the best washing results After a washing cycle if necessary re...

Page 31: ...ustic signal sounds and the display shows 10 6 Starting a programme Touch the Start Pause button to start the programme It is not possible to start the programme when the indicator of the button is off and doesn t flash e g the door is open The related indicator stops flashing and stays on The programme starts the door is locked The display shows the indicator The drain pump can operate shortly be...

Page 32: ...ause the appliance and remove the exceeding garments Once removed the exceeding garments touch the Start Pause button to start the programme again The ProSense phase can be repeated up to three times see point 1 Important If the laundry amount will not be reduced the washing programme starts anyway despite the overload In this case it will be not possible to guarantee the best washing results Abou...

Page 33: ...signals operate if they are active The display shows The indicator of the Start Pause button goes off The door unlocks and the indicator goes off 1 Press button On Off to deactivate the appliance After five minutes from the end of the programme the energy saving function automatically deactivates the appliance When you activate the appliance again the display shows the end of the previous programm...

Page 34: ...d with one or more NonStop 60min programmes automatic wash dry programmes where it is not necessary to set the Mode Dry Proceed as follows 1 After loading laundry and detergent press the On Off button for some seconds to activate the appliance 2 Set the NonStop 60min programme by means of the programme dial The indicators and appear on the display 3 Touch the Start Pause button to start the progra...

Page 35: ...by 5 minutes The display shows the set new time value 2 Touch the Start Pause button to start the programme The ProSense estimation starts In the display the door locked indicator comes on The display also shows the remaining programme time 11 4 At the end of the drying programme The appliance stops automatically The acoustic signals operate if they are active In the display comes on The indicator...

Page 36: ...1 Tap on the Time Dry button repeatedly to set the desired time value see the Timed drying table the Programmes chapter The drying level indicator goes off and the indicator comes on Each time you tap on this button the time value increases by 5 minutes The display shows the set new time value 2 Touch the Start Pause to start the programme In the display the door locked indicator comes on The disp...

Page 37: ...low the washing instructions on the laundry care labels Do not wash white and coloured items together Some coloured items can discolour with the first wash We recommend that you wash them separately for the first couple of times Button up pillowcases close zippers hooks and poppers Tie up belts Empty pockets and unfold Turn multilayered fabrics wool and items with printed illustrations inside out ...

Page 38: ...If the water hardness in your area is high or moderate we recommend that you use a water softener for washing machines In areas where the water hardness is soft it is not necessary to use a water softener To find out the water hardness in your area contact your local water authority Use the correct quantity of water softener Follow the instructions that you find on the packaging of the product 14 ...

Page 39: ...ur area is high or moderate we recommend that you use a water descaling product for washing machines Regularly examine the drum to check for limescale Regular detergents already contain water softening agents but we recommend to run a cycle with an empty drum and a descaling product occasionally Always follow the instructions that you find on the packaging of the product 15 3 Maintenance wash The ...

Page 40: ...shing programme table 3 Add a small quantity of powder detergent into the empty drum in order to rinse out any left residues Occasionally at the end of a cycle the display may show the icon this is a recommendation to perform the drum cleaning Once the drum cleaning has been performed the icon disappears 15 6 Cleaning the detergent dispenser To prevent possible deposits of dried detergent or clott...

Page 41: ...make sure that it is clean Clean the drain pump if The appliance does not drain the water The drum does not turn The appliance makes an unusual noise because of the blockage of the drain pump The display shows the alarm code WARNING Do not remove the filter while the appliance operates Do not clean the pump if the water in the appliance is hot Wait until the water cools down Proceed as follows to ...

Page 42: ...o open it without removing Let the water flow out 4 When the bowl is full of water turn the filter back and empty the container 5 Repeat the steps 4 and 5 until the water stops to flow out 1 2 6 Turn the filter anti clockwise to remove it 7 If it is necessary remove fluff and objects from the filter recess Make sure that the impeller of the pump can rotate If it does not rotate contact the Authori...

Page 43: ...re that you tighten the filter correctly to prevent leakages 1 2 10 Close the pump cover When you drain the water with the emergency drain procedure you must activate the drain system again 1 Put 2 litres of water in the main wash compartment of the detergent dispenser 2 Start the programme to drain the water ENGLISH 43 ...

Page 44: ...ppliance is installed in an area where the temperature can reach values around 0 C or drop below remove the remaining water from the inlet hose and the drain pump 1 Disconnect the mains plug from the mains socket 2 Close the water tap 3 Put the two ends of the inlet hose in a container and let the water flow out of the hose 4 Empty the drain pump Refer to the emergency drain procedure 5 When the d...

Page 45: ...e was not finished properly or the appliance stopped too early If the alarm code appears again contact the Authorised Service Centre The anti flood device is on Disconnect the appliance and close the water tap Contact the Authorised Service Centre The appliance does not fill with water properly After the proper check start the appliance again by pressing Start Pause button the appliance tries to r...

Page 46: ...and drains immedi ately Make sure that the drain hose is in the correct position The hose may be positioned too low Refer to Installation in struction The appliance does not drain the water Make sure that the sink spigot is not clogged Make sure that the drain hose has no kinks or bends Make sure that the drain filter is not clogged Clean the fil ter if necessary Refer to Care and cleaning Make su...

Page 47: ...hapter The washing results are not satisfactory Increase the detergent quantity or use a different deter gent Use special products to remove the stubborn stains before you wash the laundry Make sure that you set the correct temperature Decrease the laundry load Too much foam in the drum during the washing cycle Reduce the quantity of detergent After the washing cycle there are some deter gent resi...

Page 48: ... rotating If necessary wait until the drum stops rotating Make sure that the water level inside the drum is not too high If necessary proceed with an emergency drain refer to Emergency drain in Care and cleaning chapter To open the door proceed as follows 1 Press the On Off button to switch the appliance off 2 Disconnect the mains plug from the mains socket 3 Pull twice the emergency unlock trigge...

Page 49: ...er Fuse Frequency 230 V 2000 W 10 A 50 Hz Level of protection against ingress of solid particles and moisture ensured by the protective cover ex cept where the low voltage equipment has no pro tection against moisture IPX4 Water supply 1 Cold water Water supply pressure Minimum Maximum 0 5 bar 0 05 MPa 8 bar 0 8 MPa Maximum wash load Cotton 8 kg Maximum dry load Cotton Synthetics 4 kg 3 kg Spin Sp...

Page 50: ...product to your local recycling facility or contact your municipal office www aeg com 50 ...

Page 51: ...ENGLISH 51 ...

Page 52: ...www aeg com shop 157021270 A 342018 ...

Reviews: