background image

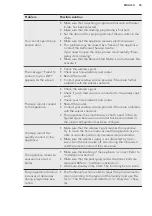
Problem

Possible solution

The washing results are
not satisfactory.

• Increase the detergent quantity or use a different deter-

gent.

• Use special products to remove the stubborn stains before

you wash the laundry.

• Make sure that you set the correct temperature.
• Decrease the laundry load.

Too much foam in the
drum during the washing
cycle.

• Reduce the quantity of detergent.

After the washing cycle,
there are some deter-
gent residues in the dis-
penser drawer.

• Make sure that the flap is in the correct position (UP for

powder detergent - DOWN for liquid detergent).

• Make sure you have used the detergent dispenser accord-

ing the indications given in this user manual.

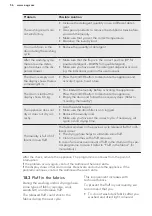
The drum is empty and
the display shows there is
some weight in.

• Press the On/Off button to deactivate the appliance and

activate it again to set a tare.

The drum is full but the
display shows 0.0 kg.

• You loaded the laundry before activating the appliance.

Press the On/Off button to deactivate the appliance.

• Empty the drum and follow the necessary steps. (Refer to

"Loading the laundry")

The appliance does not
dry or does not dry cor-
rectly.

• Turn the water tap on.
• Make sure the drain filter is not clogged.
• Reduce the laundry load.
• Make sure you have set the correct cycle. if necessary, set

again a short drying time.

The laundry is full of dif-
ferent colours fluff.

The fabrics washed in the previous cycle released fluff of a dif-
ferent colour:
• The drying phase helps to eliminate some fluff.
• Clean the clothes with a fluff remover.
In case of an excessive amount of fluff in the drum run the spe-
cial programme to clean it (refer to “Fluff in the fabrics" for
more details).

After the check, activate the appliance. The programme continues from the point of
interruption.
If the problem occurs again, contact the Authorised Service Centre.
If the display shows other alarm codes. Deactivate and activate the appliance. If the
problem continues, contact the Authorised Service Centre.

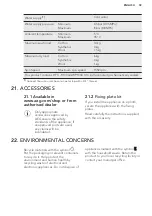
18.3 

Fluff in the fabrics

During the washing and/or drying phase,

some types of fabric, (sponge, wool,

sweatshirt) could release fluff.
The released fluff could stick to the

fabrics during the next cycle.

This inconvenient increases with

technical fabrics.
To prevent the fluff in your laundry, we

recommend that you:
• To do not wash dark fabrics after you

washed and dried light coloured

www.aeg.com

56

Summary of Contents for L9WBA61BC

Page 1: ...USER MANUAL EN User Manual Washer Dryer L9WBA61BC ...

Page 2: ...TOUCH SCREEN 16 8 WI FI CONNECTIVITY SETUP 17 9 BEFORE FIRST USE 20 10 PROGRAMMES 20 11 OPTIONS 27 12 DAILY USE WASHING ONLY 32 13 DAILY USE WASHING DRYING 37 14 DAILY USE DRYING ONLY 39 15 SETTINGS 41 16 HINTS AND TIPS 44 17 CARE AND CLEANING 46 18 TROUBLESHOOTING 53 19 CONSUMPTION VALUES 58 20 TECHNICAL DATA 58 21 ACCESSORIES 59 www aeg com 2 ...

Page 3: ...re that you have the following data available Model PNC Serial Number The information can be found on the rating plate Warning Caution Safety information General information and tips Environmental information Subject to change without notice 1 SAFETY INFORMATION Before the installation and use of the appliance carefully read the supplied instructions The manufacturer is not responsible for any inj...

Page 4: ...has a child safety device it should be activated Children shall not carry out cleaning and user maintenance of the appliance without supervision 1 2 General Safety Do not change the specification of this appliance This appliance is intended to be used in household and similar applications such as staff kitchen areas in shops offices and other working environments by clients in hotels motels bed br...

Page 5: ... The operating water pressure at the water entry point from the outlet connection must be between 0 5 bar 0 05 MPa and 8 bar 0 8 MPa Do not exceed the maximum load of 10 kg refer to the Programme chart chapter The appliance must be connected to the water mains using the new supplied hose sets or other new hose sets supplied by the Authorised Service Centre Old hose sets must not be reused If the m...

Page 6: ...te The final part of the washer dryer cycle takes place without heat cool down cycle to ensure that items reach a temperature that will not cause damage to them Do not use high pressure water sprays and or steam to clean the appliance Clean the appliance with a moist cloth Use only neutral detergents Do not use abrasive products abrasive cleaning pads solvents or metal objects Before any maintenan...

Page 7: ...ime where repair work has been carried out or new devices fitted water meters etc let the water flow until it is clean and clear Ensure that there are no visible water leaks during and after the first use of the appliance 2 4 Use WARNING Risk of injury electric shock fire burns or damage to the appliance Do not put flammable products or items that are wet with flammable products in near or on the ...

Page 8: ...e all the packaging and the transit bolts before installing the appliance WARNING As you will put down the appliance on the rear side wait about 6 hours before you use it This time is necessary to enable the compressor to work properly WARNING Use the gloves 1 Remove the external film If necessary use a cutter 2 Remove the cardboard top and the polystyrene packaging materials 3 Remove the internal...

Page 9: ...It is possible to see water flowing from the drain hose This is due to the testing with water of the appliance in factory 10 Remove the three bolts by using the spanner supplied with the appliance 11 Pull out the plastic spacers 12 Put the plastic caps that you find in the user manual bag in the holes We recommend that you keep the packaging and the transit bolts for any movement of the appliance ...

Page 10: ...ppliance does not touch the wall or other units 2 Loosen or tighten the feet to adjust the level WARNING Do not put cardboard wood or equivalent materials below the appliance feet to adjust the level x4 The appliance must be level and stable A correct adjustment of the appliance level prevents the vibration noise and the movement of the appliance when in operation When the machine is installed on ...

Page 11: ...its natural ageing The red sector in the window A shows this fault A If this occurs close the water tap and contact the authorized service centre to replace the hose 3 6 Water drainage The drain hose should be positioned at a height of not less than 60 cm and not more than 100 cm from the floor You can extend the drain hose to maximum 400 cm Contact the authorized service centre for the other drai...

Page 12: ... min 1 5 must be larger than the external diameter of the drain hose 4 If the end of the drain hose looks like this see the picture you can push it directly into the stand pipe 5 Without the plastic hose guide to a sink spigot Put the drain hose in the spigot and tighten it with a clamp Refer to the illustration Make sure that the drain hose makes a loop to prevent particles going into the applian...

Page 13: ...0 13 14 1 Worktop 2 Detergent dispenser 3 Air filter s 4 Control panel 5 Door handle 6 Rating plate 7 Drain pump filter 8 Feet for levelling the appliance 9 Airflow slots 10 Water drain hose 11 Water inlet valve 12 Mains cable 13 Transit bolts 14 Hose supports ENGLISH 13 ...

Page 14: ...rogramme options and settings 3 Touch screen Programmes options and settings can also be set by scrolling and tapping the touch screen 4 Washing and drying mode button Mode Wash Dry If both indicators are on the appliance performs a complete washing and drying cycle 5 Start Pause button Touch the Start Pause button to start pause the appliance or interrupt a running programme 6 FIRST TIME START UP...

Page 15: ... time tap on Change to change it Change OK Current time 13 45 4 4 Set Clock 6 3 More settings After you set the time the More settings screen pops up Later Set More settings to get the best results from this machine will follow Set them now More Settings If you tap on Later the programme list screen appears and you can set the desired programme Cottons ColourPro OKOPower 3h01min Cottons Eco Synthe...

Page 16: ...onfirm your choice Change OK 50 You ve selected Detergent advice 6 5 Wi Fi The startup ends with following dialog window OK Settings complete To connect your machine to WiFi see instructions in user manual OK Refer to the Wi Fi Connectivity setup section in the Settings chapter 7 TOUCH SCREEN Each time you turn the appliance on the Start up Screen appears on the touch screen AEG 13 45 After a few ...

Page 17: ...tion setting menu by just tapping on the relevant shortcut The different option setting menus can be scrolled up and down or right or left To set some options or settings it is sufficient to change the status from OFF to ON just tapping on the relevant bar Programmes options and settings can also be set by turning the programme dial and in horizontal submenus the desired choice can be set just tap...

Page 18: ...iance display to confirm that the configuration was successful 8 2 Configuring the appliance wireless connection 1 In the programme list screen tap on the shortcut to enter the setting menu 2 Tap on the Wi Fi bar to switch the connection on A pop up message will appear the icon starts flashing and wireless module begins starting up It may take about 2 minutes before it is ready Cancel Starting up ...

Page 19: ...rs and appear on the programme summary screen and the door is locked If the door is open the Remote Start Mode is deactivated If you pause or stop the cycle remotely the door remains locked To unlock the door you should be in front of the appliance and press the Start Pause To avoid accidental unlocking of the doors the Child Lock option can be activated WARNING If the temperature and level of the...

Page 20: ... Washing programmes Cottons White cotton and coloured cotton Normal heavy and light soil Cottons Eco White cotton and coloured cotton Normal heavy and light soil Cottons energy saving programme This programme at 60ºC with a load of 10 kg is the reference programme for data en tered in the energy label in compliance with 96 60 EC Direc tive Set this programme to have a good washing results and decr...

Page 21: ...lity Denim Special programme for Denim clothing with delicate wash ing phase to minimize colour fading and marks For better care a reduced load size is recommended Sportswear Mixed fabric sportswear Light soil items or items to refresh Steam programmes2 Steam can be used for dried washed or worn once laundry These programmes can reduce creases and odours and make your laundry softer Do not use any...

Page 22: ...rdingly to the type of laundry Drain All fabrics except woollens and very delicate fabrics Pro gramme for draining the water left in the drum 1 During this cycle the drum rotates slowly to ensure a gentle wash It can seem that the drum doesn t rotate or doesn t rotate properly but this is normal for this programme 2 If you set a Steam programme with dried laundry at the end of the cycle the laundr...

Page 23: ...200 rpm 1200 rpm 400 rpm 4 kg Sportswear 30 C 40 C Cold 1200 rpm 1200 rpm 400 rpm 4 kg Steam 1 kg Steam Cashmere 1 kg Rinse 1600 rpm 1600 rpm 400 rpm 10 kg Spin 1600 rpm 1600 rpm 400 rpm 10 kg Drain 10 kg Programme options compatibility When you set a washing programme and enter the menu the dis play shows the available options only Child Lock Delay Start and Memory are selectable with all program...

Page 24: ...tswear Steam Steam Cash mere Rinse Spin Drain 1 If you set the shortest duration we recommend that you decrease the load size It is possible to fully load the appliance however the washing results can be less satisfactory 2 This option is not available when setting 400 rpm 3 This option is not available with temperature lower than 40 C 4 In some programmes Cupboard Dry is the only available option...

Page 25: ...ow the garment care label for other laundry instructions M1399 The Woolmark symbol is a Certification mark in many countries 10 3 Automatic drying Dryness Level Type of fabric Load Extra Dry For towelling materials Cottons and Linen bathrobes bath towels etc up to 6 kg Denim jeans resistant garments such as denim workwear up to 4 kg Cupboard Dry1 For items to be stored Cottons and Linen bathrobes ...

Page 26: ...esidual load must be tested by setting the AUTOMATIC CUPBOARD DRY for Cottons Eco pro gramme 10 4 Timed drying Dryness Level Type of fabric Load kg Spin spee d rpm Suggested duration mins Extra Dry For towelling materials Cottons and Linen bathrobes bath towels etc 6 1600 280 300 4 1600 170 190 2 1600 120 130 Denim jeans resistant garments such as den im workwear 4 1200 230 250 2 1200 140 160 Cupb...

Page 27: ... Suitable for ironing Cottons and Linen sheets tablecloths shirts etc 6 1600 160 180 4 1600 100 120 2 1600 50 60 11 OPTIONS 11 1 Introduction When you enter the menu More the display will show only the options available for the programme set Cottons Max 10 Kg 1h07min More 1200 40 When an option shortcut is on the programme summary screen just tap on it to enter the relevant option submenu directly...

Page 28: ... right the hour and minute bars to set the desired delay start When you return to programme summary screen the indicator and the set delay time appear alternating with the indicator and the programme duration After touching the Start Pause button the appliance begins the countdown and the door is locked 11 4 Time Save With this option you can decrease the programme duration OFF normal programme du...

Page 29: ...ing phase only The appliance empties the water out automatically after approximately 18 hours 11 7 Dryness Level By tapping on the Dryness Level you can change the automatic drying level Iron Dry laundry to be ironed Cupboard Dry laundry to be put in store Extra Dry laundry to be fully dried When you return to programme summary screen the set level is shown next to the symbol and the programme dur...

Page 30: ...lected This option increases the programme duration If the Extra Rinse is set as a default option and you select a compatible washing programme the touch screen will show In this case by setting the Extra Rinse option it is possible to add just one rinse 11 11 Plus Steam This option adds a steam phase followed by a short anti crease phase at the end of the washing programme The steam phase reduces...

Page 31: ...osed by the appliance and you can set them in the programme list screen directly Cottons M1 Cottons Settings 1h07min Cottons Eco Synthetics More 1200 40 To change a saved programme 1 First set the washing programme and the desired options 2 Tap on the Memory bar to enter the submenu 3 Tap on the Memory 1 or Memory 2 bar with In Use status A message pops up asking if you want to empty or replace th...

Page 32: ...the appliance on Press the On Off button to activate the appliance again After 5 minutes from the end of the washing programme Press the On Off button to activate the appliance again The display shows the end of the last set programme Turn the programme dial to set a new cycle If you set a programme or an option that ends with water in the drum the Stand by function doesn t deactivate the applianc...

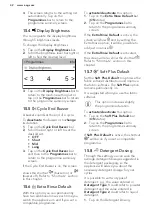
Page 33: ...On the display the weight of the laundry is updated by steps of 0 5 kg and the programme duration is updated accordingly when you return to the programme summary screen If you put in the drum more laundry than the maximum load the display tells that the suggested load has been exceeded You can wash your laundry anyway but the water and energy consumption increase To have the best consumption and w...

Page 34: ...or quantity of liquid additives Flap for powder or liquid detergent Always follow the instructions that you find on the packaging of the detergent products but we recommend that you do not exceed the maximum indicated level This quantity will however guarantee the best washing results After a washing cycle if necessary remove any detergent residue from the detergent dispenser 12 8 Check the positi...

Page 35: ... door locked indicator when the indicator goes off The estimated cycle end time The shortcut Cottons 3h01min Washing Will finish at 15 42 The drain pump can operate shortly before the appliance fills water 2 If necessary tap on to enter the option list and activate the Child Lock option Refer to Child Lock section in the Options chapter The shortcut shows up Keep pressed for about three seconds to...

Page 36: ...ff button again to activate the appliance Now you can set a new washing programme If the ProSense phase is already carried out and the water filling is already started the new programme starts without repeating the ProSense phase The water and the detergent are not drained out in order to avoid waste 12 13 Opening the door If the temperature and level of the water in the drum are too high and or t...

Page 37: ...ton to pause the programme tap on and then on the Spin Speed bar 3 When the programme is completed and the door locked indicator goes off you can open the door 4 Press the On Off button for a few seconds to deactivate the appliance In any case the appliance empties the water out automatically after approximately 18 hours 13 DAILY USE WASHING DRYING WARNING Refer to Safety chapters This appliance i...

Page 38: ...2 Tap on Dryness Level and then on the top bar to return to the programme summary screen The display will show the chosen level e g Extra Dry and the updated programme duration Cottons Max 6 Kg 3h34min More 1200 40 Wash Dry Extra The time value on the display is the duration of both cycles washing and drying To have a good drying by using less energy and in a shorter time the appliance does not le...

Page 39: ...ng the programme the display will keep you informed about each phase 13 4 At the end of the drying programme The appliance stops automatically The acoustic signals operate if they are active The display tells that the cycle is finished and shows 0h00min The indicator of button Start Pause goes off The door unlocks and the indicator goes off Press the button On Off for some seconds to deactivate th...

Page 40: ...with the programme it is possible to set one of these levels a Iron Dry for cotton items b Cupboard Dry for cotton and synthetic items c Extra Dry for cotton items 2 Tap on Dryness Level and then on the top bar to return to the programme summary screen The display will show the chosen level e g Extra Dry and the updated programme duration The time value on the display updates accordingly 3 Touch t...

Page 41: ... wet cloth The message Clean the primary air filter appears on the display to remind you to clean the air filter refer to Cleaning the air filters in Care and cleaning chapter 15 SETTINGS 15 1 Introduction 1 In the programme summary screen just tap on the screen to return to the programme list screen 2 Scroll the list up or down to find Settings Settings Machine Clean Spin OKOPower ColourPro 3 Tap...

Page 42: ...deactivate this option 1 Tap on the Extra Rinse Default bar ON status 2 Tap on the Programmes bar to return to the programme summary screen If the Extra Rinse Default is active the screen will show and by setting the Extra Rinse option it will be possible to add just one rinse If the Extra Rinse Default is activated the screen will also show the shortcut Refer to Shortcuts section in this chapter ...

Page 43: ...s 1 Tap on the Shortcuts bar to open the list of the available shortcuts Buzzer Shortcut Extra Rinse Shortcut OFF OFF OFF Back Shortcuts Child Lock 2 Tap on the bar of the desired shortcut shortcuts by changing the status to ON 3 Tap on Back to return to machine setting list and on Programmes to return to summary screen The shortcut shows up on bottom Cottons Max 10 Kg 3h01min More 1200 40 The sho...

Page 44: ...can cause balance problems with the spin phase leading to excessive vibration If this occurs a interrupt the programme and open the door refer to Daily Use chapter b manually redistribute the load so that the items are spaced evenly around the tub c press the Start Pause button The spin phase continues Button up pillowcases close zippers hooks and poppers Tie up belts cords shoelaces ribbons and a...

Page 45: ...e water hardness is soft it is not necessary to use a water softener To find out the water hardness in your area contact your local water authority Use the correct quantity of water softener Follow the instructions that you find on the packaging of the product 16 6 Prepare the drying cycle Open the water tap Check if the drain hose is connected properly Refer to installation chapter for more infor...

Page 46: ...based detergent 17 2 Descaling If the water hardness in your area is high or moderate we recommend that you use a water descaling product for washing machines Regularly examine the drum to check for limescale The regular detergents already contain water softening agents but we recommend to run a cycle with empty drum and a descaling product occasionally Always follow the instructions that you find...

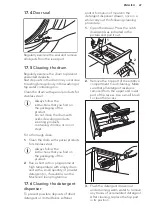
Page 47: ... the product 2 Run a short cotton programme at high temperature with empty drum and with a small quantity of powder detergent or if available run the Machine Clean programme 17 6 Cleaning the detergent dispenser To prevent possible deposits of dried detergent or clotted fabric softener and or formation of mould in the detergent dispenser drawer once in a while carry out the following cleaning proc...

Page 48: ...ter for secondary filter see pictures from 6 to 8 The acoustic signal operates The message Check the air filter could also pop up to advise you to check if the filter is correctly inserted see picture 10 To have best drying performances clean the air filters regularly Clogged filters make cycles longer and increase the energy consumption WARNING Do not use water to clean the filters to avoid that ...

Page 49: ...object If you only wash the laundry with your washer dryer it is normal to find some humidity in the primary air filter 17 8 Cleaning the drain pump WARNING Disconnect the mains plug from the mains socket Regularly check the drain pump filter and make sure that it is clean Clean the drain pump if The appliance does not drain the water The drum does not turn The appliance makes an unusual noise bec...

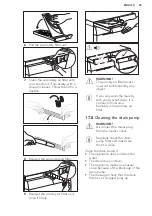
Page 50: ...te downwards Always keep a rag nearby to dry up any water spillages when removing the filter 4 Turn the filter 180 degrees in anti clockwise direction to open it without removing Let the water flow out 5 When the bowl is full of water turn the filter back and empty the container 6 Repeat the steps 4 and 5 until the water stops to flow out 7 Turn the filter anti clockwise to remove it 1 2 8 If it i...

Page 51: ...ent dispenser b Start the programme to drain the water 17 9 Cleaning the inlet hose filter and the valve filter It could be necessary to clean the filters when The appliance does not fill with water The appliance takes long time to fills with water The indicator of the Start Pause button flashes and the display shows the related alarm Refer to Troubleshooting chapter To clean the water inlet filte...

Page 52: ... activate the drain system again 1 Put 2 litres of water in the main wash compartment of the detergent dispenser 2 Start the programme to drain the water 17 11 Frost precautions If the appliance is installed in an area where the temperature can reach the values around 0 C or drop below remove the remaining water from the inlet hose and the drain pump 1 Disconnect the mains plug from the mains sock...

Page 53: ...hat the drain filter is not clogged The appliance does not drain the water Check that the door is properly closed The appliance door is open or not closed correctly Please check the door If the appliance is overloaded remove some items from the drum and or keep the door pressed while pressing the Start Pause button until the indicator stops flashing see the picture below Programme will continue wh...

Page 54: ...sure that the drain hose is in the correct position The hose may be positioned too low Refer to Installation in struction The appliance does not drain the water Make sure that the sink spigot is not clogged Make sure that the drain hose has no kinks or bends Make sure that the drain filter is not clogged Clean the fil ter if necessary Refer to Care and cleaning Make sure that the connection of the...

Page 55: ...he router Contact your wireless service provider if there are problems with the wireless network The appliance the smart device or both need to be con figured again because a new router has been installed or the router configuration has been changed The App cannot fre quently connect to the appliance Make sure that the wireless signal reaches the appliance Try to move the home router as near the a...

Page 56: ... not dry or does not dry cor rectly Turn the water tap on Make sure the drain filter is not clogged Reduce the laundry load Make sure you have set the correct cycle if necessary set again a short drying time The laundry is full of dif ferent colours fluff The fabrics washed in the previous cycle released fluff of a dif ferent colour The drying phase helps to eliminate some fluff Clean the clothes ...

Page 57: ...ashing programme continues when the power is restored If the door remains locked in case of failure it is possible to open it using the emergency unlock function Before opening the door CAUTION Risk of burns Make sure that the water temperature is not too high and the laundry is not hot If necessary wait until they cool down CAUTION Risk of injury Make sure that the drum is not rotating If necessa...

Page 58: ...sump tion kWh Water con sumption li tre Approximate pro gramme duration minutes Cottons 60 C 10 1 82 86 245 Cottons Eco Cotton Energy Saving Pro gramme 60 C1 10 0 90 75 300 Cottons 40 C 10 1 22 86 220 Synthetics 40 C 4 0 73 53 140 Delicates 40 C 2 0 62 59 64 Wool Handwash 30 C 1 5 0 29 59 70 1 Cotton Energy Saving programme at 60 C with a load of 10kg is the reference programme for the data entere...

Page 59: ...aler Only appropriate accessories approved by AEG ensure the safety standards of the appliance If unapproved parts are used any claims will be invalidated 21 2 Fixing plate kit If you install the appliance on a plinth secure the appliance with the fixing plates Read carefully the instructions supplied with the accessory 22 ENVIRONMENTAL CONCERNS Recycle materials with the symbol Put the packaging ...

Page 60: ...the complete copy of the licenses in the AEG App that can be downloaded from the corresponding App store from the License menu section It is possible to download the source code of the open source software used in the product by searching for Wi Fi Module Software version in NIUX subfolder at the following website http aeg opensoftwarerepository com www aeg com shop 157030300 A 432019 ...

Reviews: