background image

USER 
MANUAL

EN

User Manual

Washer Dryer connected

L9WEC163C

Summary of Contents for L9WEC163C

Page 1: ...USER MANUAL EN User Manual Washer Dryer connected L9WEC163C ...

Page 2: ...NS 16 7 PROGRAMMES 18 8 WI FI CONNECTIVITY SETUP 24 9 BEFORE FIRST USE 26 10 SETTINGS 26 11 DAILY USE 27 12 DAILY USE WASHING DRYING 32 13 DAILY USE DRYING ONLY 34 14 FLUFF IN THE FABRICS 35 15 HINTS AND TIPS 35 16 CARE AND CLEANING 37 17 TROUBLESHOOTING 44 18 CONSUMPTION VALUES 49 19 TECHNICAL DATA 49 20 ACCESSORIES 50 www aeg com 2 ...

Page 3: ...re that you have the following data available Model PNC Serial Number The information can be found on the rating plate Warning Caution Safety information General information and tips Environmental information Subject to change without notice 1 SAFETY INFORMATION Before the installation and use of the appliance carefully read the supplied instructions The manufacturer is not responsible for any inj...

Page 4: ...has a child safety device it should be activated Children shall not carry out cleaning and user maintenance of the appliance without supervision 1 2 General Safety Do not change the specification of this appliance This appliance is intended to be used in household and similar applications such as staff kitchen areas in shops offices and other working environments by clients in hotels motels bed br...

Page 5: ... The operating water pressure at the water entry point from the outlet connection must be between 0 5 bar 0 05 MPa and 8 bar 0 8 MPa Do not exceed the maximum load of 10 kg refer to the Programme chart chapter The appliance must be connected to the water mains using the new supplied hose sets or other new hose sets supplied by the Authorised Service Centre Old hose sets must not be reused If the m...

Page 6: ...te The final part of the washer dryer cycle takes place without heat cool down cycle to ensure that items reach a temperature that will not cause damage to them Do not use high pressure water sprays and or steam to clean the appliance Clean the appliance with a moist cloth Use only neutral detergents Do not use abrasive products abrasive cleaning pads solvents or metal objects Before any maintenan...

Page 7: ...ime where repair work has been carried out or new devices fitted water meters etc let the water flow until it is clean and clear Ensure that there are no visible water leaks during and after the first use of the appliance 2 4 Use WARNING Risk of injury electric shock fire burns or damage to the appliance Do not put flammable products or items that are wet with flammable products in near or on the ...

Page 8: ...e all the packaging and the transit bolts before installing the appliance WARNING As you will put down the appliance on the rear side wait about 6 hours before you use it This time is necessary to enable the compressor to work properly WARNING Use the gloves 1 Remove the external film If necessary use a cutter 2 Remove the cardboard top and the polystyrene packaging materials 3 Remove the internal...

Page 9: ...It is possible to see water flowing from the drain hose This is due to the testing with water of the appliance in factory 10 Remove the three bolts by using the spanner supplied with the appliance 11 Pull out the plastic spacers 12 Put the plastic caps that you find in the user manual bag in the holes We recommend that you keep the packaging and the transit bolts for any movement of the appliance ...

Page 10: ...ppliance does not touch the wall or other units 2 Loosen or tighten the feet to adjust the level WARNING Do not put cardboard wood or equivalent materials below the appliance feet to adjust the level x4 The appliance must be level and stable A correct adjustment of the appliance level prevents the vibration noise and the movement of the appliance when in operation When the machine is installed on ...

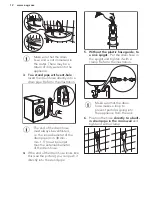
Page 11: ...its natural ageing The red sector in the window A shows this fault A If this occurs close the water tap and contact the authorized service centre to replace the hose 3 6 Water drainage The drain hose should be positioned at a height of not less than 60 cm and not more than 100 cm from the floor You can extend the drain hose to maximum 400 cm Contact the authorized service centre for the other drai...

Page 12: ... min 1 5 must be larger than the external diameter of the drain hose 4 If the end of the drain hose looks like this see the picture you can push it directly into the stand pipe 5 Without the plastic hose guide to a sink spigot Put the drain hose in the spigot and tighten it with a clamp Refer to the illustration Make sure that the drain hose makes a loop to prevent particles going into the applian...

Page 13: ...0 13 14 1 Worktop 2 Detergent dispenser 3 Air filter s 4 Control panel 5 Door handle 6 Rating plate 7 Drain pump filter 8 Feet for levelling the appliance 9 Airflow slots 10 Water drain hose 11 Water inlet valve 12 Mains cable 13 Transit bolts 14 Hose supports ENGLISH 13 ...

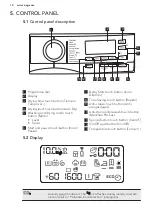
Page 14: ...se touch button Inicio Pausa 7 Delay Start touch button Inicio Diferido 8 Time Saving touch button Rápido 9 Anti crease touch button Anti arrugas rugas 10 Anti stain and prewash touch button Manchas Pre Lav 11 Spin reduction touch button Centrif 12 On Off push button On Off 13 Temperature touch button Temp C 5 2 Display MIX Laundry weight indicator The icon flashes during laundry load esti mation ...

Page 15: ...shing and or drying phase Delay time e g or Cycle end Warning code e g Washing phase indicator it flashes during prewash and wash phase Rinsing phase indicator It flashes during rinse phase The permanent Extra Rinse option one additional rinse two additional rinses Spin and drain phase indicator It flashes during spin and drain phase Steam phase indicator Drying phase indicator Indicator for the c...

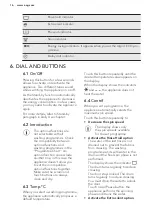
Page 16: ... together Make sure the screen and touch buttons are always clean and dry 6 3 Temp C When you select a washing programme the appliance automatically proposes a default temperature Touch this button repeatedly until the desired temperature value appears on the display When the display shows the indicators and the appliance does not heat the water 6 4 Centrif When you set a programme the appliance a...

Page 17: ...g phase This option is recommended for heavily soiled laundry especially if containing sand dust mud and other solid particles This option can increase the programme duration These two options cannot be set together 6 6 Inicio Diferido With this option you can delay the start of a programme in a more convenient time Tap on the button repeatedly to set the required delay The time increases by steps...

Page 18: ...ks to this button a cycle can perform Only washing Lavar indicator is on Washing and drying Lavar and Secar indicators are on Only drying Secar indicator is on 6 12 Inicio Pausa Touch the Inicio Pausa button to start pause the appliance or interrupt a running programme 7 PROGRAMMES 7 1 Programme Chart Programme Programme description Washing programmes Algod White cotton and coloured cotton Normal ...

Page 19: ...f and breathable jackets shell jackets with a removable fleece or inner insulation By performing a combined wash and dry pro gramme the drying phase also acts as water repellent restorer Make sure that the gar ment care label permits tumble drying Steam programme Vapor Steam programmes2 Steam can be used for dried washed or worn once laundry These programmes can reduce creases and odours and make ...

Page 20: ...t 10 minutes to let the humidity dry When the programme is completed quickly remove the laundry from the drum After a steam cycle items may be ironed however with less effort Programme temperature maximum spin speed and maximum load Programme Default tempera ture Temperature range Reference spin speed Spin speed range Maximum load Washing programmes Algod 40 C 95 C Cold 1600 rpm 1600 rpm 400 rpm 1...

Page 21: ... ECO Sintéticos NonStop 3h 3kg Delicados Lana Lãs Outdoor Vapor Aclarado Enxag Centrif Drenar Options Centrif Rinse Hold Extra Silent No Spin 1 Aclarado Enxag Extra Pré lavado Manchas2 Inicio Diferido Rápido3 Anti arrugas rugas Tiempo Tempo sec ENGLISH 21 ...

Page 22: ...ts labelled as hand wash provided that the products are washed according to the instructions on the garment label and those issued by the manufacturer of this washing machine M1230 The wool drying cycle of this machine has been tested and approved by The Woolmark Company The cycle is suitable to dry wool garments which are labelled hand wash provided that the garments are washed in a Woolmark endo...

Page 23: ...with a FIRST drying load of the maximum declared drying capacity load composition according to EN61121 by setting the AUTOMATIC CUPBOARD DRY for Algod ECO programme The SECOND drying load with the residual load must be tested by setting the AUTOMATIC CUPBOARD DRY for Algod ECO pro gramme 7 4 Timed drying Dryness Level Type of fabric Load kg Spin spee d rpm Suggested duration mins Extra Dry For tow...

Page 24: ...he full range of features and services you need Wireless network at home with internet connection enabled Mobile device connected to wireless network Frequency 2 412 2 472 GHz for European mar ket Protocol IEEE 802 11b g n two stream radio Max Power 20 dBm 8 1 Installing and configuring My AEG When connecting the appliance to the application stand near it with your smart device Make sure that your...

Page 25: ... you switch the appliance on the appliance takes 45 seconds to connect to the network automatically When the indicator stops blinking the connection is ready To switch the wireless connection off press and hold the Tiempo Tempo sec and the Modo buttons simultaneously for a few seconds until the first acoustic signal appears on the display for 5 seconds If you switch the appliance off and on again ...

Page 26: ...cal power is available and the water tap is open 3 Pour 2 litres of water into the detergent compartment marked by This action activates the drain system 4 Pour a small quantity of detergent into the compartment marked by 5 Set and start a programme for cotton at the highest temperature without any laundry in the drum This removes all possible dirt from the drum and the tub 10 SETTINGS 10 1 Child ...

Page 27: ...ted to the mains socket 2 Make sure that the water tap is open 11 3 Activating the appliance and setting a programme 1 Press button On Off for a few seconds to activate the appliance The programme dial is automatically set on cotton programme and only the Lavar indicator is on The indicator of Inicio Pausa button flashes 2 Turn the programme knob to the necessary programme The programme indicator ...

Page 28: ...etergent package If you change the washing programme after closing the door the display could show to indicate a possible overload open the door and remove a few garments 11 5 Filling the detergent and additives Compartment for prewash phase soak programme or stain remover Compartment for washing phase Compartment for liquid additives fabric conditioner starch Maximum level for quantity of liquid ...

Page 29: ...ispenser Make sure that the flap does not cause a blockage when you close the drawer 11 7 Starting a programme Touch the Inicio Pausa button to start the programme The related indicator stops flashing and stays on In the display the indicator of the operating phase starts flashing and the detergent percentage indicator goes off The programme starts the door is locked The display shows the indicato...

Page 30: ... about 15 minutes the display shows the new programme duration the time dots stop flashing The appliance adjusts automatically the programme duration to the load to achieve perfect washing results in the minimum possible time The programme duration could increase or decrease The ProSense detection is carried out with complete washing programmes only no skipping phase selected 11 10 Programme phase...

Page 31: ...tivate the appliance After five minutes from the end of the programme the energy saving function automatically deactivates the appliance When you activate the appliance again the display show the end of the last selected programme Turn the programme dial to set a new cycle 2 Remove the laundry from the appliance 3 Make sure that the drum is empty 4 Keep the door and the detergent dispenser slightl...

Page 32: ...d detergent press the On Off button for some seconds to activate the appliance 2 Set the NonStop 3h 3kgprogramme by means of the programme dial The indicator appears on the display 3 Touch the Inicio Pausa button to start the programme Non automatic wash dry programmes In some washing programmes you can combine Lavar and Secar mode for running a complete wash dry programme Proceed as follows 1 Pre...

Page 33: ...hing and Timed Drying 1 Tap on the button Tiempo Tempo sec repeatedly to set the desired time value see the Timed drying table the Programmes chapter The drying level indicator goes off and the indicator comes on The minimum timed drying is 10 minutes Each time you tap on this button the time value increases by 5 minutes The display shows the set new time value 2 Touch the Inicio Pausa to start th...

Page 34: ...gramme duration To have a good drying by using less energy and in a shorter time the appliance does not let you set a too low spin speed for the items to be washed and dried 2 Touch button Inicio Pausa to start the programme In the display the door locked indicator goes on the indicator of the running phase starts flashing The display also shows the remaining programme time 13 3 Timed Drying 1 Tap...

Page 35: ... special programme Empty the drum Clean the drum the gasket and the door with a wet cloth Set the rinse programme Simultaneously press the Manchas Pre Lav and the Anti arrugas rugas buttons until the display shows CLE to activate the cleaning function Touch the Inicio Pausa button to start the programme If the appliance is frequently used carry out the CLE programme regularly 15 HINTS AND TIPS WAR...

Page 36: ...llow the instructions that you find on packaging of the detergents or other treatments without exceeding the indicated maximum level Use the recommended detergents for the type and colour of the fabric the programme temperature and the level of soil If your appliance has not the detergent dispenser with the flap device add the liquid detergents with a dosing ball supplied by the detergent s manufa...

Page 37: ...ps Refer to the Timed drying table to find the average drying times Experience will help you to dry the laundry better Take note of the duration of the cycles done before To avoid the static charge at the end of the drying cycle 1 Use fabric conditioner in the washing cycle 2 Use special fabric conditioner for tumble dryers 3 Do not pour any detergent or softener before a drying cycle 4 Do not dry...

Page 38: ...the drum may occur due to rusting foreign body in the washing or tap water containing iron Clean the drum with special products for stainless steel Always follow the instructions that you find on the packaging of the product Do not clean the drum with acidic descaling products scouring products containing chlorine or iron or steel For a thorough clean 1 Clean the drum with special products for sta...

Page 39: ...s on to advise to clean the primary air filter see pictures from 1 to 5 The acoustic signal operates Occasionally the indicator may flash to remind you that both air filters should be cleaned the primary air filter and the secondary air filter for secondary filter see pictures from 6 to 8 The acoustic signal operates To have best drying performances clean the air filters regularly Clogged filters ...

Page 40: ...ary air filter cover P U L L 6 Pull the secondary filter out 7 Clean the secondary air filter with your hand and if necessary with a vacuum cleaner Throw the lint in a dustbin 8 Reinsert the secondary air filter 9 Reinsert the primary air filter and close it firmly WARNING The primary air filter recess must not be blocked by any object www aeg com 40 ...

Page 41: ... filter while the appliance operates Do not clean the pump if the water in the appliance is hot Wait until the water cools down WARNING Each time you carry out the special programme CLE to remove fluff clean the drain filter afterwards Proceed as follows to clean the pump 1 Open the pump cover 1 2 2 Place a suitable bowl below the drain pump access to collect the water that flows out 3 Open the ch...

Page 42: ...ten the filter correctly to prevent leakages 2 1 12 Close the pump cover 2 1 When you drain the water with the emergency drain procedure you must activate the drain system again a Put 2 litres of water in the main wash compartment of the detergent dispenser b Start the programme to drain the water 16 9 Cleaning the inlet hose filter and the valve filter It could be necessary to clean the filters w...

Page 43: ...20 Install again the inlet hose Make sure that the couplings are tight to prevent leakages Open the water tap 16 10 Emergency drain If the appliance cannot drain the water carry out the same procedure described in Cleaning the drain pump paragraph If necessary clean the pump When you drain the water with the emergency drain procedure you must activate the drain system again 1 Put 2 litres of water...

Page 44: ...Refer to Safety chapters 17 1 Introduction The start of the appliance does not occur or it stops during operation First try to find a solution to the problem refer to the table If not contact the Authorised Service Centre CAUTION Deactivate the appliance before you do the checks With some problems the acoustic signals operate and the display shows an alarm message 17 2 Possible failures Problems i...

Page 45: ...anti flood device is on The anti flood device is activated Disconnect the appliance Close the water tap Contact the service centre the mains supply is unstable Wait until the mains supply is stable The appliance auto matically starts operating check the air filter Make sure that the air filter has been cleaned Make sure that the air filter is correctly inserted Problems without alarm messages Prob...

Page 46: ...re is in the correct range Make sure you use that there is enough air circulation under the appliance You cannot open the appli ance door Make sure that the washing programme is finished Set the drain or the spin programme if there is water in the drum Make sure that the appliance receives electrical pow er This problem may be caused by a failure of the appli ance Contact the Authorised Service Ce...

Page 47: ...different de tergent Use special products to remove the stubborn stains before you wash the laundry Make sure that you set the correct temperature Decrease the laundry load After a steam programme garments are partially wet Make sure that the appliance is accurately levelled Ad just the appliance by raising or lowering the feet The drum is empty and the display shows there is some weight in Press ...

Page 48: ... in case of failure it is possible to open it using the emergency unlock function Before opening the door CAUTION Risk of burns Make sure that the water temperature is not too high and the laundry is not hot If necessary wait until they cool down CAUTION Risk of injury Make sure that the drum is not rotating If necessary wait until the drum stops rotating Make sure that the water level inside the ...

Page 49: ...consump tion kWh Water con sumption li tre Approximate pro gramme duration minutes Cottons 60 C 10 1 82 86 245 Algod ECO Cotton Energy Saving Pro gramme 60 C1 10 0 90 75 300 Cottons 40 C 10 1 22 86 220 Synthetics 40 C 4 0 73 53 140 Delicates 40 C 2 0 62 59 64 Wool Handwash 30 C 1 5 0 29 59 70 1 Cotton Energy Saving programme at 60 C with a load of 10kg is the reference programme for the data enter...

Page 50: ...er Only appropriate accessories approved by AEG ensure the safety standards of the appliance If unapproved parts are used any claims will be invalidated 20 2 Fixing plate kit If you install the appliance on a plinth secure the appliance with the fixing plates Read carefully the instructions supplied with the accessory 21 ENVIRONMENTAL CONCERNS Recycle materials with the symbol Put the packaging in...

Page 51: ...ENGLISH 51 ...

Page 52: ...the complete copy of the licenses in the AEG App that can be downloaded from the corresponding App store from the License menu section It is possible to download the source code of the open source software used in the product by searching for Wi Fi Module Software version in NIUX subfolder at the following website http aeg opensoftwarerepository com www aeg com shop 157030160 C 412019 ...

Reviews: