background image

27

How to wash

EXTRA RINSE

This appliance is designed for saving water. However, for people with
a very delicate skin (allergic to detergents) it may be necessary to
rinse the laundry using an extra quantity of water (extra rinse).

The extra rinse is available only with the cotton, easy cares or delicate
programme.

Selection of the EXTRA RINSE option

Press simultaneously PREWASH and TIME SAVING buttons for about 3
seconds: the EXTRA RINSE light in the programme progress display
comes on.
This function stays permanently on. To remove it press PREWASH and
TIME SAVING buttons again until the EXTRA RINSE light comes off.

Selection of the DELAYED START option

To delay starting of a programme, press the DELAYED START button

before starting the machine

. The figures corresponding to the

selected delay will be displayed for about 3 seconds, after which the
duration of the selected programme will appear on the display.
If the SOAK button has been pressed the selected delay will corre-
spond to the soak time. If no delay time is selected the soak pro-
gramme will last about 30 minutes. 
When the START/PAUSE button is pressed, the selected delay will
appear again on the display and the machine starts its countdown.

132994040.qxd  1/22/03  9:16 AM  Pagina  27    (Nero/Process Black pellicola)

Summary of Contents for LAVAMAT 14810

Page 1: ...BO 95 60 50 40 30 60 50 40 40 COLD 30 40 COLD 30 DRYING 40 DRYING ECONOMY SHORT SPIN LONG SPIN DRAIN SOFTENERS RINSES EASY TO IRON 1600 1200 900 700 400 PREWASH WASH RINSES EXTRA RINSE SPIN DRYING END RINSE HOLD STORE DRY DRYING TIME TIME SAVING STAIN OVERDOSAGE SOAK DELAYED START START PAUSE IRON DRY PREWASH EASY CARES COTTONS LINENS DELICATES WOOL DOOR ...

Page 2: ...machine are marked with the clover symbol If you require assistance or advice on your appliance please contact our customer care department by letter or telephone Customer Care Department AEG Domestic Appliances 55 77 High Street Slough Berkshire SL1 1DZ Tel 08705 350350 calls to this number may be recorded for training purposes Important Your machine is fitted with a balance control device which ...

Page 3: ...s 13 STAIN 13 TIME SAVING 14 SOAK 13 PREWASH 13 SPIN SPEED 14 RINSE HOLD 14 Display 15 Programme progress display 16 Cancelling a programme 16 Altering a programme which is running 16 Opening the door after the programme has started 16 Detergent dispenser drawer 17 Before the first wash 17 Preparing the wash cycle 18 Sorting out and preparing the laundry 18 Weight of laundry 19 Types of fabric and...

Page 4: ...tion 26 Selection of the EXTRA RINSE 27 Selection of the DELAY START option 27 Starting the programme 28 At the end of the programme 28 Automatic washing and drying NON STOP programme 30 How to dry 30 Drying only 30 Programme charts wash and special programmes 31 32 Programme chart timed drying 33 Consumption data for timed drying 33 Cleaning and maintenance 34 After each wash 34 Periodical cleani...

Page 5: ...nd electrical connection 47 Safety instructions for the installer 47 Dimensions of the appliance 48 Front view and side view 48 Rear view 48 Installation 49 Unpacking 49 Positioning 50 Levelling 50 Installation on a suspended floor 50 Water inlet 51 Water drainage 51 Electrical connection 53 Permanent connection 54 5 Contents ...

Page 6: ...p are damaged allowing inner components to be accessible Unplug the appliance before carrying out any cleaning or mainte nance operations Never pull the mains cable to remove the plug from the socket always take hold of the plug itself During high temperature wash programmes and during the drying cycle the door glass may get hot Let the water cool down before carrying out emergency emptying or bef...

Page 7: ... inside During use Always unplug the appliance and turn off the water tap after use This appliance is designed for domestic use only If the machine is used for any other purposes or is not used correctly the manufactur er accepts no responsibility for any possible damage that might occur For safety reasons the appliance must not be modified Use only detergents suitable for washing machines and fol...

Page 8: ...hat you follow these tips Normally soiled laundry may be washed without prewashing in order to save detergent water and time the environment is protected too Use the energy saving programme when washing normally soiled garments The machine works more economically if it is fully loaded for both washing and drying cycles When small loads are washed use only half to two thirds of the rec ommended amo...

Page 9: ...ater to prevent creasing Delay timer programme start can be delayed by 1 to 19 hours e g to times with a more economical power rate Programme progress display showing the programme steps selected and the programme phase which is running Because of its gentle washing action the special wool cycle washes your garments with extreme care The drying programmes will enable you to have dry and soft laun ...

Page 10: ...50 40 30 60 50 40 40 COLD 30 40 COLD 30 DRYING 40 DRYING ECONOMY SHORT SPIN LONG SPIN DRAIN SOFTENERS RINSES EASY TO IRON 1600 1200 900 700 400 PREWASH WASH RINSES EXTRA RINSE SPIN DRYING END RINSE HOLD STORE DRY DRYING TIME TIME SAVING STAIN OVERDOSAGE SOAK DELAYED START START PAUSE IRON DRY PREWASH EASY CARES COTTONS LINENS DELICATES WOOL DOOR ...

Page 11: ...me O OFF The selector dial can be turned either clockwise or anticlockwise Position E corresponds to the ENERGY SAVING programme at approx 67 C for normally soiled laundry extended washing time cannot be combined with TIME SAVING C F A D G H J B E 95 60 50 40 30 60 50 40 40 COLD 30 40 COLD 30 DRYING 40 DRYING ECONOMY SHORT SPIN LONG SPIN DRAIN SOFTENERS RINSES EASY TO IRON 1600 1200 900 700 400 PR...

Page 12: ...hich ends with water in the drum RINSE HOLD option press the START PAUSE button to empty out the water the machine will empty and spin DELAYED START button The wash programme can be delayed from 1 hour up to a maximum of 19 hours The button must be pressed after selecting the programme and before pressing the START PAUSE button The figures indicating the delay appear for about 3 seconds in the dis...

Page 13: ...t be selected after choosing the desired programme and before depressing the START PAUSE button When these buttons are pressed the corresponding pilot lights come on When they are pressed again the pilot lights go out STAIN To treat heavily soiled or stained laundry with stain remover extended main wash with time optimised stain action phase not selectable for wool or programmes with temperatures ...

Page 14: ...me is suppressed SPIN SPEED Press this button to reduce the maximum speed of the final speed proposed by the machine for the selected programme or to select RINSE HOLD option The maximum spin speed for cotton is 1600 rpm for model 16810 and 1400 rpm for model 14810 for easy cares and wool 900 rpm and for delicates 700 rpm RINSE HOLD By selecting this option the last rinse water is not emptied out ...

Page 15: ...has finished a steadily lit zero is displayed Delayed start 19 hours max programmed using the special button The countdown is updated every hour Alarm code indicating a fault in the machine operation see page 37 Programme progress display By selecting the wash programme the pilot lights corre sponding to the various phases making up the programme come on After the machine has started only the runn...

Page 16: ...modify the selected programme turn the programme selector dial to O and then choose a new programme The water is not emptied out and after pressing the START PAUSE but ton again the machine restarts with the newly selected programme Opening the door after the programme has started To open the door set the machine to PAUSE by pressing the START PAUSE button The door can be opened if the machine is ...

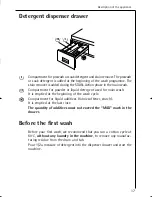
Page 17: ...t is emptied at the beginning of the wash cycle Compartment for liquid additives fabric softener starch It is emptied at the last rinse The quantity of additives must not exceed the MAX mark in the drawer Before the first wash Before your first wash we recommend that you run a cotton cycle at 60 C without any laundry in the machine to remove any manufac turing residue from the drum and tub Pour 1 ...

Page 18: ... and fabrics with trim inside out Wash small and delicate items baby socks tights inside a laundry net or in a pillow case closed with a zip or in larger socks Treat curtains with special care Remove all metal or plastic hooks or put them in a net or a bag We decline any responsibility in case of damage Whites and coloureds must be washed separately white items can loose their whiteness New colour...

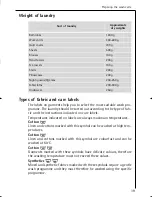
Page 19: ...ol are colourfast and can be washed at 60 C Cotton Garments marked with these symbols have delicate colours therefore the washing temperature must not exceed these values Synthetics Mixed and synthetic fabrics marked with these symbols require a gentle wash programme and they must therefore be washed using the specific programme 60 40 30 40 60 95 19 Sort of laundry Preparing the wash cycle Approxi...

Page 20: ...ularly sensitive to machine washing The WOOL programme is suitable for this type of fabric The wool wash cycle of this machine has been approved by Woolmark for the washing of machine washable Woolmark products provided that the garments are washed according to the instructions on the garment label and those issued by the manufacturer of this machine M9605 If the label has the symbol do not wash t...

Page 21: ...aning and stain removal COLOUREDS For coloured items you should use a detergent which is designed to clean while maintaining the original colour Ariel Color does not contain bleach and therefore helps to preserve colours DELICATE ITEMS When washing delicates such as woollens you should use a product which is specially designed to care for fine fabrics Dreft Automatic is suitable for woollens and o...

Page 22: ...aller dosage Follow the manufacturer s instructions to ensure the most economical usage Pour the detergent directly into the dispenser drawer or alternatively measure the detergent into the specially designed dosing device which should be placed on top of the laundry and at the back of the machine drum If you use a dosing device in a washer dryer please ensure the dosing device ball is removed bef...

Page 23: ...g Particularly delicate items such as synthetic curtains woollen and silk garments with metal inserts nylon stockings bulky garments such as anoraks bedcovers quilts sleeping bags and duvets must not be machine dried Garments padded with foam rubber or materials similar to foam rubber must not be machine dried they represent a fire hazard Also fabrics containing residues of setting lotions or hair...

Page 24: ...ic It is a good idea to make a note of these times Modification of the drying time or degree of drying If you wish to modify the drying time or the degree of drying when a dry ing programme is running first depress START PAUSE button to set the machine to PAUSE After modifying the time or degree depress START PAUSE again to continue the programme Fibre residue After drying fluffy fabrics such as n...

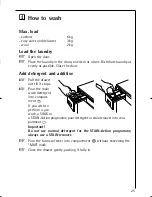
Page 25: ...t and additive Pull the drawer out till it stops Pour the main wash detergent into compart ment If you wish to perform a pre wash a SOAK or a STAIN Action programme pour detergent or stain remover into com partment Important Do not use normal detergent for the STAIN Action programme always use a STAIN remover Pour the fabric softener into compartment without exceeding the MAX mark Close the drawer...

Page 26: ...s of the relevant button the light corresponding to the selected speed comes on When selecting the RINSE HOLD option the laundry is left immersed in the final rinse water If the spin speed is not reduced the final spin speed will be as follows cottons linens 1600 r p m 16810 1400 r p m 14810 easy cares 900 r p m delicates 700 r p m wool hand washing 900 r p m 26 How to wash 95 60 50 40 30 60 50 40...

Page 27: ...ays permanently on To remove it press PREWASH and TIME SAVING buttons again until the EXTRA RINSE light comes off Selection of the DELAYED START option To delay starting of a programme press the DELAYED START button before starting the machine The figures corresponding to the selected delay will be displayed for about 3 seconds after which the duration of the selected programme will appear on the ...

Page 28: ... or cancel the delay time Load other laundry press the START PAUSE button Open the door Load the laundry Close the door and press the START PAUSE button again Modify or cancel the delay time press the START PAUSE button Press the DELAYED START button until the time required appears on the display or 0h if you wish to cancel it Press the START PAUSE button again Programme progress display By select...

Page 29: ... before opening the door either by pressing the START PAUSE button the laundry will be spun at the speed corresponding to the selected type of fabrics The spin speed can be reduced by means of the SPIN SPEED button or by selecting the SPIN SPEED and depressing START PAUSE button or by turning the selector dial to O and then to DRAIN and pressing the START PAUSE button again In this case the water ...

Page 30: ...ares timed drying Select the drying time or degree of drying Start the programme by depressing the START PAUSE button At the end of the programme turn the selector dial to O Remove the laundry How to dry Drying only Max load cottons 3 kg synthetics 2 kg During the drying programme the water tap must be open and the drain hose must be correctly positioned Turn the programme selector dial to DRYING ...

Page 31: ...Whites ECONOMY 60 Cotton and linen for example normally to lightly soiled sheets and household linen STAIN SOAK PREWASH EXTRA RINSE RINSE HOLD SPIN SPEED 6 kg Coloured cottons 60 50 40 30 Coloured cotton or linen fabric shirts underwear towels STAIN SOAK TIME SAVING PREWASH EXTRA RINSE RINSE HOLD SPIN SPEED 6 kg Easy cares 60 50 40 Synthetic fabrics underwear coloured garments non shrink shirts bl...

Page 32: ... EXTRA RINSE RINSE HOLD SPIN SPEED 6 kg Softeners Hand washed garments to be starched or softened 1 rinse with liquid additive Long spin RINSE HOLD SPIN SPEED 6 kg Drain For emptying out the last rinse water in programmes with the Rinse Hold option The water is emptied out Long Spin Separate spin for cottons Long spin SPIN SPEED 6 kg Short spin Separate spin for easy cares and delicate fabrics Sho...

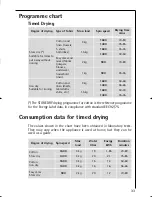
Page 33: ...y Suitable for items to put away without ironing Iron dry Suitable for ironing Cotton and linen towels T shirts bathrobes 3 kg 1600 70 80 1400 75 85 1 5 kg 1600 35 45 1400 40 50 Easy cares and mixed fabrics jumpers blouses underwear household linen 2 kg 900 70 80 1 kg 900 35 45 Cotton and linen sheets tablecloths shirts etc 3 kg 1600 50 60 1400 55 65 1 5 kg 1600 30 40 1400 35 45 Degree of drying S...

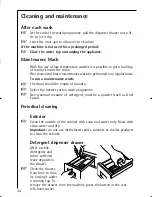
Page 34: ...gular basis To run a maintenance wash The drum should be empty of laundry Select the hottest cotton wash programme Use a normal measure of detergent must be a powder such as Ariel Futur Periodical cleaning Exterior Clean the outside of the cabinet with soap and water only Rinse with clean water and dry Important do not use methylated spirits solvents or similar products to clean the cabinet Deterg...

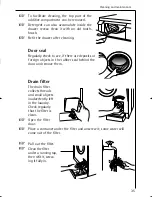
Page 35: ...s or foreign objects in the rubber seal behind the door and remove them Drain filter The drain filter collects threads and small objects inadvertently left in the laundry Check regularly that the filter is clean Open the filter door Place a container under the filter and unscrew it some water will come out of the filter Pull out the filter Clean the filter under a running tap then refit it screw i...

Page 36: ...iance is built in the kitchen furniture slightly loosen the drain filter after placing a bowl on the floor to let the water come out slowly At the end screw the filter in again Frost precautions If the machine is installed in a place where the temperature could drop below 0 C proceed as follows Close the water tap and unscrew the water inlet hose from the tap Place the end of the drain hose and th...

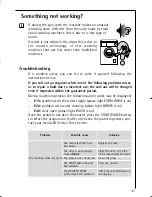
Page 37: ...n the guarantee period During machine operation the following alarm codes may be displayed E10 problem with the water supply phase light EXTRA RINSE is on E20 problem with water draining phase light RINSES is on E40 door open phase light WASH is on Once the problem has been eliminated press the START PAUSE button to restart the programme If after all checks the problem persists con tact your local...

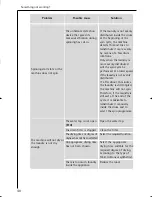
Page 38: ...cording to the manufacturer s instructions An unsuitable detergent Use a suitable washing has been used that machine detergent creates too much foam One of the connectors on Check that the hose is the water inlet hose is firmly screwed on at both leaking ends The drain filter has not Fully screw the filter into been properly screwed on place after cleaning Solution The machine does not fill The wa...

Page 39: ...f the door the water must be emptied out The machine is heating the Wait until the end of the water or drying the heating or drying phase clothes Solution The machine vibrates or is noisy The transit bolts have Check that the machine not been removed has been unpacked as described in the Installation section The feet have not been Carefully level the machine adjusted There is little laundry in Cor...

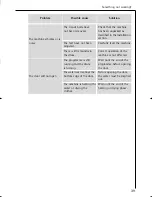
Page 40: ... the laundry is still tangled the machine will not spin Therefore if the laundry is still wet at the end of the cycle it is advisable to redistribute it manually inside the drum and to select the spin programme Problem Possible cause Solution The machine will not dry or the laundry is not dry enough The water tap is not open Open the water tap E10 The drain filter is clogged Clean the filter The d...

Page 41: ...e was too low Fabric softener especially the concentrated type has come into direct contact with the laundry Wash these stains immediately and pour fabric softener carefully Foam is still visible even after the last rinse Modern detergents often produce foam even in the last rinse How ever the laundry has been completely rinsed White residue is left on the laundry This is due to insoluble componen...

Page 42: ...ic Drum speed during washing max 55 rpm Drum speed during spinning 16810 1600 1200 900 700 400 rpm Drum speed during spinning 14810 1400 1200 900 700 400 rpm Water pressure 50 800 kPa This appliance complies with the following EC directives 73 23 EEC of 19 2 1973 Low voltage directive including directive 93 68 EEC 89 336 EEC of 3 5 1989 Electromagnetic Compatibility Directive 42 ...

Page 43: ...e parts con tact your local AEG Service Force Centre by telephoning 08705 929 929 For the address of your local Service Force Centre and further information about Service Force please visit the website at www serviceforce co uk Help us to help you Please determine your type of enquiry before telephoning When you contact us we need to know 1 Your name address and post code 2 Your telephone number 3...

Page 44: ...al enquiries regarding your AEG appliance or further infor mation on AEG products please contact our Customer Care Depart ment at the address below or visit our website at www aeg co uk Customer Care Department AEG Domestic Appliances 55 77 High Street Slough Berkshire SL1 1DZ Tel 08705 350350 Calls to this number may be recorded for training purposes 44 ...

Page 45: ...person not authorised by us All service work under this guarantee must be undertaken by a Ser vice Force Centre Any appliance or defective part replaced shall become the Company s property This guarantee is in addition to your statutory and other legal rights Home visits are made between 8 30am and 5 30pm Monday to Fri day Visits may be available outside these hours in which case a premium will be...

Page 46: ...ome is within the European Community EC or European Free Trade Area The product is installed and used in accordance with our instructions and is only used domestically i e a normal household The product is installed taking into account regulations in your new country Before you move please contact your nearest Customer Care centre listed below to give them details of your new home They will then e...

Page 47: ...graph Any electrical work required to install this appliance must be carried out by a qualified electrician or competent person Any plumbing work required to install this appliance must be carried out by a qualified plumber or competent person After having installed the machine check that it is not standing on its electrical supply cable If the appliance is placed on a carpeted floor ensure that a...

Page 48: ...G 40 DRYING ECONOMY SHORT SPIN LONG SPIN DRAIN SOFTENERS RINSES EASY TO IRON 1600 1200 900 700 400 PREWASH WASH RINSES EXTRA RINSE SPIN DRYING END RINSE HOLD STORE DRY DRYING TIME TIME SAVING STAIN OVERDOSAGE SOAK DELAYED START START PAUSE IRON DRY PREWASH EASY CARES COTTONS LINENS DELICATES WOOL DOOR Cold water 335 165 50 40 45 85 Power cable Drain 566 600 1015 25 ...

Page 49: ...ed by placing one of the corner packing pieces between the machine and the floor Remove the polystyrene block from the bot tom of the machine and release the two plastic bags Carefully slide out the left hand bag removing it towards the right and then downwards Slide out the right hand bag removing it towards the left and then upwards Set the machine upright and remove the remaining rear screw Sli...

Page 50: ...the side facing the cooker or stove must be inserted between the two appliances The machine must not be installed in rooms where the temperature can drop below 0 C The water inlet hose and the drain hose must not be kinked Please ensure that when the appliance is installed it is easily accessi ble for the engineer in the event of a breakdown Levelling Carefully level by screwing the adjustable fee...

Page 51: ...t the hose correctly by loosening the ring nut After positioning the inlet hose be sure to tighten the ring nut again to prevent leaks Do not connect to a hot water supply Water drainage The appliance drain hose should hook into a standpipe the hook in the drain hose is formed using the plastic U Piece supplied The standpipe should have an internal diame ter of approximately 38 mm see diagram on p...

Page 52: ... in the pipes In the interest of the environment Washing machines and dish washers should be connected to the FOUL drainage system the water will then be taken to a sewage works for treat ment before being discharged safely into a river It is essential that these appli ances are not connected to the surface water drainage system as this water is discharged directly into a river or stream and may c...

Page 53: ...kings identifying the terminals in your plug proceed as follows Connect the green and yellow earth wire to the terminal in the plug which is marked with the letter E or the earth symbol or coloured green and yellow Connect the blue neutral wire to the terminal in the plug which is marked with the letter N or coloured black Connect the brown live wire to the terminal in the plug which is marked wit...

Page 54: ...d the electricity supply mains with a minimum gap of 3 mm between the switch contacts and of a type suitable for the required load in compliance with the current electrical regulations The switch must not break the yellow and green earth cable at any point This operation should only be performed by a qualified electrician 54 Installation ...

Page 55: ......
Page 56: ...oup The world s No 1 choice The Electrolux Group is the world s largest producer of powered appliances for kitchen cleaning and outdoor use More than 55 million Electrolux Group products such as refrigerators cookers washing machines vacuum cleaners chain saws and lawn mowers are sold each year to a value of approx USD 14 billion in more than 150 countries around the world ...

Reviews: