background image

English

58

 NOTE: 

If no button is pushed within 5 seconds, the display will 
change back to the normal display. The settings are auto-
matically stored.

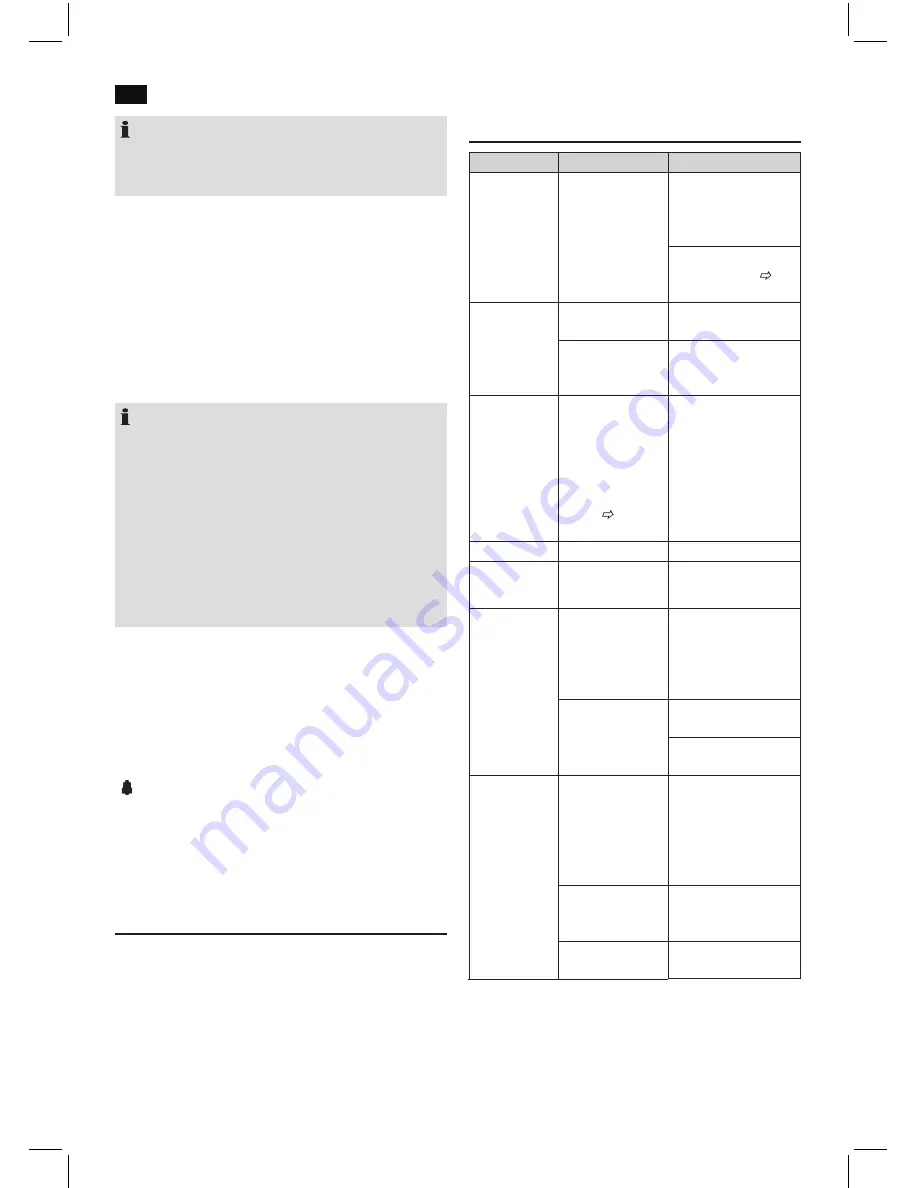
Setting the alarm time

1.  Press the ALARM button during standby operation. 

“SETTING ALARM 1” is shown on the display.

2.  Select the time at which the alarm time needs to be 

activated. Select from: ALL DAYS, ONCE, WEEKENDS, 
WEEKDAYS. The setting ALARM OFF deactivates the 
function.

3.  Now set the alarm time.
4. 

SOURCE:

 Select a source by which you want to be awak-

ened. Select from: DAB, FM, CD, USB, AUX, B.T.

 NOTE: 

•  When choosing DAB or FM, the last set radio station 

will be selected.

•  When choosing CD or USB, a medium must be inser

-

ted, respectively connected.

•  When choosing AUX, the connected audio source 

must also be programmed to the same point in time.

•  When choosing B.T., the Bluetooth function must be 

turned on at the device and must have been connec-
ted with the device previously. The functionality of 
the alarm through Bluetooth is dependent on your 
playback device.  

5.  Finally select the volume at which you want to be awak-

ened. 

6.  After you have adjusted the settings for the first alarm 

time, you will get to the settings of a second alarm time. 
“SETTING ALARM 2” will be shown in the display. To set 
the second alarm time, proceed as described above (point 
2-5).

The activated alarm function is shown on the display by the  
“ ” symbol. If you have set both alarm times, two symbols 
will be displayed. 

Deactivate alarm function

Select the option “ALARM OFF” in the section “Setting the 
alarm time” (point 2).

Cleaning and maintenance

•  Disconnect the mains plug before cleaning.
•  You may wipe off external stains, using a slightly damp 

cloth without any additives.

Troubleshooting

Problem

Cause

Solution

The unit cannot 
be operated

The unit is blocked 
and “hangs”

Pull the mains plug 
for approximately 5 
seconds. Then connect 
the unit again
Reset the device to the 
factory defaults.   

see 

“Settings menu”

No DAB Radio 
reception

Dipole antenna not 
aligned correctly 

Align the dipole 
antenna vertically

No Digital Radio 
can be received in 
your area

Problems with 
DAB radio 
reception

Depending on 
the location, you 
may not be able to 
receive some sta-
tions at all or with 
interference in your 
region.   

see also 

note on page


54

Switch to FM mode to 
receive these stations. 
If these stations are 
transmitted via UKW. 
Find out more on the 
internet site of the 
radio station.

No sound

Volume is too low Increase the volume

Poor sound 
quality

Radio signal too 
weak

Try to adjust the an-
tenna position.

No audio 
signal during 
Bluetooth con-
nection 

Device has not 
been registered 
with the audio 
source. 

Check whether there 
is a connection. 
Reregister the device 
with the audio source, 
if necessary.

Volume too low

Increase the volume on 
the device.
Increase the volume on 
the audio source. 

Bluetooth con-
nection cannot 
be established 

Device is not in 
CONNECT mode. 
The LED (11) blinks 
slowly. 

Press the CONNECT 
button (button 7 on the 
RC). The LED will blink 
rapidly. Try to recon-
nect the devices with 
each other. 

Registration 
doesn’t work 

Check, whether the 
audio source supports 
the A2DP protocol.

Audio source is 
turned off

Turn the audio source 
on

Summary of Contents for MC 4457

Page 1: ...oni per l uso 42 Instruction Manual 51 MUSIK CENTER MIT DAB BLUETOOTH MC 4457 DAB BLUETOOTH D Musik Center mit DAB Bluetooth NL Muziekcenter met DAB Bluetooth F Chaîne stéréo compacte avec DAB Bluetooth E Centro musical con DAB Bluetooth I Centro musicale con DAB Bluetooth GB Music Center with DAB Bluetooth ...

Page 2: ...ts de commande Page 3 Aperçu du menu Page 4 Mode d emploi Page 24 Données techniques Page 32 Élimination Page 32 Español Contenidos Indicación de los elementos demanejo Página 3 Resumen del menú Página 4 Manual del usuario Página 33 Especificaciones técnicas Página 41 Eliminación Página 41 Italiano Contenuto Elementi di comando Pagina 3 Panoramica menu Pagina 4 Manuale dell utente Pagina 42 Specif...

Page 3: ...icht der Bedienelemente 3 Overzicht van de bedieningselementen Liste des différents éléments de commande Indicación de los elementos demanejo Elementi di comando Location of Controls Abb 1 Fig 1 Abb 2 Fig 2 ...

Page 4: ... oder feuchten Orten verwenden Benutzen Sie das Gerät ausschließlich für den privaten und den dafür vorgesehenen Zweck Dieses Gerät ist nicht für den gewerblichen Gebrauch bestimmt Achten Sie darauf dass das Stromkabel nicht geknickt eingeklemmt oder mit Hitzequellen in Berührung kommt Achten Sie darauf dass das Stromkabel keine Stolperfalle darstellt Berühren Sie den Netzstecker oder das Kabel ni...

Page 5: ...durch Personen einschließlich Kinder mit eingeschränkten physischen sensorischen oder geistigen Fähigkeiten oder mangels Erfahrung und oder mangels Wissen benutzt zu werden es sei denn sie werden durch eine für ihre Sicherheit zuständige Person beaufsichtigt oder erhielten von ihr Anweisungen wie das Gerät zu benutzen ist Kinder sollten beaufsichtigt werden um sicherzustellen dass sie nicht mit de...

Page 6: ...s 2 Schalten Sie das Gerät mit der STANDBY Taste 10 26 ein Das Gerät sucht automatisch nach DAB Sendern SCANNING und ein Fortschrittsbalken erscheint im Display Die Zahl rechts im Display zeigt die Anzahl der gefundenen Radiosender an Anschließend wird der erste alphanumerische DAB Sender abgespielt Beim Abspielen eines Radiosenders wird die Uhrzeit und das Datum von der Sendeanstalt übernommen Em...

Page 7: ...auscht der empfan gene Sender versuchen Sie durch Drehen und ab bzw aufwickeln der Antenne den Empfang zu verbessern FM Informationen anzeigen Durch Drücken der INFO Taste 21 können Sie sich die folgenden Informationen anzeigen lassen sofern vom Radio sender ausgestrahlt Standardmäßig wird der Radio Text im Display angezeigt Wenn keine Informationen vorliegen erscheint im Display No RadioText Hier...

Page 8: ...die Menüs Autoscan Manual tune DRC und Prune Autoscan Startet den Sendersuchlauf Das DAB Fre quenzband wird nach Sendern durchsucht Manual tune Hierbei ist es nötig die Senderfrequenz zu kennen Diese erfahren Sie auf der Internetseite der Sendeanstalt Wählen Sie die einzelnen Frequenzen mit den Tasten 6 an DRC kurz für Digital Range Control Dynamikumfang Mit dem Begriff DRC wird das Verhältnis vom...

Page 9: ...nander anmelden 1 Stellen Sie sicher dass die Bluetooth Funktion in Ihrem Abspielgerät z B Mobiltelefon aktiviert ist Beachten Sie hierfür die Bedienungsanleitung Ihres Abspielgerätes 2 Drücken Sie die BT Taste 23 Die Kontrollleuchte 11 blinkt schnell 3 Wählen Sie in Ihrem Abspielgeräte das Bluetooth Menü und melden Sie das Gerät in Ihrem Abspielgerät an Beachten Sie hierfür die Bedienungsanleitun...

Page 10: ...MP3 CD abspielen 1 Drücken Sie die CD USB Taste 25 Im Display wird die Anzeige CD angezeigt 2 Drücken Sie die EJECT Taste 1 2 um das CD Fach 7 zu öffnen 3 Legen Sie eine CD mit dem Aufdruck nach oben auf den CD Fach Schlitten Drücken Sie erneut die EJECT Taste um das CD Fach wieder zu schließen 4 Im Display erscheint die Meldung LOADING DISC Anschließend beginnt die Wiedergabe Im Display wird das ...

Page 11: ... alle programmier ten Titel wiedergegeben wurden Die Anzeige P erlischt und die programmierte Reihenfolge wird aus dem Speicher gelöscht Wiedergabe von Musik im MP3 Format Sie haben die Möglichkeit mit diesem Gerät Musikstücke im MP3 Format wiederzugeben Das Gerät unterstützt außer dem die gängigen CD Typen CD CD RW CD R Sie können mit Ihrem Gerät MP3 CDs abspielen Auf diesen CDs können bis zu 200...

Page 12: ... Gerät auf die Werkseinstel lungen zurück siehe Einstellungsmenü Kein DAB Radioempfang Wurfantenne nicht richtig ausgerichtet Richten Sie die Wurfan tenne vertikal aus In Ihrem Gebiet wird kein Digital Radio empfangen Fehler Ursache Lösung Störungen beim DAB Radioempfang Standortbedingt können einige Sender in Ihrer Region eventuell nicht oder nur mit Störungen emp fangen werden siehe auch Hinweis...

Page 13: ...rt der Schaden Mangel behoben werden soll ob durch Reparatur oder durch Austausch eines gleichwertigen Geräts 4 Garantieleistungen werden nicht für Mängel erbracht die auf der Nichtbeachtung der Gebrauchsanweisung un sachgemäßer Behandlung oder normaler Abnutzung des Geräts beruhen Garantieansprüche sind ferner ausge schlossen für leicht zerbrechliche Teile wie zum Beispiel Glas oder Kunststoff Sc...

Page 14: ...reie Einsendung Ihres Gerätes vor Unfreie Lieferungen werden von uns nicht angenommen Es entstehen Ihnen damit erhebliche Kosten Stand 06 2012 Entsorgung Bedeutung des Symbols Mülltonne Schonen Sie unsere Umwelt Elektrogeräte gehören nicht in den Hausmüll Nutzen Sie die für die Entsorgung von Elektrogeräten vorge sehenen Sammelstellen und geben dort Ihre Elektrogeräte ab die Sie nicht mehr benutze...

Page 15: ...paraat worden geplaatst Open de behuizing van het apparaat nooit Verkeerde reparaties kunnen ernstig gevaar voor de gebruiker opleveren Als het apparaat of vooral het elektriciteits snoer beschadigd is gebruik het apparaat dan niet meer en laat het repareren door een gekwaliiceerd specialist Controleer het elektriciteitssnoer regelmatig op bescha digingen Om gevaar te voorkomen mag het elektricite...

Page 16: ...paraat in gebruik neemt Bepaald een geschikte plek voor het apparaat De onder grond waarop u het apparaat plaatst dient droog vlak en niet glad te zijn voor een gemakkelijke bediening Zorg dat het apparaat voldoende geventileerd wordt Sluit de luidsprekers aan op de SPEAKERS aansluitin gen op de achterzijde van het apparaat Terwijl dat te doen besteed aandacht aan de juiste polariteit zwart naar z...

Page 17: ...egeven Druk opnieuw op deze toets om de functie te deactiveren MUTE OFF wordt voor een korte tijd weergegeven OPMERKING De geactiveerde functie wordt om technische redenen niet permanent op de display getoond TONE toets 12 Druk herhaaldelijk op deze toets om het totale volume MAS TER VOLUME de bassen BASS en de hoge tonen TREBLE aan te passen Wijzig de instellingen met de VOL VOL toetsen 11 OPMERK...

Page 18: ...p het scherm verschijnt 2 U kunt het volgende of vorige station selecteren door gebruik te maken van de toetsen 6 3 Als de ontvangst te zwak is en het ontvangen station stoort kunt u de ontvangst proberen te verbeteren door de positie van de antenne te wijzigen OPMERKING Voor een optimale ontvangst van DAB is het aan te raden dat de dipool antenne verticaal wordt uitgericht U kunt tijdens de DAB o...

Page 19: ... Factory reset Selecteer de YES optie als u het appa raat naar de standaard fabrieksinstellingen wilt herstel len Alle instellingen die u hebt gemaakt gaan hierbij verloren SW version Hier kunt u de huidige softwareversie van het apparaat weergeven AUDIO IN aansluitingen achterkant van het apparaat Voor het aansluiten van analoge afspeelapparaten via deze aansluiting kunt u ook het geluid van ande...

Page 20: ...via Bluetooth Om audiogegevens te kunnen sturen dient Bluetooth ingeschakeld te blijven op uw speler Bestudeer de gebruiksaanwijzing van uw speler OPMERKING Als een mobiele telefoon van waaraf u muziek afspeelt een gesprek ontvangt wordt de muziek onderbroken Het geluid wordt afhankelijk van de mobiele telefoon via de luidsprekers afgespeeld Om het gesprek naar uw mobiele telefoon over te zetten h...

Page 21: ...ar de normale weergave terug te keren STOP 9 11 Het afspelen wordt gestopt REPEAT 16 Druk 1x REP One verschijnt voor een korte tijd op de display Het huidige nummer wordt voortdurend herhaald Druk 2x REP All verschijnt voor een korte tijd op de display Alle nummers worden voortdurend herhaald Druk 3x REP Off verschijnt voor een korte tijd op de display Alle functies worden gestopt Het normaal afsp...

Page 22: ...terug naar de normale weergave veranderen De instellingen worden automatisch opgeslagen De alarmtijd instellen 1 Druk op de ALARM toets tijdens de standby modus SETTING ALARM 1 wordt op de display weergegeven 2 Selecteer het tijdstip waarop de alarm moet worden geactiveerd Selecteer uit ALL DAYS alle dagen ONCE eens WEEKENDS weekenden WEEKDAYS weekda gen De instelling ALARM OFF Alarm uit deactivee...

Page 23: ...ar te verbinden Registratie werkt niet Controleer of de audiobron het A2DP protocol ondersteunt De audiobron is uitgeschakeld Schakel de audiobron in Bluetooth is op de audiobron uitge schakeld Zet de Bluetooth func tie op de audiobron aan De Bluetooth versie wordt niet ondersteund Gebruik een ander afspeelapparaat Technische specificaties Model MC 4457 DAB BT Voeding 220 240 V 50 Hz Opgenomen ver...

Page 24: ...r l appareil Ne jamais ouvrir le coffrage de l appareil Une réparation inadéquate peut entraîner un réel danger pour l utilisa teur Si l appareil en particulier le cordon électrique est endommagé cesser de l utiliser et le faire réparer par un technicien qualifié Vérifier régulièrement que le cordon électrique n est pas endommagé Afin d éviter tout danger un cordon électrique endom magé doit être ...

Page 25: ...ficultés Assurez vous que l appareil dispose d une ventilation adaptée Raccordez les haut parleurs aux connexions SPEAKERS à l arrière de l appareil En faisant cela respectez la bonne polarité noir vers noir Retirez si nécessaire le film de protection qui recouvre l écran Alimentation électrique Insérezr la prise électrique dans une prise trois points de 230 V 50 Hz correctement installée S assure...

Page 26: ...s si vous sélectionnez l un des modes de l égalisateur précédemment définis Bouton DSP 13 Permet de prérégler la fonction d égalisateur Différents mo des de son sont disponibles JAZZ ROCK CLASSICS POP LIVE DANCE OFF Off Télécommande infrarouge Pour une commande à distance de 5m Si la portée de la télécommande diminue les piles doivent être changées Garder libre l espace entre la télécommande et le...

Page 27: ...ations DAB supplémentaires En mode DAB vous pouvez afficher les informations supplé mentaires suivantes si elles sont diffusées par la station de radio Pour cela appuyez sur le bouton INFO 21 Le texte DLS s afiche par défaut DLS Abréviation de Dynamic Label Segment Ce para mètre affiche des données complémentaires Il contient p ex des informations sur la station ou le titre et l artiste de la chan...

Page 28: ...uyez sur le bouton AUX IN 22 La notification AUX s affichera Vous pouvez également sélectionner le mode AUX en appuyant plusieurs fois sur le bouton INPUT 9 sur l appareil 3 Démarrez la lecture de votre source audio Ecoutez le son via le haut parleur Vous pouvez régler le volume à l aide des boutons VOL VOL 11 5 4 Dans la suite de la procédure référez vous au mode d emploi de la source audio exter...

Page 29: ...r l appareil Le voyant de contrôle clignote ou s allume selon la fonction de l appareil Voyant de contrôle Fonction de l appareil Clignote rapide ment Mode CONNECT Une connexion à une nouvelle source audio peut maintenant être créée Voyant de contrôle Fonction de l appareil Clignote lente ment Mode PAIRING Une connexion à une source audio déjà précédemment enre gistrée peut être rétablie S allume ...

Page 30: ...les titres du CD audio sont lus de ma nière répétée et dans un ordre aléatoire NOTE Cette fonction n est disponible que pour les CD audio CDDA La fonction activée peut ne pas s afficher en perma nence pour des raisons techniques Boutons numérotés 2 Pour sélectionner directement un titre saisissez le numéro du titre demandé Appuyez sur le bouton ENTER 19 pour lire le titre Programmation de la lectu...

Page 31: ...D ou USB un support doit être inséré ou connecté Si vous choisissez AUX la source audio connectée doit également être programmée dans le même temps Si vous choisissez B T la fonction Bluetooth doit être activée sur l appareil et déjà connectée à l appareil La fonctionnalité de l alarme via Bluetooth dépend de votre lecteur 5 Puis sélectionnez le volume de votre réveil 6 Après avoir réglé les param...

Page 32: ...C 4457 DAB BT Alimentation 220 240 V 50 Hz Consommation électrique 40 W Classe de protection II Poids net 2 63 kg Radio Gamme de fréquences VHF FM 87 5 108 0 MHz DAB DAB 174 240 MHz Bluetooth Prise en charge Bluetooth V2 1 EDR Portée 15 mètres environ Fréquences de transmission 2 4 2 48 GHz Protocoles A2DP AVRCP Nous nous réservons le droit d apporter des modifications techniques ainsi que des mod...

Page 33: ...das no deben colocarse sobre la unidad No abra nunca el chasis del dispositivo Una reparación inadecuada puede provocar graves riesgos para el usuario Si el dispositivo o especialmente el cable de alimentación está dañado no siga usando el dispo sitivo y hágalo reparar por un especialista cualificado Compruebe regularmente si hay daños en el cable de alimentación Para evitar peligros un cable de a...

Page 34: ...es de usar el dispositivo Seleccione una ubicación adecuada para el dispositi vo Las ubicaciones adecuadas son superficies secas uniformes y antideslizantes sobre las que pueda usar con facilidad el dispositivo Asegúrese de que exista una ventilación adecuada para el dispositivo Conecte los altavoces a las conexiones SPEAKERS de la parte posterior del dispositivo Al hacerlo preste atención a la po...

Page 35: ...evemen te Pulse este botón de nuevo para desactivar la función Se mostrará MUTE OFF brevemente NOTA La función activada no puede mostrarse permanentemen te en pantalla por motivos técnicos Botón TONE 12 Pulse repetidamente este botón para ajustar el volumen global MASTER VOLUME los graves BASS y los agudos TREBLE Cambie la configuración con los botones VOL VOL 11 NOTA La configuración se perderá s...

Page 36: ...lla 2 Puede seleccionar la emisora siguiente o anterior usando los botones 6 3 Si la recepción es muy débil y la emisora tiene saltos pruebe a mejorar la recepción cambiando la posición de la antena NOTA Para una recepción óptima de DAB recomendamos alinear verticalmente la antena dipolo Durante la recepción DAB no puede cambiar entre Mono y Estéreo Para establecer manualmente una frecuencia DAB p...

Page 37: ...do se perderán SW version Aquí puede mostrar la versión de software del dispositivo Tomas AUDIO IN parte posterior del dispositivo Conectando dispositivos de reproducción analógicos me diante esta toma podrá escuchar también el sonido de otros dispositivos de reproducción como reproductores MP3 reproductores de CD etc por los altavoces 1 Conecte el dispositivo externo a las tomas AUDIO IN de la pa...

Page 38: ...amada la música se interrumpirá El sonido se reproduce por los altavoces según el telé fono móvil Para transferir la conversación a su teléfono móvil observe la entrada en la pantalla del teléfono móvil Cuando haya finalizado la llamada telefónica los dispositivos se volverán a conectar entre si Puede tener que reiniciar la reproducción Testigo de control 11 en el dispositivo El testigo de control...

Page 39: ...nción activada no puede mostrarse permanentemen te en pantalla por motivos técnicos SHUFFLE 14 Pulsar 1 x Se reproducen todos los títulos del CD audio en orden aleatorio La reproducción se detiene cuando se han reproducido todos los títulos Pulsar 2 x Se reproducen todos los títulos del CD audio repetidamente en orden aleatorio NOTA Esta función solamente está disponible para CD audio CDDA La func...

Page 40: ...n de semana WEEK DAYS día de la semana La posición ALARM OFF alarma apagada desactiva esta función 3 Establezca la hora de alarma 4 SOURCE Seleccione la fuente con la que quiera desper tar Puede seleccionar entre DAB FM CD USB AUX B T NOTA Cuando elija DAB o FM se seelccionará la última emisora sintonizada Cuando elija CD o USB debe introducir un medio o conectarlo Cuando elija AUX la fuente de au...

Page 41: ...A2DP Fuente de audio apagada Active la fuente de audio Bluetooth apaga do en la fuente de audio Active la función Blue tooth de la fuente de audio Versión de Blue tooth no soporta da Use otra unidad de reproducción Especificaciones técnicas Modelo MC 4457 DAB BT Alimentación 220 240 V 50 Hz Consumo 40 W Clase de protección II Peso neto 2 63 kg Radio Rangos de frecuencia UKW FM 87 108 MHz DAB DAB 1...

Page 42: ...loggiamento del dispositivo Ripara zioni non corrette potrebbero determinare pericoli per l utente Se il dispositivo o il cavo risultano danneggiati non utilizzare più il dispositivo e farlo riparare da un tecnico professionista Controllare regolarmente la spina e il cavo in caso di guasti Per evitare guasti un cavo danneggiato deve essere sostituito dal produttore servizio assistenza o persona si...

Page 43: ...facilmente Assicurare una ventilazione adeguata Appendere gli altoparlanti alle connessioni SPEAKERS sul retro del dispositivo Durante questa fase far attenzio ne alla corretta polarità a nero a nero All occorrenza rimuovere la pellicola protettiva dal display Alimentazione Inserire la spina di rete in una presa a tre spine corretta mente installata con 230 V 50 Hz Accertarsi che il voltaggio di r...

Page 44: ...seleziona una delle moda lità precedentemente impostate dell equalizzatore Tasto DSP 13 Funzione di preimpostazione equalizzatore Sono disponibili diverse modalità audio JAZZ ROCK CLASSICS POP LIVE DANCE OFF disattiva Telecomando a raggi infrarossi Per il controllo wireless entro una distanza di 5 m Se la distan za diminuisce è necessario sostituire le pile Per un corretto funzionamento tener uno ...

Page 45: ...iene visualizzato sul display per default DLS Abbreviazione per Dynamic Label Segment Que sto comporta dati complementari Questo contenuto può essere ad esempio informazioni sulla stazione o sulla traccia musicale e l artista riprodotto Visualizza la potenza del segnale ricevuto Questo indica la categoria della stazione ad es musica pop notizie ecc Visualizza il nome del gruppo di stazioni ad es D...

Page 46: ...ti VOL VOL 11 5 4 Per la procedura fate riferimento al manual dell utente della fonte audio esterna NOTA Se possibile regolare il volume dell unità esterna ad un livello comodo Riprodurre musica tramite Bluetooth Bluetooth utilizza una tecnologia per il collegamento radio wireless di apparecchi a breve distanza Gli apparecchi con Bluetooth standard trasmettono tra 2 402 e 2 480 GHz nella banda ISM...

Page 47: ...sitivi di memorizzazone USB di tutti i tipi attualmente sul mercatoile non permette di garantire la piena compatibilità di tuttii i dispositivi di memorizzazione USB Per questo mootivo in rari casi possono insorgere problemi nella riproduzione di file da dispositivi USB Non si tratta di anomalia 1 Premere il tasto CD USB 25 ripetutamente finché SOURCE USB non compare sul display 2 Collegare un dis...

Page 48: ...e posizioni di memoria successive premere il tasto NOTA Devono essere programmati almeno due brano per dare inizio alla riproduzione Sono programmabili un massimo di 20 tracce Lo stesso titolo può comparire più di una volta nell elenco 4 Ripetere la procedura finché avete selezionato tutti i brani 5 Dopo aver programmato tutti i brani selezionare il sim bolo con i tasti direzionali Premere il tast...

Page 49: ...play con il simbolo Se sono stati impostati entrambi gli orari della sveglia saranno visualizzati due simboli Disattivazione del segnale allarme Selezionare l opzione ALARM OFF nella sezione Imposta zione orario allarme punto 2 Pulizia e manutenzione Scollegare l alimentazione prima di pulire l apparecchio Rimuovere le macchie esterne con un panno leggermen te umido senza detergente Risoluzione di...

Page 50: ...iche tecniche e di design nel corso dello sviluppo del prodotto Questo dispositivo risponde a tutte le direttive della CE come la direttiva sulla compatibilità elettromagnetica e quella sul basso voltaggio ed è prodotto secondo le più recenti norme di sicurezza Smaltimento Significato del simbolo Cassonetto con ruote Rispettare l ambiente non smaltire dispositivi elettrici nei rifiuti domestici Lo...

Page 51: ...urces of fire such as e g burning candles may not be placed onto the unit Never open the device s case Improper repairs can cause severe danger to the user If the device or particularly the power cord is damaged don t use the device any further and have it repaired by a qualified specialist Check the power cord regularly for damages To avoid any danger a damaged power cord must be replaced only by...

Page 52: ...easily Make sure there is proper ventilation for the device Hook up the loudspeakers to the SPEAKERS con nections on the rear of the device While doing so pay attention to the correct polarity black to black Remove if necessary the protection sheet from the display Power supply Insert the grid plug into a properly installed three prong socket with 230 V 50 Hz Make sure the grid voltage corresponds...

Page 53: ...the VOL VOL buttons 11 NOTE The settings are lost if you select one of the preset equal izer modes DSP button 13 Preset equalizer function Different sound modes are avail able JAZZ ROCK CLASSICS POP LIVE DANCE OFF Off Infrared Remote Control For wireless control within a distance of 5 m If the distance decreases you should change the batteries For proper operation mind a clear view between the rem...

Page 54: ...NFO button 21 The DLS text is shown on the display by default DLS Short for Dynamic Label Segment This involves complementary data This content may be e g informa tion about the station or the music title and artist being played Displays the received signal strength This indicates the station category e g Pop Music News etc Displays the name of the station group e g DR Deutschland Frequency of the...

Page 55: ...h involves a technology for wireless radio connec tion of devices over a short distance Devices with Bluetooth standard are transmitting between 2 402 and 2 480 GHz in the ISM band Industrial Scientific and Medical Interference can be caused for example by WLAN networks DAB radios cordless phones or microwave ovens which work on the same frequency band This device offers you the possibility to use...

Page 56: ...vice 1 Press the CD USB button 25 repeatedly until SOURCE USB is shown on the display 2 Connect a USB storage device directly into the port The message USB CHECKING will appear for a short time after a few seconds Then the playback will start The symbol MP3 the current title and its elapsed playing time as well as the total number of titles will be shown in the display For operation please refer t...

Page 57: ...e same title can appear more than once in the list 4 Repeat the procedure until all the desired tracks are selected 5 After you have programmed all the titles select the symbol with the direction buttons Press the ENTER button for confirmation The playback starts The symbol CDDA P the current title and its elapsed playing time as well as the total number of titles will be shown in the display 6 Wh...

Page 58: ...ALARM OFF in the section Setting the alarm time point 2 Cleaning and maintenance Disconnect the mains plug before cleaning You may wipe off external stains using a slightly damp cloth without any additives Troubleshooting Problem Cause Solution Theunitcannot be operated The unit is blocked and hangs Pull the mains plug for approximately 5 seconds Then connect the unit again Reset the device to the...

Page 59: ...esign modifications in the course of continuous product development remains reserved This device has been tested according to all relevant current CE guidelines such as electromagnetic compatibility and low voltage directives and has been constructed in accordance with the latest safety regulations Disposal Meaning of the Wheelie Bin Symbol Take care of our environment do not dispose of electrical...

Page 60: ......

Page 61: ......

Page 62: ...Stand 05 12 Elektro technische Vertriebsges mbH www etv de MC 4457 DAB BT ...

Reviews: