12
2.4 Installation location
The natural stone heating unit is designed exclusively for fixed wall mounting. In this regard, care is
to be taken to ensure that a wall with a sufficient load bearing capacity is available.
Installation is possible in all rooms, in bathrooms the natural stone heating unit can be installed in
protection zone 2.
2.5 Installation of the unit
The unit is set up at the factory for
horizontal
installation.
In the event of
vertical
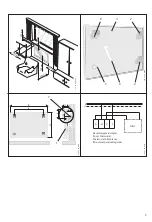
installation of the natural stone heating unit, the following changes are to
be made prior to starting the installation:
the wall mounting (
2
) lying above the mains connection lead must be exchanged with the
spacer bolt lying diagonally (
5
).
Care is to be taken to ensure that the mains connection cable is always located at the bottom
edge;
rotate both wall mountings with the slotted hole openings to face downwards.
Tighten the securing screws (6) in the natural stone heating unit carefully, as the dowels in
the natural stone slab can otherwise be turned excessively.
2.5.1 Securing on the wall
The natural stone heating unit must only be secured to a level wall, since cracks can otherwi-
se occur in the natural stone slab as the result of stresses.
In the event of any unevenness, the surface must be levelled prior to tightening the securing
screws.
Measure out dimensions
a
and
b
for the drilled holes, on the natural stone heating unit.
Drill holes, based on the noted dimensions, in a wall with a sufficient load-bearing capacity, ta-
king care to ensure that a safety distance of 100 mm on all sides is adhered to (e.g. dimension
b
+ 100 mm).
Screw the hexagonal screws (
7
) into the drilled holes up to the point at which the natural stone
heating unit with the open slotted holes in its wall mountings (
2
) can still be hooked on behind
the screw head.
Hang the natural stone heating unit (do not allow to topple or tilt –
danger of breakage
) and
tighten up the hexagonal screws. In this process, take care to ensure that any stresses which oc-
cur are compensated for by slightly loosening the securing screws (
6
) in the natural stone slab.
These should subsequently be retightened up to the stop point (overtightening can cause dowels
to become loose).
2.5.2 Electrical connection
Connect the natural stone heating unit only to a 230 V 50 Hz alternating current supply.
If the mains connection lead is shortened, take care to ensure that the natural stone heating unit
can be taken off again, even without disconnecting the connection lead.
2.6 First start-up
When the natural stone heating unit is heated up for the first time, a heating-up time of
20 minutes should not be exceeded. The slab must then cool down for at least 60 minutes.
This measure is to be repeated one further time.
In the first two days, the heating should be built up to the desired room temperature in stages.
This avoids hairline cracks developing. If hairline cracks should nevertheless develop, this is not dan-
gerous and impairs neither the functioning nor the safety of the natural stone heating unit.
2.7 Handover
Explain the functions of the unit to the user. Draw his or her attention to the safety instructions, in
particular.
Hand the operating and installation instructions to the user.
For the Fitter
!
!
!
!


