background image


9


|


P a g e


Trouble


Shooting


If


any


problem


occurs,


please


detach


the


plug


from


the


socket


and


contact


Euro

Parts


or


a


similarly


qualified


person


in


order


to


avoid


a


hazard.


Problem


Cause


Solution


Light


on,


but


motor


does


not


work


The


outlet


valve


is


blocked


Detach


flue


and


duct


then


turn


on


the


hood


to


check


if


the


valves


open


The


capacitor


has


failed


Call


for


technical


service


The


control


switch


has


broken


Call


for


technical


service


Light


does


not


work,


motor


does


not


work


No


power


supply


Plug


another


appliance


into


the


socket


to


confirm


there


is


power


supply


Fuse


has


blown


Open


up


the


plug


and


replace


he


13A


fuse


Vibration


The


propeller


is


damaged


or


unbalanced


Call


for


technical


service


The


hood


is


not


installed


correctly


Review


the


installation


instructions


and


check


the


installation


again


for


loose


screws,


brackets


or


connections


Insufficient


suction


effect


The


distance


between


the


hood


and


cooktop


is


too


great


Check


that


the


distance


is


between


600mm


and


762mm


The


filters


are


saturated


Clean


the


filters


from


grease


residue


and


replace


after


cleaning


6


|


P a g e


How


to


Use


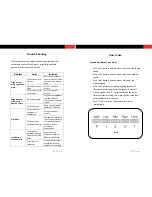
3


speed


adjustment


(see


pic


6)


o


Push


the


1


button,


and


the


motor


will


run


at


the


lowest


speed


o


Push


the


2


button,


and


the


motor


will


run


at


medium


speed


o


Push


the


3


button,


and


the


motor


will


run


at


the


highest


speed


o


Push


the


Light


button,


and


the


lighting


lamps


will


illuminate.


Push


it


again


and


the


lights


will


turn


off


o


On


any


speed,


Push


“T”


button


once


and


the


delay


timer


will


start


working.


The


motor


will


be


turned


off


automaticlly


after


5


minutes


o


Push


“T”


button


twice,


the


motor


will


turn


off


immediately.


Pic


6

Summary of Contents for Perfekt Pyramid?30

Page 1: ...Perfekt Pyramid 30 Perfekt Pyramid 36 Range Hood Instruction Manual Thank you for the purchase of this product Please read the manual carefully before operating the appliance ...

Page 2: ...G Appliances are imported and distributed in North America by Euro Line Appliances Inc For more information visit www euro line appliances com or contact 871 Cranberry Court Oakville Ontario L6L6J7 Canada Tel 905 829 3980 1 800 421 6332 Euro Line Appliances Inc 1 800 ELA WEST Euro Line Appliances West marketing euro line appliances com All AEG Appliances are backed by a comprehensive 2 year part a...

Page 3: ...lating fans frequently Grease should not be allowed to accumulate on fan or filter Use proper pan size Always use cookware appropriate for the size of the surface element Warning To reduce the risk of injury to persons in the event of a range top grease fire observe the following Smother flames with a close fitting lid baking sheet or metal tray and then turn off the burner Be careful to prevent b...

Page 4: ...rvision o Young children should be supervised to ensure that they do not play with the appliance o The maximum number of burners covered by a range hood should not exceed 5 o Any modifications to the appliance electric wire and plug is dangerous and voids the warranty Features o This appliance is manufactured from top quality materials and offers superb streamlined effects o With high suction powe...

Page 5: ...s from other appliances burning gas or other fuels 2 To install onto the wall mounting bracket should be positioned on wall 13 75 350mm above the bottom of the range hood see pic 1 and pic 2 in next page 3 Insert expanding screws into the holes see pic 2 in next page 4 Drill 2 holes in wall 2 75 70mm on either side of centre point of range hood Drill 2 additional holes for mounting bracket 2 36 60...

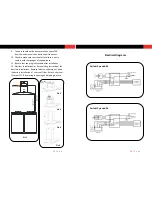
Page 6: ...e that the plug is accessible after installation 12 Ductless installations or Recirculating Instruction for ductless installations Remove label on underside of hood indicating installation of charcoal filter Attach charcoal filter part CF B by placing in opening and dipping in place 6 00 762 mm 24 3 0 950 111 2mm 3 8 44 Pic 1 Pic 5 Pic 4 Pic 2 Pic 3 10 P a g e Electrical Diagrams Perfekt Pyramid 3...

Page 7: ...od is not installed correctly Review the installation instructions and check the installation again for loose screws brackets or connections Insufficient suction effect The distance between the hood and cooktop is too great Check that the distance is between 600mm and 762mm The filters are saturated Clean the filters from grease residue and replace after cleaning 6 P a g e How to Use 3 speed adjus...

Page 8: ...nformation o There must be permanent and adequate ventilation of the room when operating the range hood with appliances burning gas or other fuels o Do not check the status of the filters when the range hood is operating wait at least 30 minutes after switching off to avoid scalding o Do not touch the LED light within 30 minutes after appliance use o Avoid operating a gas cooktop when there is no ...

Reviews: