background image

Problem

Possible cause

Solution

The appliance is noisy.

The appliance is not sup-
ported properly.

Check if the appliance stands
stable.

The lamp does not work.

The lamp is in stand-by.

Close and open the door.

The lamp is defective.

Refer to "Replacing the lamp".

The compressor operates
continually.

Temperature is set incor-
rectly.

Refer to "Operation" chapter.


Many food products were
put in at the same time.

Wait some hours and then
check the temperature again.


The room temperature is
too high.

Refer to climate class chart on
the rating plate.


Food products placed in
the appliance were too
warm.

Allow food products to cool to
room temperature before stor-
ing.

The door is not closed cor-
rectly.

Refer to "Closing the door".

There is too much frost and
ice.

The door is not closed cor-
rectly or the gasket is de-
formed/dirty.

Refer to "Closing the door".

The water drainage plug is
not correctly positioned.

Position the water drainage
plug in the correct way.

Food products are not
wrapped properly.

Wrap the food products bet-
ter.

Temperature is set incor-
rectly.

Refer to "Operation" chapter.

Water flows on the rear
plate of the refrigerator.

During the automatic de-
frosting process, frost
melts on the rear plate.

This is correct.

Water flows inside the refrig-
erator.

The water outlet is clog-
ged.

Clean the water outlet.

Food products prevent
that water flows into the
water collector.

Make sure that food products
do not touch the rear plate.

Water flows on the floor.

The melting water outlet is
not connected to the
evaporative tray above the
compressor.

Attach the melting water out-
let to the evaporative tray.

Door is misaligned or inter-
feres with ventilation grill.

The appliance is not level-
led.

Refer to "Levelling".

www.aeg.com

30

Summary of Contents for S53220CSW2

Page 1: ...DA Brugsanvisning 2 Køle fryseskab EN User Manual 19 Fridge Freezer SK Návod na používanie 36 Chladnička s mrazničkou S53220CSW2 ...

Page 2: ...r Brug et par minutter på at læse mere så du kan få det bedste ud af det Besøg vores websted for at Få rådgivning brochurer fejlfinding serviceinformation www aeg com Registrere dit produkt for bedre service www registeraeg com Købe tilbehør forbrugsvarer og originale reservedele til dit apparat www aeg com shop KUNDEPLEJE OG SERVICE Brug altid originale reservedele Sørg for at have følgende data ...

Page 3: ... med apparatet Rengøring og vedligeholdelse må ikke udføres af børn uden overvågning Opbevar al emballage utilgængeligt for børn 1 2 Generelt om sikkerhed Dette apparat er beregnet til husholdningsbrug eller lignende anvendelse som f eks Stuehuse kantineområder i butikker på kontorer og i andre arbejdsmiljøer Af kunder på hoteller moteller bed breakfast og andre miljøer af indkvarteringstypen Sørg...

Page 4: ... komfurer ovne eller kogeplader Apparatets bagside skal anbringes mod væggen Installér ikke apparatet hvor der er direkte sollys Installér ikke dette apparat på områder der er for fugtige eller for kolde som f eks udhuse garager og vinkældere Når du flytter apparatet skal du løfte op i forkanten så gulvet ikke bliver ridset 2 2 Tilslutning el ADVARSEL Risiko for brand og elektrisk stød Apparatet s...

Page 5: ...hvis dine hænder er våde eller fugtige Indfrys ikke madvarer der har været optøet Overhold opbevaringsanvisningerne på emballagen til frostvaren 2 4 Indvendigt lys Den type lampe der bruges i dette apparat er ikke egnet til oplysning i almindelige rum 2 5 Vedligeholdelse og rengøring ADVARSEL Risiko for skader på mennesker eller apparat Sluk for apparatet og tag stikket ud af kontakten inden vedli...

Page 6: ... stikket i en stikkontakt Drej termostatknappen med uret til en mellemindstilling 4 2 Deaktivering Sluk for apparatet ved at dreje termostatknappen til positionen O 4 3 Indstilling af temperatur Temperaturen reguleres automatisk Apparatet betjenes på følgende måde Drej termostatknappen mod lavere indstillinger for at vælge minimum køling Drej termostatknappen mod højere indstillinger for at vælge ...

Page 7: ...et nederste rum Den maksimale mængde madvarer der kan indfryses på 24 timer står på mærkepladen der er anbragt indvendigt i apparatet Indfrysningsprocessen varer 24 timer i dette tidsrum må der ikke lægges andre madvarer i som skal indfryses 5 2 Opbevaring af frosne madvarer Ved første start eller efter længere tids stilstand skal apparatet køre i mindst 2 timer før der lægges madvarer i Fryseskuf...

Page 8: ...i bagkanten før de kan tages ud Flyt ikke glashylden over grøntsagsskuffen Den sikrer korrekt luftcirkulation 5 6 Flaskestativ Sæt flaskehylden på plads og sæt flaskerne i med åbningerne fremad Sæt kun lukkede flasker i 5 7 Udtagning af fryserens frysekurve Frysekurvene har endestop så de ikke kan glide ud ved et uheld eller falde ned Hvis en kurv skal tages ud af fryseren trækker du den mod dig s...

Page 9: ...er kun sikkert at opbevare kød på denne måde i højst 1 2 dage Tilberedt mad pålæg kolde retter og lignende bør pakkes ind og kan stilles på alle hylder Frugt og grønt bør rengøres grundigt og lægges i den de særlige skuffe r Smør og ost bør lægges i specielle lufttætte beholdere eller pakkes ind i alufolie eller polyætylenposer så luften holdes bedst muligt ude Flasker disse har brug for en hætte ...

Page 10: ...akten og der tændes for skabet første gang skal du lade apparatet stå lodret i mindst 4 timer Dette sikrer tilstrækkelig tid til at olien løber tilbage i kompressoren Ellers kan kompressoren eller de elektroniske komponenter tage skade 7 3 Indvendig rengøring Inden apparatet tages i brug bør det vaskes indvendig inkl tilbehør med lunkent vand tilsat neutral sæbe for at fjerne den typiske lugt af n...

Page 11: ...på maden i skabet 7 7 Afrimning af fryseren PAS PÅ Brug aldrig skarpe metalgenstande til at skrabe rim af fryseren Det kan beskadige den Brug ikke mekaniske redskaber eller andre kunstige hjælpemidler til at fremskynde optøningen medmindre det er anbefalet af producenten Hvis dybfrostvarernes temperatur er steget under afrimningen kan det forkorte deres holdbarhed Ca 12 timer før afrimningen indst...

Page 12: ... et andet elek trisk apparat til den pågæl dende stikkontakt Kontakt en autoriseret elektriker Apparatet støjer Apparatet står ikke stabilt Kontrollér om apparatet står stabilt Pæren lyser ikke Pæren er i standby Luk og åbn døren Pæren er sprunget Se Udskiftning af pære Kompressoren kører hele tiden Temperaturen er indstillet forkert Se kapitlet Betjening Der blev lagt for store mængder madvarer i...

Page 13: ...tilsluttet til fordampnings bakken over kompresso ren Sæt afløbet til afrimningsvand på fordamperbeholderen Døren flugter ikke med kabi nettet eller støder på venti lationsristen Apparatet er ikke i vater Se Nivellering Temperaturen i apparatet er for lav høj Temperaturen er ikke in dstillet korrekt Vælg en højere lavere temper atur Døren er ikke lukket rig tigt Se Lukning af døren Madvarernes tem...

Page 14: ...ng Apparatet kan installeres et tørt sted med god udluftning hvor rumtemperaturen passer til den anførte klimaklasse på apparatets typeskilt Klima klasse Omgivelsestemperatur SN 10 C til 32 C N 16 C til 32 C ST 16 C til 38 C T 16 C til 43 C Der kan opstå visse funktionsproblemer for visse typer modeller når de betjenes uden for dette interval Der kan kun garanteres korrekt drift inden for det spec...

Page 15: ...glementet Stikket på netledningen har en kontakt til dette formål Hvis der ikke er jord på stikkontakten tilsluttes apparatet en særskilt jordforbindelse iht Stærkstrømsreglementet Spørg en autoriseret installatør til råds Producenten fralægger sig ethvert ansvar hvis de nævnte sikkerhedsregler ikke overholdes Apparatet er i overensstemmelse med EU direktiverne 9 4 Nivellering Ved opstillingen ska...

Page 16: ...sel 5 og skru den nederste hængseltap 6 ind i den venstre udboring på det nederste hængsel 5 6 9 Skru skruerne i det nederste hængsel ud og fjern hængslet 8 10 Skru de nederste dækselstik ud og skru dem i hullet på den modsatte side 7 11 Sæt det nederste hængsel i modsatte side og fastgør det med skruerne 8 7 8 12 Placér den nederste dør på den nederste hængseltap 9 13 Skru de midterste dækselstik...

Page 17: ...kabinettet Døren åbner og lukker rigtigt Undertiden slutter pakningen ikke perfekt til kabinettet hvis omgivelserne er kolde dvs om vinteren Hvis dette er tilfældet Pakningen tilpasser sig efterhånden af sig selv Hvis du ikke selv vil vende døren kan du henvende dig til det nærmeste autoriserede servicecenter En autoriseret tekniker vil herefter vende døren mod betaling 10 TEKNISK INFORMATION 10 1...

Page 18: ...let Anbring emballagematerialet i passende beholdere til genbrug Hjælp med at beskytte miljøet og menneskelig sundhed samt at genbruge affald af elektriske og elektroniske apparater Kasser ikke apparater der er mærket med symbolet sammen med husholdningsaffaldet Lever produktet tilbage til din lokale genbrugsplads eller kontakt din kommune www aeg com 18 ...

Page 19: ...e spend a few minutes reading to get the very best from it Visit our website for Get usage advice brochures trouble shooter service information www aeg com Register your product for better service www registeraeg com Buy Accessories Consumables and Original spare parts for your appliance www aeg com shop CUSTOMER CARE AND SERVICE Always use original spare parts When contacting our Authorised Servi...

Page 20: ... play with the appliance Cleaning and user maintenance shall not be made by children without supervision Keep all packaging away from children 1 2 General Safety This appliance is intended to be used in household and similar applications such as Farm houses staff kitchen areas in shops offices and other working environments By clients in hotels motels bed and breakfast and other residential type e...

Page 21: ...cookers oven or hobs The rear of the appliance must stand against the wall Do not install the appliance where there is direct sunlight Do not install this appliance in areas that are too humid or too colds such as the construction appendices garages or wine cellars When you move the appliance lift it by the front edge to avoid scratching the floor 2 2 Electrical connection WARNING Risk of fire and...

Page 22: ...has been thawed Obey the storage instructions on the packaging of frozen food 2 4 Internal light The type of lamp used for this appliance is not suitable for household room illumination 2 5 Care and cleaning WARNING Risk of injury or damage to the appliance Before maintenance deactivate the appliance and disconnect the mains plug from the mains socket This appliance contains hydrocarbons in the co...

Page 23: ...e shelf 7 Freezer drawers 8 Rating plate 4 OPERATION 4 1 Switching on Insert the electrical plug into a wall socket Turn the temperature regulator clockwise to a medium setting 4 2 Switching off To turn off the appliance turn the temperature regulator to the O position 4 3 Temperature regulation The temperature is automatically regulated ENGLISH 23 ...

Page 24: ...urs reset the temperature regulator to a warmer setting Place the fresh food to be frozen in the bottom compartment The maximum amount of food that can be frozen in 24 hours is specified on the rating plate a label located on the inside of the appliance The freezing process lasts 24 hours during this period do not add other food to be frozen 5 2 Storage of frozen food When first starting up or aft...

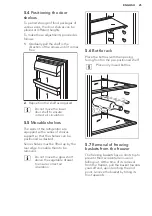
Page 25: ...es support so that the shelves can be positioned as desired Some shelves must be lifted up by the rear edge to enable them to be removed Do not move the glass shelf above the vegetable drawer to ensure correct air circulation 5 6 Bottle rack Place the bottles with the opening facing front in the pre positioned shelf Place only closed bottles 5 7 Removal of freezing baskets from the freezer The fre...

Page 26: ...frosting and so a saving in electricity consumption 6 3 Hints for fresh food refrigeration To obtain the best performance do not store warm food or evaporating liquids in the refrigerator do cover or wrap the food particularly if it has a strong flavour position food so that air can circulate freely around it 6 4 Hints for refrigeration Useful hints Meat all types wrap in polythene bags and place ...

Page 27: ... to the freezer in the shortest possible time not open the door frequently or leave it open longer than absolutely necessary once defrosted food deteriorates rapidly and cannot be refrozen do not exceed the storage period indicated by the food manufacturer 7 CARE AND CLEANING WARNING Refer to Safety chapters 7 1 General warnings CAUTION Unplug the appliance before carrying out any maintenance oper...

Page 28: ...event unpleasant smells WARNING If the cabinet will be kept on ask somebody to check it once in a while to prevent the food inside from spoiling in case of a power failure 7 6 Defrosting of the refrigerator Frost is automatically eliminated from the evaporator of the refrigerator compartment every time the motor compressor stops during normal use The defrost water drains out through a trough into ...

Page 29: ...e defrosting process place a pot of warm water in the freezer compartment In addition remove pieces of ice that break away before defrosting is complete 4 When defrosting is completed dry the interior thoroughly and keep the scraper for future use 5 Switch on the appliance After three hours reload the previously removed food into the freezer compartment 8 TROUBLESHOOTING WARNING Refer to Safety ch...

Page 30: ... not closed cor rectly or the gasket is de formed dirty Refer to Closing the door The water drainage plug is not correctly positioned Position the water drainage plug in the correct way Food products are not wrapped properly Wrap the food products bet ter Temperature is set incor rectly Refer to Operation chapter Water flows on the rear plate of the refrigerator During the automatic de frosting pr...

Page 31: ...e does not lead to the desired result contact the nearest Authorised Service Centre 8 2 Closing the door 1 Clean the door gaskets 2 If necessary adjust the door Refer to Installation 3 If necessary replace the defective door gaskets Contact the Authorised Service Centre 8 3 Replacing the lamp CAUTION Disconnect the plug from the mains socket 1 At the same time with the fingers expand up and down t...

Page 32: ...etween the top of the cabinet and the wall unit must be at least 100 mm Ideally however the appliance should not be positioned below overhanging wall units Accurate levelling is ensured by one or more adjustable feet at the base of the cabinet A B 100 mm min 20 mm CAUTION In order to guarantee proper functioning in ambient temperature above 38 C it is advised to have a 30mm separation between the ...

Page 33: ... Place the cover of the upper hinge into the holes on the opposite side 5 Screw off the screws of the middle hinge 3 6 Remove the plugs on the upper side of both doors and move them to the other side 7 Remove the lower door from the lower hinge pivot 4 4 3 8 Screw off the pivot of the lower hinge 5 and screw the lower hinge pivot 6 into the left drill of the lower hinge 5 6 9 Screw off the screws ...

Page 34: ...he door handles and plugs on the opposite side A A C C B B Do a final check to make sure that All screws are tightened The magnetic seal adheres to the cabinet The door opens and closes correctly If the ambient temperature is cold i e in Winter the gasket may not fit perfectly to the cabinet In that case wait for the natural fitting of the gasket In case you do not want to carry out the above ment...

Page 35: ... of the appliance and in the energy label 11 ENVIRONMENT CONCERNS Recycle the materials with the symbol Put the packaging in applicable containers to recycle it Help protect the environment and human health and to recycle waste of electrical and electronic appliances Do not dispose appliances marked with the symbol with the household waste Return the product to your local recycling facility or con...

Page 36: ... svoj spotrebič mohli využívať čo najlepšie Navštívte našu stránku kde nájdete Tipy na používanie brožúry riešenie problémov a informácie o údržbe www aeg com Zaregistrujte si produkt a využite tak ešte lepší servis www registeraeg com Do spotrebiča si môžete zakúpiť príslušenstvo spotrebný materiál a originálne náhradné diely www aeg com shop STAROSTLIVOSŤ A SLUŽBY ZÁKAZNÍKOM Odporúčame aby ste p...

Page 37: ...m používaní spotrebiča a rozumejú prípadným rizikám Nedovoľte aby sa deti hrali so spotrebičom Čistenie a údržbu nesmú vykonávať deti bez dozoru Obaly uschovajte mimo dosahu detí 1 2 Všeobecné bezpečnostné pokyny Tento spotrebič je určený na používanie v domácnosti a podobnom prostredí ako sú napr Vidiecke domy kuchynky pre zamestnancov v obchodoch kanceláriách a inom pracovnom prostredí Pre klien...

Page 38: ...adnú stranu spotrebiča je potrebné umiestniť oproti stene Neinštalujte spotrebič na miesta kde dopadá priame slnečné svetlo Tento spotrebič neinštalujte na miestach ktoré sú príliš vlhké alebo chladné ako napr prístavby garáže alebo vínne pivnice Pri presúvaní spotrebiča nadvihnite jeho prednú hranu aby ste nepoškriabali podlahu 2 2 Zapojenie do elektrickej siete VAROVANIE Hrozí nebezpečenstvo pož...

Page 39: ...estoru nevyberajte žiadne predmety ani sa ich nedotýkajte Rozmrazené potraviny nikdy znovu nezmrazujte Dodržiavajte pokyny ohľadne správneho uskladnenia uvedené na obale mrazených potravín 2 4 Vnútorné osvetlenie Druh žiarovky používaný v tomto spotrebiči nie je vhodný na osvetlenie izieb domácností 2 5 Ošetrovanie a čistenie VAROVANIE Hrozí nebezpečenstvo zranenia alebo poškodenia spotrebiča Pred...

Page 40: ...ok 4 PREVÁDZKA 4 1 Zapnutie Zástrčku zasuňte do sieťovej zásuvky Ovládač teploty otočte v smere pohybu hodinových ručičiek do strednej polohy 4 2 Vypnutie Ak chcete spotrebič vypnúť otočte ovládač teploty do polohy O 4 3 Regulácia teploty Teplota sa reguluje automaticky Pri prevádzke spotrebiča postupujte takto minimálne chladenie sa dosiahne otočením regulátora teploty smerom na nižšie nastavenia...

Page 41: ... zmrazenie môžete vložiť do spodnej priehradky Maximálne množstvo potravín ktoré možno zmraziť za 24 hodín sa uvádza na typovom štítku ktorý sa nachádza vo vnútri spotrebiča Proces zmrazovania trvá 24 hodín v tomto čase nepridávajte ďalšie potraviny na zmrazenie 5 2 Skladovanie mrazených potravín Pri prvom zapnutí spotrebiča alebo ak ste ho dlho nepoužívali nechajte spotrebič v prevádzke aspoň 2 h...

Page 42: ... niekoľkými lištami aby ste police mohli umiestniť do polohy ktorú požadujete Pri niektorých poličkách treba pri vyberaní nadvihnúť zadný okraj Nepremiestňujte sklenenú policu nad zásuvkou na ovocie a zeleninu aby bola zaručená správna cirkulácia vzduchu 5 6 Polica na fľaše Fľaše ukladajte hrdlom vpred na príslušnú policu Ukladajte iba zatvorené fľaše 5 7 Vybratie zmrazovacích košov z mrazničky Zm...

Page 43: ...matické odmrazovanie a aby ste ušetrili elektrickú energiu 6 3 Rady na chladenie čerstvých potravín V záujme optimálnej účinnosti do chladničky nevkladajte teplé potraviny ani odparujúce sa kvapaliny potraviny prikryte alebo zabaľte hlavne ak majú prenikavú arómu potraviny uložte tak aby vzduch mohol voľne cirkulovať okolo nich 6 4 Rady pre chladenie Užitočné rady Mäso všetky druhy zabaľte do poly...

Page 44: ...aloobchodný predajca adekvátne skladuje komerčné mrazené potraviny dbajte aby ste mrazené potraviny preniesli z predajne potravín do mrazničky podľa možnosti čo najrýchlejšie neotvárajte dvierka spotrebiča príliš často a nenechávajte ich otvorené dlhšie ako je absolútne nevyhnutné po rozmrazení sa potraviny rýchlo kazia a nesmú sa znova zmrazovať neprekračujte dobu skladovania stanovenú výrobcom p...

Page 45: ... 7 5 Obdobia mimo prevádzky Ak spotrebič nebudete dlhší čas používať vykonajte nasledujúce opatrenia 1 Spotrebič odpojte od elektrického napájania 2 Vyberte všetky potraviny 3 Spotrebič odmrazte v prípade potreby a potom spotrebič a všetky časti príslušenstva vyčistite 4 Spotrebič a všetky časti príslušenstva vyčistite 5 Nechajte dvierka pootvorené aby sa zabránilo vzniku nepríjemného zápachu VARO...

Page 46: ... do niekoľkých vrstiev novinového papiera a uložte na chladnom mieste VAROVANIE Mrazených potravín sa nedotýkajte mokrými rukami Ruky by vám mohli primrznúť k potravinám 3 Dvierka nechajte otvorené plastovú škrabku zasuňte na príslušné miesto v strednej časti dna a podložte nádobu na zachytávanie rozmrazenej vody Do mraziaceho priestoru vložte hrniec s teplou vodou aby sa proces odmrazovania urých...

Page 47: ...e si údaje o klimatickej triede uvedené na typovom štítku Potraviny vložené do spo trebiča boli príliš teplé Pred vložením nechajte potra viny vychladnúť na izbovú te plotu Dvierka spotrebiča nie sú správne zatvorené Pozrite si časť Zatvorenie dvierok Príliš veľa námrazy a ľadu Dvierka nie sú správne zatvorené alebo tesnenie je zdeformované špinavé Pozrite si časť Zatvorenie dvierok Nie je správne...

Page 48: ... príliš vysoká Pred vložením do spotrebiča nechajte potraviny najprv vy chladnúť na izbovú teplotu Do spotrebiča ste vložili naraz veľa potravín Do spotrebiča vkladajte naraz menej potravín Námraza je hrubšia ako 4 5 mm Spotrebič odmrazte Dvierka ste otvárali príliš často Dvierka otvorte len ak je to potrebné V spotrebiči neprúdi stude ný vzduch Zabezpečte prúdenie studené ho vzduchu v spotrebiči ...

Page 49: ...rávnu prevádzku je možné zaručiť len v rámci uvedeného teplotného rozsahu Ak máte akékoľvek pochybnosti týkajúce sa miesta inštalácie spotrebiča obráťte sa na predajcu na náš zákaznícky servis alebo na najbližšie servisné stredisko 9 2 Umiestnenie Spotrebič sa musí dať odpojiť od sieťového napájania Preto musí byť zásuvka po inštalácii spotrebiča ľahko prístupná Spotrebič by mal byť nainštalovaný ...

Page 50: ...ými predpismi Poraďte sa s kvalifikovaným elektrikárom Výrobca odmieta akúkoľvek zodpovednosť pri nedodržaní hore uvedených bezpečnostných opatrení Tento spotrebič spĺňa smernice EHS 9 4 Vyrovnanie do vodorovnej polohy Pri umiestňovaní spotrebiča dbajte na to aby bol vyrovnaný do vodorovnej polohy Vyrovnanie do vodorovnej polohy zabezpečte pomocou dvoch nastaviteľných nožičiek vpredu v dolnej čast...

Page 51: ...su 5 a zaskrutkujte čap dolného závesu 6 do ľavého otvoru dolného závesu 5 6 9 Odskrutkujte skrutky dolného závesu a odstráňte záves 8 10 Odskrutkujte dolné kryty a zaskrutkujte ich do otvoru na opačnej strane 7 11 Dolný záves premiestnite na opačnú stranu a upevnite ho pomocou skrutiek 8 7 8 12 Dolné dvierka umiestnite na čap dolného závesu 9 13 Odskrutkujte stredné kryty a zaskrutkujte ich do ot...

Page 52: ...erka sa správne otvárajú a zatvárajú Ak je okolitá teplota nízka t j v zime môže sa stať že tesnenie nebude dokonale priliehať V takom prípade počkajte kým sa tesnenie samovoľne neprispôsobí Ak predchádzajúce úkony nechcete robiť sami obráťte sa na najbližšie autorizované servisné stredisko Zmenu smeru otvárania dverí vykoná technik servisného strediska za poplatok 10 TECHNICKÉ INFORMÁCIE 10 1 Tec...

Page 53: ...čené symbolom odovzdajte na recykláciu Obal hoďte do príslušných kontajnerov na recykláciu Chráňte životné prostredie a zdravie ľudí a recyklujte odpad z elektrických a elektronických spotrebičov Nelikvidujte spotrebiče označené symbolom spolu s odpadom z domácnosti Výrobok odovzdajte v miestnom recyklačnom zariadení alebo sa obráťte na obecný alebo mestský úrad SLOVENSKY 53 ...

Page 54: ...www aeg com 54 ...

Page 55: ...SLOVENSKY 55 ...

Page 56: ...www aeg com shop 280154523 A 372014 ...

Reviews: