background image

3

4

1

5

2

5.

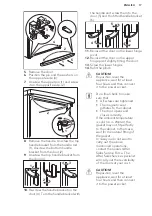
Remove the door.

6.

Position the pin and the washers on

the opposite side (4).

7.

Unscrew the upper pin (1) and screw

it on the opposite side. (2)

2

1

8.

Remove the handle. Unscrew the top

handle bracket from the handle rod

(1). Unscrew the bottom handle

bracket from the door (2)

9.

Unscrew the top handle bracket from

the door (3).

1

2

3

10.

Re-screw the handle bracket on the

door (4). Turn the handle bracket with

the handle and screw them to the

door (5) and the fitted handle bracket

(6)

6

5

4

11.

Re-insert the door on the lower hinge

pivot .

12.

Re-insert the door on the upper

hinge pivot slightly tilting the door.

13.

Screw the lower hinges.

14.

Refit the plinth.

CAUTION!

Reposition, level the

appliance, wait for at least

four hours and then connect

it to the power socket.

Do a final check to make

sure that:

• All screws are tightened.

• The magnetic seal

adheres to the cabinet.

• The door opens and

closes correctly.

If the ambient temperature

is cold (i.e. in Winter), the

gasket may not fit perfectly

to the cabinet. In that case,

wait for the natural fitting of

the gasket.

In case you do not want to

carry out the above

mentioned operations,

contact the nearest After

Sales Service Force. The

After Sales Service specialist

will carry out the reversibility

of the doors at your cost.

CAUTION!

Reposition, level the

appliance, wait for at least

four hours and then connect

it to the power socket.

ENGLISH

17

Summary of Contents for S74010KDX1

Page 1: ...EN User Manual Refrigerator S74010KDX1 ...

Page 2: ...end a few minutes reading to get the very best from it Visit our website for Get usage advice brochures trouble shooter service information www aeg com Register your product for better service www registeraeg com Buy Accessories Consumables and Original spare parts for your appliance www aeg com shop CUSTOMER CARE AND SERVICE Always use original spare parts When contacting our Authorised Service C...

Page 3: ...en play with the appliance Keep all packaging away from children Cleaning and user maintenance shall not be made by children without supervision 1 2 General Safety This appliance is intended to be used in household and similar applications such as Farm houses staff kitchen areas in shops offices and other working environments By clients in hotels motels bed and breakfast and other residential type...

Page 4: ...rs oven or hobs The rear of the appliance must stand against the wall Do not install the appliance where there is direct sunlight Do not install this appliance in areas that are too humid or too colds such as the construction appendices garages or wine cellars When you move the appliance lift it by the front edge to avoid scratching the floor 2 2 Electrical connection WARNING Risk of fire and elec...

Page 5: ...ser They are hot 2 4 Care and cleaning WARNING Risk of injury or damage to the appliance Before maintenance deactivate the appliance and disconnect the mains plug from the mains socket This appliance contains hydrocarbons in the cooling unit Only a qualified person must do the maintenance and the recharging of the unit Regularly examine the drain of the appliance and if necessary clean it If the d...

Page 6: ...N 3 1 Product overview 1 8 7 10 2 4 5 6 3 9 1 Control panel 2 Butter shelf 3 Door shelf 4 Bottle shelves 5 Snack shelf 6 Rating plate 7 Vegetable drawer 8 MaxiBox drawer 9 Glass shelves 10 DYNAMICAIR function www aeg com 6 ...

Page 7: ... 1 Connect the mains plug to the power socket 2 Press the appliance ON OFF if the display is off The alarm buzzer could operate after few seconds The temperature indicators show the set default temperature To reset the alarm refer to High temperature alarm To select a different set temperature refer to Temperature regulation If dEMo appears on the display refer to What to do if chapter If the door...

Page 8: ...n appears To turn off the Holiday mode repeat the procedure until the Holiday indicator icon goes off 4 7 Door open alarm An acoustic alarm will sound if the door is left open for a few minutes The door open alarm conditions are indicated by a flashing Alarm indicator an acoustic buzzer When normal conditions are restored door closed the alarm will stop The buzzer can also be switched off by press...

Page 9: ... To switch off the function repeat the steps until the DYNAMICAIR indicator goes off 5 DAILY USE WARNING Refer to Safety chapters 5 1 Movable shelves The walls of the refrigerator are equipped with a series of runners so that the shelves can be positioned as desired 5 2 Positioning the door shelves To permit storage of food packages of various sizes the door shelves can be placed at different heig...

Page 10: ...tings to allow automatic defrosting and so a saving in electricity consumption 6 3 Hints for fresh food refrigeration To obtain the best performance do not store warm food or evaporating liquids in the refrigerator do cover or wrap the food particularly if it has a strong flavour position food so that air can circulate freely around it 6 4 Hints for refrigeration Useful hints Meat all types wrap i...

Page 11: ...lean and free from debris 3 Rinse and dry thoroughly 4 If accessible clean the condenser and the compressor at the back of the appliance with a brush This operation will improve the performance of the appliance and save electricity consumption 7 4 Defrosting of the refrigerator Frost is automatically eliminated from the evaporator of the refrigerator compartment every time the motor compressor sto...

Page 12: ...m The temperature in the ap pliance is too high Refer to Door Open Alarm or High Temperature Alarm The door is left open Close the door The temperature in the ap pliance is too high Contact a qualified electrician or contact the nearest Author ized Service Centre A rectangular symbol is shown instead of numbers on the Temperature Display Temperature sensor prob lem Contact the nearest Author ized ...

Page 13: ...uch the rear plate Water flows on the floor The melting water outlet is not connected to the evaporative tray above the compressor Attach the melting water out let to the evaporative tray Temperature cannot be set The FROSTMATIC or COOLMATIC function is switched on Switch off FROSTMATIC or COOLMATIC manually or wait until the function resets auto matically to set the tempera ture Refer to FROSTMAT...

Page 14: ...ING Refer to Safety chapters 9 1 Positioning This appliance can be installed in a dry well ventilated indoor where the ambient temperature corresponds to the climate class indicated on the rating plate of the appliance Climate class Ambient temperature SN 10 C to 32 C N 16 C to 32 C ST 16 C to 38 C T 16 C to 43 C Some functional problems might occur for some types of models when operating outside ...

Page 15: ...red markings identifying the terminals in your plug proceed as follows 1 Connect the wire coloured green and yellow to the terminal marked either with the letter E or by the earth symbol or coloured green and yellow 2 Connect the wire coloured blue to the terminal either marked with the letter N or coloured black 3 Connect the wire coloured brown to the terminal either marked with the L or coloure...

Page 16: ... of the arrow A 2 Raise the shelf from the rear and push it forward until it is freed B 3 Remove the retainers C 1 2 3 9 7 Door reversibility WARNING Before carrying out any operations remove the plug from the power socket CAUTION To carry out the following operations we suggest that this be made with another person that will keep a firm hold on the doors of the appliance during the operations Bef...

Page 17: ...tilting the door 13 Screw the lower hinges 14 Refit the plinth CAUTION Reposition level the appliance wait for at least four hours and then connect it to the power socket Do a final check to make sure that All screws are tightened The magnetic seal adheres to the cabinet The door opens and closes correctly If the ambient temperature is cold i e in Winter the gasket may not fit perfectly to the cab...

Page 18: ...iance and in the energy label 11 ENVIRONMENT CONCERNS Recycle the materials with the symbol Put the packaging in applicable containers to recycle it Help protect the environment and human health and to recycle waste of electrical and electronic appliances Do not dispose appliances marked with the symbol with the household waste Return the product to your local recycling facility or contact your mu...

Page 19: ...ENGLISH 19 ...

Page 20: ...www aeg com shop 280154845 A 462014 ...

Reviews: