background image

S93000KZM0

EN

FRIDGE

USER MANUAL

2

DE

KÜHLSCHRANK

BENUTZERINFORMATION

23

IT

FRIGO

ISTRUZIONI PER L’USO

45

RU


66

Summary of Contents for S93000KZM0

Page 1: ...S93000KZM0 EN FRIDGE USER MANUAL 2 DE KÜHLSCHRANK BENUTZERINFORMATION 23 IT FRIGO ISTRUZIONI PER L USO 45 RU 66 ...

Page 2: ...se spend a few minutes reading to get the very best from it ACCESSORIES AND CONSUMABLES In the AEG webshop you ll find everything you need to keep all your AEG appliances looking spotless and working perfectly Along with a wide range of accessories designed and built to the high quality standards you would expect from specialist cookware to cutlery baskets from bottle holders to delicate laundry b...

Page 3: ... if 18 Technical data 18 Installation 20 Noises 22 Environmental concerns The following symbols are used in this user manual Important information concerning your personal safety and information on how to avoid damaging the appliance General information and tips Environmental information Subject to change without notice Contents 3 ...

Page 4: ...he plug out of the socket cut the connection cable as close to the appliance as you can and remove the door to prevent playing chil dren to suffer electric shock or to close themselves into it If this appliance featuring magnetic door seals is to replace an older appliance having a spring lock latch on the door or lid be sure to make that spring lock unusable before you discard the old appliance T...

Page 5: ... appliance to direct sunlight Bulb lamps2 used in this appliance are special purpose lamps selected for household ap pliances use only They are not suitable for household room illumination Daily Use Do not put hot pot on the plastic parts in the appliance Do not store flammable gas and liquid in the appliance because they may explode Do not place food products directly against the air outlet on th...

Page 6: ...vent possible burn The appliance must not be located close to radiators or cookers Make sure that the mains plug is accessible after the installation of the appliance Connect to potable water supply only 4 Service Any electrical work required to do the servicing of the appliance should be carried out by a qualified electrician or competent person This product must be serviced by an authorized Serv...

Page 7: ...w seconds To reset the alarm refer to High temperature alarm 4 If dEMo appears on the display the appliance is in demonstration mode Refer to What to do if paragraph 5 The temperature indicators show the set default temperature To select a different set temperature refer to Temperature regulation Switching off To switch off the appliance do these steps 1 Press the ON OFF button for 5 seconds 2 The...

Page 8: ...until the Minute Minder indicator flashes 2 Press the OK button to confirm 3 The Minute Minder indicator goes off It is possible to change the time at any time during the countdown and at the end by press ing the Temperature colder button and the Temperature warmer button Child Lock function To lock the buttons from unintentional operation select the Child Lock function To switch on the function 1...

Page 9: ...er When normal conditions are restored door closed the alarm will stop During the alarm the buzzer can be switched off by pressing any button FIRST USE Cleaning the interior Before using the appliance for the first time wash the interior and all internal accessories with lukewarm water and some neutral soap so as to remove the typical smell of a brand new product then dry thoroughly Do not use det...

Page 10: ...rage of food packages of various sizes the door shelves can be placed at dif ferent heights Positioning the sliding box The sliding box can be placed at different heights To make these adjustments proceed as follow 1 lift the shelf with the sliding box up wards and out of the holders in the door 2 remove the retaining bracket out of the guide under the shelf 3 Reverse the above operation to insert...

Page 11: ...ator com partments This allows you to stock more fresh food Taste degree of freshness quality and nutritional values vitamins and minerals are well preserved Loss of weight in vegetables and fruit diminishes Food yields a higher degree of nutritional value The LONGFRESH 0 C compartment is also suitable for defrosting food In this case the thawed food can be stored up to two days Humidity control B...

Page 12: ...tops lift and re move You can remove all drawers to store large quanti ties of foods Storage time in the longfresh 0 C compartment for fresh food Type of food Air humidity adjustment Storage time Onion dry up to 5 months Butter dry up to 1 month Large pork cuts dry up to 10 days Beef venison small pork cuts poultry dry up to 7 days Tomato sauce dry up to 4 days Fish shellfish cooked meat products ...

Page 13: ...orter the storage time Cakes containing cream and other kinds of pastry products can be stored in the longfresh 0 C compartment for 2 or 3 days Not to be placed in the longfresh 0 C compartment cold sensitive fruit which have to be stored at cellar or room temperature like pineapple bananas grapefruit melons mango papaya oranges lemons kiwi fruit The types of food not mentioned above should be sto...

Page 14: ...pliance is fully loaded the compressor may run continuously causing frost or ice on the evaporator If this happens set the Temperature Regulator toward warmer settings to allow automatic defrosting and so a saving in electricity consump tion Hints for fresh food refrigeration To obtain the best performance do not store warm food or evaporating liquids in the refrigerator do cover or wrap the food ...

Page 15: ...ctricity consumption The lowest shelf dividing the cooler compartment from the LONGFRESH 0 C compartment can be removed only for cleaning To remove pull out the shelf straight The cover plates above the drawers in the compartment can be taken out for cleaning To make sure fully functionality of the LONGFRESH 0 C compartment the lowest shelf and cover plates must be put back in their original posit...

Page 16: ...s into a recipient on the compressor and evaporates This recipi ent cannot be removed Periods of non operation When the appliance is not in use for long periods take the following precautions disconnect the appliance from electricity supply remove all food defrost5 and clean the appliance and all accessories leave the door doors ajar to prevent unpleasant smells If the cabinet will be kept on ask ...

Page 17: ...he door open longer than necessary The product temperature is too high Let the product temperature de crease to room temperature be fore storage The room temperature is too high Decrease the room temperature The compressor does not start immediately after pressing the COOLMATIC switch or after changing the temperature This is normal no error has oc curred The compressor starts after a pe riod of t...

Page 18: ...the lamp The appliance is equipped with a longlife LED interior light Only service is allowed to replace the lighting device Contact your Service Center Closing the door 1 Clean the door gaskets 2 If necessary adjust the door Refer to Installation 3 If necessary replace the defective door gaskets Contact the Service Center TECHNICAL DATA Dimension of the recess Height 1855 mm Width 545 mm Depth 57...

Page 19: ...re spond to your domestic power supply The appliance must be earthed The power supply cable plug is provided with a contact for this purpose If the domestic power supply socket is not earthed connect the appliance to a separate earth in compliance with current regulations consulting a qualified electrician The manufacturer declines all responsibility if the above safety precautions are not ob serv...

Page 20: ...ilter from the plastic bag 3 Insert the filter in the slot found in the back of the flap cover 2 4 Close the flap cover During operation always keep the air ventilation flap closed The filter should be handled carefully so frag ments do not loosen from the surface NOISES There are some sounds during normal running compressor refrigerant circulation BRRR HISSS CLICK BLUBB CRACK SSSRRR OK CLICK CLIC...

Page 21: ...BRRR BRRR BLUBB BLUBB HISSS HISSS SSSRRR SSSRRR Noises 21 ...

Page 22: ... electronic equipment By ensuring this product is disposed of correctly you will help prevent potential negative consequences for the environment and human health which could otherwise be caused by inappropriate waste handling of this product For more detailed information about recycling of this product please contact your local council your household waste disposal service or the shop where you p...

Page 23: ...cht vorhanden sind Nehmen Sie sich ein paar Minuten Zeit zum Lesen um seine Vorzüge kennen zu lernen ZUBEHÖR UND VERBRAUCHSMATERIALIEN Im AEG Webshop finden Sie alles was Sie für ein makelloses Aussehen und perfektes Funktionieren Ihrer AEG Geräte benötigen Wir bieten auch ein umfangreiches Zubehörsortiment das Ihre höchsten Qualitätsansprüche erfüllt vom Profi Kochgeschirr bis zu Besteckkörben vo...

Page 24: ...ge 38 Was tun wenn 40 Technische Daten 40 Montage 42 Geräusche 44 Hinweise zum Umweltschutz In dieser Benutzerinformation werden folgende Symbole verwendet Wichtige Hinweise zur Sicherheit von Personen und Informationen zur Vermeidung von Geräteschäden Allgemeine Hinweise und Ratschläge Hinweise zum Umweltschutz Änderungen vorbehalten 24 Inhalt ...

Page 25: ...rden damit sie nicht am Gerät herumspielen können Halten Sie das Verpackungsmaterial unbedingt von Kindern fern Erstickungsgefahr Ziehen Sie vor der Entsorgung des Gerätes den Netzstecker schneiden Sie das Netzkabel so nah wie möglich am Gerät ab und entfernen Sie die Tür so dass spielende Kinder vor elektrischem Schlag geschützt sind und sich nicht in dem Gerät einschließen können Wenn dieses Ger...

Page 26: ...st schwer Vorsicht beim Transport Entnehmen oder berühren Sie nie mit nassen feuchten Händen Tiefkühlgut da dies zu Hautverletzungen oder Kälteverbrennungen führen kann Das Gerät nicht über eine längere Zeit direkter Sonneneinstrahlung aussetzen Die Leuchtmittel7 für dieses Gerät sind Speziallampen die ausschließlich für Haushalts geräte geeignet sind Sie eignen sich nicht zur Raumbeleuchtung Tägl...

Page 27: ...eisungen Das Gerät sollte zur Vermeidung von Verbrennungen durch Berührung von heißen Bau teilen Kompressor Kondensator möglichst mit der Rückseite gegen eine Wand aufge stellt werden Das Gerät darf nicht in der Nähe von Heizkörpern oder Kochern installiert werden Vergewissern Sie sich dass der Netzstecker des Gerätes nach der Installation frei zugäng lich ist Verbinden Sie das Gerät ausschließlic...

Page 28: ...larmanzeige 6 Temperaturanzeige Einschalten des Geräts Zum Einschalten des Geräts 1 Stecken Sie den Netzstecker in die Netzsteckdose 2 Drücken Sie die Taste ON OFF wenn das Display ausgeschaltet ist 3 Nach ein paar Sekunden ertönt möglicherweise ein akustisches Alarmsignal Wie Sie den Alarm ausschalten erfahren Sie unter Temperaturwarnung 4 Wenn dEMo auf dem Display angezeigt wird befindet sich da...

Page 29: ...zeigt den eingestellten Wert 30 Minuten ein paar Sekunden lang an 2 Drücken Sie die Einstelltaste des Timers um den eingestellten Wert des Timers auf 1 bis 90 Minuten zu ändern 3 Drücken Sie zur Bestätigung die Taste OK Die Anzeige Minute Minder leuchtet Der Timer beginnt zu blinken min Nach Ablauf des Countdowns blinkt die Anzeige Minute Minder und es ertönt ein Alarmsig nal 1 Drücken Sie die Tas...

Page 30: ...C wird nach etwa 6 Stunden automatisch abgeschaltet Zum Ausschalten der Funktion vor ihrer automatischen Abschaltung 1 Die Taste Mode drücken bis die Anzeige COOLMATIC blinkt 2 Drücken Sie zur Bestätigung die Taste OK 3 Die Anzeige COOLMATIC erlischt Die Funktion wird durch die Auswahl einer anderen Temperatur für den Kühlraum ausge schaltet Alarm Tür offen Es ertönt ein Alarmsignal wenn die Tür e...

Page 31: ...ten Bereich des Kühlraums anzeigt Verstellbare Ablagen Einsätze Die Wände des Kühlschranks sind mit einer Anzahl von Führungsschienen ausgestattet die verschie dene Möglichkeiten für das Einsetzen der Ablagen bieten Zur besseren Raumnutzung können die vorderen Halbteile der Ablagen auf die rückwärtigen hi naufgelegt werden Positionierung der Türeinsätze Die Türeinsätze können in verschiedener Höhe...

Page 32: ...und es ist keine Einstellung erforderlich Die konstante Lagertemperatur von ca 0 C und die relative Feuchte zwischen 45 und 90 bieten optimale Bedingungen für alle Arten von Lebensmitteln Daher können Sie eine Vielzahl frischer Lebensmittel im LONGFRESH 0 C Fach lagern denn hier halten sie bis zu 3 mal frischer und qualitativ besser im Vergleich zu normalen Kühlfä chern Dies ermöglicht die Lagerun...

Page 33: ...uchtigkeitsgrad wird erreicht wenn beide Schieberegler auf diese Position gestellt und die Lüftungsschlitze geschlossen sind Die Feuchtigkeit wird eingeschlossen und kann nicht entweichen Longfresh Schubladen Der Feuchtigkeitsgrad kann nicht eingestellt wer den Die Metalleinsätze in den Schubladen ermöglichen die freie Luftzirkulation und damit eine verbesser te Frischhaltung der Lebensmittel Das ...

Page 34: ...o feucht bis zu 21 Tagen Brokkoli Chinakohl Grünkohl Kohl Rettich Wirsing feucht bis zu 14 Tagen Erbsen Kohlrabi feucht bis zu 10 Tagen Frühlingszwiebeln Radieschen Spargel Spinat feucht bis zu 7 Tagen Obst 1 Birnen frische Datteln Erd beeren Pfirsiche 1 feucht bis zu 1 Monat Pflaumen 1 Rhabarber Stachelbeeren feucht bis zu 21 Tagen Äpfel keine kälteempfindli chen Sorten Quitten feucht bis zu 20 T...

Page 35: ...ackt und trocken zu lagern Proteinreiche Lebensmittel verderben schneller So verderben Meeresfrüchte schneller als Fisch und dieser schneller als Fleisch In einem Fach mit 0 C lässt sich diese Art von Le bensmitteln bis zu dreimal länger und ohne Qualitätsverlust lagern Alle in einem Fach mit 0 C gelagerten Lebensmittel sind ca 15 30 Minuten vor dem Ver zehr aus der Schublade zu nehmen Dies gilt i...

Page 36: ...nanen Kartoffeln Zwiebeln und Knoblauch sollten nicht im Kühlschrank aufbewahrt werden außer diese sind dafür speziell verpackt REINIGUNG UND PFLEGE VORSICHT Ziehen Sie bitte vor jeder Reinigungsarbeit immer den Netzstecker aus der Steckdose Der Kältekreis des Gerätes enthält Kohlenwasserstoffe Wartungsarbeiten und Nachfüllen von Kältemittel dürfen daher nur durch vom Hersteller autorisiertes Fach...

Page 37: ... die den im Gerät verwendeten Kunststoff angreifen können Aus diesem Grund ist es empfehlenswert das Gerät außen nur mit warmem Wasser und etwas flüssigem Tellerspülmittel zu reinigen Schließen Sie das Gerät nach der Reinigung wieder an die Netzversorgung an Wechseln des Kohlefilters Der Kohlefilter trägt dazu bei die Gerüche im Innern des Kühlschranks zu reduzieren Da durch wird eine Übertragung ...

Page 38: ...all nicht im Innern des Gerätes verdirbt WAS TUN WENN WARNUNG Ziehen Sie vor der Fehlersuche immer den Netzstecker aus der Steckdose Maßnahmen im Rahmen der Fehlersuche die in der vorliegenden Gebrauchsanweisung nicht beschrieben sind dürfen nur von einem qualifizierten Elektriker bzw einer anderen kompetenten Person durchgeführt werden Problem Mögliche Ursache Abhilfe Das Gerät ist zu laut Das Ge...

Page 39: ...e die Taste COOL MATIC gedrückt oder die Temperatur auf einen an deren Wert eingestellt ha ben Das ist keine Störung sondern normal Der Kompressor schaltet sich nach einer Weile ein Wasser fließt an der Rück wand des Kühlschranks herunter Beim automatischen Abtauen fließt das abgetaute Wasser an der Rückwand des Geräts he runter Das ist normal Die Temperatur im Gerät ist zu hoch niedrig Der Temper...

Page 40: ... langlebigen LED Innenbeleuchtung ausgestattet Die Beleuchtung darf nur von einem Fachmann ausgetauscht werden Wenden Sie sich hierzu an den Kundendienst Schließen der Tür 1 Reinigen Sie die Türdichtungen 2 Stellen Sie die Tür nach Bedarf ein Siehe hierzu Montage 3 Ersetzen Sie die defekten Türdichtungen falls erforderlich Kontaktieren Sie den Kun dendienst TECHNISCHE DATEN Abmessung der Aussparun...

Page 41: ...Anschluss Kontrollieren Sie vor der ersten Benutzung des Gerätes ob die Netzspannung und fre quenz Ihres Hausanschlusses mit den auf dem Typenschild angegebenen Anschlusswerten übereinstimmen Das Gerät muss geerdet sein Zu diesem Zweck ist die Netzkabelsteckdose mit einem Schutzkontakt ausgestattet Falls die Steckdose Ihres Hausanschlusses nicht geerdet sein sollte lassen Sie das Gerät bitte gemäß...

Page 42: ...ingesetzt werden bevor das Gerät eingeschaltet wird 1 Öffnen Sie die Klappenabdeckung 1 2 Entnehmen Sie den Filter aus der Plastikum hüllung 3 Setzen Sie den Filter in den Schlitz an der Rückseite der Klappenabdeckung 2 ein 4 Schließen Sie die Klappenabdeckung Die Lüftungsklappe muss während des Betriebs stets geschlossen sein Behandeln Sie den Filter sorgfältig damit sich kei ne Partikel von der ...

Page 43: ...CLICK CLICK BRRR BRRR BLUBB BLUBB HISSS HISSS Geräusche 43 ...

Page 44: ...von elektrischen und elektronischen Geräten abgegeben werden muss Durch Ihren Beitrag zum korrekten Entsorgen dieses Produkts schützen Sie die Umwelt und die Gesundheit Ihrer Mitmenschen Umwelt und Gesundheit werden durch falsches Entsorgen gefährdet Weitere Informationen über das Recycling dieses Produkts erhalten Sie von Ihrem Rathaus Ihrer Müllabfuhr oder dem Geschäft in dem Sie das Produkt gek...

Page 45: ... alla lettura per sapere come trarre il massimo dal vostro elettrodomestico ACCESSORI E PRODOTTI DI CONSUMO All interno del webshop AEG troverete tutto ciò che vi serve per fare in modo che i vostri elettrodomestici AEG siano sempre perfettamente puliti e funzionanti Non mancano inoltre una vasta gamma di accessori studiati e realizzati conformemente agli elevati standard qualitativi che vi aspett...

Page 46: ...fare se 62 Dati tecnici 62 Installazione 64 Rumori 65 Considerazioni ambientali In questo manuale sono riportati i seguenti simboli Informazioni importanti relative alla prevenzione dei rischi per la salute personale e dei danni alle apparecchiature Informazioni e consigli generali Informazioni in materia di sicurezza ambientale Con riserva di modifiche 46 Indice ...

Page 47: ...ischi di soffocamento Qualora l apparecchio venga demolito estrarre la spina dalla presa tagliare il cavo di col legamento il più vicino possibile all apparecchio e smontare lo sportello per evitare che i bambini giocando possano subire scosse elettriche o chiudersi dentro l apparecchio Se questo nuovo apparecchio che è dotato di guarnizioni magnetiche nello sportello va a sostituirne uno più vecc...

Page 48: ...estrarre o di toccare gli alimenti riposti nel vano congelatore con le mani ba gnate o umide il contatto potrebbe provocare abrasioni o ustioni da freddo Evitare un esposizione prolungata dell apparecchiatura alla luce solare diretta Lampadine12 utilizzate in questa apparecchiatura solo lampadine speciali selezionate per essere usate unicamente negli elettrodomestici Non sono adatte per l illumina...

Page 49: ...contro una parete per evitare di toccare le parti calde o di rimanervi impigliati compressore condensatore evitando così possibili scottature L apparecchio non deve essere posto vicino a radiatori o piani di cottura a gas Installare l apparecchio in modo che la presa rimanga accessibile Per il collegamento idrico usare solo sorgenti d acqua potabile 14 Assistenza tecnica Gli interventi elettrici s...

Page 50: ...e della temperatura Accensione Per accendere l apparecchiatura procedere come segue 1 Inserire la spina nella presa di alimentazione 2 Premere il tasto ON OFF se il display è spento 3 Il segnale acustico d allarme potrebbe attivarsi dopo alcuni secondi Per resettare l allarme consultare la sezione Allarme di alta temperatura 4 Se dEMo appare sul display l apparecchiatura si trova in modalità dimos...

Page 51: ...ato 30 minuti per alcuni secondi 2 Premere il tasto Regolatore timer per modificare il valore impostato da 1 a 90 minuti 3 Premere il tasto OK per confermare La spia Minute Minder viene visualizzata Il Timer inizia a lampeggiare min Al termine del conto alla rovescia la spia Minute Minder lampeggia e viene emesso un se gnale acustico 1 premere il tasto OK per spegnere il segnale acustico e porre f...

Page 52: ...re il tasto Mode fino a quando l indicatore COOLMATIC lampeggia 2 Premere il tasto OK per confermare 3 La spia COOLMATIC si spegne La funzione si disattiva selezionando un impostazione di temperatura per il frigorifero di versa Allarme porta aperta Se la porta è lasciata aperta per alcuni minuti viene emesso un segnale acustico Le condi zioni di allarme della porta aperta sono indicate da indicato...

Page 53: ...el frigorifero per mettono di posizionare i ripiani a diverse altezze Per un migliore sfruttamento dello spazio i semi ripiani anteriori possono essere collocati sopra a quelli posteriori Posizionamento delle mensole Per facilitare l introduzione di alimenti di diverse dimensioni le mensole della porta possono essere posizionate ad altezze differenti Posizionamento della scatola scorrevole La scat...

Page 54: ... automaticamente Resta costantemente a circa 0 C e non richiede regolazioni La temperatura di conservazione costante di circa 0 C e l umidità relativa compresa tra il 45 e il 90 forniscono condizioni ottimali per i vari tipi di alimenti È possibile pertanto conservare svariati alimenti freschi nello scomparto LONGFRESH 0 C dove avranno una durata almeno tripla e una qualità migliore rispetto ai no...

Page 55: ...umidità relativa elevata fino al 90 Questo livello di umidità viene raggiunto quando entrambi i dispositivi di scorrimento vengono impostati sulla posizione e le aperture di ventilazione sono chiuse L umi dità viene mantenuta e non può fuoriuscire Cassetti Longfresh L umidità non è regolabile I ripiani in filo all interno degli scomparti consen tono la libera circolazione dell aria e quindi una mi...

Page 56: ...do fino a 21 giorni Broccoli cavolo cinese cavolo verde cavolo cappuccio rava nelli verza umido fino a 14 giorni Piselli rapa umido fino a 10 giorni Cipollotti ravanelli asparagi spinaci umido fino a 7 giorni Frutta 1 Pere datteri freschi fragole pesche 1 umido fino a 1 mese Prugne 1 rabarbaro uva spina umido fino a 21 giorni Mele che non risentono del freddo mele cotogne umido fino a 20 giorni Al...

Page 57: ...ionati e asciutti Gli alimenti ad alto tenore proteico si deteriorano più rapidamente I frutti di mare ad esempio si deteriorano prima del pesce che a sua volta si deteriora prima della carne Conservando gli alimenti in uno scomparto a 0 C il tempo di conservazione relativo al l alimento può essere aumentato anche di tre volte senza perdita di qualità Tutti gli alimenti conservati in uno scomparto...

Page 58: ...o contiene idrocarburi nell unità di raffreddamento la manutenzione e la ricarica devono pertanto essere effettuate esclusivamente da tecnici autorizzati Pulizia periodica L apparecchio deve essere pulito regolarmente Lavare l interno e gli accessori con acqua tiepida e sapone neutro Ispezionare regolarmente le guarnizioni dello sportello ed eliminare con un panno umido tracce di sporco e residui ...

Page 59: ...ati Per garantire il massimo rendimento sostituire il filtro a carbone una volta all anno I filtri di ricambio possono essere acquistati presso il distributore di zona Il filtro dell aria è posizionato dietro al flap e può essere raggiunto tirando il flap verso l e sterno 1 Estrarre dall alloggiamento il filtro dell aria consumato Inserire nella fessura il filtro di ricambio 2 Chiudere il flap Il ...

Page 60: ...tti e quattro i piedini devono essere a contatto con il pavimen to L apparecchio non funzio na La lampadina non si accende L apparecchio è spento Accendere l apparecchiatura La spina non è inserita corretta mente nella presa di alimenta zione Inserire correttamente la spina nella presa di alimentazione L apparecchio non riceve corren te Assenza di tensione nella presa di alimentazione Collegare al...

Page 61: ... alimenti lasciarli raffreddare a temperatura ambiente Sono stati introdotti molti ali menti contemporaneamente Introdurre gli alimenti poco alla volta La temperatura nel frigori fero è troppo alta L aria fredda non circola corret tamente all interno dell apparec chio Adottare le misure necessarie per garantire una corretta circolazio ne dell aria fredda Sul display della tempera tura è visualizza...

Page 62: ...ll installazione leggere attentamente le Informazioni per la sicurezza che riportano le precauzioni da rispettare per la propria incolumità e il corretto funziona mento dell apparecchiatura Luogo d installazione AVVERTENZA Qualora occorra ritirare dall uso un apparecchio con serratura si raccomanda di rendere quest ultima inservibile per evitare che i bambini possano chiudersi all interno La spina...

Page 63: ...ciente Installazione del filtro dell aria al carbone Il filtro dell aria al carbone è un filtro a carbone attivo che assorbe i cattivi odori e permette a tutti gli alimenti conservati di mantenere le proprie proprietà organolettiche senza il ri schio di contaminazione di odori Alla consegna il filtro a carbone è contenuto in una confezione di plastica che ne garantisce la durata e le caratteristic...

Page 64: ...rante l uso alcuni rumori di funzionamento come quelli del compressore o del circuito refrigerante sono da considerarsi normali BRRR HISSS CLICK BLUBB CRACK SSSRRR OK CLICK CLICK BRRR BRRR BLUBB BLUBB 64 Rumori ...

Page 65: ...parecchiature elettriche ed elettroniche Provvedendo a smaltire questo prodotto in modo appropriato si contribuisce a evitare potenziali conseguenze negative per l ambiente e per la salute che potrebbero derivare da uno smaltimento inadeguato del prodotto Per informazioni più dettagliate sul riciclaggio di questo prodotto contattare l ufficio comunale il servizio locale di smaltimento rifiuti o il...

Page 66: ...AEG AEG AEG www aeg com shop 66 ...

Page 67: ...68 71 74 74 79 80 82 84 84 86 88 67 ...

Page 68: ... 68 ...

Page 69: ... R600a 1 2 3 4 5 6 16 17 18 16 17 69 ...

Page 70: ... 19 18 Frost Free 19 70 ...

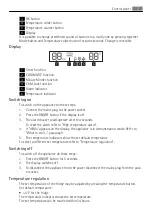
Page 71: ... 1 2 3 4 5 6 1 ON OFF 2 Mode 3 OK 4 5 6 Mode 5 6 2 4 3 1 1 2 COOLMATIC 3 Minute Minder 4 71 ...

Page 72: ...5 6 1 2 ON OFF 3 4 dEMo 5 1 ON OFF 5 2 3 5 C 24 Minute Minder Minute Minder 1 Mode Minute Minder 30 2 1 90 72 ...

Page 73: ...3 OK Minute Minder min Minute Minder 1 OK 1 Mode Minute Minder 2 OK 3 Minute Minder 1 Mode 2 3 OK 1 Mode 2 OK 3 COOLMATIC COOLMATIC 1 Mode COOLMATIC 2 OK COOLMATIC COOLMATIC 6 1 Mode COOLMATIC 2 OK 73 ...

Page 74: ...3 COOLMATIC dEMo 74 ...

Page 75: ... 1 2 3 CLEANAIR CONTROL LONGFRESH C L E A N A I R C O N T R O L 75 ...

Page 76: ... LONGFRESH LONGFRESH 0 C 0 C 0 C 45 90 LONGFRESH 0 C 3 LONGFRESH 0 C 50 90 76 ...

Page 77: ...Longfresh 0 C 5 1 10 7 4 3 2 77 ...

Page 78: ... 1 21 14 10 7 1 1 1 1 21 20 14 10 8 7 5 1 0 C 0 C 78 ...

Page 79: ... 0 C 0 C 0 C 0 C 15 30 79 ...

Page 80: ... LONGFRESH 0 C 80 ...

Page 81: ... LONGFRESH 0 C 1 2 1 2 81 ...

Page 82: ... 20 20 82 ...

Page 83: ... COOLMATIC dEMo dEMo OK 10 83 ...

Page 84: ... 1 2 3 1855 545 575 230 240 50 84 ...

Page 85: ...SN 10 C 32 C N 16 C 32 C ST 16 C 38 C T 16 C 43 C 50 mm min 200 cm2 min 200 cm2 85 ...

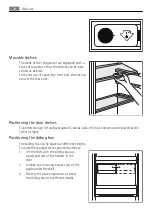
Page 86: ... 1 1 2 3 2 4 BRRR HISSS CLICK BLUBB CRACK SSSRRR OK CLICK CLICK 1 2 86 ...

Page 87: ...BRRR BRRR BLUBB BLUBB HISSS HISSS SSSRRR SSSRRR 87 ...

Page 88: ...CRACK CRACK 88 ...

Page 89: ...89 ...

Page 90: ...90 ...

Page 91: ...91 ...

Page 92: ...www aeg com shop 222353915 A 172011 ...

Reviews: