background image

17

Guarantee Conditions

Guarantee Conditions

AEG offer the following guarantee to the first purchaser of this appliance.

1. The guarantee is valid for 12 months commencing when the appliance is

handed over to the first retail purchaser, which must be verified by purcha-
se invoice or similar documentation.
The guarantee does not cover commercial use.

2. The guarantee covers all parts or components which fail due to faulty work-

manship or faulty materials. The guarantee does not cover appliances whe-
re defects or poor performance are due to misuse, accidental damage,
neglect, faulty installation, unauthorised modification or attempted repair,
commercial use or failure to observe requirements and recommendations
set out in the instruction book.
This guarantee does not cover such parts as light bulbs, removable glas-
sware plastic.

3. Should guarantee repairs be necessary the purchaser must inform the nea-

rest customer service office (manufacturerÕs service or authorised agent).
AEG reserves the right to stipulate the place of the repair (i.e. the custo-
merÕs home, place of installation or AEG workshop).

4. The guarantee or free replacement includes both labour and materials. 
5. Repairs carried out under guarantee do not extend the guarantee period for

the appliance. Parts removed during guarantee repairs become the pro-
perty of AEG.

6. The purchaserÕs statutory rights are not affected by this guarantee.

European Guarantee

If you should move to another country within Europe then your guarantee
moves with you to your new home subject to the following qualifications:
- The guarantee starts from the date you first purchased your product.
- The guarantee is for the same period and to the same extent for labour and

parts as exist in the new country of use for this brand or range of products.

- This guarantee relates to you and cannot be transferred to another user.
- Your new home is within the European Community (EC) or European Free

Trade Area.

- The product is installed and used in accordance with our instructions and is

only used domestically, i.e. a normal household.

- The product is installed taking into account regulations in your new 

country.

Before you move please contact your nearest Customer Care Centre, listed
below, to give them details of your new home. They will then ensure that the
local Service Organisation is aware of your move and able to look after you
and your appliances.
France

Senlis

+33 (0)3 44 62 29 29

Germany

NŸrnberg

+49 (0) 911 323 2600

Italy

Pordenone

+39 (0) 1678 47053

Sweden

Stockholm

+46 (0) 8 738 7910

UK

Slough

+44 (0) 8705 350 350

Summary of Contents for Santo 2632-4 KG

Page 1: ...Santo 2632 4 KG Fridge Freezer Operating Instructions ...

Page 2: ...ch are important for your safety or for the proper functioning of the appliance are stressed with a warning triangle and or the words Warning Important Attention Please observe the following instructions carefully Additional information regarding operation and practical applications of the appliance appear after this symbol Tips and notes concerning economical and environmentally sound use of the ...

Page 3: ...orrect positioning of foods 9 Freezing and storing frozen food 9 Preparation of Ice Cubes 10 Defrosting 11 Switching off the appliance 12 Cleaning and Care 12 Energy Saving Tips 13 Something Not Working 14 Changing the light bulb 15 Service and Spare Parts 16 Guarantee Conditions 17 Installation 18 Electrical Connection 18 Installation Location 19 Your appliance needs air 19 Rear spacers 20 Levell...

Page 4: ... The refrigerant isobutane R600a is contained within the refrigerant circuit of the appliance a natural gas with a high level of environ mental compatibility which is nevertheless flammable During transportation and installation of the appliance be certain that none of the components of the refrigerant circuit become damaged If the refrigerant circuit should become damaged Ð avoid open flames and ...

Page 5: ...always pull the plug from the mains socket do not pull on the cable Service Under no circumstances should you attempt to repair the appliance yourself Repairs carried out by inexperienced persons may cause injury or serious malfunctioning Contact your local AEG Service Force Centre Disposal Appliance Packaging Information All materials are environmentally sound The plastics can be recycled and are...

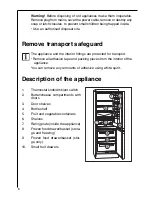
Page 6: ...ble Remove plug from mains sever the power cable remove or destroy any snap or latch closures to prevent small children being trapped inside Use an authorised disposal site Description of the appliance 1 Thermostat knob Ambient switch 2 Butter cheese compartments with doors 3 Door shelves 4 Bottle shelf 5 Fruit and vegetable containers 6 Shelves 7 Rating plate inside the appliance 8 Frozen food dr...

Page 7: ... the refrigerator compartment and freezer com partment cannot be independently regulated If you want to freeze fresh food rapidly select setting Ò6Ó ensuring that the temperature in the refrigerator compartment does not drop below 0 C You should promptly reset the temperature regulator to setting Ò3Ó or Ò4Ó if this does occur Important High ambient temperatures e g on hot summer days and a cold se...

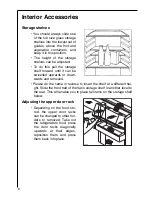
Page 8: ...lled upwards or down wards and removed Please do the same in reverse to insert the shelf at a different hei ght Slide the front half of the Vario storage shelf in another level to the rear This will enable you to place tall items on the storage shelf below Adjusting the upper door rack Depending on the food sto red the upper door racks can be changed to other hol ders or removed Take out the refri...

Page 9: ... drying out or transmit ting smells to other stored foods The following materials are suitable plastic bags or food wrap plastic containers with lids special elasticised plastic covers aluminium foil Freezing and storing frozen food You can use your freezer for freezing fresh food yourself Important The temperature in the freezer compartment must be Ð18 C or col der before freezing food Please obs...

Page 10: ...s can even explode Never store lemonade juices beer wine sparkling wine etc in the freezer All foods must be packed air tight prior to freezing so that they do not dry out or lose their flavour and so that no flavour contamina tion of other frozen goods occurs Important Do not touch frozen food with wet hands Your hands could freeze to the food 1 To achieve faster freezing of food or to freeze the...

Page 11: ...liner comple te defrosting should be carried out as follows 1 Remove the frozen food from the freezer wrap it in several layers of newspaper and put it in a very cool place 2 Switch off the appliance and pull out the plug or turn the temperature regulator to Ò0Ó 3 Leave the freezer compartment door open 4 Insert the plastic scraper into the recess provided under the defrost water channel and pla c...

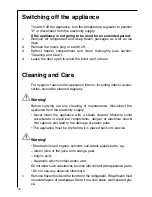
Page 12: ...rly Warning Before carrying out any cleaning or maintenance disconnect the appliance from the electricity supply Never clean the appliance with a steam cleaner Moisture could accumulate in electrical components danger of electrical shock Hot vapours can lead to the damage of plastic parts The appliance must be dry before it is placed back into service Warning Ethereal oils and organic solvents can...

Page 13: ...ot install the appliance near cookers radiators or other sources of warmth High ambient temperatures cause longer more frequent operation of the compressor Ensure sufficient air circulation and exhaust at the appliance base and at the back wall of the appliance Never cover air vent ope nings Do not place warm foods into the appliance Allow warm foods to cool first Only leave door open as long as n...

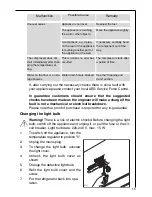
Page 14: ...ocation section A large quantity of warm food was placed in the appliance within the last 24 hours Open the door only as long as necessary Malfunction Possible Cause Remedy Appliance does not work Appliance is not switched on Switch on the appliance Mains plug is not plugged in or is loose Insert mains plug Fuse has blown or is defec tive Check fuse replace if necessary Socket is defective Mains m...

Page 15: ... the light bulb switch off the appliance and unplug it or pull the fuse or the cir cuit breaker Light bulb data 220 240 V max 15 W 1 To switch off the appliance turn the temperature regulator to position 0 2 Unplug the mains plug 3 To change the light bulb unscrew the light cover 4 Unhook the light bulb cover as shown 5 Change the defective light bulb 6 Refit the light bulb cover and the screw 7 P...

Page 16: ...details of the fault What is the fault When does the fault occur 4 The model production number and product identification number 5 Date of purchase This information can be found on the serial plate in the interior at the left of the appliance Model Name Model Number PNC Serial Number S No Customer Care Department For general enquiries regarding your AEG appliance or futher informa tion on AEG prod...

Page 17: ... 5 Repairs carried out under guarantee do not extend the guarantee period for the appliance Parts removed during guarantee repairs become the pro perty of AEG 6 The purchaserÕs statutory rights are not affected by this guarantee European Guarantee If you should move to another country within Europe then your guarantee moves with you to your new home subject to the following qualifications The guar...

Page 18: ... are coloured in accordance with the fol lowing code Green and Yellow Earth Blue Neutral Brown Live As the colours of the wires in the mains lead of this appliance may not correspond with the coloured markings identifying the terminals in your plug proceed as follows 1 The wire coloured green and yellow must be connected to the termi nal marked with the letter ÒEÓ or by the earth symbol or coloure...

Page 19: ...be found on the serial plate which is located at the left on the inside of the appliance The following table shows which ambient temperature is correct for each climate classification Climate classification for an ambient temperature of SN 10 to 32 C N 16 to 32 C Your appliance needs air Air flows in from under the door at the front and flows out upwards over the back For correct air circulation i...

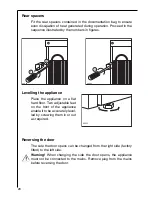
Page 20: ...ens can be changed from the right side factory fitted to the left side Warning When changing the side the door opens the appliance must not be connected to the mains Remove plug from the mains before reversing the door AEG70 AEG68 2 1 AEG69 3 Rear spacers Fit the rear spacers contained in the documentation bag to ensure even dissipation of heat genereted during operation Proceed in the sequence il...

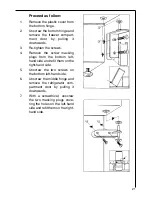
Page 21: ...s 4 Remove the screw masking plugs from the bottom left hand side and refit them on the right hand side 5 Unscrew the two screws on the bottom left hand side 6 Unscrew the middle hinge and remove the refrigerator com partment door by pulling it downwards 7 With a screwdriver unscrew the two masking plugs cove ring the holes on the left hand side and refit them on the right hand side ...

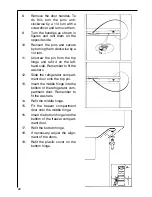
Page 22: ...fit it on the left hand side Remember to fit the washers 12 Slide the refrigerator compart ment door onto the top pin 13 Insert the middle hinge into the bottom of the refrigerator com partment door Remember to fit the washers 14 Refit the middle hinge 15 Fit the freezer compartment door onto the middle hinge 16 Insert the bottom hinge into the bottom of the freezer compart ment door 17 Refit the ...

Page 23: ...nt prevention regulations for refrigeration appliances VBG 20 and the regulations of the German Society of Electrical Engineers VDE were observed in the manufacture of this appliance The refrigerant circuit has been checked for leaks This appliance is in accordance with the following EU guidelines Ð 73 23 EWG dated 19 February 1973 low voltage guidelines Ð 89 336 EWG dated 3 May 1989 including gui...

Page 24: ...AEG HausgerŠte GmbH Postfach 1036 D 90327 NŸrnberg http www aeg hausgeraete de 2222 100 52 ...

Reviews: