background image

Positioning the door shelves

To permit storage of food packages of various sizes, the door shelves can be placed at

different heights.

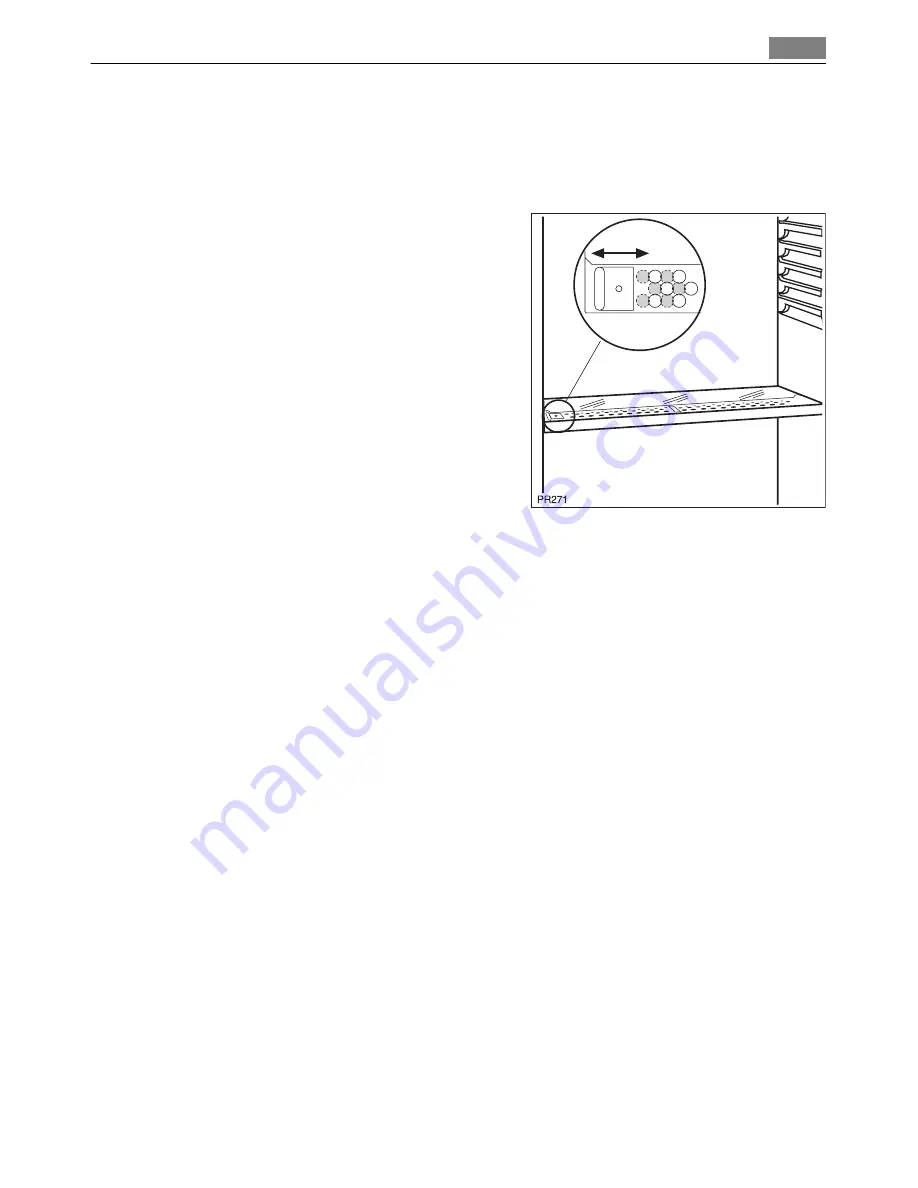
Humidity control

The glass shelf incorporates a device with slits

(adjustable by means of a sliding lever), which

makes it possible to regulate the temperature in

the vegetable drawer(s).

When the ventilation slots are closed:

the natural moisture content of the food in the

fruit and vegetable compartments is preserved for

longer.

When the ventilation slots are opened:

more air circulation results in a lower air moisture

content in the fruit and vegetable compartments.

Helpful hints and tips

Hints for energy saving

• Do not open the door frequently or leave it open longer than absolutely necessary.

• If the ambient temperature is high, the Temperature Regulator is on the higher setting

and the appliance is fully loaded, the compressor may run continuously, causing frost

or ice on the evaporator. If this happens, turn the Temperature Regulator toward lower

settings to allow automatic defrosting and so a saving in electricity consumption.

Hints for fresh food refrigeration

To obtain the best performance:

• do not store warm food or evaporating liquids in the refrigerator

• do cover or wrap the food, particularly if it has a strong flavour

• position food so that air can circulate freely around it

Hints for refrigeration

Useful hints:

Meat (all types) : wrap in polythene bags and place on the glass shelf above the vegetable

drawer.

For safety, store in this way only one or two days at the most.

Cooked foods, cold dishes, etc..: these should be covered and may be placed on any shelf.

Fruit and vegetables: these should be thoroughly cleaned and placed in the special drawer(s)

provided.

Butter and cheese: these should be placed in special airtight containers or wrapped in

aluminium foil or polythene bags to exclude as much air as possible.

Milk bottles: these should have a cap and should be stored in the bottle rack on the door.

Helpful hints and tips

29

Summary of Contents for SANTO C 8 16 41-4i

Page 1: ...SANTO C 8 16 41 4i Benutzerinformation Kühl Gefrierkombination User manual Fridge Freezer ...

Page 2: ...ch 6 Einfrieren frischer Lebensmittel 6 Lagerung gefrorener Produkte 7 Gefrierkalender 7 Auftauen 7 Eiswürfelbereitung 7 Kälteakku s 7 Verstellbare Ablagen Einsätze 8 Positionierung der Türeinsätze 8 Feuchtigkeitsregulierung 8 Praktische Tipps und Hinweise 8 Energiespartipps 8 Hinweise für die Kühlung frischer Lebensmittel 9 Hinweise für die Kühlung 9 Hinweise zum Einfrieren 9 Hinweise zur Lagerun...

Page 3: ...e möglich am Gerät ab und entfernen Sie die Tür so dass spielende Kinder vor elektrischem Schlag geschützt sind und sich nicht in dem Gerät einschließen können Wenn dieses Gerät mit magnetischer Türdichtung ein älteres Modell mit Schnappver schluss Türlasche an der Tür oder auf dem Deckel ersetzt machen Sie den Schnapp verschluss vor dem Entsorgen des Altgerätes unbrauchbar So verhindern Sie dass ...

Page 4: ...rätes Lagern Sie keine feuergefährlichen Gase oder Flüssigkeiten in dem Gerät Explosionsge fahr Legen Sie Lebensmittel nicht direkt vor den Luftauslass auf der Rückwand 2 Ein aufgetautes Produkt darf nicht wieder eingefroren werden Abgepackte Tiefkühlkost immer entsprechend den Herstellerangaben aufbewahren Die Lagerempfehlungen des Geräteherstellers sollten strikt eingehalten werden Halten Sie si...

Page 5: ...rbinden Sie das Gerät ausschließlich mit einer Trinkwasserzuleitung 3 Kundendienst Sollte die Wartung des Gerätes elektrische Arbeiten verlangen so dürfen diese nur von einem qualifizierten Elektriker oder einem Elektro Fachmann durchgeführt werden Wenden Sie sich für Reparaturen und Wartung nur an Fachkräfte der autorisierten Kun dendienststellen und verlangen Sie stets Original Ersatzteile Umwel...

Page 6: ...wählt wer den die ein automatisches Abtauen ermöglicht und damit auch einen niedrigeren Ener gieverbrauch Erste Inbetriebnahme Reinigung des Innenraums Bevor Sie das Gerät in Betrieb nehmen beseitigen Sie den typischen Neugeruch am besten durch Auswaschen der Innenteile mit lauwarmem Wasser und einem neutralen Reini gungsmittel Sorgfältig nachtrocknen Benutzen Sie keinesfalls Putzmittel oder Scheu...

Page 7: ...zeigen verschiedene Arten gefrorener Lebensmittel an Die Zahlen geben die Lagerzeiten in Monaten für die entsprechenden Arten gefrorener Lebensmittel an Es hängt von der Qualität der Lebensmittel und ihrer Behandlung vor dem Einfrieren ab ob der obere oder der untere Wert für die angezeigte Lagerzeit gilt Auftauen Tiefgefrorene oder gefrorene Lebensmittel können vor der Verwendung je nach der zur ...

Page 8: ...ckungen Feuchtigkeitsregulierung In die Glasablage ist eine Vorrichtung mit über einen Schieber verstellbaren Schlitzen integriert die die Temperaturregelung in den Gemüsefä chern ermöglicht Bei geschlossenen Lüftungsschlitzen bleibt der natürliche Feuchtegehalt der Lebens mittel in den Obst und Gemüsefächern für län gere Zeit erhalten Bei geöffneten Lüftungsschlitzen führt die höhere Luftzirkulat...

Page 9: ...e diese sollten stets in speziellen luftdichten Behältern verpackt sein oder in Aluminiumfolie bzw in lebensmittelechte Tüten eingepackt werden um so wenig Luft wie möglich in der Verpackung zu haben Milchflaschen bitte bewahren Sie Milchflaschen stets mit Deckel im Flaschenregal in der Tür auf Bananen Kartoffeln Zwiebeln und Knoblauch sollten nicht im Kühlschrank aufbewahrt werden außer diese sin...

Page 10: ...ehen Sie bitte vor jeder Reinigungsarbeit immer den Netzstecker aus der Steckdose Der Kältekreis des Gerätes enthält Kohlenwasserstoffe Wartungsarbeiten und Nachfüllen von Kältemittel dürfen daher nur durch vom Hersteller autorisiertes Fachpersonal ausge führt werden Regelmäßige Reinigung Der gesamte Kühlschrank muss regelmäßig gereinigt werden Reinigen Sie die Innenseiten und die Zubehörteile mit...

Page 11: ...ls damit das Wasser nicht überfließt und auf die gelagerten Lebensmittel tropft Be nutzen Sie dazu bitte das mitgelieferte Reini gungswerkzeug das sich bereits in der Ablauföff nung befindet Abtauen des Gefrierschranks Auf den Ablagen des Gefrierschranks und im Innern des oberen Fachs wird sich stets etwas Reif bilden Tauen Sie den Gefrierschrank ab wenn die Reifschicht eine Stärke von etwa 3 bis ...

Page 12: ...ießlich an die Angaben des Geräteherstellers Ein Temperaturanstieg des Gefrierguts während des Abtauens des Gerätes kann die Lager zeit dieser Lebensmittel verkürzen Stillstandzeiten Bei längerem Stillstand des Gerätes müssen Sie folgendermaßen vorgehen trennen Sie das Gerät von der Netzversorgung entnehmen Sie alle Lebensmittel tauen Sie das Gerät ab 4 Reinigen Sie das Gerät und alle Zubehörteile...

Page 13: ...ch Lassen Sie die Produkttemperatur auf Raumtemperatur abkühlen bevor Sie die Produkte einlagern Die Raumtemperatur ist zu hoch Senken Sie die Raumtemperatur Wasser fließt auf die hin tere Platte des Kühl schranks Beim automatischen Abtauen schmilzt der Frost auf der hint eren Platte Das ist normal Wasser fließt in den Kühlschrank Der Wasserabflusskanal ist ver stopft Reinigen Sie den Wasserabflus...

Page 14: ... Sie die Lebensmittel richtig DieTüristnicht richtiggeschlos sen Siehe hierzu Schließen der Tür Der Temperaturregler ist nicht richtig eingestellt Stellen Sie eine höhere Tempera tur ein Ersetzen der Lampe 1 Trennen Sie den Netzstecker von der Netzversorgung 2 Lösen Sie die Schraube an der Lampenabdeckung 3 Nehmen Sie die Lampenabdeckung ab siehe hierzu die Abbildung 4 Ersetzen Sie die alte Lampe ...

Page 15: ... C bis 38 C T 16 C bis 43 C Elektrischer Anschluss Kontrollieren Sie vor der ersten Benutzung des Gerätes dass die Netzspannung und fre quenz Ihres Hausanschlusses mit den auf dem Typschild angegebenen Anschlusswerten übereinstimmen Das Gerät muss geerdet sein Zu diesem Zweck ist die Netzkabelsteckdose mit einem Schutzkontakt ausgestattet Falls die Steckdose Ihres Hausanschlusses nicht geerdet sei...

Page 16: ... Türanschlags Die Tür des Geräts geht nach rechts auf Wenn Sie möchten dass die Tür nach links aufgeht befolgen Sie bitte diese Schritte bevor Sie das Gerät einbauen 1 Lösen Sie den oberen Bolzen und entfer nen Sie ihn 2 Entfernen Sie die obere Türe 3 Nehmen Sie das Distanzstück ab 4 Lösen Sie das mittlere Scharnier 5 Entfernen Sie die untere Tür A B 16 Gerät aufstellen ...

Page 17: ...wissern Sie sich dass sich das Netzkabel des Gerätes frei bewegen kann Führen Sie diese Schritte durch 1 Installieren Sie das Gerät in der Einbau nische Schieben Sie das Gerät in Pfeilrichtung 1 bis die obere Anschlagleiste am Kü chenmöbel anliegt Vergewissern Sie sich dass der Abstand zwischen dem Gerät und der Schrankvorderkante 44 mm beträgt Schieben Sie das Gerät auf der den Scharnieren gegenü...

Page 18: ...Abstand zwischen Kü chenmöbel und Gerät abgedeckt Öffnen Sie die Tür Drücken Sie das Kunststoffdistanzstück in den Zwi schenraum 3 Befestigen Sie das Gerät mit 4 Schrauben in der Nische 4 Bringen Sie den Dichtungsstreifen wie in der Abbildung gezeigt am Gerät an 44mm 4mm I I 18 Gerät aufstellen ...

Page 19: ...n den Öffnungen der oberen Anschlagleis te Bauen Sie das Entlüftungsgitter B ein Bringen Sie die Scharnierabdeckungen E am Scharnier an 7 Schließen Sie das Gerät seitlich wie folgt an das Küchenmöbel an a Lösen Sie die Schrauben von Teil G und verschieben Sie Teil G zur Küchenmöbel Seitenwand b Ziehen Sie die Schrauben von Teil G erneut fest c Befestigen Sie Teil H an Teil G B E E D C G H Gerät au...

Page 20: ...n Sie die Teile Ha Hb Hc und Hd 9 Montieren Sie Teil Ha an der Innenseite der Tür des Küchenmöbels 10 Drücken Sie Teil Hc auf Teil Ha Ha Hb Hc Hd ca 50 mm ca 50 mm 21 mm 90 90 21 mm Ha Hc 20 Gerät aufstellen ...

Page 21: ...d markie ren Sie die Bohrungen 12 Nehmen Sie das Führungsstück ab Mar kieren Sie 8 mm von der Außenkante entfernt die Stelle an der der Nagel K einzuschlagen ist 13 Setzen Sie das Führungsstück erneut auf die Führungsschiene und schrauben Sie es mit den mitgelieferten Schrauben fest Richten Sie die Küchenmöbeltür und die Gerätetür mittels Führungsstück Hb aus Ha Hb 8 mm Ha K 8 mm Hb Gerät aufstell...

Page 22: ... nicht als normaler Haushaltsabfall zu behandeln ist sondern an einem Sammelpunkt für das Recycling von elektrischen und elektronischen Geräten abgegeben werden muss Durch Ihren Beitrag zum korrekten Entsorgen dieses Produkts schützen Sie die Umwelt und die Gesundheit Ihrer Mitmenschen Umwelt und Gesundheit werden durch falsches Entsorgen gefährdet Weitere Informationen über das Recycling dieses P...

Page 23: ...ng the door shelves 29 Humidity control 29 Helpful hints and tips 29 Hints for energy saving 29 Hints for fresh food refrigeration 29 Hints for refrigeration 29 Hints for freezing 30 Hints for storage of frozen food 30 Care and cleaning 30 Periodic cleaning 30 Defrosting of the refrigerator 31 Defrosting the freezer 31 Periods of non operation 32 What to do if 32 Replacing the lamp 34 Closing the ...

Page 24: ... this appliance featuring magnetic door seals is to replace an older appliance having a spring lock latch on the door or lid be sure to make that spring lock unusable before you discard the old appliance This will prevent it from becoming a death trap for a child General safety CAUTION Keep ventilation openings clear of obstruction The appliance is intended for keeping foodstuff and or beverages i...

Page 25: ...able gas and liquid in the appliance because they may explode Do not place food products directly against the air outlet on the rear wall 6 Frozen food must not be re frozen once it has been thawed out Store pre packed frozen food in accordance with the frozen food manufacturer s in structions Appliance smanufacturersstoragerecommendationsshould bestrictlyadheredto Refer to relevant instructions D...

Page 26: ...re parts must be used Environment Protection This appliance does not contain gasses which could damage the ozone layer in either its refrigerant circuit or insulation materials The appliance shall not be discarded together with the urban refuse and rubbish The insulation foam contains flammable gases the appliance shall be disposed according to the applicable regulations to obtain from your local ...

Page 27: ...zer compartment is suitable for freezing fresh food and storing frozen and deep frozen food for a long time To freeze fresh foods it is not necessary to change the medium setting However for a faster freezing operation turn the temperature regulator toward higher settings to obtain the maximum coldness In this condition the refrigerator compartment temperature might drop below 0 C If this occurs r...

Page 28: ...he refrigerator com partment or at room temperature depending on the time available for this operation Small pieces may even be cooked still frozen directly from the freezer in this case cooking will take longer Ice cube production This appliance is equipped with one or more trays for the production of ice cubes Fill these trays with water then put them in the freezer compartment Do not use metall...

Page 29: ...ly causing frost or ice on the evaporator If this happens turn the Temperature Regulator toward lower settings to allow automatic defrosting and so a saving in electricity consumption Hints for fresh food refrigeration To obtain the best performance do not store warm food or evaporating liquids in the refrigerator do cover or wrap the food particularly if it has a strong flavour position food so t...

Page 30: ...possibly cause the skin to be freeze burnt it is advisable to show the freezing in date on each individual pack to enable you to keep tab of the storage time Hints for storage of frozen food To obtain the best performance from this appliance you should make sure that the commercially frozen foodstuffs were adequately stored by the re tailer be sure that frozen foodstuffs are transferred from the f...

Page 31: ... the evaporator of the refrigerator compartment every time the motor compressor stops during normal use The defrost water drains out through a trough into a special container at the back of the appliance over the motor compressor where it evaporates It is important to periodically clean the defrost water drain hole in the middle of the refrigerator compartment channel to prevent the water over flo...

Page 32: ... device or any artificial means to speed up the thawing process other than those recommended by the manufacturer A temperature rise of the frozen food packs during defrosting may shorten their safe storage life Periods of non operation When the appliance is not in use for long periods take the following precautions disconnect the appliance from electricity supply remove all food defrost 8 and clea...

Page 33: ... plate of the refrigerator During the automatic defrosting process frost defrosts on the rear plate This is correct Water flows into the re frigerator The water outlet is clogged Clean the water outlet Products prevent that water flows into the water collector Make sure that products do not touch the rear plate Water flows on the ground The melting water outlet does not flow in the evaporative tra...

Page 34: ... refer to the il lustration 4 Replace the used lamp with a new lamp of the same power the maximum power is shown on the lamp cover 5 Install the lamp cover 6 Tighten the screw to the lamp cover 7 Connect the mains plug to the mains socket 8 Open the door Make sure that the lamp comes on Closing the door 1 Clean the door gaskets 2 If necessary adjust the door Refer to Installation 3 If necessary re...

Page 35: ...ovided with a contact for this purpose If the domestic power supply socket is not earthed connect the appliance to a separate earth in compliance with current regulations consulting a qualified electrician The Manufacturer declines all responsibility if the above safety precautions are not ob served This appliance complies with the E E C Directives Removing the shelf holders Your appliance is equi...

Page 36: ...spacer 4 Loosen the middle hinge 5 Remove the lower door 6 Loosen and remove the lower pin On the opposite side 1 Tighten the lower pin 2 Install the lower door 3 Tighten the middle hinge 4 Install the spacer 5 Install the upper door 6 Tighten the upper pin 36 Installation ...

Page 37: ...he appliance in the direction of the arrow 1 until the upper gap cover stops against the kitchen furniture Make sure that the distancebetweenthe appliance and the cupboard front edge is 44 mm Push the appliance in the direction of the arrow 2 against the cupboard on theoppositesideofthehinge Makesure that the clearance between the appli ance and the cupboard is 4 mm 50 mm min 200 cm2 min 200 cm2 1...

Page 38: ...akes sure that the distance be tween the appliance and the kitchen furniture is correct Openthedoor Putthelowerhingecover in position 3 Attach the appliance to the niche with 4 screws 4 Apply the adhesive sealing strip to the appliance as shown in figure 44mm 4mm I I 38 Installation ...

Page 39: ... to the lugs and the hinge holes Install the vent grille B Attach the hinge covers E to the hinge 7 Connect the appliance laterally to the kitchen furniture sidewall a Loosen the screws of the part G and move the part G till the fur niture sidewall b Tighten the screws of the part G again c Attach the part H to the part G B E E D C G H Installation 39 ...

Page 40: ...isconnect the parts Ha Hb Hc and Hd 9 Install the part Ha on the inner side of the kitchen furniture 10 Push the part Hc on the part Ha Ha Hb Hc Hd ca 50 mm ca 50 mm 21 mm 90 90 21 mm Ha Hc 40 Installation ...

Page 41: ...the furniture door and mark the holes 12 Remove the brackets and mark a dis tance of 8 mm from the outer edge of the door where the nail must be fitted K 13 Place the small square on the guide again and fix it with the screws supplied Align the kitchen furniture door and the appliance door by adjusting the part Hb Ha Hb 8 mm Ha K 8 mm Hb Installation 41 ...

Page 42: ...uld be taken to the appropriate collection point for the recycling of electrical and electronic equipment By ensuring this product is disposed of correctly you will help prevent potential negative consequences for the environment and human health which could otherwise be caused by inappropriate waste handling of this product For more detailed information about recycling of this product please cont...

Page 43: ...43 ...

Page 44: ...auchsmaterial und Ersatzteile Dann besuchen Sie bitte unseren Onlineshop unter www aeg electrolux at Benötigen Sie Zubehör Verbrauchsmaterial und Ersatzteile Dann besuchen Sie bitte unseren Onlineshop unter www aeg electrolux de 222315233 00 102008 ...

Reviews: