background image

Interior Accessories

Storage shelves

Various glass storage shelves are included with your appliance.

The height of the storage shelves can be adjusted:
To do this pull the storage shelf forward until it can be swivelled 
upwards or downwards and removed.
Please do the same in reverse to insert the shelf at a different height.

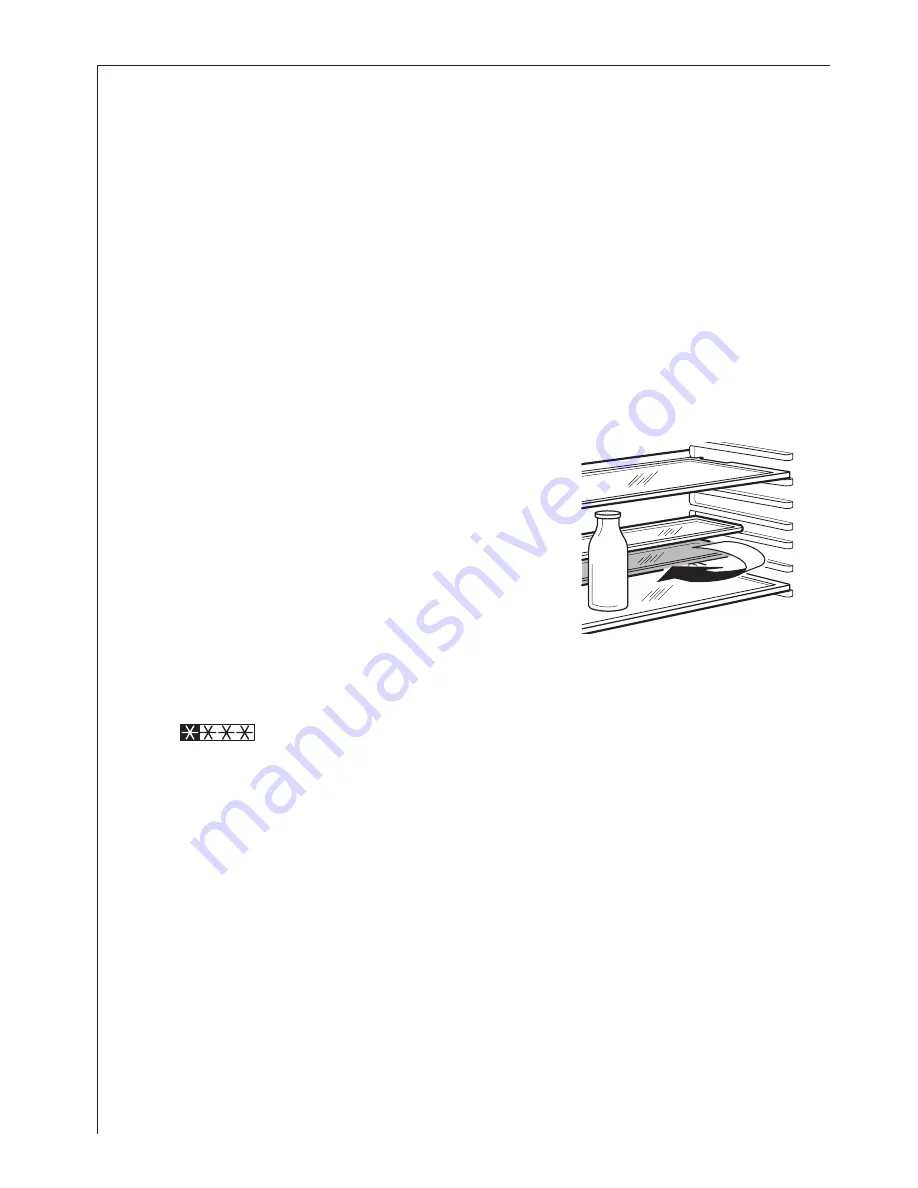
VARIO glass storage shelf

Your appliance is equipped with two half
size glass storage shelves.
Storing tall items:
Slide the front half of the Vario storage
shelf in another level to the rear. By this 
means you will gain space to place tall
items on the storage shelf below.

Correct storage

This symbol means that deep-frozen food can be kept for

some months in the freezer compartment.
The length of storage time depends on the type of food - see manu-
facturer’s instructions.
However, small quantities of fresh foods can be frozen (see: “Freezing
and storage”).

Tip:

Food in the fridge should always be covered or packaged, to pre-

vent drying and tainting of other food.
The following are suited for packaging:
– Polyethylene airtight bags and wraps;
– Plastic containers with lids;
– Special plastic covers with elastic;
– aluminium foil.

20

Summary of Contents for SANTO U 66040i

Page 1: ...SANTO U 66040i Built In Refrigerator Operating and Installation Instructions ...

Page 2: ... appliance are stressed with a warning triangle and or with signal words Warning Caution Important Please observe the following carefully This symbol guides you step by step in the operation of the appliance Supplementary information regarding operation and practical applicati ons of the appliance appear after this symbol Tips and notes concerning economical and environmentally sound use of the ap...

Page 3: ...appliance 18 Prior to Initial Start Up 18 Starting up and temperature regulation 19 Interior Accessories 20 Storage shelves 20 VARIO glass storage shelf 20 Correct storage 20 Freezing and storing frozen food 21 Preparation of Ice Cubes 22 Defrosting 22 The fridge defrosts automatically 22 Defrosting the freezer compartment 22 Switching off the appliance 23 Cleaning and Care 23 Energy Saving Tips 2...

Page 4: ...lity for any damages which may occur Prior to initial start up Check the appliance for transport damage Under no circumstance should a damaged appliance be plugged in In the event of damage please contact your supplier Ensure that the appliance does not stand on the electrical supply cable Important if the supply cable is damaged it must be replaced by authorised service or qualified personnel usi...

Page 5: ...beer wine sparkling wine etc in the freezer compartment Do not place ice cream or ice cubes in the mouth immediately after removal from the freezer compartment Very cold ice can freeze to the lips or tongue and cause injury Do not touch frozen food with wet hands Your hands could freeze to the food Do not operate any electrical appliances in the refrigerator freezer e g electric ice cream makers m...

Page 6: ...Before disposing of old appliances make them inoperable Remove plug from mains sever the power cable remove or destroy any snap or latch closures This eliminates the danger that playing children lock themselves into the appliance danger of suffocation or place themselves into other life endangering situations Disposal The appliance may not be disposed of with domestic waste or bulky refuse The ref...

Page 7: ... temperature is correct for each climate classification If the refrigeration appliance is installed next to another refrigerator or freezer a clearance of 5 cm at the sides is required in order to prevent the formation of condensation on the outside of the appliance Grid preparation The side at which the door opens can be changed from the right side as supplied to the left side if the instal latio...

Page 8: ... on to the clasps a until they click a a Reversing the door The side at which the door opens can be changed from the right side as supplied to the left side if the installation site requires To reverse the opening direction of the door proceed as shown in the figures 6 8 7 2 ...

Page 9: ...er compartment door a little way Using a small screwdriver press the spring in the opening of the lower door bearing slightly upwards and take the door bearing out complete with the door Position the covering cap M on the opposite side Turn the freezer compartment door through 180 and fit the lower door bearing into the lower bearing cavity of the freezer compartment door Lift the freezer compartm...

Page 10: ...1 2 Two cabinet securing brackets are supplied with the installa tion pack They need to be assembled onto the cabinet prior to cabinet being pushed into the Kitchen aperture To fit these brackets remove the two screws at the top left and right hand front corners of the cabinet Position the two brackets as shown in the figure and replace the two securing screws Left hand bracket Right hand bracket ...

Page 11: ... 596 555 max Li89 2 The rear feet are adjusted by turning the screw in the front kick plate to the left or right If necessary pads are supplied for the rear feet to make sliding the appliance in and out of the recess easier To fit the pads press them onto the rear feet If required the dimensions of these pads can be reduced by breaking them where marked N B The joint cover B is to be assembled aft...

Page 12: ...appliance into place and retain the cab inet with screws through the securing brackets into the worktop or adjacent woodwork as necessary 5 To mount the furniture door proceed as shown in the fig ures 6 a b 10 1 2 3 4 C ...

Page 13: ...13 7 8 a b clic clic c C C Upper part of kitchen furniture panel 9 b a 1 2 ...

Page 14: ...14 Lower part of kitchen furniture panel 11 10 10 1 2 3 45 12 9 a 275 275 max 100 ...

Page 15: ...For plinth heights greater than a 100 mm b 150 mm a cut should be made in the plinth 580 mm wide in the centre of the appliance position leaving a remaining height of a 100 mm b 150 mm Attach plinth to the kitchen units Important The plinth must be positioned at a minimum distance of 25 mm from the door Please check whether after installing your appliance and especially after reversing the door th...

Page 16: ...cian or competent person If your appliance needs repairing please contact your local AEG Service Force Centre 16 Electrical Connection Any electrical work required to install this appliance should be carried out by a qualified electrician or competent person WARNING THIS APPLIANCE MUST BE EARTHED The manufacturer declines any liability should these safety mea sures not be observed Before switching...

Page 17: ...rth symbol or coloured green and yellow 2 The wire coloured blue must be connected to the terminal marked N or coloured black 3 The wire coloured brown must be connected to the terminal marked L or coloured red 4 Upon completion there must be no cut or stray strands of wire pre sent and the cord clamp must be secure over the outer sheath Warning A cut off plug inserted into a 13 amp socket is a se...

Page 18: ...drawers Storage shelves Thermostat Frozen food storage freezing food icemaking Prior to Initial Start Up Please clean the appliance interior and all accessories prior to initial start up see section Cleaning and Care Description of the appliance View of the appliance ...

Page 19: ...ll be reliably frozen and that a storage temperature of 18 C will be maintained in the freezer compartment If you want to freeze fresh food rapidly select setting 6 ensuring that the temperature in the refrigerator compartment does not drop below 0 C You should also promptly reset the thermostat knob to set ting 3 or 4 after the freezing of the fresh food is complete Important High ambient tempera...

Page 20: ...io storage shelf in another level to the rear By this means you will gain space to place tall items on the storage shelf below Correct storage This symbol means that deep frozen food can be kept for some months in the freezer compartment The length of storage time depends on the type of food see manu facturer s instructions However small quantities of fresh foods can be frozen see Freezing and sto...

Page 21: ...to airtight packages or containers prior to freezing so that they do not dry out or lose their flavour and so that no flavour contamination of other frozen goods occurs Caution Do not touch frozen food with wet hands Your hands could stick to the food causing skin abrasions Lay the packaged food on the base of the freezer compartment Unfrozen food must not touch items already frozen otherwise the ...

Page 22: ...freezer compartment door is opened mois ture is deposited in the freezer compartment as frost Remove this frost from time to time with the soft plastic scraper Under no cir cumstances use hard or pointed objects to remove frost The freezer compartment should always be defrosted when the layer of frost has reached a thickness of approx 4 millimetres however at least once a year A good time for defr...

Page 23: ... To switch off the appliance turn the temperature regulator to positi on 0 If the appliance is not going to be used for an extended period Remove all refrigerated and frozen packages Switch off the appliance by turning the thermostat knob to position 0 Remove the mains plug or switch off or disconnect from the electrici ty supply Clean thoroughly see section Cleaning and Care Leave the door open t...

Page 24: ...ction Switch the appliance off and remove the plug from the mains or dis connect from the electricity supply Clean the appliance and the interior accessories with a cloth and luke warm water Commercially available dish washing detergents may also be used After cleaning wipe with fresh water and rub dry An accumulation of dust will affect the performance of the appliance and cause excessive electri...

Page 25: ...e What to do if Correcting Malfunctions Spare parts The following spare parts can be ordered from the Service Force Centre You can fit these yourself without any special skill or training e g butter cheese compartment egg holders door shelves fruit and vegetable drawers storage shelves A malfunction may be caused by only a minor fault that you can recti fy yourself using the following instructions...

Page 26: ...was open for an extended period A large quantity of warm food was placed in the appliance within the last 24 hours The appliance is near a heat source Door seal is not airtight possibly after reversing the door Carefully warm the leaking sections of the door seal with a hair dryer on a cool setting At the same time shape the warmed door seal by hand such that it sits correctly Do not leave the doo...

Page 27: ...the power supply Light bulb data 220 240 V max 15 W To switch off the appliance turn the thermostat knob to position 0 Unplug the mains plug To change the light bulb undo the screw Press the light bulb cover as shown and slide it backwards Change the defective light bulb Refit the light bulb cover and the screw Put the refrigerator back into operati on AEG65 ...

Page 28: ...tee service calls Help us to Help You Please determine your type of enquiry before writing or telephoning When you contact us we need to know 1 Your name address and post code 2 Your telephone number 3 Clear and concise details of the fault 4 The model number and serial number see rating plate 5 Date of purchase Customer Care For general enquiries concerning your AEG appliance and for further info...

Page 29: ...lines This appliance was designed for household use and was manufactured in accordance with the appropriate standards The necessary measures in accordance with appliance safety legislation regulations GSG acci dent prevention regulations for refrigeration appliances VBG 20 and the regulations of the German Society of Electrical Engineers VDE were observed in the manufacture of this appliance The r...

Page 30: ...equires heat to evaporate This heat is removed from the interior of the appliance as a result the interior is cooled The evaporator is therefore located inside the appli ance or placed in foam immediately behind the inner wall and thus not visible The compressor looks like a small drum It is driven by a built in electric motor and is mounted on the base of the appliance at the rear The task of the...

Page 31: ......

Page 32: ...AEG Hausgeräte GmbH Postfach 1036 D 90327 Nürnberg http www aeg hausgeraete de Copyright by AEG 02 0301 2222 682 24 ...

Reviews: