background image

3.2 

Location

To ensure appliance's best functionality,

you should not install the appliance in

the nearby of the heat source (oven,

stoves, radiators, cookers or hobs) or in a

place with direct sunlight. Make sure that

air can circulate freely around the back of

the cabinet.

3.3 

Positioning

This appliance should be installed in a

dry, well ventilated indoor position.
This appliance is intended to be used at

ambient temperature ranging from 10°C

to 43°C.

The correct operation of the

appliance can only be

guaranteed within the

specified temperature

range.

If you have any doubts

regarding where to install

the appliance, please turn to

the vendor, to our customer

service or to the nearest

Authorised Service Centre.

It must be possible to

disconnect the appliance

from the mains power

supply. The plug must

therefore be easily

accessible after installation.

3.4 

Electrical Connection

CAUTION!

Any electrical work required

to install this appliance

should be carried out by a

qualified electrician or

competent person.

WARNING!

This appliance must be

earthed.

The manufacturer declines

any liability should these

safety measures not be

observed.

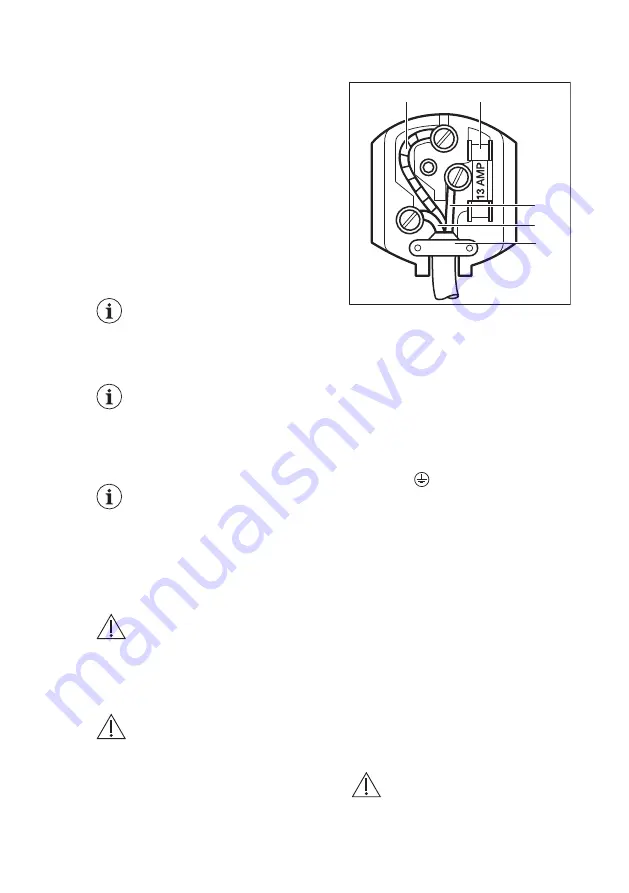
The wires in the mains lead are coloured

in accordance with the following code:

A

B

C

D

E

A

 - green and yellow: Earth

C

 - brown: Live

D

 - blue: Neutral

As the colours of the wires in the mains

lead of this appliance may not

correspond with the coloured markings

identifying the terminals in your plug,

proceed as follows:

1.

Connect the wire coloured green and

yellow to the terminal marked either

with the letter “E“ or by the earth
symbol   or coloured green and

yellow.

2.

Connect the wire coloured blue to

the terminal either marked with the

letter “N“ or coloured black.

3.

Connect the wire coloured brown to

the terminal either marked with the

“L“ or coloured red.

4.

Check that no cut, or stray strands of

wire is present and the cord clamp (

E

)

is secure over the outer sheath.

Make sure the electricity supply

voltage is the same as that indicated

on the appliance rating plate.

5.

Switch on the appliance.

The appliance is supplied with a 13 amp

fuse (

B

). In the event of having to change

the fuse in the plug supplied, a 13 amp

ASTA approved (BS 1362) fuse must be

used.

WARNING!

A cut off plug inserted into a

13 amp socket is a serious

safety (shock) hazard. Ensure

that it is disposed of safely.

www.aeg.com

8

Summary of Contents for SCE818E6NS

Page 1: ...USER MANUAL EN User Manual Fridge Freezer SCE818E6NS ...

Page 2: ...e shooter service and repair information www aeg com support Register your product for better service www registeraeg com Buy Accessories Consumables and Original spare parts for your appliance www aeg com shop CUSTOMER CARE AND SERVICE Always use original spare parts When contacting our Authorised Service Centre ensure that you have the following data available Model PNC Serial Number The informa...

Page 3: ...ies provided that they have been properly instructed Children of less than 3 years of age should be kept away from the appliance unless continuously supervised Do not let children play with the appliance Children shall not carry out cleaning and user maintenance of the appliance without supervision Keep all packaging away from children and dispose of it appropriately 1 2 General Safety This applia...

Page 4: ...t off defrost clean dry and leave the door open to prevent mould from developing within the appliance Do not store explosive substances such as aerosol cans with a flammable propellant in this appliance If the supply cord is damaged it must be replaced by the manufacturer its Authorised Service Centre or similarly qualified persons in order to avoid a hazard 2 SAFETY INSTRUCTIONS 2 1 Installation ...

Page 5: ... mains socket only at the end of the installation Make sure that there is access to the mains plug after the installation Do not pull the mains cable to disconnect the appliance Always pull the mains plug 2 3 Use WARNING Risk of injury burns electric shock or fire The appliance contains flammable gas isobutane R600a a natural gas with a high level of environmental compatibility Be careful not to c...

Page 6: ...hermostats temperature sensors printed circuit boards light sources door handles door hinges trays and baskets Please note that some of these spare parts are only available to professional repairers and that not all spare parts are relevant for all models Door gaskets will be available for 10 years after the model has been discontinued 2 7 Disposal WARNING Risk of injury or suffocation Disconnect ...

Page 7: ... height width and depth of the appliance including the handle plus the space necessary for free circulation of the cooling air Overall space required in use H3 A B mm 1816 W3 mm 548 D3 mm 1071 the height width and depth of the appliance including the handle plus the space necessary for free circulation of the cooling air plus the space necessary to allow door opening to the minimum angle permittin...

Page 8: ...facturer declines any liability should these safety measures not be observed The wires in the mains lead are coloured in accordance with the following code A B C D E A green and yellow Earth C brown Live D blue Neutral As the colours of the wires in the mains lead of this appliance may not correspond with the coloured markings identifying the terminals in your plug proceed as follows 1 Connect the...

Page 9: ...lay 2 Freezer Temperature warmer button 3 Freezer Temperature colder button 4 OK 5 Mode 6 Fridge Temperature warmer button 7 Fridge Temperature colder button 8 ON OFF It is possible to change predefined sound of buttons by pressing together Mode and temperature colder button for a few seconds Change is reversible 4 1 Display Off min A B C D E F G I H J K L A Fridge compartment indicator B Timer in...

Page 10: ...d on To select a different set temperature refer to Temperature regulation 4 6 Switching off the fridge It is possible to switch off only the fridge compartment maintaining the freezer on 1 Press Mode until the fridge compartment indicator appears The fridge OFF indicator and the fridge compartment indicator flash The fridge temperature indicator shows dashes 2 Press OK to confirm The fridge OFF i...

Page 11: ...corresponding icon appears The DYNAMICAIR indicator flashes 2 Press the OK button to confirm The DYNAMICAIR indicator is shown To switch off the function repeat the procedure until the DYNAMICAIR indicator icon goes off If the function is activated automatically the DYNAMICAIR indicator is not shown refer to Daily use The activation of the DYNAMICAIR function increase the energy consumption The dy...

Page 12: ... reached for a few seconds then the display shows the set temperature again The alarm indicator continues to flash until the normal conditions are restored If you do not press any button the sound switches off automatically after around one hour to avoid disturbing 4 14 Door open alarm If the fridge door is left open for approximately 5 minutes the sound is on and alarm indicator flashes The alarm...

Page 13: ... function The fan operates only when the door is closed 5 5 Freezing fresh food The freezer compartment is suitable for freezing fresh food and storing frozen and deep frozen food for a long time To freeze fresh food activate the Frostmatic function at least 24 hours before placing the food to be frozen in the freezer compartment Store the fresh food evenly distributed in the first compartment or ...

Page 14: ...zer The internal configuration of the appliance is the one that ensures the most efficient use of energy Fridge Most efficient use of energy is ensured in the configuration with the drawers in the bottom part of the appliance and shelves evenly distributed Position of the door bins does not affect energy consumption Do not remove the cold accumulators from the freezer basket Do not open the door f...

Page 15: ...emperature setting that ensures preservation of frozen food products is a temperature less than or equal to 18 C Higher temperature setting inside the appliance may lead to shorter shelf life The whole freezer compartment is suitable for storage of frozen food products Leave enough space around the food to allow air to circulate freely For adequate storage refer to food packaging label to see the ...

Page 16: ...e the appliance Make sure it has cooled down at room temperature before inserting it To prevent food waste the new stock of food should always be placed behind the old one 6 7 Hints for food refrigeration Meat all types wrap in a suitable packaging and place it on the glass shelf above the vegetable drawer Store meat for at most 1 2 days Fruit and vegetables clean thoroughly eliminate the soil and...

Page 17: ...s automatically eliminated from the evaporator of the refrigerator compartment during normal use The defrost water drains out through a trough into a special container at the back of the appliance over the motor compressor where it evaporates It is important to periodically clean the defrost water drain hole in the middle of the refrigerator compartment channel to prevent the water overflowing and...

Page 18: ...rm or High Temperature Alarm The door is left open Close the door The compressor operates continually Temperature is set incorrect ly Refer to Control Panel chapter Many food products were put in at the same time Wait a few hours and then check the temperature again The room temperature is too high Refer to Installation chap ter Food products placed in the appliance were too warm Allow food produc...

Page 19: ... chapter Appliance is fully loaded and is set to the lowest tempera ture Set a higher temperature Refer to Control Panel chapter Temperature set in the appli ance is too low and the am bient temperature is too high Set a higher temperature Refer to Control Panel chapter Water flows on the rear plate of the refrigerator During the automatic de frosting process frost melts on the rear plate This is ...

Page 20: ...re decrease to room temperature before storage Many food products are stor ed at the same time Store less food products at the same time The door has been opened often Open the door only if neces sary The Frostmatic function is switched on Refer to Frostmatic func tion section The Coolmatic function is switched on Refer to Coolmatic func tion section There is no cold air circula tion in the applia...

Page 21: ...he Authorised Service Centre 9 NOISES SSSRRR CLICK HISSS BRRR BLUBB 10 TECHNICAL DATA The technical information is situated in the rating plate on the internal side of the appliance and on the energy label The QR code on the energy label supplied with the appliance provides a web link to the information related to the performance of the appliance in the EU EPREL database Keep the energy label for ...

Page 22: ...ces shall be as stated in this User Manual at Chapter 3 Please contact the manufacturer for any other further information including loading plans 12 ENVIRONMENTAL CONCERNS Recycle materials with the symbol Put the packaging in relevant containers to recycle it Help protect the environment and human health by recycling waste of electrical and electronic appliances Do not dispose of appliances marke...

Page 23: ......

Page 24: ...www aeg com shop 222377759 B 142020 ...

Reviews: