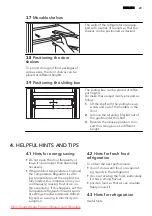
background image

1.6 

Service

• Any electrical work required to do the

servicing of the appliance should be
carried out by a qualified electrician or
competent person.

• This product must be serviced by an

authorized Service Centre, and only
genuine spare parts must be used.

1.7 

Environment Protection

This appliance does not contain
gasses which could damage the
ozone layer, in either its refriger-

ant circuit or insulation materials.
The appliance shall not be dis-
carded together with the urban
refuse and rubbish. The insula-
tion foam contains flammable
gases: the appliance shall be dis-
posed according to the applica-
ble regulations to obtain from
your local authorities. Avoid
damaging the cooling unit, espe-
cially at the rear near the heat ex-
changer. The materials used on
this appliance marked by the
symbol 

 are recyclable.

2. 

OPERATION

2.1 

Switching on

Insert the plug into the wall socket.
Turn the Temperature regulator clock-
wise to a medium setting.

2.2 

Switching off

To turn off the appliance, turn the Tem-
perature regulator to the "O" position.

2.3 

Temperature regulation

The temperature is automatically regula-
ted.
To operate the appliance, proceed as
follows:
• turn the Temperature regulator to-

ward lower settings to obtain the mini-
mum coldness.

• turn the Temperature regulator to-

ward higher settings to obtain the
maximum coldness.

A medium setting is generally
the most suitable.

However, the exact setting should be
chosen keeping in mind that the temper-
ature inside the appliance depends on:
• room temperature
• how often the door is opened
• the quantity of food stored
• the location of the appliance.

If the ambient temperature is
high or the appliance is fully loa-
ded, and the appliance is set to
the lowest temperatures, it may
run continuously causing frost to
form on the rear wall. In this case
the dial must be set to a higher
temperature to allow automatic
defrosting and therefore reduced
energy consumption.

3. 

DAILY USE

3.1 

Cleaning the interior

Before using the appliance for the first
time, wash the interior and all internal
accessories with lukewarm water and
some neutral soap so as to remove the
typical smell of a brand-new product,
then dry thoroughly.

Do not use detergents or abra-
sive powders, as these will dam-
age the finish.

ENGLISH

21

Downloaded from Fridge-Manual.com Manuals

Summary of Contents for SCS51800S0

Page 1: ...SCS51800S0 ZH 用户手册 2 EN User manual 18 Downloaded from Fridge Manual com Manuals ...

Page 2: ...性能表现 且 采用了普通器具上所没有的创新技术 帮助让生活变得更加简单 请花几分钟时间阅读 以便充 分了解该款产品的功能 访问我们的网站以 获取有用的建议 手册 故障检修工具 检修信息 www aeg com 注册您的产品以获取更好的服务 www aeg com productregistration 为您的器具购买配件 消耗品和原装备件 www aeg com shop 客户关怀与服务 我们推荐使用原装备件 当您联系服务部门时 请确保您可以提供以下数据 该信息可以在标牌上找到 机型 产品编号 序列号 警告 注意 安全信息 综合信息和提示 环境信息 如有更改恕不另行通知 2 www aeg com Downloaded from Fridge Manual com Manuals ...

Page 3: ...如冰激凌机 除非制造商认可 此用途 不要损坏制冷回路 本冰箱的制冷回路内含有制冷异丁烷 R600a 这是一种与环境高度相容的天 然气 但可燃烧 运输和安装冰箱期间 请确保没有损坏 制冷回路的组件 如果制冷回路被损坏 避免明火并远离火源 让冰箱所在房间彻底通风 无论以任何方式改变本产品规格或改造 本产品都非常危险 损坏电线可能导致 短路 火灾和 或电击 警告 无论哪种电气组件 电线 插头或 压缩机 都必须由经认证的维修 代理或具备资格的维修人员更换 以避免发生危险 1 不得延长电源线 2 确保冰箱背面没有压扁或损坏电源 插头 压扁或损坏的电源插头可能 会过热并导致火灾 3 确保您可以触及冰箱的电源插头 4 不要拉扯电源电线 5 如果电源插头插座松动 请不要插 入插头 否则可能会触电或引发火 灾 6 不得在没有灯罩 如果事先知道 或内部照明灯的情况下运行该冰 箱 该冰箱很重 搬动时请务必小心 ...

Page 4: ...1 6 维修 维修电气所需的任何电气工作都应该由 具备资格的电气工程师或有相当能力的 人员进行 本产品必须由授权的维修中心进行维 修 并且只能使用原装零配件 1 7 环境保护 本冰箱的制冷回路或绝缘材料都 不含可能破坏臭氧层的气体 本 冰箱不应随城市垃圾和废物一起 废弃处理 绝缘泡沫含有可燃气 体 本冰箱应该依照当地政府颁布 的适用法规进行处置 避免损坏 冷却装置 尤其是靠近热交换器后 部的冷却装置 本冰箱上使用的 标有符号 的材料为可回收利用 材料 2 操作 2 1 开机 将插头插入墙上的插座 按顺时针方向将温度调节器转动到中间位 置 2 2 关机 要关闭冰箱 请将温度调节器转到 O 位 置 2 3 温度调节 温度会自动调节 要运行冰箱 请按照以下步骤进行 将温度调节器转向较低的设置以达到最 小冷冻度 将温度调节器转向较高的设置以达到最 大冷冻度 一般来说 中间设置最适当 不过 选择确切...

Page 5: ...品 冷冻室适合冷冻新鲜食物和长期存放冷冻 及深度冷冻的食物 冷冻新鲜食物无需更改中间设置 警告 确保食物不会超过冰箱上部侧面 标识的装载限制 如适用 在此条件下 冰箱不见温度可能下 降到 0 C 以下 如果出现这种情 况 请重新设定温度调节器 调高 温度设定 3 4 解冻 深度冷冻或冷冻的食品 在使用之前 可 以放入冷藏室或室温下进行解冻 具体视 操作当时的可行性而定 小块食品甚至可以从冷冻室取出后直接进 行烹煮 无需解冻 在这种情况下 可能 需要烹煮较长时间 3 5 冰块制作 本冰箱配备了一个或多个用于制作冰块的 盘子 在盘子中倒入水 然后放入冷冻 室 请勿使用金属器具取出冷冻室中 的冰块盘 3 6 积冷器 冰箱中至少有一个积冷器 它们可以在出 现电源故障的情况下 延长食物保存的时 间 3 7 可移动搁架 冰箱的内壁上装有一系列滑槽 以便可以 根据需要安放搁架 3 8 安放门搁架 为了能...

Page 6: ...放在任何搁架上 水果和蔬菜 这些食品应该彻底清洗并放 在随附的特定抽屉内 黄油和奶酪 这些食品应该放在特制的密 封容器内或裹在铝箔或塑料保鲜袋中 以 最大限度地排除空气 奶瓶 这些食品应该盖盖并存放在冰箱门 内的瓶架中 香蕉 土豆 洋葱和大蒜如果没有包好 不得存放在冷藏室内 4 4 冷冻提示 为了帮助您最好地利用冷冻过程 特提供 一些重要提示 可以在 24 小时内冷冻的最大食品量 显 示在定额牌上 冷冻过程需要 24 小时 在这期间 不 得添加更多要冷冻的食品 只可冷冻优质 新鲜和彻底清洁的食 品 将食物分成小块以便快速 彻底地冷冻 并且以后解冻时只需取出需要的量 将食品裹在铝箔或塑料保鲜膜中 并确 保包装密封 不要让新鲜的未冷冻食品接触已冷冻的 食品 以免引起后者温度升高 相对于肥的食品来说 瘦的食品保存质 量更好 时间更长 盐会缩短食品的保 存时间 如果从冷冻室取出冰块后立刻食用 可 ...

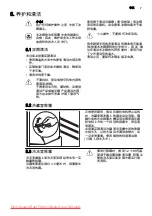
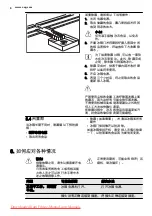
Page 7: ...后的压缩机 这会提高冰箱性能并节省 耗电量 小心操作 不要损坏冷却系统 很多厨房专用的表面清洁剂都含有可能浸 蚀 损害本冰箱塑料的化学成分 因此 建 议在清洁本冰箱的外壳表面时 使用只加 了少许清洁剂的温水 清洁之后 重新将冰箱连接至电源 5 2 冷藏室除霜 正常使用期间 每当压缩机电机停止运转 时 冷藏室蒸发器上的霜会自动消除 霜 融化成的水会顺着水槽流到冰箱背部压缩 机电机上方的一个特别的容器中 然后逐 渐蒸发 必须要定期清洁冷藏室导流槽中间的除霜 水排水孔 以防水溢出并滴到食物内 这 一点非常重要 使用随附的特制清洁刷 已插入排水孔中 5 3 冷冻室除霜 冷冻室搁架上和冷冻室顶部经常会有一定 数量的结霜 当霜层厚度达到约 3 5 毫米时 就要除去 冷冻室的霜 要进行除霜时 提前 12 小时将温 度调节器设置到最高设置 积累足 够的冷冻度以备冰箱中断运行期 间消耗 中文 7 Downl...

Page 8: ...的金属工具铲除蒸发器上面 的霜冻 因为这样有可能会损坏蒸发器 不得使用机械设备或制造商建议之外的任 何人工方法加快融化速度 在除霜过程中 冷冻的食品包装温度如升 高 则食品的储存保质期可能缩短 5 4 闲置期 当冰箱长期不用时 请遵循以下预防措 施 断开冰箱电源 取出所有食品 除霜 如果需要 并清洁冰箱和所有 配件 冰箱门保持微开以防异味 如果冰箱保持开机 请安排人员偶尔检查 一下 以防里面的食品因为断电而变质 6 如何应对各种情况 警告 排除故障之前 请先从插座断开电 源插头 只有具备资格的电工或有相当能 力的人员才可以进行本手册中未 述之故障排除工作 正常使用期间 可能会有响声 压 缩机 制冷循环 问题 可能的原因 解决办法 冰箱不工作 照明灯 不亮 冰箱电源未打开 打开冰箱电源 插头没有正确连接到插座 将插头正确连接到插座 8 www aeg com Downloaded from ...

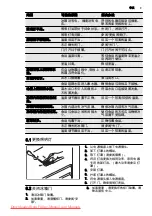
Page 9: ...品与背板互不接触 地板上面出现水流 溶水出口未引入压缩机上 方的蒸发盒 将溶水出口连接到蒸发盒 冰箱内的温度过低 过 高 温度调节器设置不正确 设定一个较高 较低的温度 冰箱内的温度过高 冰箱内部没有冷气流通 确保冰箱内部有冷气流通 冷冻室内的温度过高 食品与食品之间的间隙太 小 储存食品的方式应当确保冷 气流通不受阻碍 霜冻过多 食品包裹不当 正确包裹食品 未正确关闭冰箱门 请参阅 关门 温度调节器设定不当 设定一个较高的温度 6 1 更换照明灯 1 从电源插座上拔下电源插头 2 卸下灯罩上的螺丝 3 取下灯罩 请参阅插图 4 将旧灯泡更换为相同功率 家用电器 专用的新灯泡 最大功率请参见灯 罩 5 安装灯罩 6 拧紧灯罩上的螺丝 7 将电源插头插入电源插座 8 打开门 确保照明灯亮起 6 2 关闭冰箱门 1 清洁冰箱门垫圈 2 如果需要 请调整柜门 请参阅 安 装 3 如果需要 请更换...

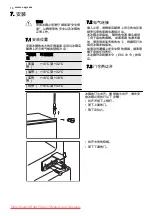
Page 10: ...32 C 亚热 带 16 C 到 38 C 热带 16 C 到 43 C 7 2 电气连接 插入之前 请确保定额牌上所示的电压和 频率与您的家庭电源相对应 本冰箱必须接地 随附的电源插头提供 了用于接地的插脚 如果家庭电源未接 地 请咨询具备资格的电工 根据现行法 规将冰箱单独接地 如果没有遵循上述安全预防措施 制造商 概不承担任何责任 本冰箱符合欧盟法令 EEC 法令 的规 定 7 3 门可两边开 冰箱的门为右开 要想换为左开 请在安 放冰箱之前执行以下步骤 松开并卸下上销钉 卸下上面的门 取下定位片 松开中间的铰链 卸下下面的门 10 www aeg com Downloaded from Fridge Manual com Manuals ...

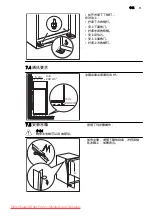
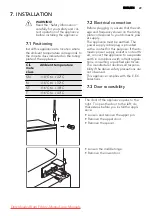
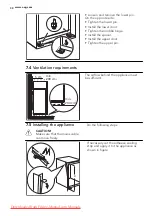
Page 11: ... 在对边上 拧紧下方的销钉 安上下面的门 拧紧中间的铰链 安上定位片 安上上面的门 拧紧上方的销钉 7 4 通风要求 5 cm min 200 cm2 min 200 cm2 冰箱后面必须通风良好 7 5 安装冰箱 小心 确保主电线可以自由移动 按照下列步骤操作 x x 如有必要 请剪下黏性封条 并将其贴 在冰箱上 如图所示 中文 11 Downloaded from Fridge Manual com Manuals ...

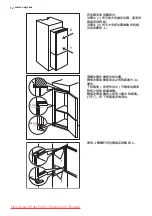
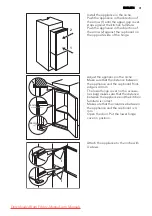
Page 12: ...推动冰箱 直至间 隙盖顶到厨柜 沿箭头 2 所示方向把冰箱推靠在铰链 对边的橱柜上 4 mm 44 mm 调整冰箱在橱柜中的位置 确保冰箱和橱柜前边之间的距离为 44 毫米 下铰链盖 在附件包中 可确保冰箱和 厨柜之间的距离准确 确保冰箱和橱柜之间有 4 毫米的距离 打开门 将下铰链盖安放到位 I I 使用 4 颗螺钉将冰箱固定到橱柜上 12 www aeg com Downloaded from Fridge Manual com Manuals ...

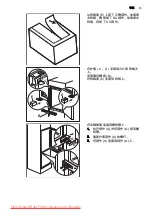
Page 13: ...部件 如果是 右铰链 确保卸下 DX 部件 如果是左 铰链 则卸下 SX 部件 E E B D C 将护盖 C D 安装到凸片和铰链孔 上 安装通风栅格 B 将铰链盖 E 安装到铰链上 G H 将冰箱侧面连接到橱柜壁上 1 松开部件 G 并将部件 G 移至橱 柜壁 2 重新拧紧部件 G 的螺钉 3 将部件 H 连接到部件 G 上 中文 13 Downloaded from Fridge Manual com Manuals ...

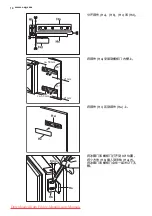
Page 14: ...Hb Hc 和 Hd ca 50 mm ca 50 mm 21 mm 90 90 21 mm 将部件 Ha 安装到橱柜门内壁上 Ha Hc 将部件 Hc 压到部件 Ha 上 Ha Hb 8 mm 将冰箱门和橱柜门打开到 90 位置 将小方块 Hb 插入到导轨 Ha 内 将冰箱门和橱柜门合在一起并记下孔 眼 14 www aeg com Downloaded from Fridge Manual com Manuals ...

Page 15: ...标记距门外边为 8 毫米的距 离 这是安装螺钉 K 的位置 Hb 重新将小方块放到导轨上 然后用随附 的螺钉将其固定 通过调整部件 Hb 对齐橱柜门和器具 门 Hb Hd 将部件 Hd 压到部件 Hb 上 进行最后检查以确保 所有螺钉已拧紧 封条已牢牢安装到机壳上 门能够正常开关 8 噪音 正常使用期间 可能会有响声 压缩机 制冷循环 中文 15 Downloaded from Fridge Manual com Manuals ...

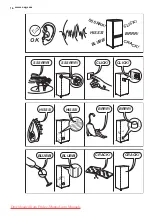
Page 16: ...BRRR HISSS CLICK BLUBB CRACK SSSRRR OK CLICK CLICK SSSRRR SSSRRR BRRR BRRR HISSS HISSS BLUBB BLUBB CRACK CRACK 16 www aeg com Downloaded from Fridge Manual com Manuals ...

Page 17: ...米 深度 550 毫米 上升时间 24 小时 电压 230 240 V 频率 50 Hz 技术信息位于冰箱内部左侧的铭牌和能源 标签上 10 环保问题 回收带有该标志 的材料 把包装 材料放入适用的容器以循环利用 帮助保护环境和人类健康 促进电器及 电子产品的废物利用 请勿将带有该 标志 的电器与生活垃圾一起处理 将产品退回到您当地的回收处 或联系 您所在城市的办事处 中文 17 Downloaded from Fridge Manual com Manuals ...

Page 18: ...to get the very best from it Visit our website for Get usage advice brochures trouble shooter service information www aeg com Register your product for better service www aeg com productregistration Buy Accessories Consumables and Original spare parts for your appliance www aeg com shop CUSTOMER CARE AND SERVICE We recommend the use of original spare parts When contacting Service ensure that you h...

Page 19: ...g magnetic door seals is to replace an older appli ance having a spring lock latch on the door or lid be sure to make that spring lock unusable before you dis card the old appliance This will pre vent it from becoming a death trap for a child 1 2 General safety WARNING Keep ventilation openings in the appli ance enclosure or in the built in struc ture clear of obstruction The appliance is intended...

Page 20: ...freezer compartment as it creates pressure on the container which may cause it to explode result ing in damage to the appliance Ice lollies can cause frost burns if con sumed straight from the appliance 1 4 Care and cleaning Before maintenance switch off the ap pliance and disconnect the mains plug from the mains socket Do not clean the appliance with metal objects Do not use sharp objects to remo...

Page 21: ...erature regulation The temperature is automatically regula ted To operate the appliance proceed as follows turn the Temperature regulator to ward lower settings to obtain the mini mum coldness turn the Temperature regulator to ward higher settings to obtain the maximum coldness A medium setting is generally the most suitable However the exact setting should be chosen keeping in mind that the tempe...

Page 22: ...load limit stated on the side of the upper section where applicable In the event of accidental de frosting for example due to a power failure if the power has been off for longer that the value shown in the technical character istics chart under rising time the defrosted food must be con sumed quickly or cooked imme diately and then re frozen after cooling 3 4 Thawing Deep frozen or frozen food pr...

Page 23: ...HELPFUL HINTS AND TIPS 4 1 Hints for energy saving Do not open the door frequently or leave it open longer than absolutely necessary If the ambient temperature is high and the Temperature Regulator is set to low temperature and the appliance is fully loaded the compressor may run continuously causing frost or ice on the evaporator If this happens set the Temperature Regulator toward warm er settin...

Page 24: ...ow fresh unfrozen food to touch food which is already frozen thus avoiding a rise in temperature of the latter lean foods store better and longer than fatty ones salt reduces the stor age life of food water ices if consumed immediately after removal from the freezer com partment can possibly cause the skin to be freeze burnt it is advisable to show the freezing in date on each individual pack to e...

Page 25: ...ply 5 2 Defrosting of the refrigerator Frost is automatically eliminated from the evaporator of the refrigerator com partment every time the motor compres sor stops during normal use The de frost water drains out through a trough into a special container at the back of the appliance over the motor compres sor where it evaporates Periodically clean the defrost water drain hole in the middle of the ...

Page 26: ...e 6 After two or three hours reload the previously removed food into the compartment Never use sharp metal tools to scrape off frost from the evaporator as you could damage it Do not use a mechanical device or any artificial means to speed up the thawing process other than those recommended by the manufacturer A temperature rise of the frozen food packs during defrosting may shorten their safe sto...

Page 27: ...ocket Contact a qualified electri cian The lamp does not work The lamp is in stand by Close and open the door The lamp is defective Refer to Replacing the lamp The compressor op erates continually The temperature is not set correctly Set a higher temperature The door is not closed correctly Refer to Closing the door The door has been opened too frequently Do not keep the door open longer than nece...

Page 28: ...ulation There is too much frost Food is not wrapped cor rectly Wrap the food correctly The door is not closed correctly Refer to Closing the door The temperature regula tor is not set correctly Set a higher temperature 6 1 Replacing the lamp 1 Disconnect the mains plug from the mains socket 2 Remove the screw from the lamp cover 3 Remove the lamp cover refer to the illustration 4 Replace the used ...

Page 29: ... pow er supply The appliance must be earthed The power supply cable plug is provided with a contact for this purpose If the do mestic power supply socket is not earth ed connect the appliance to a separate earth in compliance with current regula tions consulting a qualified electrician The manufacturer declines all responsi bility if the above safety precautions are not observed This appliance com...

Page 30: ...upper pin 7 4 Ventilation requirements 5 cm min 200 cm2 min 200 cm2 The airflow behind the appliance must be sufficient 7 5 Installing the appliance CAUTION Make sure that the mains cable can move freely Do the following steps x x If necessary cut the adhesive sealing strip and apply it to the appliance as shown in figure 30 www aeg com Downloaded from Fridge Manual com Manuals ...

Page 31: ...he appliance in the niche Make sure that the distance between the appliance and the cupboard front edge is 44 mm The lower hinge cover in the accesso ries bag makes sure that the distance between the appliance and the kitchen furniture is correct Make sure that the clearance between the appliance and the cupboard is 4 mm Open the door Put the lower hinge cover in position I I Attach the appliance ...

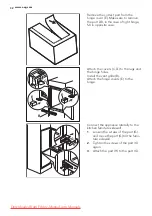
Page 32: ... and the hinge holes Install the vent grille B Attach the hinge covers E to the hinge G H Connect the appliance laterally to the kitchen furniture sidewall 1 Loosen the screws of the part G and move the part G till the furni ture sidewall 2 Tighten the screws of the part G again 3 Attach the part H to the part G 32 www aeg com Downloaded from Fridge Manual com Manuals ...

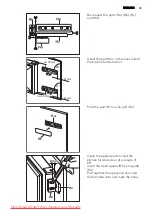
Page 33: ...the kitchen furniture door Ha Hc Push the part Hc on the part Ha Ha Hb 8 mm Open the appliance door and the kitchen furniture door at an angle of 90 Insert the small square Hb into guide Ha Put together the appliance door and the furniture door and mark the holes ENGLISH 33 Downloaded from Fridge Manual com Manuals ...

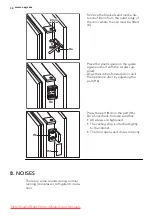
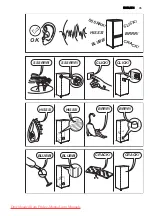
Page 34: ...n the kitchen furniture door and the appliance door by adjusting the part Hb Hb Hd Press the part Hd on the part Hb Do a final check to make sure that All screws are tightened The sealing strip is attached tightly to the cabinet The door opens and closes correctly 8 NOISES There are some sounds during normal running compressor refrigerant circula tion 34 www aeg com Downloaded from Fridge Manual c...

Page 35: ...BRRR HISSS CLICK BLUBB CRACK SSSRRR OK CLICK CLICK SSSRRR SSSRRR BRRR BRRR HISSS HISSS BLUBB BLUBB CRACK CRACK ENGLISH 35 Downloaded from Fridge Manual com Manuals ...

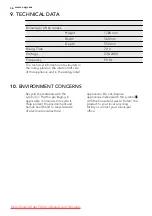
Page 36: ...rgy label 10 ENVIRONMENT CONCERNS Recycle the materials with the symbol Put the packaging in applicable containers to recycle it Help protect the environment and human health and to recycle waste of electrical and electronic appliances Do not dispose appliances marked with the symbol with the household waste Return the product to your local recycling facility or contact your municipal office 36 ww...

Page 37: ...ENGLISH 37 Downloaded from Fridge Manual com Manuals ...

Page 38: ...38 www aeg com Downloaded from Fridge Manual com Manuals ...

Page 39: ...ENGLISH 39 Downloaded from Fridge Manual com Manuals ...

Page 40: ...www aeg com shop 222358092 A 202012 Downloaded from Fridge Manual com Manuals ...

Reviews: