background image

minimum 10 min to maximum of 2 hours

(in 10 min steps). When this option is

maximum, load indicator disappears.

6.6 

 Time Dry on Wool

program

Option applicable to Wool program to

adjust final dryness level to more dry or

less dry.

6.7 

 Delay Start

Lets to delay the start of a

drying program from

minimum of 30 minutes to

maximum of 20 hours.

1.

Set the drying program and options.

2.

Touch 

 Delay Start button again

and again.

Time of delay is on the display (e.g. 

 if the program has to start after 12

hours.)

3.

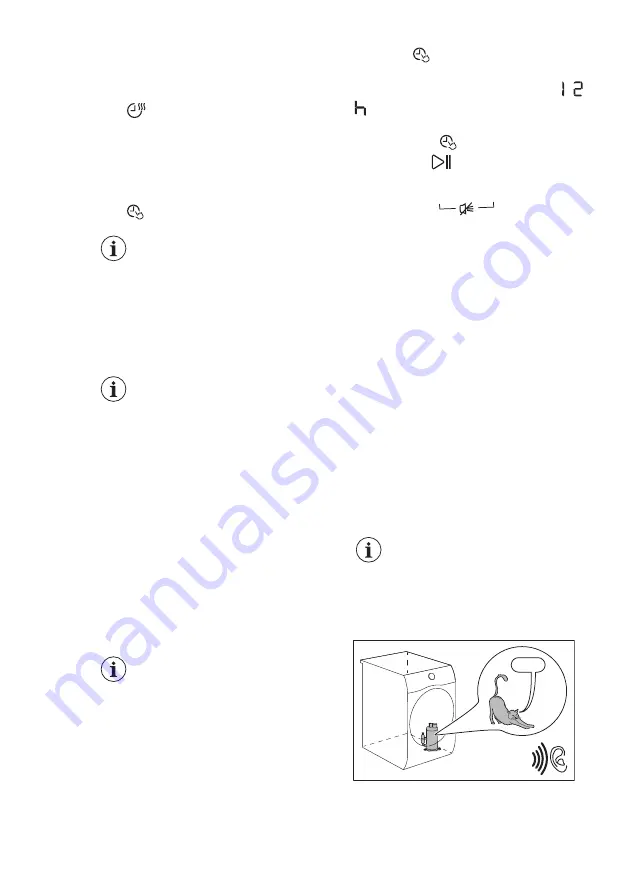
To activate 

 Delay Start option,

touch the 

 Start/Pause button.

Time to start decreases on the display.

6.8 

Buzzer 

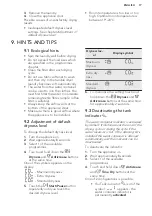
The sound is heard at the:
• cycle end

• start and end of crease guard phase

The buzzer option is by default always

on. You can use this option to activate or

deactivate the sound.

7. 

BEFORE FIRST USE

Rear drum locks are

removed automatically when

dryer is activated for the first

time. Possible to hear some

noise.

To unlock the rear drum locks:
1.

Switch on the appliance.

2.

Set any programme.

3.

Press the Start/Pause button.

Drum starts to rotate. Rear drum locks

are automatically deactivated.

Before you use the appliance to dry

items:

• Clean the tumble dryer drum with a

moist cloth.

• Start a 1 hour programme with moist

laundry.

At the beginning of the

drying cycle (first 3-5 min)

there could be a slightly

higher sound level. This is

due to the compressor

starting up. This is normal for

compressor powered

appliances such as

refrigerators and freezers.

7.1 

Unusual smell

The appliance is tightly packed.

After product unpacking you can feel an

unusual smell. This is normal for brand

new products.
Appliance is built of several different

types of material which all together can

generate unusual smell.
Over usage time, after few drying cycles

unusual smell gradually disappears.

7.2 

Noises

Different noises may be

heard at different times

during the drying cycle. They

are perfectly normal

operating sounds.

Working compressor.

Brrrr

Rotating drum.

ENGLISH

13

Summary of Contents for T8DBG48S

Page 1: ...USER MANUAL EN User Manual Tumble Dryer T8DBG48S ...

Page 2: ...features you might not find on ordinary appliances Please spend a few minutes reading to get the very best from it Visit our website for Get usage advice brochures trouble shooter service and repair information www aeg com support Register your product for better service www registeraeg com Buy Accessories Consumables and Original spare parts for your appliance www aeg com shop CUSTOMER CARE AND S...

Page 3: ...and knowledge if they have been given supervision or instruction concerning the use of the appliance in a safe way and understand the hazards involved Children between 3 and 8 years of age and persons with very extensive and complex disabilities shall be kept away from the appliance unless continuously supervised Children of less than 3 years of age should be kept away from the appliance unless co...

Page 4: ...ed by a carpet mat or any floor covering CAUTION The appliance must not be supplied through an external switching device such as a timer or connected to a circuit that is regularly switched on and off by a utility Connect the mains plug to the mains socket only at the end of the installation process Make sure that the mains plug is accessible after installation If the mains power supply cable is d...

Page 5: ...he packaging Do not install or use a damaged appliance Follow the installation instructions supplied with the appliance Always take care when moving the appliance as it is heavy Always use safety gloves and enclosed footwear Do not install or use the appliance where the temperature can be lower than 5 C or higher than 35 C The floor area on which the appliance is to be installed must be flat stabl...

Page 6: ...NING Risk of injury or damage to the appliance Do not use water spray and steam to clean the appliance Clean the appliance with a moist soft cloth Use only neutral detergents Do not use abrasive products abrasive cleaning pads solvents or metal objects Be careful when you clean the appliance to prevent damage to the cooling system 2 5 Compressor WARNING Risk of damage to the appliance The compress...

Page 7: ...ater container 2 Control panel 3 Appliance door 4 Filter 5 Rating plate 6 Airflow slots 7 Condenser lid 8 Condenser cover 9 Adjustable feet For ease of loading laundry or ease of installation the door is reversible see separate leaflet ENGLISH 7 ...

Page 8: ...3 Start Pause button 4 Options 5 On Off button with Auto Off function 6 Programs 4 1 Display Symbol on the display Symbol description laundry maximum load delay start option on delay start selection 30min 20h cycle time indication buzzer off www aeg com 8 ...

Page 9: ...ection 10min 2h indicator drying phase indicator crease guard phase indicator cooling phase 5 PROGRAM Program Load 1 Properties Fabric mark 2 3 Cottons Eco 8 0 kg Cycle to be used to dry cotton with cotton cupboard dryness level with maximum energy saving Cottons 8 0 kg Cycle defined to dry cottons items of different size different weaving altogether Synthetics 3 5 kg Synthetic and mixed fabrics M...

Page 10: ...Woolmark symbol is a Certification mark in many countries Silk 1 kg Gentle drying of hand washable silks Bed Linen 3 kg Bed linen such as single and dou ble sheets pillowcases duvet cov er Easy Iron 1 kg or 5 shirts Easy care fabrics for which a minimum of ironing is necessary The drying results can be different from one type of fabric to another Shake the items before putting them in the applianc...

Page 11: ... and it is the most efficient programme in terms of energy consumption for drying wet cotton laundry 5 1 Programmes and options selection Options Programmes 1 Dry ness Extra Silent Anti crease Time Dry Cottons Eco Cottons Synthetics 2 Mixed Wool 3 Silk Bed Linen Easy Iron Outdoor Sports 1 Together with the programme you can set 1 or more options 2 cupboard dry of Dryness level is not available wit...

Page 12: ...is option helps to achieve requested laundry dryness Possible selections ready to iron iron dry level ready to store cupboard dry level default selection which is related to the programme ready to store cupboard dry level ready to store extra dry level 6 2 Extra Silent The appliance operates with low noise without effect on the drying quality The appliance operates slowly with longer cycle time 6 ...

Page 13: ...the first time Possible to hear some noise To unlock the rear drum locks 1 Switch on the appliance 2 Set any programme 3 Press the Start Pause button Drum starts to rotate Rear drum locks are automatically deactivated Before you use the appliance to dry items Clean the tumble dryer drum with a moist cloth Start a 1 hour programme with moist laundry At the beginning of the drying cycle first 3 5 mi...

Page 14: ...s with the internal layer made of cotton inside out Cotton layer must be faced outwards Always set the programme suitable for the type of laundry Do not put light and dark colours together Use suitable programme for cottons jersey and knitwear to reduce shrinkage Do not exceed the maximum load stated in the programmes chapter or shown on the display Dry only the laundry that is suitable for tumble...

Page 15: ...tors appear on the display 8 4 Auto Off function To decrease the energy consumption the Auto Off function turns the appliance off automatically if the Start Pause touch button is not touched within 5 minutes 5 minutes after a cycle ends Push the On Off button to turn on the appliance If the appliance is on some indications appear on the display 8 5 Setting a programme Use the programme dial to set...

Page 16: ...touch the above buttons again until the symbol disappears 8 8 Starting a program To start the program Touch the Start Pause button The appliance starts and the LED above the button stops flashing and stays on 8 9 Program change To change a program 1 Push the On Off button to turn the appliance off 2 Push the On Off button again to turn on the appliance 3 Set a new program 8 10 Programme end Clean ...

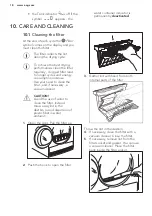
Page 17: ...e on 2 Wait approximately 8 seconds 3 Select 1 of the available programmes 4 Touch and hold down the Dryness and Anticrease buttons at the same time One of the symbols appears on the display Maximum dryness Extra dryness Standard dryness 5 Touch the Start Pause button repeatedly until you reach the desired dryness level Dryness lev el Display symbol Maximum dryness Extra dry ness Standard dryness ...

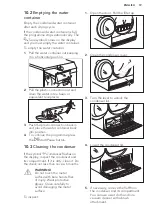
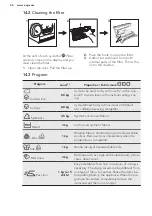
Page 18: ...consumption increase Use your hand to clean the filter and if necessary a vacuum cleaner CAUTION Avoid the use of water to clean the filter Instead throw away lint in the dustbin avoid dispersion of plastic fiber in water ambient 1 Open the door Pull the filter up 2 Push the hook to open the filter 3 Gather lint with hand from both internal parts of the filter Throw the lint in the dustbin 4 If ne...

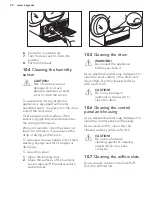
Page 19: ...back into position 4 To continue the programme press the Start Pause button 10 3 Cleaning the condenser If the symbol Condenser flashes on the display inspect the condenser and its compartment If it is dirty clean it Do the check not less than once a 6 months WARNING Do not touch the metal surface with bare hands Risk of injury Wear protective gloves Clean carefully to avoid damaging the metal sur...

Page 20: ...t of vinegar or dish soap To clean the sensor 1 Open the loading door 2 Clean the surfaces of the humidity sensor wiping off the metal surface several times 10 5 Cleaning the drum WARNING Disconnect the appliance before you clean it Use a standard neutral soap detergent to clean the inner surface of the drum and drum lifters Dry the cleaned surfaces with a soft cloth CAUTION Do not use abrasive ma...

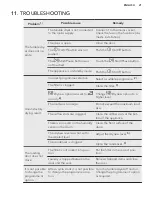
Page 21: ...ge Dryness option to a higher level The load was too large Do not exceed the maximum load size The airflow slots are clogged Clean the airflow slots at the bot tom of the appliance There is some dirt on the humidity sensor in the drum Clean the front surface of the drum The dryness level was not set to the desired level Adjust the dryness level 5 The condenser is clogged Clean the condenser 3 The ...

Page 22: ...filter is clogged Clean the filter The load is too large Do not exceed the maximum load size The laundry was not spun suffi ciently Spin the laundry well in the wash ing machine Too low or too high room temper ature this is not the appliance malfunction Ensure a room temperature higher than 5 C and lower than 35 C Optimal room temperature to ach ieve best drying results is between 19 24 C 1 If the...

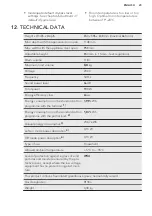
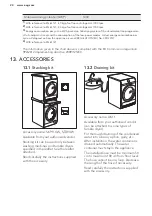
Page 23: ... dB Total power 900 W Energy efficiency class A Energy consumption on the standard cotton programme with the full load 1 1 99 kWh Energy consumption on the standard cotton programme with the partial load 2 1 07 kWh Annual energy consumption3 234 7 kWh Left on mode power absorption 4 0 13 W Off mode power absorption 4 0 13 W Type of use Household Allowed ambient temperature 5 C to 35 C Level of pro...

Page 24: ...ESSORIES 13 1 Stacking kit Accessory name SKP11GW STA9GW Available from your authorised vendor Stacking kit can be used only between washing machines and tumble dryers specified in the leaflet See the leaflet attached Read carefully the instructions supplied with the accessory 13 2 Draining kit Accessory name DK11 Available from your authorised vendor can be attached to some types of tumble dryer ...

Page 25: ...for laundry storage e g towels cleaning products etc Read carefully the instructions supplied with the accessory 14 QUICK GUIDE 14 1 Daily use 1 2 3 5 4 4 1 2 3 5 4 1 Push the On Off button to turn on the appliance 2 Use the programme dial to set the programme 3 To activate or deactivate an option touch the relevant button or 2 buttons combination 4 Touch the Start Pause button 5 The appliance sta...

Page 26: ...ms of different size different weaving altogether Synthetics 3 5 kg Synthetic and mixed fabrics Mixed 3 kg Cotton and synthetic fabrics Wool 1 kg Woollen fabrics Gentle drying for hand washable woollens Remove items immediately when the programme is completed Silk 1 kg Gentle drying of hand washable silks Bed Linen 3 kg Bed linen such as single and double sheets pillow cases duvet cover Easy Iron ...

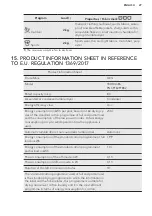
Page 27: ...e standard cotton programme at full and partial load and the consumption of the low power modes Actual energy consumption per cycle will depend on how the appliance is used 234 7 Automatic tumble drier or non automatic tumble drier Automatic Energy consumption of the standard cotton programme at full load in kWh 1 99 Energy consumption of the standard cotton programme at partial load in kWh 1 07 P...

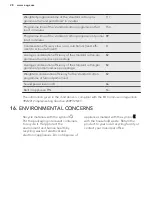
Page 28: ...partial load as a percentage 82 Weighted condensation efficiency for the standard cotton programme at full and partial load 82 Sound power level in dB 66 Built in appliance Y N No The information given in the chart above is compliant with the EU Commission regulation 392 2012 implementing directive 2009 125 EC 16 ENVIRONMENTAL CONCERNS Recycle materials with the symbol Put the packaging in relevan...

Page 29: ......

Page 30: ......

Page 31: ......

Page 32: ...www aeg com shop 136945304 A 072020 ...

Reviews: