background image

© 

AEI CORPORATION 2009


16 


This hose, coupler, and shut-off valve assembly comply with all UL standards.  DO NOT attempt any 
modifications to this hook-up. 


You have now finished the assembly of the heater.  We have tried to design your Patio Comfort heater 
with the finest materials and safety systems available.  Please do not try to modify any part of the 
product, the feed line assembly, natural gas regulator, or quick disconnect connections. 
 
These are high quality components designed to provide you with maximum convenience and flexibility 
and more importantly to maximize the safety to you and your family. 
  
Our unique double quick connect system allows you to safely detach the hose set from the heater 
when not in use.  If your dealer has not included this hook-up kit with your heater go back to the dealer 
and insist that they provide it to you.  The hose kit is an integral part of the heater and will add greatly 
to the safety and convenience of the product. 


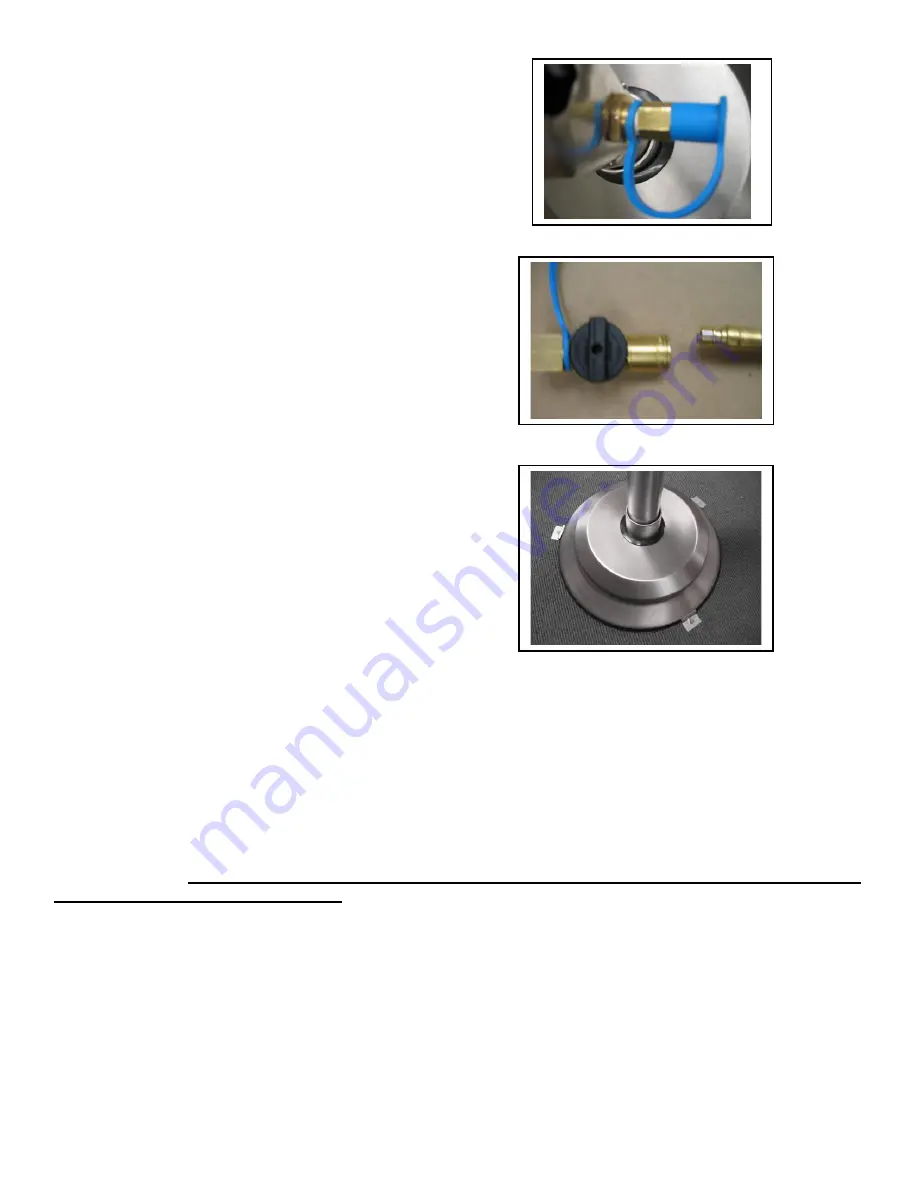
Step 15:

  Always be sure to use the dust plug 

when the heater is not in use. 
(See Figure #15) 

Step 16:  Please Note

:  The end of the hose set that 

attaches to your home natural gas supply also has a 
quick disconnect coupler and state of the art shut- off 
safety valve for your safety and convenience. As an 
added feature when the“ON and OFF” black control 
knob on the shut-

off valve is in the “ON” position you 

cannot inadvertently remove the hose from the coupler 
while the heater is in operation.  (See Figure #16) 


Figure #16 

Step 17:

  If your patio heater is being placed in a 

location or on a surface where you have concerns 
over it being tipped or knocked over during operation 
we have provided three optional mounting brackets 
with screws for your use.  If the heater will be used in 
a commercial application these brackets may be 
required.  (See Figure #17)  

Please check your local 

codes.


Figure #15 

Figure #17 

Summary of Contents for PATIO COMFORT NPC 05

Page 1: ...per installation adjustment alteration service or maintenance of this product can result in death or cause injury or property damage Please read the installation operation and maintenance instructions thoroughly before installing or servicing this appliance WARNING Do not store or use gasoline or other flammable vapors or liquids in the vicinity of this or any other appliance This appliance is des...

Page 2: ...bly instructions as shown from pages 11 16 If you do not understand any of these instructions or feel uncomfortable assembling your unit please call your selling dealer or call us directly at 949 474 3070 8 Please carefully inspect the rubber hose included with the unit before each use Be sure there are no visible cracks damage abrasion or other signs of visible wear If the hose quick connect coup...

Page 3: ... combustible materials gasoline and other flammable materials Failure to follow these instructions could result in death injury or property damage Please be sure there are no obstructions near the heater head The appliance is operating properly when there is a nice cherry red glow seen better at night coming from the emitter grid starting two to three inches from the bottom of the emitter grid Win...

Page 4: ...he safe assembly or use of your heater please call your Patio Comfort Dealer or Authorized Distributor or call us directly at 949 474 3070 Thank you very much for purchasing a Patio Comfort Patio heater This manual contains very important information detailing the proper assembly operation and maintenance of this product This product has been designed with the latest in safety technology but it is...

Page 5: ...11 ASSEMBLY INSTRUCTIONS STEP 2 TO 4 12 ASSEMBLY INSTRUCTIONS STEP 5 TO 7 13 ASSEMBLY INSTRUCTIONS STEP 8 TO 9 14 ASSEMBLY INSTRUCTIONS STEP 10 TO 12 15 ASSEMBLY INSTRUCTIONS STEP 13 TO 14 16 INFORMATION ON NATURAL GAS SUPPLY 18 PLACEMENT OF HEATER 19 LIGHTING INSTRUCTIONS 20 HEATER STORAGE AND INSECT WARNING 21 CLEANING AND MAINTENANCE 22 TROUBLE SHOOTING GUIDE 23 WARNINGS AND SAFETY POINTS 24 SE...

Page 6: ... included Function of Heater Infrared heaters utilize virtually 100 of the fuel energy they consume to produce clean draft free warmth Infrared heaters do not waste precious energy by trying to heat the air Infrared heat works like the radiant rays of the sun and will directly heat objects near them such as people tables chairs who in turn will absorb the heat and reflect it The push button Piezo ...

Page 7: ...n any questions you might have on assembly or operation When in doubt please ask We re at your service The PATIO COMFORT Model NPC 05 Meets or Exceeds the safety performance and construction requirements of the following CSA STANDARD as it applies to Gas Fired Outdoor Patio Heaters Class 2901 01 ANS Z83 26 2014 CSA 2 37 2014 Gas Fired Outdoor Infrared Patio Heater The NPC 05 Also Complies with the...

Page 8: ...12 Pan Assy SS 1 5140 Access panel hole Ø22 paint 1 13 1013 Perforated Body 1 41 1141 Bulk Head Fitting 1 14 1014 Pilot Shield 1 42 1142 Molding for Decorative Socket 1 15 1015 Electrode 1 43 4143 Decorative Cover for Base SS 1 16 1016 Pilot Assy 1 5143 Paint decorative cover for base 1 17 1017 Wire Insulation 1 44 1104 04 Hex Bolt M6 x 20mm SS 4 18 1018 Thermocouple 1 45 1145 Hex Bolt M6 x 50mm S...

Page 9: ... AEI CORPORATION 2009 9 ...

Page 10: ...e customer A qualified gas appliance technician should do all repair or servicing Make sure there are no cracks in the hose cuts or other abrasions which might cause a fuel leak If the hose couplers heater valve or natural gas regulator assembly is found to be faulty in any way DO NOT USE the appliance Call your authorized Patio Comfort dealer and only use genuine Patio Comfort replacement parts U...

Page 11: ...uel Gas Code In Canada in the absence of a local building code requirement it must comply with the National Standards of Canada CA CGA B149 1 2 M86 Your Model PC NG base has been pre assembled at the factory The base assembly includes a heavy molded or cast iron ballast Under no circumstances should the ballast weight be removed from the base or altered in any way This ballast weight provides for ...

Page 12: ... flat washer and screw into four holes Securely tighten the four stainless steel screws with flat washers and lock washers lock washer is installed first against post and then flat washer at post to socket connection See Figure 2 Step 3 Slide 3 diameter stainless steel slip collar over post The slip collar should now be at the bottom of the post socket assembly The slip collar is intended to cover...

Page 13: ...tter or public utility Step 8 Since there are a variety of possible gas supply configurations our directions can only be general in nature 1 First shut off the flow of gas to the stub 2 This can be accomplished at the stub if you have a shut off on your stub If not you will need to shut off the gas at its source to your stub 3 Attach the combination coupler shut off valve that we have provided wit...

Page 14: ... of gas ON 2 Using a soapy solution carefully check each and every brass fitting quick coupler and gas connection Perform the leak test from the valve to your house gas supply all the way to the connections at the post Also check where the fitting at the feed line hose is attached to the heater head You should do this with a soapy water solution There should be no open flames or other sources of i...

Page 15: ... 13 Figure 14 Figure 12 PLEASE NOTE Before the last assembly step of securing the head to the post align the head and post and the gas inlet to minimize any possible trip hazards Always try to position your heater and hose in a way as to minimize trip hazards Step 11 If your unit passes the gas leak test 100 you can now secure the access panel at the bottom of the post with the four self tapping p...

Page 16: ...ey provide it to you The hose kit is an integral part of the heater and will add greatly to the safety and convenience of the product Step 15 Always be sure to use the dust plug when the heater is not in use See Figure 15 Step 16 Please Note The end of the hose set that attaches to your home natural gas supply also has a quick disconnect coupler and state of the art shut off safety valve for your ...

Page 17: ...em has a very small orifice size and it may take up to two minutes to bleed all of the air out of the line After purging the air depress the igniter button and you will hear the pilot light You can also visually see it through the vents in the base of the heater head or through the small access hole with cover plate on the base of the heater head A FEW WORDS ABOUT NATURAL GAS First natural gas is ...

Page 18: ... installation or use of this product please contact your selling dealer or distributor before using this product Placement of the Heater Your Patio Comfort outdoor patio heater is designed for use as temporary comfort heating for your outdoor patio outdoor decks outdoor spa areas pool areas and other outdoor areas with plenty of fresh air The heater is NOT designed approved or intended for indoor ...

Page 19: ... operation The heater must always be used on firm level and stable ground Never move the heater while it is in operation Never try to hook up multiple feed line hoses together WARNING Never operate heater in an explosive atmosphere and be sure to keep unit away from where gasoline or other flammable liquids or vapors are stored or used ...

Page 20: ...ed hoses This is how long it might take for the air to be purged from the hoses and feedline delivery system It will take less than 10 seconds for regular relighting Do NOT continually press on the igniter while you are purging the line This will only cause premature wear and tear on the ignition and weaken the charge created by the piezo ignition Occasionally depress the igniter and you will hear...

Page 21: ...t the heater please always use the blue protective rubber caps to keep insects and other debris out of the feed line and internals of your heater Dirt debris or insects can impede or completely obstruct the flow of gas to your heater and negatively affect the operation of the heater Store your heater in an upright position in an area sheltered from inclement weather such as rain snow sleet hail du...

Page 22: ...deposits surface rusting or surface oxidation on the heater This is to be expected of any stainless steel product used outdoors We recommend washing the outer stainless steel or painted surfaces components such as the post and decorative cover and perforated material around the lighting instructions with a mild detergent solution and immediately wiping it clean with a dry soft cloth The stainless ...

Page 23: ...s Knob in Pilot position for full 30 seconds Remove emitter grid and replace thermocouple Use only Patio Comfort thermocouples and parts 4 Put heater in more protected location Do not use heater in winds in excess of 10 MPH Do not use heater in high wind conditions rain or at temperatures below 40 F Main burner will not light 1 Gas Pressure is low 2 Blockage in main burner orifice 3 Control knob i...

Page 24: ...ay rain and or dripping water or winds Do not attempt to paint reflector emitter grid or any portion of the heater control assembly Do not attempt to modify or alter the natural gas regulator that is included with your heater It is preset at the factory for 4 5 water column This is required for proper operation and safety The heater is equipped specifically for use with Natural Gas For Your Safety...

Page 25: ...n any manner whatsoever The unit has been designed to provide you with many years of trouble free service if maintained per our recommendations Inspect heater before each use If you find a damaged part please replace the part with a genuine Patio Comfort part before using the appliance Do not attempt to use your heater without the proper factory supplied hose and regulator Use of unauthorized repl...

Page 26: ...ay warranty protection for heaters that are used in a commercial or rental application Commercial warranty does NOT cover emitters ignition burners or component failure caused by abuse transportation or misuse This warranty is valid from the original date of purchase and is transferable Please keep your original sales receipt or invoice Proof of purchase is required to obtain warranty replacement ...

Page 27: ...riod the warranty protects the new owner as well This warranty provides you with specific legal rights You may also have other rights that vary from state to state How to obtain service For most product missing parts or assembly related problems your selling dealer can provide you with help The product has been designed to be as trouble free and maintenance free as possible and requires minimal as...

Page 28: ...lease fill out the information below as completely as possible Last Name______________________First Name______________Middle Initial_______ Date of Purchase Month________________ Day_________ Year__________________ Model of Heater__________________________Fuel Type NATURAL GAS Serial Number of Heaters Purchased __________________ _________________ _______________ _______________ _______________ __...

Page 29: ... AEI CORPORATION 2009 29 PATIO COMFORT Model NPC05 Natural Gas Heater By AEI Corporation ...

Page 30: ... AEI CORPORATION 2009 30 ...

Reviews: