BA 418-12 * 1.0 * 418_12_4_4_Inbetriebnahme.fm
4-61
Putting into operation 4
Jump-starting the engine
Safety instructions regarding external starting aids
NOTICE
Damage to electrical system due to short circuit when starting the
machine with an external starting aid.
►
Ensure that there is no contact among the vehicles.
►
Do not jump-start the machine if the battery is malfunctioning or frozen.
►
Do not connect two batteries in series.
►
Use only batteries with the same voltage for jump-starting.
►
Use only tested and certified battery jumper cables with insulated
terminal clamps and a sufficient cable cross-section.
►
Route the battery jumper cables so that they cannot catch on rotating
engine parts.
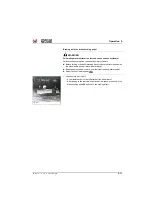
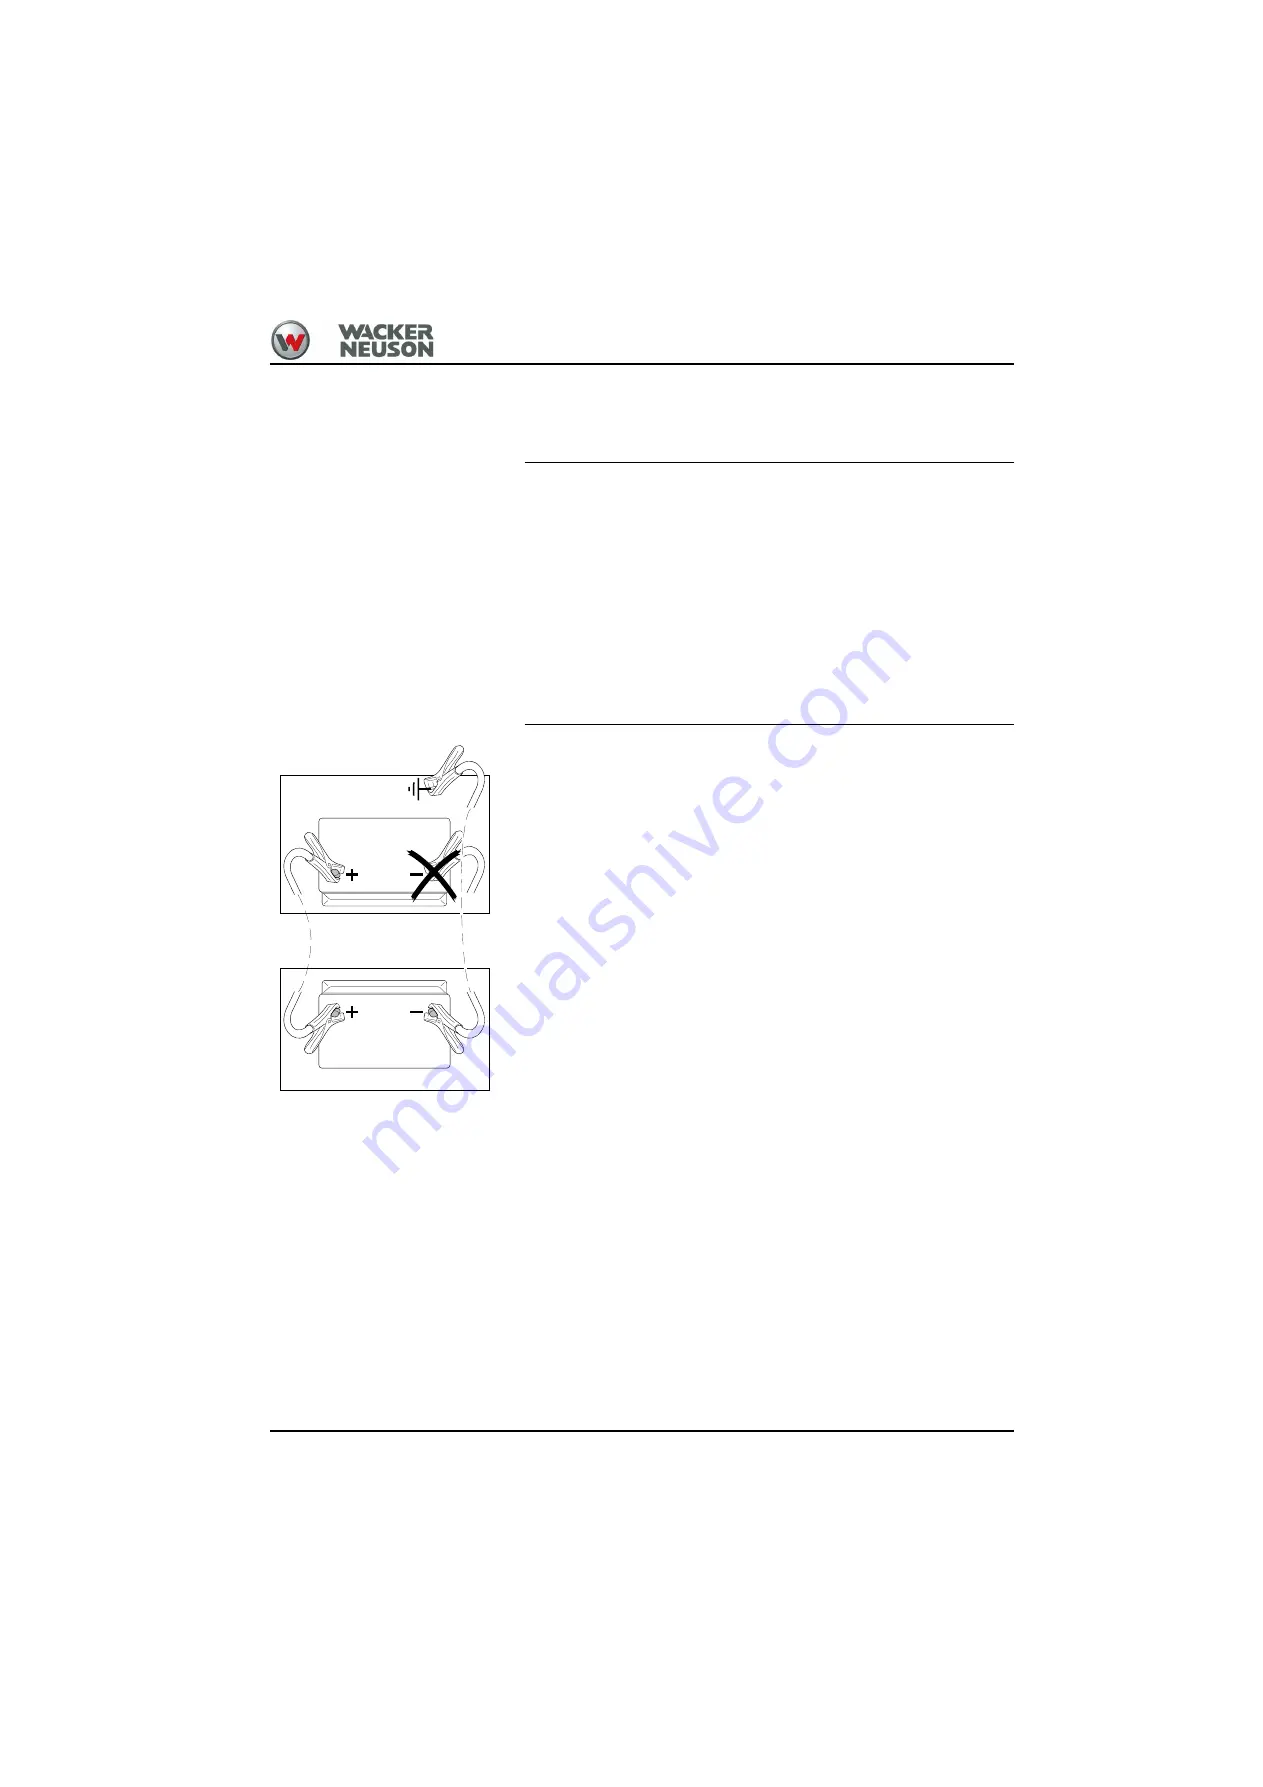
Perform the starting aid as follows:
1. Drive the jump-starting vehicle close enough to the machine so that the
battery jumper cables can reach to connect the two batteries.
2. Let the engine of the jump-starting vehicle run.
3. First connect one end of the red cable to the
+
terminal
of the empty
battery, then connect the other end to the
+
terminal
of the starting
battery.
4. Connect one end of the black cable to the
–
terminal
of the starting
battery, then the other end (–) to a metal component firmly screwed on
the engine block or to the engine block itself.
➥
Do not connect it to the negative terminal of the empty battery, as
otherwise explosive gas emerging from the battery can ignite if
sparks are formed!
5. Start the engine of the machine with the empty battery.
Once the engine has started:
1. With the engine running, disconnect both battery jumper cables in the
reverse order (first the
–
terminal
, then the
+
terminal
).
➥
This prevents sparking at the battery terminals!
12 V
12 V
34001b710_05.eps
Fig. 175
Empty battery
Starting battery
Summary of Contents for 418-12
Page 59: ...BA 418 12 1 0 418_12_3_Einleitung fm 3 27 Introduction 3 Right side of machine Fig 4 30 20 ...
Page 60: ...3 28 BA 418 12 1 0 418_12_3_Einleitung fm 3 Introduction Front of machine Fig 5 ...
Page 61: ...BA 418 12 1 0 418_12_3_Einleitung fm 3 29 Introduction 3 Rear of machine Fig 6 30 20 ...
Page 63: ...BA 418 12 1 0 418_12_3_Einleitung fm 3 31 Introduction 3 Outside right of the vehicle Fig 8 ...
Page 64: ...3 32 BA 418 12 1 0 418_12_3_Einleitung fm 3 Introduction Inside the cabin Fig 9 ...
Page 65: ...BA 418 12 1 0 418_12_3_Einleitung fm 3 33 Introduction 3 Engine compartment interior Fig 10 ...
Page 66: ...3 34 BA 418 12 1 0 418_12_3_Einleitung fm 3 Introduction Outside front of the vehicle Fig 11 ...
Page 67: ...BA 418 12 1 0 418_12_3_Einleitung fm 3 35 Introduction 3 Outside rear of the vehicle Fig 12 ...
Page 326: ...5 170 BA 418 12 1 0 418_12_5_Bedienung fm 5 Operation ...
Page 338: ...6 12 BA 418 12 1 0 418_12_6_Transport fm 6 Transport ...
Page 426: ...7 88 BA 418 12 1 0 418_12_7_Wartung fm 7 Maintenance ...
Page 462: ...8 36 BA 418 12 1 0 418_12_8_Betriebsstoerung fm 8 Malfunctions Notes ...
Page 499: ...BA 418 12 1 0 BA_418_12_V1_usSIX fm S 7 Index ...
Page 500: ...S 8 BA 418 12 1 0 BA_418_12_V1_usSIX fm Index ...
Page 527: ...FORM RTF 0907 Printed in U S A ...

