background image


85


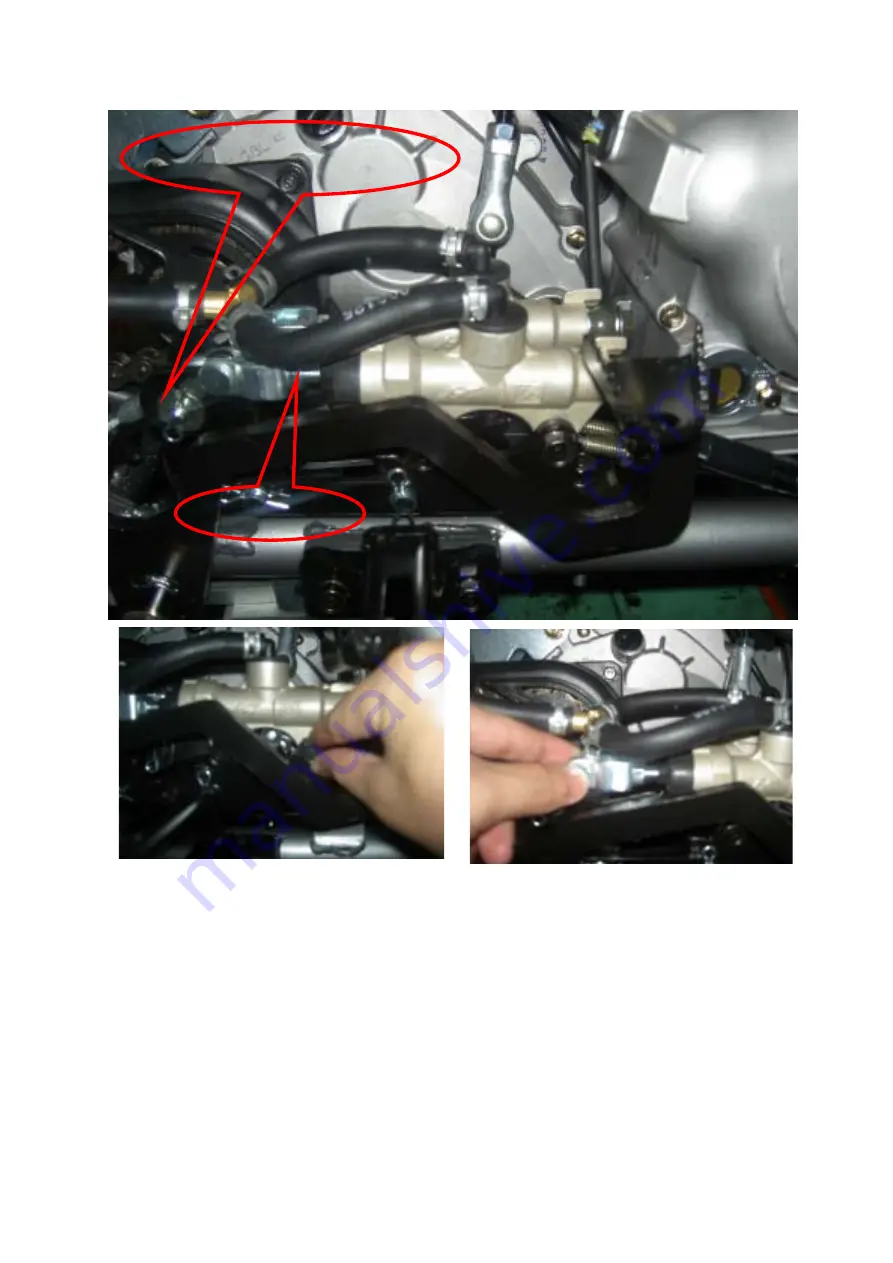
(STEP.2) The setup of the adjusting nut of the brake pump: 


1. 

The brake pedal should be in the highest location under the function of the returning 

spring. 

2. The adjusting nut changes the distance between the brake pump and the hydraulic 

cylinder driving rod. Make the nut touch the surface of the rod and revolve 1 circle 

(360

°

), then confirm the nut location and spin the rod till the nut is locked. 

3. Notice: If adjust the nut over 1 circle, it might result in the brake pump malfunction and jam     

the brake. 

Hydraulic Clyinder Driving 

Rod 

Adjusting Bolt 

Summary of Contents for Cobra 220

Page 1: ...AEON MOTOR CO LTD SERVICE MANUAL...

Page 2: ...L AND INSTALLATION 17 4 LUBRICATION 19 5 CYLINDER HEAD VALVES 29 6 CYLINDER PISTON 40 7 TRANSMISSION KICKSTARTER 49 8 FRONT WHEEL SUSPENSION AND STEERING 61 9 REAR WHEEL SYSTEM 80 10 FENDERS AND EXHAU...

Page 3: ...tact with the electrolyte flush the area thoroughly with water If you get the electrolyte in your eyes flush with water and contact a doctor immediately HOT PARTS Engine and exhaust pipe become very h...

Page 4: ...y SUSPENSION Front Rear BRAKES Front Rear TIRES Front Rear Specifications subject to change without notice Air cooled 4 stroke vertical cylinder 195 8 cc 65 59mm 9 6 1 1 45 N m 5000 rpm Mikuni C D I E...

Page 5: ...4 1 4 SERIAL NUMBER The frame serial number is stamped on the front frame And stick a bar code paper to cover it The engine number is stamped under the crankcase...

Page 6: ...nut Rear wheel bolt Exhaust muffler mounting bolt Engine hanger bolt Rear axle holder bolt Swing arm pivot nut Rear shock absorber mounting nut 5 N m 3 5 lbs ft 10 N m 7 2 lbs ft 22 N m 16 lbs ft 35...

Page 7: ...ansmission lubrication 2 1 MAINTENANCE DATA SPECIFICATION SPARK PLUG Spark plug cap Recommended spark plugs Throttle lever free play Idle speed Brake lever free play Drive chain slack Front rear tire...

Page 8: ...tle Cable ETC Switch 50H 6 M 500 800 Inspect adjust lubricate replace if necessary E Choke cable 50H 6 M 500 800 Inspect adjust lubricate replace if necessary E Carburetor air intake ducts flange 50H...

Page 9: ...Timing 100H 12 M 1000 1600 Inspect Wiring 100H 12 M 1000 1600 Inspect for wear routing security apply dielectric grease to connectors subjected to wear mud etc Clutches drive and driven 100H 12 M 1000...

Page 10: ...Inspect for deterioration damage cuts and nicks or kink in the throttle cable replace it if necessary Check the throttle lever free play should be not more than 5 10 mm at the tip of the throttle leve...

Page 11: ...tabs in the fuel tank 3 Remove clips from air box cover A and remove cover Inspect the gasket It should adhere tightly to the cover and seal all the way around 4 Install the new one 5 Reinstall filter...

Page 12: ...ry by carefully bending the side electrode SPARK PLUG GAP 0 6 0 7 mm RECOMMENDED REPLACEMENT PLUG NGK CR7HSA 6 Check the sealing washer and replace with a new one if damaged 7 With the sealing washer...

Page 13: ...g nut Tighten the axle holder lock nut Torque 90N m 65 Ft lbs When the drive chain becomes very dirty it should be removed cleaned and lubricated with the specified lubricant Clean the drive chain wit...

Page 14: ...he standard is 10 20 mm Adjust the free play of the front brake lever by turning the adjuster on the brake lever assembly Inspect the rear brake lever and cable for excessive play or other damage Repl...

Page 15: ...he front wheels turned straight ahead When there is excessive play inspect the tie rod kingpin bushing and ball joint Steering shaft holder bushing Remove the front fender Remove the steering shaft ho...

Page 16: ...both marks be equally positioned in order to get an accurate measurement 4 Measure the distance between the marks and record the measurement Call this measurement A 5 Rotate the tires 180 by moving v...

Page 17: ...engine STEP1 Place a drain pan beneath oil pan and remove drain plug from the crankcase Allow oil to drain completely STEP2 Reinstall the drain plug Tighten to specification STEP3 Add the proper amou...

Page 18: ...Remove the following parts as required Seat Left and Right Side Covers Fuel Tank Cover Front Cab Fuel Tank 8 Remove exhaust pipe 9 Remove airbox 10 Remove carburetor Insert a clean shop towel into the...

Page 19: ...18 3 2 ENGINE REPLACEMENT Engine installation is essentially the reverse order of removal The torque of engine hanger bolt is 30 Nm Route the wires and cable properly in reverse order of removal...

Page 20: ...cement of the engine oil oil filter screen and assembly of the oil pump Fill the oil pump with clean oil when reassembling the pump SPECIFICATIONS Engine Oil Capacity 0 8 1 0 Liters Engine Oil Recomme...

Page 21: ...l to its true level in the engine sump 3 Stop engine and check oil level sight glass 4 Check to see that the oil level is in the normal range The level should be at minimum halfway between to the top...

Page 22: ...e sealing surfaces of the drain plug and crankcase should be clean and free of burrs nicks or scratches 7 Reinstall drain plug and torque to 14 ft lbs 19Nm 8 The oil filter is located on the right sid...

Page 23: ...ON 1 Remove stator housing bolts and remove housing 2 Remove the start drive gear and shaft by pulling the shaft and tilting the gear slightly Flywheel removal generally is not required 3 Measure the...

Page 24: ...joint flywheel nut and washer 7 Install Flywheel Puller PN PA 47308 and remove flywheel CAUTION Do not hammer or strike the tool while attached to the crankshaft end which may become damaged 8 Remove...

Page 25: ...d parts 15 Using the Slotted Nut Socket remove the balance shaft slotted nut A NOTE Slotted nut is a right hand thread 16 Remove cam chain drive sprocket B drive sprocket C and woodruff key from balan...

Page 26: ...rive gear 23 Remove the oil pump retaining screws 24 Inspect the sprockets and chain for wear or damage Inspect chain for worn or missing rollers or damage Replace chain anytime the oil pump is replac...

Page 27: ...OIL PUMPASS Y INSTALLATION 1 Install the crankshaft gear woodruff key and slotted nut 2 Install the balance shaft gear and align the mark with the crankshaft gear mark as shown 3 Install the woodruff...

Page 28: ...27 4 Install the oil pump 5 Install the chain A over the sprocket on the balance shaft gear B 6 Install the washer and nut Torque to specification...

Page 29: ...28 7 Install the oil pump galley 8 Install flywheel key flywheel washer and nut 9 Install stator housing...

Page 30: ...s sure the orifice is not clogged and the gasket O ring and dowel pins are in place SPECIFICATIONS ITEM STANDARD SERVICE LIMIT Cylinder compression 160 190 PSI Cam lobe height IN EX 29 795 29 56 29 40...

Page 31: ...or damaged valve seats Burned or bent valve Incorrect valve timing Weak valve spring Cylinder head Leaking or damaged head gasket Warped or cracked cylinder head Faulty cylinder or piston Excessive n...

Page 32: ...31 5 3 CAM SHAFT ASS Y REMOVAL Remove the cylinder head cover Remove the two cam chain tensioner falange bolts Remove the nuts A and washers Remove the camshaft holder and dowel pins...

Page 33: ...or uneven wear replace the rocker arm NOTE Always inspect camshaft lobe if rocker arms are worn or damaged Remove each rocker arm shaft using the 10 mm hex bolt that secures the lock plate Measure the...

Page 34: ...the cam chain from the sprocket by tilting the cam assembly and simultaneously lifting the chain INSPECTION Inspect the cam lobes surface and height of cam lobes for wear or damage SERVICE LIMIT IN 2...

Page 35: ...ad gasket CYLINDER HEAD DISASSEMBLY Using a valve spring compressor compress the valve spring and remove the spilt keeper NOTE To prevent loss of tension do not Compress the valve spring more than nec...

Page 36: ...rements are out of specification Remove valve seals Note Replace seals whenever the cylinder head is disassembled Hardened cracked or worn valve seals will cause excessive oil consumption and carbon b...

Page 37: ...ound They must be replaced if worn bent or damaged Measure diameter of valve stem with a micrometer in three places and in two different directions six measurements total Replace if excessive wear is...

Page 38: ...avoid damaging valve seal Dip valve spring and retainer in clean engine oil and install spring with closely spaced coils toward the cylinder head Place retainer on spring and install valve spring com...

Page 39: ...the cylinder head on the cylinder Install the two 6 mm bolts but do not tighten Install the cam according to the Cam shaft Timing procedure Verify the cam chain is in Place around the crankshaft gear...

Page 40: ...oop the cam chain over the sprocket while verifying the cam is inserted with the alignment marks parallel to the gasket surface Apply clean engine oil liberally to the valve springs cam chain rocker a...

Page 41: ...SPECIFICATION ITEM STANDARD SERVICE LIMIT Cylinder I D 65 65 01 Taper 0 05 Out of round 0 05 Warp across top 0 05 Piston Piston O D 64 96 64 98 Piston pin Piston pin bore 15 997 16 Piston rings Piston...

Page 42: ...essive carbon build up on piston or combustion chamber wall Knocking or abnormal noise Worn piston and cylinder Excessive carbon build up Excessive smoke Worn cylinder piston or piston rings Improper...

Page 43: ...ylinder head lightly with a plastic hammer until loose Remove the cylinder head and head gasket Remove cam chain guide at front of cylinder Remove the two 6 mm cylinder base bolts Tap cylinder lightly...

Page 44: ...h the top ring Using a piston ring pliers Carefully expand ring and lift it off the piston CAUTION Do not expand the ring more than the amount necessary to remove it from the piston or the ring may br...

Page 45: ...scratches or damage Inspect cylinder for taper and out of round with a telescoping gauge or a dial bore gauge Measure in two different directions front to back and side to side on three different lev...

Page 46: ...om the bottom of the piston at a right angle to the direction of the piston pin Subtract this measurement from the maximum cylinder measurement obtained earlier Measure piston pin bore Replace piston...

Page 47: ...thickness gauge Replace piston and rings if ring to groove clearance exceeds service limits 6 5 PISTON INSTALLATION CAUTION Do not re use circlips Circlips become deformed during the removal process...

Page 48: ...N casting mark facing the intake side of engine The piston pin should be a push fit into the piston Install the other circlip with the gap facing up or down Push the piston pin in both directions to m...

Page 49: ...d area of the cylinder Place the cylinder on to the studs Loop the cam chain through the cylinder chain room and secure with mechanic s wire Allow cylinder to fully seat on the piston and support bloc...

Page 50: ...the tube should be drained SPECIFICATIONS ITEM STANDARD mm SERVICE LIMIT mm Driven the width 19 8 20 2 19 0 Weight roller O D 17 9 18 1 17 40 Movable drive face I D 27 98 28 0 28 03 Drive face collar...

Page 51: ...50 7 2 TROUBLESHOOTING Engine starts but can t travel Worn driven belt Worn clutch lining Damaged driven face spring Low engine power Worn driven belt Worn weight roller Dirty driven face...

Page 52: ...rom the crankshaft Remove the fixed sheave A starter pawl B and slide bushing C Inspect the fixed sheave and slide bushing for scoring grooving or abnormal wear Replace any worn or damaged parts Remov...

Page 53: ...Remove and inspect the slide bushings and cam plate Replace any components that found to be worn excessively or appear abnormal To reassemble reverse the procedures Do not apply any lubricants to the...

Page 54: ...d removing the nut from the shaft Pull the entire clutch off as an assembly Set the driven clutch assembly on a flat surface Remove the cover spring washer stack and ball bearing retainer Inspect comp...

Page 55: ...either the measurements or the lining indicates excessive wear replace the clutch cover Inspect the condition of the friction pads Measure the amount of remaining pad using a depth caliper Inspect th...

Page 56: ...tension the measurement should be no less than 3 50 89 mm If out of specification replace the spring Remove the outer roller pin cover by turning and pulling up on the cover Replace the 2 o rings Remo...

Page 57: ...ller pin cover Place the washer onto the threaded shaft and apply LoctiteTM 272 to the threads Have an assistant available for final assembly Install the compression spring Place the friction pad asse...

Page 58: ...washer from kick starter spindle composition Remove the kick starter spindle ass y Remove the kick starter idle gear ass y Remove the kick spindle bush INSPECTION Inspect the kick starter spindle comp...

Page 59: ...tarter spindle bush for wear of damage Inspect the kick driven gear and spring for wear or damage 7 5 KICK STARTER ASSEMBLY Install the kick driven gear and spring Install the kick spindle bush return...

Page 60: ...ing the primary sliding sheave and the cam plate assembly NOTE When installing the primary sliding sheave and the cam plate assembly hold the cam plate and the primary sliding sheave together The weig...

Page 61: ...the drive clutch nut to specification CVT Drive Clutch Nut Torque 40 ft lbs 55 Nm Install the driven clutch assembly and driven clutch nut Torque the nut to specification Apply LoctiteTM 272 to the se...

Page 62: ...61 8 FRONT WHEEL SUPENSION AND STEERING 8 1 PARTS DRAWING 8 2 TROUBLESHOOTING 8 3 HANDLEBAR SYSTEM 8 4 THROTTLE HOUSING 8 5 FRONT WHEEL 8 6 FRONT BRAKES 8 7 STEERING SYSTEM 8 1 PARTS DRAWING...

Page 63: ...62...

Page 64: ...O ONE SIDE Bent tie rods Wheel installed incorrectly Unequal tire pressure Bent frame Worn swing arm pivot bushing Incorrect wheel alignment POOR BRAKE PERFORMANCE Brake shoes worn Worn brake drum Bra...

Page 65: ...wo fix screws Remove the throttle lever housing on the right handlebar Remove brake lever bracket assembly Remove the handlebar switch on the left handle bar Remove rear brake lever bracket ass y Remo...

Page 66: ...65 Installation Install the switch housing Tighten two screws securely Install the throttle lever housing and brake lever bracket ass y...

Page 67: ...ound by placing a jack or other support under the frame Remove the front wheel nuts washer and wheels Installation Install and tighten the four wheel nuts torque 54 N m 40 lbs ft Remember put a cotter...

Page 68: ...n into caliper bore slowly using a C clamp or locking pliers NOTE Brake fluid will be forced through compensating port into master cylinder fluid reservoir when piston is pushed back into caliper Remo...

Page 69: ...Replace pads if worn beyond the service limit FRONT PAD ASSEMBLY WARNING If the brake pads are contaminated with grease oil or liquid soaked do not use the pads use only new clean pads Install pads w...

Page 70: ...to prevent air from entering the brake system Be sure fluid level in reservoir is between MIN and MAX lines and install reservoir cap Install wheels and torque wheel nuts BRAKE BURNISHING It is recom...

Page 71: ...beyond service limit Brake Disc Thickness New 0 150 0 164 3 810 4 166 mm Service Limit 0 140 3 556 mm Brake Disc Thickness Variance Service Limit 0 002 0 051 mm difference between measurements Mount...

Page 72: ...ll disc on hub CAUTION Always use new brake disc mounting bolts The bolts have a pre applied locking agent which is destroyed upon removal Install new bolts and tighten to specified torque Front Brake...

Page 73: ...liper mounting bolts B and remove the brake caliper FRONT CALIPER INSTALL Install caliper on hub strut and torque mounting bolts to 18 ft lbs 24 Nm Install brake line and tighten securely with a line...

Page 74: ...T CALIPER DISASSEMBLY Remove the c clips A from the caliper sliding bolts Remove the caliper slide bolts B mounting bracket C and brake pads D Remove the outside dust boot E Remove the piston and dust...

Page 75: ...alcohol NOTE Be sure to clean seal grooves in caliper body FRONT CALIPER INSPECTION Inspect caliper body bore for nicks scratches or wear Measure bore for roundess Replace if damage is evident Inspect...

Page 76: ...per and seat the dust boot into caliper groove Be sure groove is clean and free of residue or brakes may drag Install piston with a twisting motion while pushing inward Piston should slide in and out...

Page 77: ...on the backside of the wheel Remove the two brake caliper hex bolts B and the brake caliper Remove hub cap C cotter pin front spindle nut and washer Remove the outer spacer D from the spindle Inspect...

Page 78: ...on the upper A arm and pull the top ball joint from the steering spindle Push down on the lower A arm to move the lower ball joint from the steering spindle Tie rod inspection To check for play in th...

Page 79: ...determine the cause Steering shaft removal Remove the handle bar cover and handle bar Remove the front fender Remove handlebar lower holder Unscrew steering shaft holder bolt remove steering shaft ho...

Page 80: ...der Install the holder and oil seal tighten with the nuts Torque 33 N m 24 lbs ft Installation of steering shaft Install the steering shaft nut and tighten it This nut is under this steering shaft Tor...

Page 81: ...80 9 REAR WHEEL SYSTEM 9 1 PARTS DRAWING 9 2 TROUBLESHOOTING 9 3 REMOVE REAR WHEELAND REAR BRAKE 9 4 DRIVE MECHNISM 9 1 Parts Drawings...

Page 82: ...rings are worn Faulty tires Rear axle bearing holder is faulty Brake Drag Incorrect brake adjustment Sticking brake cam Sticking brake cable Hard Suspension Bent damper rod Faulty swing arm pivot bush...

Page 83: ...side brake lever Hydraulic Cylinder Driving Rod The rear brake cable fixing set Brake Pump Foot Brake Padal Hydraulic Cylinder Driving Rod Brake Pump Handlebar Front Brake Cable Rear Brake Oil Tube Re...

Page 84: ...83 Brake Oil Tank Left Side Brake Lever Right Side Brake Lever The cable connects to front brake disc The cable connects to rear brake disc...

Page 85: ...84 The Brake Adjustment STEP 1 Take off the rear brake fixing set and the bolt of brake pump Brake Oil Tube Rear Brake Caliper Rear Brake Cable Fixing Set...

Page 86: ...t changes the distance between the brake pump and the hydraulic cylinder driving rod Make the nut touch the surface of the rod and revolve 1 circle 360 then confirm the nut location and spin the rod t...

Page 87: ...mal if the brake oil could drain automatically please try this for couple times for confirmation If it doesn t work please be back to STEP 2 and decrease the distance until the oil could run out norma...

Page 88: ...le 1 Spin the gap adjuster on the left lever till the shortest position 2 Adjust the adjusting screw and keep the gap being 2 3 mm Adjusting Screw Brake Cable Gap Adjuster Rear Brake Cable Fixing Set...

Page 89: ...DRIVE MECHNISM Removal and inspection Remove the rear wheel and the rear brake Remove the skid plate under swing arm Remove the drive chain cover Disassemble the chain retaining clips and master link...

Page 90: ...nout limit is 0 5 mm Check the turning of inner race of bearing with fingers The bearings should turn smoothly and quietly Replace if necessary Also check that the bearing outer race fits tightly in t...

Page 91: ...chains on the driven sprocket Assemble the master link and retaining clip NOTE The retaining clip direction Install the drive chain cover Assemble the chain under cover Install the skid plate Install...

Page 92: ...INSTALLATION 10 1 REAR FENDER REMOVAL Pull the Seat Release Bar to take off the seat This seat release bar is under the right side of the rear fender Rear Cab 4 bolts at rear of cab 8 screws secure fo...

Page 93: ...ONT FENDER REMOVAL Front Cab 2 screws at rear of cab to frame 2 screws at front of cab to frame 8 screws secure footwell to front cab unless removed previous Side Covers 2 plastic inserts and 1 screw...

Page 94: ...pipe bolts that fixed with engine NOTE Do not service the exhaust pipe while they are hot Remove the exhaust pipe bolts mounting on the frame below the rear fender Remove the exhaust pipe carefully 10...

Page 95: ...E STOP SWITCH AT LEFT OR RIGHT POSITION GEARSHIFT BAR IS NOT AT NEUTRAL POSITION FAULTY IGNITION COIL FAULTY GENERATOR FAULTY CDI UNIT POORLY CONNECTED Between CDI and ignition coil Between alternator...

Page 96: ...IGNITION SYSTEM FAULTY ENGINE STOP SWITCH ENGINE PROBLEMS HEAD LIGHT DO NOT WORK THE SWITCH DO NOT PUSH TO THE ON POSITION THE LIGHT BULB IS BURN OUT NEED BE REPLACED 11 2 IGNITION COIL Remove the sp...

Page 97: ...s sulfuric acid electrolyte Contact with skin or eyes may cause severe burns Wear protective clothing and a face shield Electrolyte is poisonous Drink large quantities of water or milk and call a phys...

Page 98: ...ing is preferred 11 8 ELECTRIC STARTER Information A weak battery may be unable run the starter motor quickly enough If the battery voltage is enough while the engine is not cranking the starter motor...

Page 99: ...reach up under the front cab Rotate the socket 2 counterclockwise and pull it away from the headlight assembly Install the new headlamp Reinstall all components TAILLIGHT BRAKELIGHT LAMP REPLACEMENT...

Page 100: ...ITE 11 1 25 YELLOW RED 19 0 85 W A T H E T B L U E 2 7 BLACK BLUE 4 YELLOW 12 1 25 B L U E 2 0 0 8 5 BLUE RED 28 BROWN 5 0 85 P I N K 1 3 BLUE WHITE 21 0 85 YELLOW BLUE 29 GREEN 6 0 85 WHITE BLACK 14...

Page 101: ...fuel tank cap breather hole Faulty Spark Plug Fouled spark Plug Faulty CDI unit Faulty Alternator Faulty engine stop switch Poor connection Broken or shorted wires Broken or shorted ignition coil Wor...

Page 102: ...ment Check for intake pipe leak Deteriorated insulator O Ring Perform Spark Plug Test Loose or disconnected ignition system wires Faulty spark plug carbon fouled or wet Faulty alternator Faulty CDI un...

Page 103: ...cause Faulty CDI unit or Pulse generator Check Fuel Flow to Carburetor Lack of fuel in tank Clogged fuel line Clogged fuel valve Clogged fuel filter Clogged fuel tank breather hose Remove Carburetor c...

Page 104: ...on Leaking head gasket Worn Cylinder and or piston rings Check Carburetor Clean fuel jets Clean float valve Check Spark Plug Clean Re gap spark plug Faulty spark plug Spark plug is incorrect heat rang...

Page 105: ...earing Damaged steering shaft bushing Bent steering shaft Bent rim Improperly installed wheel hub Excessive wheel bearing play Bent swing arm Bent frame Excessive wear of swing arm bushing Bent Axle B...

Reviews: