background image

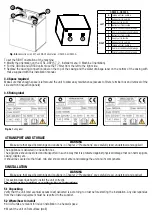
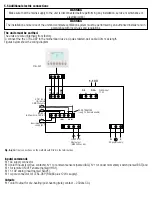
5.4 Precabled electric connections

The unit must be earthed.

The units are wired internally from factory.

To connect the the CTRL-DSP to the mother board use a 4 poles twisted-pair cable: 30m max length. 

Unit comes pre-wired with:

- mains supply cable (3-core: brown, blue, yellow/green).

- control cable, for connection to CTRL-DSP (4-core: green, brown, yellow, white).

- cable for connection to remote sensor (2-core: blue, brown).

WARninG

Make sure that the mains supply to the unit is disconnected before performing any installation, service, maintenance or 

electrical work!

WARninG

The installation and service of the unit and complete ventilation system must be performed by an authorized installer and in 

accordance with local rules and regulations.

fig. 5.p 

Electric connections

YELL

O

W

-GREEN

BL

UE

BROW

N

N

L

SUPPLY

CONTROL

YELL

O

W (A)

WHITE (B)

BR

O

WN (+12V)

GREEN (GND)

REMOTE SENSOR

BL

UE

BROW

N

Summary of Contents for QR280A

Page 1: ...QR280A QR400A QR550A aL ...

Page 2: ...s and Weight 03 3 3 Duct connections 03 3 4 Space required 04 3 5 Rating label 04 4 Transport and Storage 04 5 Installation 04 5 1 Unpacking 04 5 2 Where how to install 04 5 3 Installation 05 5 4 Precabled electric connections 08 5 5 Additional electric connections 09 6 Commissioning 10 6 1 Setting Fan speed 10 6 2 Before Starting the System 14 7 Operation 15 7 1 User Menu on CTRL DSP 16 7 2 Insta...

Page 3: ...s other than those specified in this manual This appliance can be used by children aged from 8 years and above and persons with reduced physical sensory or mental capabilities or lack of experience and knowledge if they have been given supervision or instruction concerning use of the appliance in a safe way and understand the hazards involved Children shall not play with the appliance Cleaning and...

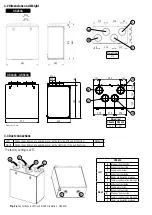
Page 4: ...air from inside E Winter condensation drainage F Summer condensation drainage RIGHT A Extract air from inside B Supply air to inside C Exhaust air to outside D Intake air from outside E Summer condensation drainage F Winter condensation drainage Ø125 Ø118 592 55 610 665 298 Weight kg 21 4 227 227 276 276 104 104 90 89 89 A B C D A B C D E F QR280A 778 861 799 62 144 490 144 180 247 123 279 220 279...

Page 5: ...ance is delivered in one carton box The appliance should be stored and transported in such a way that it is protected against physical damage that can harm spigots casing display etc It should be covered so that dust rain and snow cannot enter and damage the unit and its components WARNING Make sure that specific warnings and cautions in Chapter 2 Precautions are carefully read understood and appl...

Page 6: ... accessible Leave free space for opening the removable panels and for removal of the main components 3 4 The outdoor air grilles if possible be put in the northern or eastern side of the building and away from other exhaust outlets like kitchen fan exhausts or laundry room outlets 5 3 Installation The unit must be installed in the following position It is important that the unit is vertical in ord...

Page 7: ...l by means of the fixing brackets 5 f Screw safely 5 gMake sure that the unit is at spirit level 5 hConnect the condensation drain joints G 3 4 M placed in the bottom side of the unit to a U bend or similar on the condensation drainage pipe In case close the non used joint by means of the supplied drain stopper Make sure this operation is well done in accordance to the best practice in order to as...

Page 8: ... 5 k Fix the 2 spacers on the back of the unit 5 l Hook the unit at its bracket 5 m Make sure it is at spirit level and fix it by means of the safety screw 5 n Connect the condensation drain joints G 3 4 M placed in the bottom side of the unit to a U bend or similar on the condensation drainage pipe In case close the non used joint by means of the supplied drain stopper Make sure this operation is...

Page 9: ...n brown yellow white cable for connection to remote sensor 2 core blue brown WARNING Make sure that the mains supply to the unit is disconnected before performing any installation service maintenance or electrical work WARNING The installation and service of the unit and complete ventilation system must be performed by an authorized installer and in accordance with local rules and regulations Fig ...

Page 10: ...y Outputs N 1 on off output for pre heating post heating relay contact 250Vac 5A Fig 5 q Electrical connections on the motherboard fitted in the terminal box WARNING Make sure that the mains supply to the unit is disconnected before performing any installation service maintenance or electrical work WARNING The installation and service of the unit and complete ventilation system must be performed b...

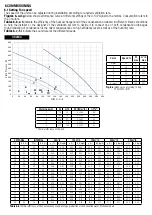
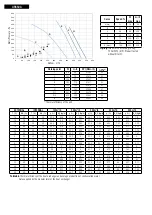
Page 11: ... INTERNAL 50m3 h 100m3 h 150m3 h 200m3 h 250m3 h T C R H T C R H ƞ H2 O kg h ƞ H2 O kg h ƞ H2 O kg h ƞ H2 O kg h ƞ H2 O kg h 18 60 20 30 95 3 0 16 92 2 0 29 89 0 0 41 85 0 0 51 81 5 0 58 18 70 20 40 96 0 0 22 92 6 0 42 90 0 0 61 86 8 0 78 83 3 0 88 18 80 20 50 96 8 0 28 94 0 0 55 90 6 0 79 88 0 1 02 84 5 1 16 10 60 20 30 95 1 0 10 91 3 0 18 87 6 0 24 83 6 0 29 80 1 0 32 10 70 20 40 96 1 0 16 92 5 ...

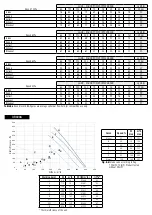
Page 12: ...1 45 Speed 60 Lw dB SOUND POWER OCTAVE BAND Lp dB A 63 125 250 500 1K 2K 4K 8K Tot 3m Intake 57 57 69 57 51 49 42 33 70 41 Supply 55 55 64 54 49 43 34 24 65 37 Extract 60 54 62 53 49 44 34 24 65 36 Exhaust 57 56 68 57 51 49 42 33 69 41 Breakout 56 55 61 54 50 45 35 25 64 36 Speed 40 Lw dB SOUND POWER OCTAVE BAND Lp dB A 63 125 250 500 1K 2K 4K 8K Tot 3m Intake 51 51 58 47 40 38 28 21 60 31 Supply ...

Page 13: ...le 6 f Sound level dBA figures are average spherical free field for comparitive use only Table 6 e Thermal efficiency of the heat exchanger and average production of condensation water Data supplied by the manufacturer of the heat exchanger The heat exchanger is tested at the University of Luzern Hochschule Lezern EXTERNAL INTERNAL 100m3 h 200m3 h 300m3 h 400m3 h T C R H T C R H ƞ H2 O kg h ƞ H2 O...

Page 14: ...h ƞ H2 O kg h ƞ H2 O kg h ƞ H2 O kg h ƞ H2 O kg h 18 60 20 30 95 4 0 28 91 8 0 53 88 7 0 75 85 9 0 95 83 2 1 12 18 70 20 40 95 9 0 4 92 8 0 77 90 1 1 11 87 7 1 42 85 5 1 72 18 80 20 50 96 4 0 5 93 7 0 99 91 4 1 44 89 3 1 87 87 4 2 29 10 60 20 30 95 2 0 18 91 3 0 32 87 8 0 44 84 7 0 52 81 7 0 59 10 70 20 40 95 8 0 29 92 5 0 54 89 6 0 77 87 0 96 84 5 1 14 10 80 20 50 96 3 0 39 93 5 0 74 91 1 1 07 88...

Page 15: ...4 78 47 Exhaust 78 65 70 71 62 59 53 45 80 50 Breakout 81 69 67 69 62 56 48 36 82 48 Speed 80 Lw dB SOUND POWER OCTAVE BAND Lp dB A 63 125 250 500 1 K 2 K 4 K 8K Tot 3m Intake 73 61 67 69 59 56 50 43 75 47 Supply 72 61 63 65 56 50 41 31 74 43 Extract 73 60 63 65 57 51 42 31 74 44 Exhaust 73 61 66 67 58 55 49 41 75 46 Breakout 71 64 62 67 59 53 45 33 74 45 Speed 60 Lw dB SOUND POWER OCTAVE BAND Lp ...

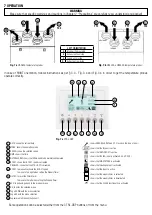
Page 16: ... shows error alarm see 7 3 to check the type of error shows that the Bypass is active shows that ANTI FROST is active shows that the IAQ input is activated i e HY CO2 shows that NIGHT MODE is activated shows that Heating output is activated shows that the Boost is active shows that the weekly timer is activated shows that the weekly timer is deactivated shows that the SLAVE functionality is activa...

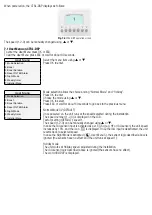
Page 17: ...ss OK to select Press ESC or wait for about 60 seconds to go back to the previous menu Normal Mode 3V DEFAULT Once powered on the unit runs at the speed selected during the installation The speed number 1 2 3 is displayed on the LCD Factory setting DEFAULT speed 1 The speed 1 2 3 can be manually changed using or In case the IAQ sensor input is activated as per Fig 5q e g HY or IAQ sensor the unit ...

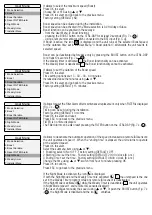
Page 18: ...ows to deactivate the automatic operation of the speed increased via remote IAQ sensors the unit operates at speed 1 When the ending time is elapsed the unit returns to operate at the selected speed Press OK to select Select the submenu item using or 1 Enabling select ON or OFF Factory setting DEFAULT OFF 2 Starting Time set the time Factory setting DEFAULT 20 00 o clock 8 p m 3 Ending Timer set t...

Page 19: ... Boost functionality need to be used make reference to the User Menu 2 Boost for more details It allows to select the Installer menu Press OK to enter the Installer menu Press ESC to go back to the previous menu Enter installer menu User Menu 1 Mode Selection 2 Boost 3 Boost Duration 4 Reset FILTER Alarm 5 Night Mode 6 Weekly timer 7 Installer Menu User Menu 1 Mode Selection 2 Boost 3 Boost Durati...

Page 20: ...actory setting DEFAULT 3V 3V Mode To adjust the speeds refer to the paragraph 10 Speed setting in the Installer Menu Slave Mode It allows to control the speed by means of the 0 10V analogic input any other operation logic is ignored If the Slave mode is activated the icon and the word Slave are displayed Constant Pressure Mode Currently not available Installer Menu 1 Language 2 Date time 3 Machine...

Page 21: ...The HEAT output Fig 5q is activated 3 Heating threshold POST it allows to set the heating threshold The setting range is 15 C 25 C Increase decrease the temperature using or Press OK to select Factory setting DEFAULT 20 C If the heater is activated the icon is displayed Installer Menu 8 Heating 10 Speed setting 11 Airflow Balancing 12 F7 filter 13 Filter Alarm interval It allows to adjust the spee...

Page 22: ...crease the speed using or Press OK to select Press ESC to go back to the previous menu Installer Menu 8 Heating 10 Speed setting 11 Airflow Balancing 12 F7 filter 13 Filter Alarm interval It allows to select the F7 filter in case the unit is not equipped with it from factory The F7 filter should be installed to the supply air side T22 Fig 7 a and 7 b Press OK to enter Choose NO or YES using or Pre...

Page 23: ...kly Timer is OFF Press OK to enter Press ESC to go back to the previous menu Installer Menu 15 Constant Pressure 17 Periodic purge 18 Working Hours Counter 19 ModBus settings 20 Save settings The unit can be controlled via ModBus ModBus RTU over RS485 For specification contact our customer service Installer Menu 15 Constant Pressure 17 Periodic purge 18 Working Hours Counter 19 ModBus settings 20 ...

Page 24: ...85 connection between the CTRL DSP and the motherboard E001 no rotation of the exhaust air fan Fig 8 a and 8 b E002 no rotation of the intake air fan Fig 8 a and 8 b E003 thermistor T11 broken disconnected Fig 7 a and 7 b E004 thermistor T12 broken disconnected Fig 7 a and 7 b E005 thermistor T21 broken disconnected Fig 7 a and 7 b E006 thermistor T22 broken disconnected Fig 7 a and 7 b E007 dehum...

Page 25: ...try CONTROL CABLE SUPPLY CABLE CABLE FOR REMOTE SENSOR 9 Fig 8 a QR280A internal components 3 8 1 2 3 4 5 6 7 8 G4 Filter Heat exchanger Condensation drainS ThermISTOR Fan INTAKE air Fan EXHAUST air Electrical connection CARD ADDITIONAL Cable entry CONTROL CABLE SUPPLY CABLE CABLE FOR REMOTE SENSOR 9 10 11 Fig 8 b QR400A e QR550A internal components 4 1 2 3 4 5 6 7 8 9 10 11 12 QR280A QR400A QR550...

Page 26: ... to easily disconnect and replace the fans if necessary Filters The filters are of filter quality G4 for both the supply air and extract air filter The QR400 and QR550 units are equipped with a F7 filter on the supply air The filters need to be cleaned regularly and replaced when polluted during maintenance New sets of filters can be acquired from your installer or wholesaler Heat exchanger The un...

Page 27: ... mains supply to the unit is disconnected before performing any installation service maintenance or electrical work WARNING The installation and service of the unit and complete ventilation system must be performed by an authorized installer and in accordance with local rules and regulations Keep the unit surface free from dust Clean the filters with a vacuum cleaner following the below illustrati...

Page 28: ...oor ambient conditions and on frequency of filter cleaning Do not move the motor balance clips Fig 8 k l o q Fig 8 q Keep the unit surface free from dust Clean the filters with a vacuum cleaner following the below illustrations Fig 8 r t u for the QR400A unit and Fig 8 r s t u for QR550A unit when the FILTER signal Fig 7 c is displayed on LCD The actual need to perform this operation may vary depe...

Page 29: ...ng on indoor and outdoor ambient conditions and on frequency of filter cleaning Fig 8 v Fig 8 u Clean the fans every year with a vacuum cleaner following the below illustrations Fig 8 r w for the QR400A unit and Fig 8 r s w for the QR550A unit The actual need to perform this operation may vary depending on indoor and outdoor ambient conditions and on frequency of filter cleaning Do not move the mo...

Page 30: ... Unpleasant smell 1 Drain connections have not been installed correctly 2 Drain connection below the unit has a too low water level fill it up with water 3 Check filters Change of filters required 4 Check ducting system and grilles and diffusers Cleaning required Water leakage near the unit 1 Drain connections have not been installed correctly Checking necessary 2 Drain connections are dirty Clean...

Page 31: ...emand control Controllo ambientale centrale Central demand control Controllo manuale no DCV Manual control no DCV Controllo ambientale locale Local demand control Controllo ambientale centrale Central demand control Controllo manuale no DCV Manual control no DCV o1 Trafilamento interno massimo Maximum internal leakage rate 1 5 0 6 0 8 o2 Trafilamento esterno massimo Maximum external leakage rate 1...

Reviews: