MFC Series Boilers Installation Manual
Installing Expansion Joint and Front Connection Pipe – Cont.
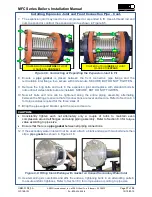
7. The expansion joint may need to be compressed or expanded to fit. Use all-thread rod and
nuts to expand or contract the expansion joint as shown in Figure 8-5.
Figure 8-5: Contracting or Expanding the Expansion Joint to Fit
8. Ensure a
pipe gasket
is placed between the front connection pipe flange and the
recirculation inlet flange, then secure with bolts & nuts. SECURE, BUT DO NOT TIGHTEN.
9. Remove the long bolts and nuts in the expansion joint and replace with standard bolts &
nuts until all sixteen bolts/nuts are installed. SECURE, BUT DO NOT TIGHTEN.
10. Now all bolts and nuts can be tightened along the entire piping assembly, alternating
between the fittings to ensure that all connections are level and secure. Refer to Section 8.3
for torque values required for the three sizes of
11. Bring the pipe support bracket up to the pipe and secure.
CAUTION:
•
Consistently tighten each nut alternately only a couple of turns to maintain even
compression around all flanges and along piping assembly. Refer to Section 8.3 for torque
value according to pipe size.
•
Ensure that there is a
pipe gasket
between all piping connections.
12. If the secondary water inlet will not be used, attach a blank endcap with two bolts/nuts then
slip a
pipe gasket
as shown in Figure 4-16.
Figure 8-6: Fitting blank Endcap with Gasket on Unused Secondary Water Inlet
13. Use remaining six nuts/bolts and affix the endcap, tightening bolts in an alternating pattern
to assure uniform tightness. Refer to Section 8.3 for torque value according to pipe size.
TIGHTEN NUTS ON
INSIDE
OF JOINT
FLANGES TO
EXPAND
TIGHTEN NUTS ON
OUTSIDE
OF JOINT
FLANGES TO
CONTRACT
OMM-0108_0A
AERCO International, Inc.
•
100 Oritani Dr.
•
Blauvelt, NY 10913
Page
17
of
32
GF-146-IN
Ph.: 800-526-0288
12/15/2015


