Aercus Instruments™
- WeatherSleuth®
41 |
P a g e
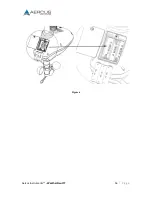
Batteries may have been inserted incorrectly
If the batteries were recently replaced, check their polarity to ensure they are
around the correct way as per the icons inside the battery comparted as
shown in Figure 6.
Follow the reset procedure in section 3.3.5.
WeatherSleuth
®
receiver may not have been reset after loss of signal
There may have been a temporary loss of communication due to reception
loss from interference or other location factors, or the batteries may have
been changed in the sensor array and the WeatherSleuth
®
receiver has not
been reset. In this case follow the reset procedure in section 3.3.5.
Indoor thermo-
hygrometer does not
communicate with
the console
Your indoor thermo-hygrometer may be out of range
To check that the indoor thermo-hygrometer is not out of range move the
indoor thermo-hygrometer to within 3m of the WeatherSleuth
®
receiver,
power the WeatherSleuth
®
receiver (by removing the AC adaptor), wait 10
seconds and then reinsert the AC adaptor.
The signal from the indoor thermo-hygrometer may be experiencing
interference
Wireless communication is susceptible to interference, distance, walls and
metal barriers. We recommend the following best practices for trouble free
wireless communication.
1.
Electro-Magnetic Interference (EMI). Keep the WeatherSleuth
®
receiver at least 1.5m away from computer monitors and TVs.
2.
Radio Frequency Interference (RFI). Check for sources of
interference (cordless phones, baby monitors, PC monitors etc). If
this is an issue the WeatherSleuth
®
receiver and/or thermo-
hygrometer will need to be relocated.
To check that the indoor thermo-hygrometer is not encountering interference
move the thermo-hygrometer to within 3m of the WeatherSleuth
®
receiver,
power the WeatherSleuth
®
receiver down (by removing the AC adaptor),
wait 10 seconds and then reinsert the AC adaptor.
You may need to put fresh batteries in the indoor thermo-hygrometer
Check that the batteries in the indoor thermo-hygrometer are fresh and fully
charged then power the WeatherSleuth
®
receiver down (by removing the AC
adaptor), wait 10 seconds and then reinsert the AC adaptor.
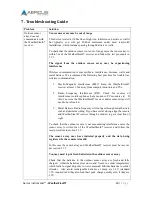
Batteries may have been inserted incorrectly
If the batteries were recently replaced, check their polarity to ensure they are
around the correct way as per the icons inside the battery comparted as
shown in Figure 13. Then power the WeatherSleuth
®
receiver down (by
removing the AC adaptor), wait 10 seconds and then reinsert the AC
adaptor.
Summary of Contents for WeatherSleuth
Page 1: ...v1 2 WeatherSleuth PROFESSIONAL IP WEATHER STATION WITH DIRECT REAL TIME INTERNET PUBLISHING ...
Page 11: ...Aercus Instruments WeatherSleuth 11 P a g e Figure 6 ...
Page 36: ...Aercus Instruments WeatherSleuth 36 P a g e Figure 30e ...
Page 39: ...Aercus Instruments WeatherSleuth 39 P a g e Figure 32 Figure 33 ...
Page 54: ...Aercus Instruments WeatherSleuth 54 P a g e Figure 6 ...
Page 80: ...Aercus Instruments WeatherSleuth 80 P a g e Figure 30e ...
Page 83: ...Aercus Instruments WeatherSleuth 83 P a g e Figure 32 Figure 33 ...

