background image


28 / 36

TF6790_A_NOT_DXA230_EVOLUTION 

Aereco S.A.

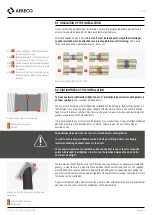
9.1. INSULATION OF THE INSTALLATION

In cases where the ductwork must be insulated, the use of prefabricated double wall ducts and 
accessories should be favoured to obtain good thermal performance.

External insulation on site is possible, 

but care must be taken not to create thermal bridges, 

and the insulation must be attached securely enough to prevent its moving.

 This is quite 

tricky on shaped parts, singularities, branch, ducts, etc.

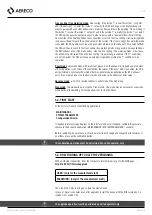
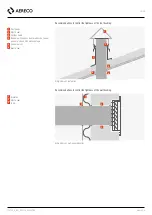
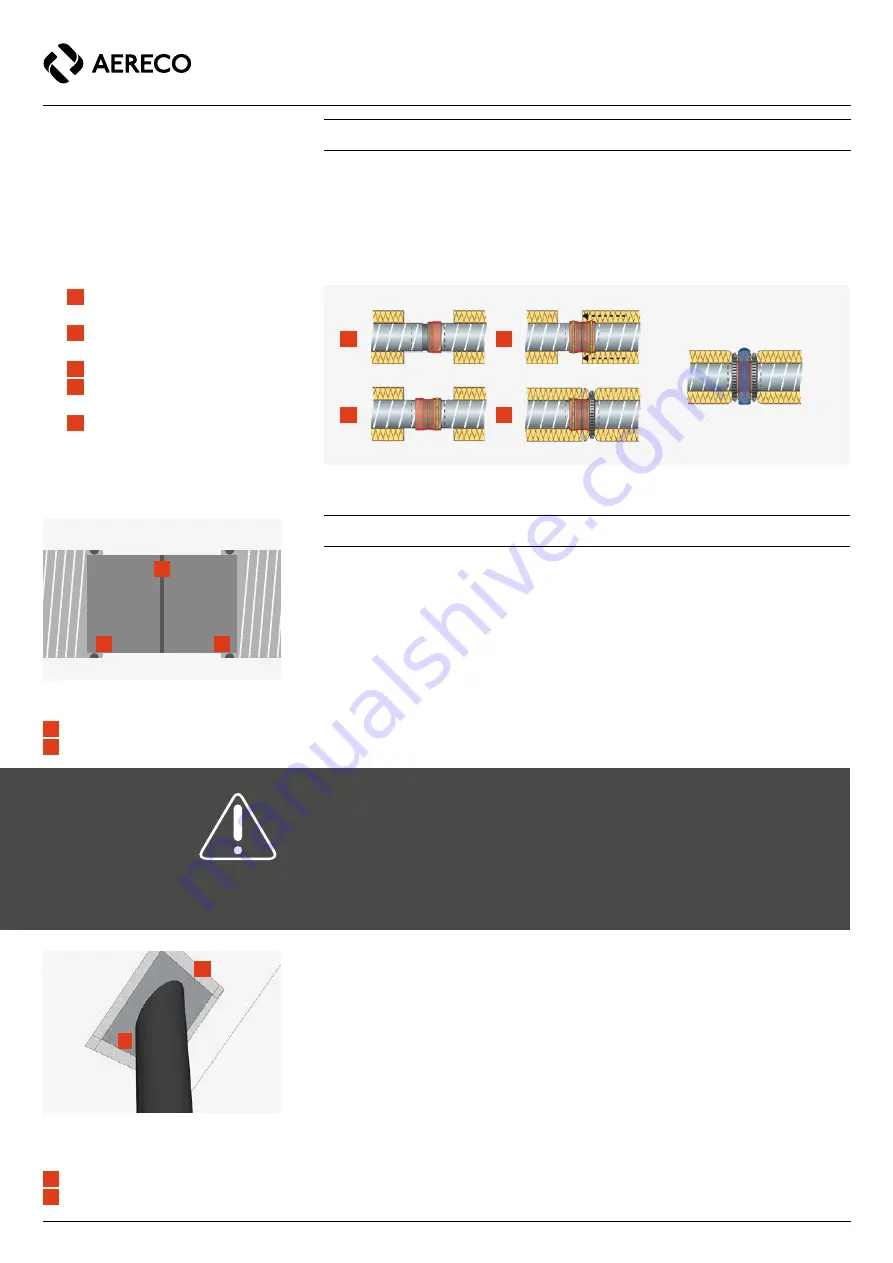
Connection of insulated ducts © CSTB

1

3

2

4

Step 

1

: ensure airtightness of the internal face of 

the duct by glue or tape.

Step 

2

:  tighten with a clamp, so that the connection 

is mechanically strong in the long term.

Step 

3

:  pull the insulation to avoid thermal bridges.

Step 

4

:  tighten the insulation with a clamp, to avoid 

its removal.

Step 

5

: if two ducts are to be connected, use an 

adhesive tape to airtight the two pieces of 
insulation.

9.2. AIRTIGHTNESS OF THE INSTALLATION

To make ductwork sufficiently airtight, the use of prefabricated accessories with gaskets is 

an ideal solution

 (bends, junctions between ducts). 

The use of such hardware also facilitates the installation of the ductwork: thanks to the gasket, all 
that remains is to ensure the mechanical strength of the ductwork. There is no need for adhesive 
tape or mastic. Rivets or self-piercing screws can be used to make accessories and ductwork with 
gaskets as explained by the manufacturers.

If it is not planned to use accessories with gaskets, it is essential to use a special airtight ventilation 
adhesive at each junction between ducts, or mastic. Take care also to do as little cutting as 
possible on site.

Any bushings (through walls, the roof, etc.) must be made with rigid duct.

In order to ensure proper airtightness where ducts pass through walls, we strongly 

recommend leaving adequate space for the ducts.

The connection between the ventilation units and the duct is one of the most sensitive 

points with respect to airtightness. In all cases, the junction between the unit and the 

duct must be airtight.

We recommend connecting the units to the terminal ducts by means of a coupling, preferably with 
gaskets, in order to ensure a proper junction between the exhaust unit and the duct. The coupling 
must be bedded to ensure airtightness between the dwelling and the supporting wall. Failing this, 
any other system that provides equivalent tightness while nevertheless leaving it possible to remove 
the device can be considered. 

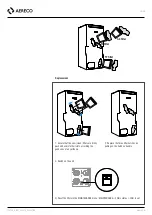
A special component with a metal plate at the wall in contact with the exterior and a special sealant 
adhesive can be used to ensure the airtightness of the wall bushing.

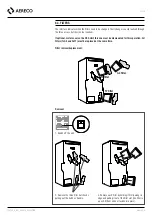
Connection by accessory with gasket

1

2

2

1

 Connection with gaskets

2

 Gaskets

Sealing part for the bushing in a wall giving on 
the exterior

1

2

1

  Special tighten adhesive

2

  Metal sheet

Summary of Contents for DXA 230 EVOLUTION

Page 1: ...INSTALLATION AND MAINTENANCE INSTRUCTION ENGLISH VERSION dx system DXA 230 EVOLUTION Heat recovery ventilation for cupboard installation TF6790_A_NOT_DXA230_EVOLUTION Aereco S A ...

Page 2: ...he defrosting 17 4 3 Electrical connection of the condensate pump 17 5 Starting and settings of the DXA 18 5 1 Ways to access to the interface 18 5 2 DXA Home page 19 5 3 First start 21 5 4 How to bring up to date the versioning 21 6 Maintenance 22 6 1 Regular maintenance of the installation 22 6 2 Power supply and motor material protections 22 6 3 Filters 23 7 Troubleshooting 25 8 Acceptance of w...

Page 3: ...y children aged from 8 years and above and persons with reduced physical sensory or mental capabilities or lack of experience and knowledge if they have been given supervision or instruction concerning use of the appliance in a safe way and understand the hazards involved Children shall not play with the appliance The electrical installation and electrical connections must be carried out by a qual...

Page 4: ... BXC units adjust automatically the airflow according to parameters read by various sensors humidity used in the kitchen in the bathroom and in WC presence can be used in WC Versions with switch presence remote CO2 or VOC sensors can also be used for exhaust units According to the size of the dwelling the exhaust fan motor provides a constant pressure in the exhaust ductwork that can easily be set...

Page 5: ... 1 Heat recovery unit with balanced demand controlled airflows Preheater 2I2O Module 6 4 Manual registrer for balancing Smart pannel interface 9 Optional Galvanised steel body with built in resistance optional 10 mA max 5V DC OUT 1 OUT 2 IN 2 IN 1 0 Volt 2I2OMODULE Power ON Modbus traffic Modbus connection SDC 100 3 Supply unit Air intake and outlet grilles 7 BXC 5 Exhaust units various sensors RJ...

Page 6: ...hange Very high efficiency heat exchanger with plastic plates washable Intelligent electronic control unit of the heat recovery with integrated control interface Integrated bypass and free cooling automatically controlled ø160 ø160 88 248 151 155 1189 240 R2 50 80 1184 130 545 40 482 545 138 118 151 R80 248 155 554 R80 101 2 3 DXA ASSEMBLING When delivered the DXA Unit is furnished with 4 lipseals...

Page 7: ...he degradation of the heat recovery performance Features and uses DXA Unit Max altitude of the product installation 2000 m Temperature range of the installation place 5 C 50 C Humidity range of the installation place 5 95 3 2 DXA UNIT The caps on the DXA Unit must stay during the entire duration of the work in order to keep dust and pollution from getting into the boxes 3 2 1 LOCATION Before the i...

Page 8: ...ccessible to be able to disconnect the DXA Unit from the supply before any operation on the appliance The circuit breaker must be easily identified and accessible 3 2 3 FIXING OF THE DXA UNIT The DXA Unit is fixed on a wall thanks to the use of two metal brackets specific to Aereco The first bracket is fixed in the DXA while the second bracket is screwed in the wall The two brackets are assembled ...

Page 9: ...0_EVOLUTION Aereco S A Installation of the fixing system for the DXA Unit 1 5 6 7 8 x2 x12 x12 x12 DXA Unit DXA Unit 2 3 4 Ø6 mm Note For plasterboard walls molly metal anchors may be used instead of provided plastic anchors ...

Page 10: ...on box by a Ø100 mm for rigid duct or by a Ø75 mm duct for semi rigid duct Each semi rigid duct cannot afford an airflow bigger than 30 m3 h 1 Ø100 or Ø75 mm 2 Ø100 mm or Ø125 mm 3 Ø160 mm 4 Ø160 50 mm insulation All supply grilles have to be balanced to reach the required airflow in each main rooms living room bedrooms This may be done by the use of manual registers blocks of foam or grilles with...

Page 11: ...lt in The DXA1712 is equipped with a lift pump while the DXA1711 is equipped with a siphon Only the evacuation pipe to the wastewater has to be realized This evacuation must be insulated if installed outside the heated volume risk of freezing Using the lift pump DXA1712 A vertical height of 8 meters must not exceed between the lift pump and the evacuation duct Note The lift pump proposed by Aereco...

Page 12: ...st not be installed with the electrical device at the bottom Note The DXA Unit has been specially designed to work with the defrosting provided by Aereco defrost strategy specific to DX System and adapted diameter Besides it has been CEM certified with the DXA Unit Using another defrosting can lead to serious problems of functioning and degrade the security of the system Anti frost without pre hea...

Page 13: ...aker IOA output 1 ov ov Wi Fi ON OFF ON Pump 2I2O optionnal only to display an error message if the pump is not OK Preheater mandatory to drive 1 or 2 preheaters 2I2O OV in 1 in 2 out 2 out 1 5V 2I2O OV in 1 in 2 out 2 out 1 5V RJ45 cable bus cap or toward 2I2O module The 2I2O module may be used to display pump warning message on the interface optional The 2I2O module is mandatory to drive 1 or 2 ...

Page 14: ...t be securely attached Tauten the straight parts so that the duct is smooth and straight when using flexible or semi flexible ducts If the flexible duct is longer than necessary it must be cut rather than pushing the surplus into the false ceiling Do not crush the duct or squeeze it down to force it through a narrow passage The interior of the ductwork must be protected during the entire duration ...

Page 15: ...ply with standards in force in the country ModBus components 2I2O module or smart interface may be connected on one of the 2 RJ45 ModBus socket the one you want it doesn t matter for a parallel wiring But the ModBus components may also be connected one after the other for a serial wiring up to you Each modbus line must be ended with a ModBus cap So 2 ModBus caps must be connected on the ModBus net...

Page 16: ...ON THE DXA UNIT 1 DX ModBus RJ 45 2 Ethernet 3 230VAC 50 60Hz 180W max 4 ON OFF To circuit breaker 2A N GND L 3 2 1 230VAC 1 5mm 230VAC 1 5mm 230VAC 1 5mm 4 Wi Fi ON OFF ON The main power supply is on the DXA Unit Smart Interface optional and 2I2O module if pump or preheater ...

Page 17: ...ntact separation device having an opening distance of at least 3 mm on each pole Note there is no alarm in the defrosting provided by Aereco Details of condensate pump electrical connections 4 3 ELECTRICAL CONNECTION OF THE CONDENSATE PUMP THE DXA1711 is provided with a built in siphon It is still possible to connect a condensate pump after the siphon The diagram below displays the electrical conn...

Page 18: ...er way is to use internet browser On internet browser address bar Edge Chrome Safari the following addresses give an access to the settings and to the user home page of the DXA s interface http 169 254 1 20 to go to the Home page 2 Communication through Wi Fi connexion From any smartphone or from a computer or laptop access to the available Wi Fi network Select the WiFi network named DXA The passw...

Page 19: ...olution of the device parameters Configuration wizard The wizard allows to proceed to the DXA settings Before starting to run the DXA make sure that all the ductwork have been correctly done The Modbus communication cable supplies the 2I2O module if pump or preheater and the smart interface if smart interface Reset This erase all configuration data kept in memory A new configuration setting by the...

Page 20: ...s email addresses c The text from the contact field d The status of the system including the event the devices composing the system their serial number hardware version software version functioning parameters when the event happened The status information is sent as a link onto the manufacturer cloud 5 The manufacturer collects only the status information in anonymous fashion The text from contact...

Page 21: ...onstant airflow regulation is run to boost the ventilation Be careful if the boost mode is enabled the DXA unit performed a constant airflow mode that may generate noise pollution on the BXC exhaust units If too many noises stop the boost mode or decrease the airflow set point value Absence mode a 40 m3 h constant airflow is performed all the mode long Stop mode this mode allows to stop the 2 fan ...

Page 22: ...ir inlet and exhaust air outlet check the unobstructed passage of air no dead leaves no snow Supply and exhaust units cleaning as recommended by the manufacturer this part can be done by the occupant Evacuation of condensates check that the system is not obstructed by impurities WARNING Plan replacement of the condensates evacuation pump according to the life span announced by the supplier If usin...

Page 23: ... Unit this one must be dismounted for this operation All filters 1xG4 and 2xF7 must be replaced at the same time Filter removal replacement Removal 2 Remove the three filter hatches by pulling out the hatches handle F7 filter F7 filter G4 filter 3 Remove each filter by holding it firmly along its edge and pulling it out of the filter slot the filter is a push fit item and not fastened in place 1 S...

Page 24: ...re firmly pushed back into their slots according the good sens of any airflows 2 Replace the three filter hatches by pulling on the hatches handle 4 Reset the filters in the MAINTENANCE menu MAINTENANCE Filters status Filter reset 3 Switch on the unit Wi Fi ON OFF ON F7 filter F7 filter G4 filter ...

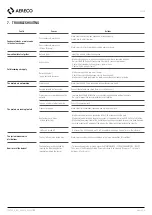
Page 25: ... there is not spillages on it Pressure loss or major leakage on the network Improve the network installation use the recommended grilles and roof exhausts Be sure to respect the recommendations of installation Too high number of extraction grille Check the operating limits Filters are clogged Make sure filters have been changed when system asked for it Heat exchanger is frozen Using a defrosting M...

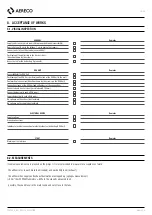
Page 26: ...the DXA Unit and airtightness of the connections Exhaust air and fresh air duct insulated and Ø160 mm Exhaust balancing in each utility room Supply balancing in each utility room No spilages on the exhaust duct network No spilages on the supply duct network ELECTRICAL DEVICE Remarks Supply voltage Ground connections Individual electrical connection for electrical device defrosting DXA Unit START R...

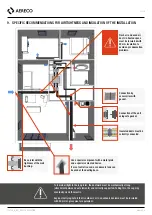
Page 27: ...on by accessories with gasket Fresh air and used air ducts in heated space must be insulated with 50 mm insulation to avoid any condensation problems 9 SPECIFIC RECOMMENDATIONS FOR AIRTIGHTNESS AND INSULATION OF THE INSTALLATION To remain airtight in the long term the ductwork must be mechanically strong attachment between duct elements and correctly supported Failing this the sag may eventually c...

Page 28: ...s or self piercing screws can be used to make accessories and ductwork with gaskets as explained by the manufacturers If it is not planned to use accessories with gaskets it is essential to use a special airtight ventilation adhesive at each junction between ducts or mastic Take care also to do as little cutting as possible on site Any bushings through walls the roof etc must be made with rigid du...

Page 29: ...of roof outlet Airtightness of wall mounted outlet Recommendations to control the tightness of the wall bushing 1 2 3 3 1 2 5 6 4 3 1 Roof hoods 2 Mastic seal 3 Skylight frame 4 Bonding with vapour barrier adhesive tape or pose of a sleeve with adhesive tape 5 Vapour barrier 6 Mastic seal 1 Insulation 2 Mastic seal 3 Tube ...

Page 30: ... unheated volume must be insulated with 50 mm of glass wool or equivalent At supply and exhaust units airflow must be adjusted by the installer Desired flow rates may be achived by the use of foam in the pipe or by the use of manual balancing register Units can be wall mounted or installed in the ceiling they must be readily accessible for cleaning supply and exhaust units and maintenance replacem...

Page 31: ...ween each setting of 10 m3 h maximum 50 m3 h See the table below for more details concerning the airflow set up at 60 Pa Ø 100 mm Ø 125 mm Pos Min airflow m3 h 60 Pa Max airflow m3 h 60 Pa Pos Min airflow m3 h 60 Pa Max airflow m3 h 60 Pa 0 9 62 0 9 54 1 14 70 1 14 62 2 19 77 2 19 70 3 23 85 3 23 77 4 28 93 4 28 85 5 33 101 5 33 93 Case of exhaust units with manual flow control The installation of...

Page 32: ... the countries of the European Union and other countries with special collection centre The symbol on the appliance indicates that this appliance should not be treated as domestic waste It must be taken to a special collection centre for the recycling of electrical and electronic equipment For further information on the treatment recovery and recycling of this product contact your competent local ...

Page 33: ... 1 2012 10 EN 60335 1 2012 DIN EN 60335 2 40 VDE 0700 40 2010 03 EN 62233 VDE 0700 366 2008 11 14 CHARACTERISTICS 1 Base 2 Condensate pump specific to DXA1240 3 Siphon specific to DXA1247 4 Fans 5 Bypass 6 F7 filters 7 G4 filter 8 Heat exchanger 9 Condensates receiver 10 Spigots 11 Control and supply box 12 Access hatches of the filters 13 Bottom cover optional 14 Ducts cover optional code ADX1448...

Page 34: ...xhaust units type humidity presence switch C02 VOC Characteristics Exchanger polystyrene counter flow type 93 efficiency Filters on supply air 2 x F7 on exhaust air 1 x G4 Weight kg 23 Colour Black Material main expanded polypropylene EPP Dimensions mm with duct connectors 1428 x 552 x 545 without duct connectors 1188 x 552 x 545 Installation Max number of main rooms 6 Max number of technical room...

Page 35: ...30 545 40 482 545 138 118 151 R80 248 155 554 R80 101 0 50 100 150 200 250 0 50 100 150 200 250 300 350 0 50 100 150 200 250 0 10 20 30 40 50 60 70 80 90 100 a b c d Pressure in Pa Airflow in m3 h Power in W Airflow in m3 h 80 m3 h 140 m3 h 200 m3 h 230 m3 h DXA Unit maximal airflow setting a 49 dB b 54 dB c 59 dB d 60 dB Sound power level Lwa 80 m3 h 140 m3 h 200 m3 h 230 m3 h DXA Unit maximal ai...

Page 36: ...OLUTION Copyright Aereco All data and pictures in this document are non contractual and are subject to change without prior notice Aereco S A 62 rue de Lamirault Collégien 77615 MARNE LA VALLEE CEDEX 3 FRANCE www aereco com ...

Reviews: