background image

8

20.05 – 4138421_03

DISEGNO SPECIFICO DEL MODELLO-

SOLLEVAMENTO UNITÀ CON CINGHIE, 

CORDE O FUNI

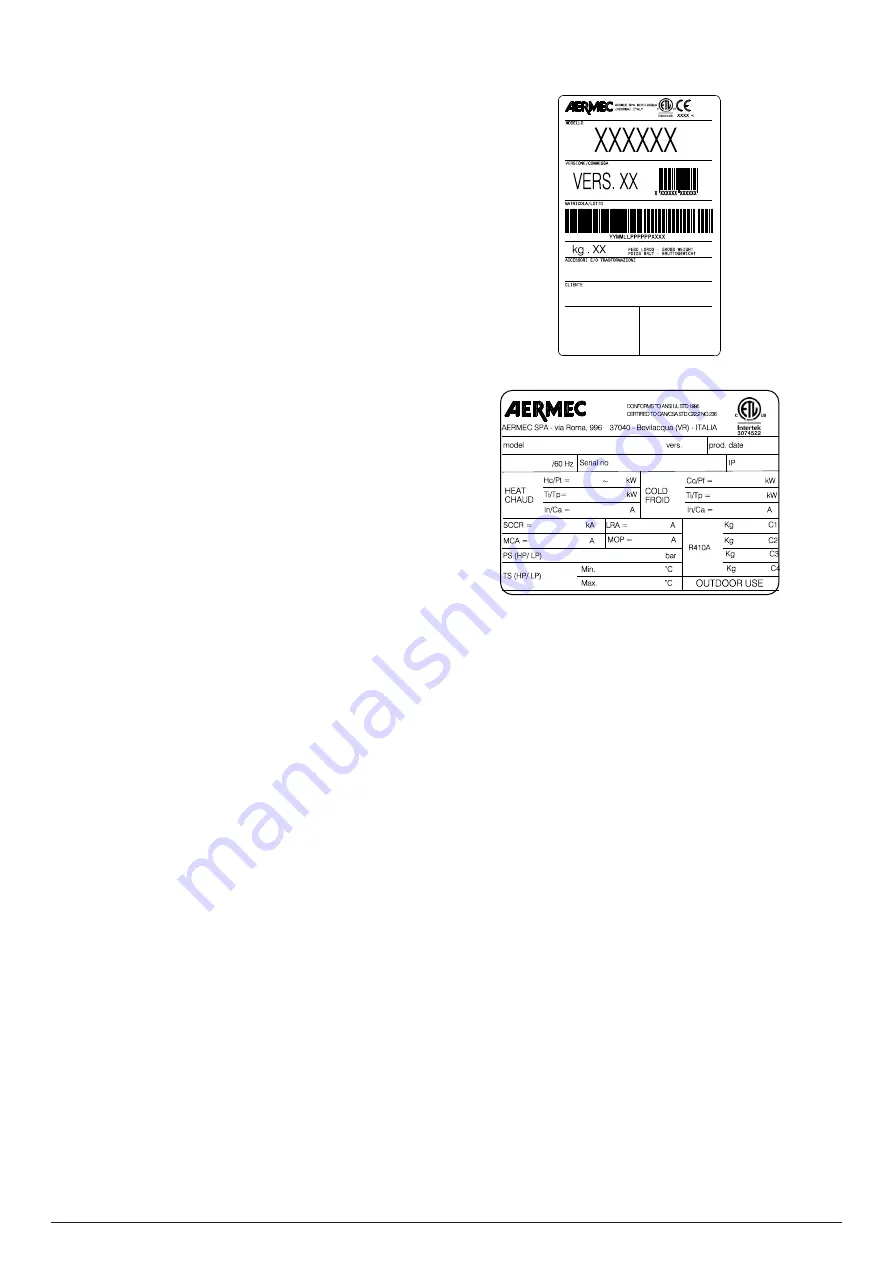
Packaging label 

Technical plate

RECEPTION

TRANSPORT


AND


HANDLING

The unit must be handled by qualified personnel. Carefully follow the 

lifting instructions on the labels placed on the unit. 

The unit must be lifted with extreme care to prevent knocks to the frame, 

panels, electrical panel, etc..

NOTE: Plastic elements can be used to protect the units against damage 

during transport. The machine is also wrapped in packaging. We recom-

mend keeping this protection during all transport and lifting operations 

and not remove the plastic elements until commissioning.

If the unit has anti-vibration supports, they must be installed on the unit 

before final positioning.

Inspection upon receipt

Perform the following check upon receipt of the product.

-   Check that the exterior has not been damaged in any way.

-   Check that the lifting and transport devices are appropriate to the 

type of equipment and compliant with the transport and handling 

instructions attached to this manual.

-   Check that the accessories required for on-site installation have been 

delivered and are operational.

-   If the unit is provided pre-loaded with refrigerant, make sure there have 

been no leaks.

-   Check that the equipment supplied corresponds to the order and 

delivery note

Product identification

The Aermec products can be identified by the 

packaging label

 bearing 

the identification data of the product and by the 

technical plate

 bearing 

the performance and technical data of your unit.

If the product is damaged, send a registered letter with the details of 

the problem to the shipping company within 48 working hours from 

delivery.

LIFTING


Before lifting the unit, place protections between the belts (or ropes and 

chains) and the framework to prevent damage to the structure.


CAUTION: ALWAYS USE ALL THE UNIT LIFTING POINTS PROVIDED

•   Follow all safety regulations and standards

•   Wear safety glasses, work gloves and safety shoes

•  Pay the utmost attention to heavy and bulky equipment during lifting 

and handling, and when placing it on the ground.

•   All panels must be tightly fixed before moving the unit

•   Before lifting, check the specific weight on the technical plate.

•   Use all, and only, the lifting points indicated;

•   Use ropes in compliance with Standards and of equal length;

•   Use a spacer in accordance with the sling (not included) see drawing

•   Handle the unit with care and without sudden movements

•  Do not stand under the unit during lifting

Attention: the units cannot be stacked

RECEPTION

Technical plate

Packging label

Summary of Contents for NYB

Page 1: ...l a t i o n f r o m o r i g i n a l I n s t a l l a t i o n m a n u a l EN 60Hz AIR WATER CHILLER AND AIR WATER CHILLER WITH FREE COOLING C o o l i n g c a p a c i t y 2 8 9 7 t o n 2 8 4 6 t o n NYB...

Page 2: ......

Page 3: ...inuous changes in the market and its regulations reserves the right to make all the changes deemed necessary for improving the product including technical data Thank you again AERMEC S p A This markin...

Page 4: ...ht distribution 12 Hydraulic connections 13 Water features 13 Hydraulic circuits 14 Internal and external hydraulic circuit NYB 14 Water features 14 Electrical connections 15 Electrical data of the un...

Page 5: ...20 05 4138421_03 5 CERTIFICATIONS COMPANY CERTIFICATIONS COMPANY CERTIFICATIONS SAFETY CERTIFICATIONS...

Page 6: ...ssary repairs The installation must comply with the requirements of EN378 3 and the local current regulations In particular indoor installation must ensure adequate ventilation and provide refrigerant...

Page 7: ...r its mixtures with ethylene glycol propylene in a maximum concentration of 30 The machine must only be employed for the use for which it was made any other use can be dangerous and void the warranty...

Page 8: ...ed pre loaded with refrigerant make sure there have been no leaks Check that the equipment supplied corresponds to the order and delivery note Product identification The Aermec products can be identif...

Page 9: ...NSTALLATION The chiller is shipped already tested and only requires electrical and hydraulic connections in the installation site Before beginning the installation process decide with the client where...

Page 10: ...ny case make sure that the anti vibration supports rest at on the base surface It is essential that the units are installed leaving su cient space around them to allow easy access to the components fo...

Page 11: ...20 05 4138421_03 11 DIMENSIONS MINIMUM TECHNICAL SPACES NYB Vers A1 B1 B2 C1 C2 in in in in in 0500 A 118 79 59 47 in ELECTRICAL BOX C2 B2 C1 B1 A1 96 5 in 86 7 in 6 6 in 46 9 in 9 9 in 11 9 in 5 0 in...

Page 12: ...option Empty 2 046 24 0 40 4 26 27 23 24 Running 2 213 24 0 43 4 24 26 24 26 Freecoolingversion optionF Empty 2 672 23 7 41 6 26 26 24 24 Running 3 007 23 7 43 9 24 25 25 26 ATTENTION For installatio...

Page 13: ...he environment temperature drops below 0 C insulate the pipes and provide an electric heater As an option you can also protect the pipes inside the unit Check the continuity of the earthing ATTENTION...

Page 14: ...vibrationjoints 7 Airdrainvalve 8 Pump 9 Drainvalve 10 Pressuregauge 11 Flowshut offvalves 12 Expansionvessel 13 Safetyvalve 14 Loadingunit 15 Storagetank 16 Anti freezeelectricheater 17 Flowswitch MA...

Page 15: ...ection The manufacturer cannot be considered responsible for any damage caused by the lack of or ineffective appliance earth connection For units with three phase power supply check the correct connec...

Page 16: ...M A 228 MCA M A 74 MOP M A 100 Power supply 575V 3 60Hz LRA J A 167 MCA J A 61 MOP J A 80 LRA M A 171 MCA M A 65 MOP M A 80 Size NYB free cooling Fans 0500 Power supply 208V 3 60Hz LRA J A 434 MCA J A...

Page 17: ...e that all protections removed for the electric connection have been restored before powering the unit electrically Close all the opened panels Turn the switch at ON position Position the system maste...

Page 18: ...les present in this manual Check the correct functioning of the ow meters if installed Closing the cut off valve at the output of the heat exchanger the unit control panel must show the block Finally...

Page 19: ...event their activation before accessing them Isolate the unit from the mains by means of the external isolator provided for the insertion of padlocks up to 3 for blocking in open position Place a sign...

Page 20: ...e replaced after draining the refrigerant gas contained in the circuit During venting protect yourself against any leakage of uids at dan gerous temperatures and or pressures Always use appropriate eq...

Page 21: ...f The high low pressure switch where present must be tested with the machine closed reading the high pressure circuit pressure on the machine control panel In case of machines with the cooling circuit...

Page 22: ...ts paying particular attention to under pres sure containers In this case replace them of intervene with specific products General cleaning of the unit Bleed the hydraulic circuit and the heat exchang...

Page 23: ...roper functioning of the thermostatic valve Check the charge of refrigerant gas 1 Check the proper functioning of the solenoid valves MAINTENANCE LIST OF THE RECOMMENDED PERIODIC INTERVENTIONS DECOMMI...

Page 24: ...0 B e v i l a c q u a V R I t a l y P h o n e 3 9 0 4 4 2 6 3 3 1 1 1 F a x 3 9 0 4 4 2 9 3 5 7 7 s a l e s a e r m e c c o m w w w a e r m e c c o m DOWNLOAD THE LATEST VERSION http www aermec com q...

Reviews: