The following steps are typical of most installations:
1. Once the engine has been allowed to cool, relieve the fuel system pressure and disconnect the negative battery cable.
2. Raise the vehicle and support it with jack stands.
3. Referring to the appropriate vehicle service manual for instructions, remove the OEM fuel pump.
4. Install an after-market high flow capacity fuel tank pickup, per the manufacturer’s instructions.
Note: Failure to mount the pump lower than and close to the fuel tank may cause the pump to run dry, resulting in
extreme pump wear! Make sure the pump is located lower than and as close as possible to the fuel tank, so that
the pump is always supplied with fuel!
5. Find a suitable place on the vehicle chassis to mount the Aeromotive fuel pump. Make sure the location will
accommodate the pump mounting bolts, will position the pump lower than the fuel tank, is clear of the exhaust, is clear
of any moving suspension or drivetrain components and will keep the pump clear of road obstructions or debris.
6. Using the bracket as a template, mark and drill four mounting holes to accept ¼” bolts. Mount the fuel pump using four
¼” bolts, nuts and lock washers.
Note: Be sure to route all fuel lines clear of any moving suspension or drivetrain components, and any exhaust
components! Protect fuel lines from abrasion and road obstructions or debris.
7. Connect the fuel tank pickup to the fuel filter inlet and the fuel filter outlet to the fuel pump inlet. The inlet side of the
fuel pump is where most fuel system problems occur; it is important to minimize any restrictions in this area.
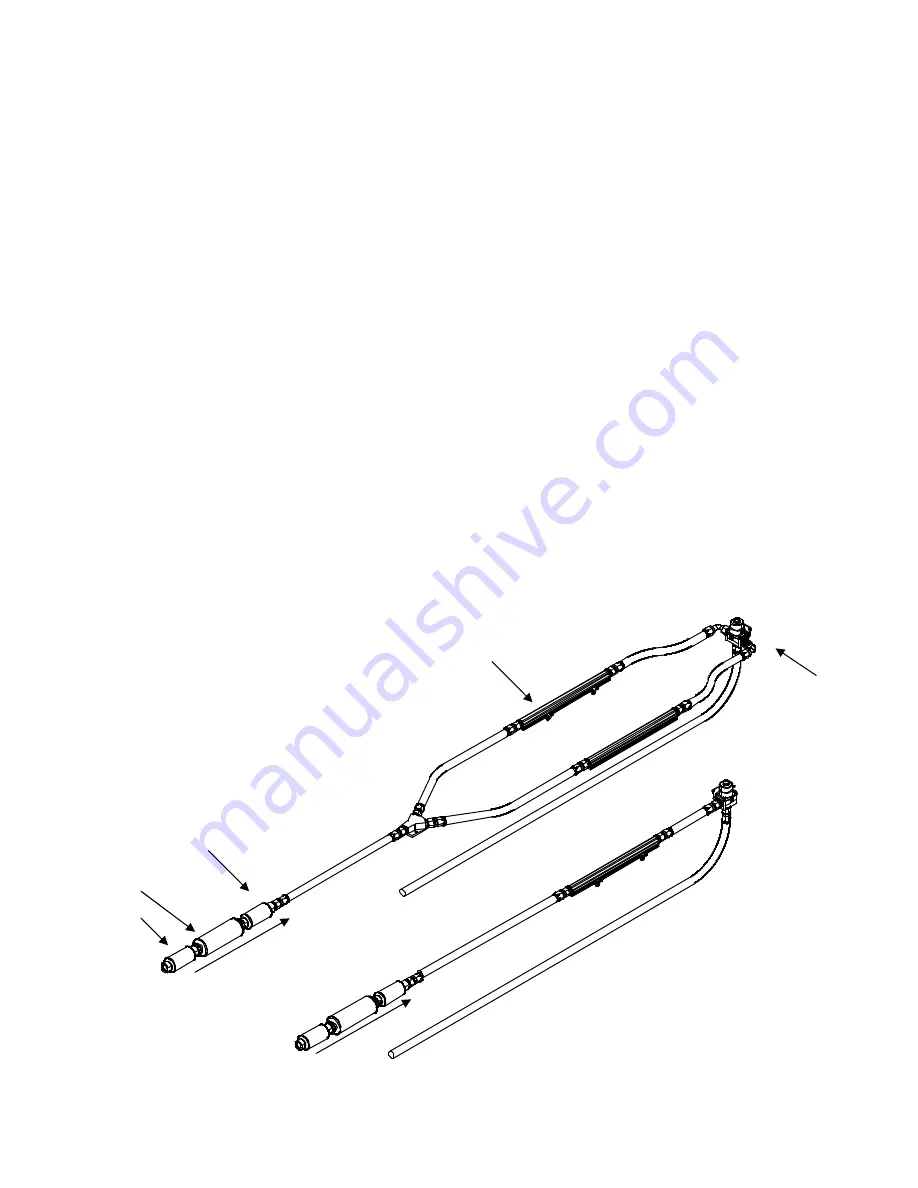
8. Connect the fuel pump outlet to the vehicle’s fuel rails in the engine compartment. See figure 1 for recommended
system plumbing. Make sure you use high pressure(150 psi minimum) fuel line for this connection!
Figure 1
100 Micron Filter
Pump
10 Micron Filter
Fuel Rail(s)
Regulator


