background image


16 

WARNING 

DO NOT PERFORM MORE THAN ONE ADJUSTMENT AT ONCE. IF YOU DO NOT HAVE ENOUGH 
EXPERIENCE TO TEST FLY THE WING, ASK MORE EXPERIENCED PILOT TO DO IT FOR YOU. IT 
SHOULD BE PERFORMED IN SMOOTN AIR AND WITH CAUTION. 
 

BATTENS 
 

The battens will need to be compared and adjusted to match the batten profile template at regular 
intervals. Small variations in batten camber (± 10 mm at the trailing edge) will not have significant effect 
on flight characteristics.  
 

BATTENS TENSION 
 

With some airtime on the wing the battens tension may get too loose, this may cause the trailing edge to 
flatter. If the battens tensioned too much, the handling will become harder. Make sure the battens tension 
on both wings identical.  
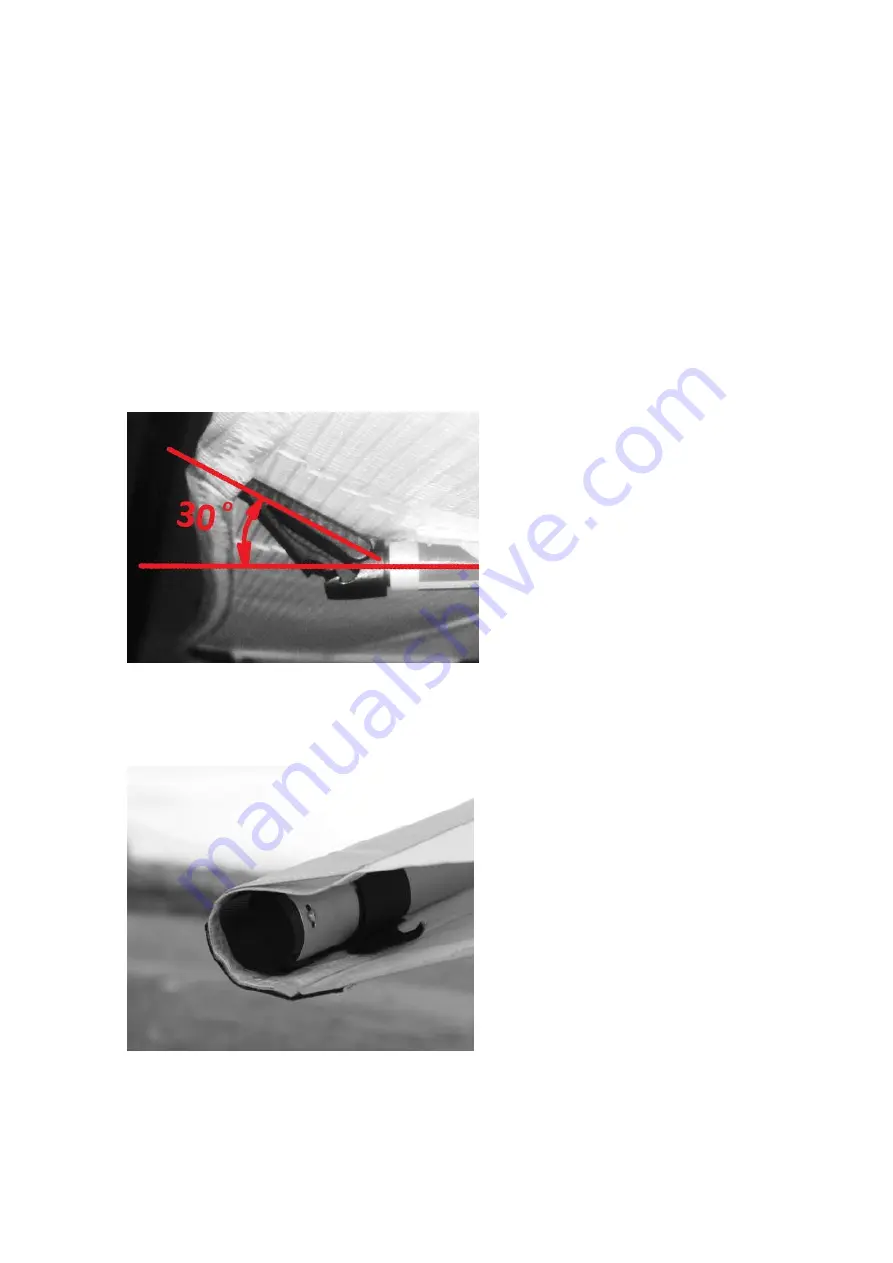
All battens on the Fox13-T are tensioned by lever batten tips. The desired batten tension can be easily 
adjusted by the threaded batten tip adjuster.  


Figure 37


The correct batten tension can be adjusted and 
checked as follows. Unlatch the batten tip without 
taking it out of the pocket at the trailing edge of 
the sail. Measure the angle between the opened 
part of the batten tip and the batten tube. If this 
angle is about 30 degrees, then the batten tension 
is adjusted correctly (fig. 37). 
To increase batten tension rotate the threaded 
lever batten tip adjuster counter clockwise. To 
decrease batten tension rotate the threaded lever 
batten tip adjuster clockwise. 


SAIL MOUNT CAPS ADJUSTMENT 
 

The turn of the wing can be corrected by rotating one of the sail mount plastic caps (fig.38).  


   Figure 38 

A left turn is corrected by twisting the right sail cap 
clockwise (twisting the sail up at the trailing edge). 
A right turn is corrected by twisting the left sail 
mount cap counter clockwise (twisting the sail up 
at the trailing edge). If rotation of the plastic cap on 
one side is not enough to compensate turn, you 
can at the same time rotate the plastic cap on 
another wing in opposite direction. 


CG ADJUSTMENT 
 

CG adjustment is done by changing the location of your hang point along the keel. The farther forward 
your hang point is, the faster the wing will trim, the less effort will be required to fly fast, and the more 
effort will be required to fly slow.  

Summary of Contents for NANOLIGHT TRIKE FOX13-T 2020

Page 1: ...IGHT TRIKE WING FOX13 T OWNER SERVICE MANUAL Manufactured by AEROS Ltd Tel 380 44 4554120 Post Volynskaya St 5 Fax 380 44 4554116 Kiev 03061 E mail info aeros com ua Ukraine http www aeros com ua December 2020 ...

Page 2: ...2 ...

Page 3: ...mbly after Shipping Procedure 5 3 Fox13 T Breakdown for Shipping Procedure 6 4 Fox13 T Set Up Procedure 7 5 Preflight Procedure 10 6 Laying the Wing Down Flat 13 7 Speed to Fly 12 8 Fox13 T Breakdown 12 9 Wing Tuning 15 10 Maintenance 17 11 In Closing A Few Words on Your Safety 19 Schemes ...

Page 4: ...this manual before initial operation We encourage you to read this manual thoroughly for information on the proper use and maintenance of your Aeros wing If you have access to the Internet please visit us regularly at http www aeros com ua In case of any doubts or questions contact your local dealers or Aeros directly We wish you safe and enjoyable flying career Aeros Ltd Definitions Definitions u...

Page 5: ...usty winds or turbulence may result in loss of control of the wing which may lead to injury and death Do not fly in such conditions unless you realize and wish to personally accept the associated risks 2 FOX13 T REASSEMBLY AFTER SHIPPING PROCEDURE 1 With the wing in its transportation bag packed in the 4 meters long package lay it on the ground 2 Unzip the bag Undo the Velcro straps Remove the bat...

Page 6: ...PPING PROCEDURE This process will basically be the reverse of reassembling after breakdown for shipping Before beginning read through the section above on how to re install the rear leading edges 1 Lay the wing on the ground or floor unzip the bag and remove the Velcro ties Remove the speed bar and battens from the wing Remove the protection wing tip bags 2 Unscrew the sail mount screws from the l...

Page 7: ...INSIDE OF THE CONTROL BAR 4 Flip the wing upright on the control bar Try to set the control bar on level ground Remove the wing bag protection pads and all the Velcro sail ties Remove the battens set Do not remove the leading edge tip protection bags at this time 5 By lifting up the nose batten push the nose batten fully back into the sail so that the V tip of the batten rests on top of the keel t...

Page 8: ...metry before each flight you should at a minimum check them once a month Aeros convention is that the red marked battens go in the left wing and green marked battens in the right wing Battens are numbered from the center outwards and the longest batten in a Fox13 T is designated as the No 1 batten Install the cambered battens in the sail leaving out the shortest three on each side for now 10 Sprea...

Page 9: ...gure 12 CAUTION INSERT THE BATTENS CAREFULLY SO AS TO MINIMISE STRESS AND WEAR ON THE SAIL Never insert or remove battens with the crosstube tensioned except for up to the last three on each side and never insert or remove battens with heavy wind pressure on the top of the sail or in any condition which causes the battens to slide with great resistance in the pockets To open or close the batten ti...

Page 10: ...8 18 After the wing is attached to the trike install the nosecone which is attached to the front part of the keel tube with the string fig 19 WARNING DO NOT FLY WITHOUT THE NOSECONE 5 PREFLIGHT PROCEDURE Conduct a complete preflight inspection of the wing checking all assemblies which have not already been checked Every bolt nut pin safety ring and fastener of any kind should be checked during eve...

Page 11: ...ig 20 At the left wingtip Check that the tip lever batten is properly installed Along the trailing edge left wing Check that there are no tears in the sail material along the trailing edge Check that all battens are properly secured Check that the trailing edge carbon batten is properly installed Check that the outboard sprog is properly secured in position supporting the last outboard cambered ba...

Page 12: ...g sure there are no kinks or twisted thimbles Check for proper installation of all nuts and safety rings at the control bar corners fig 25 Figure 25 Figure 26 Under the wing at the control frame apex fig 26 Check the crossbar center plate s assembly including the sweep wires X bar junction and the center bolt Check the sweep wire for wear Also visually inspect the cross tubes by sighting along the...

Page 13: ...out the speed bar the bar pressure is progressively increase The Fox13 T speeds up to 85 km h 53 mph being essentially roll neutral with no tendency to yaw The bar pressure will increase progressively as the speed increases WARNING ALL SPEEDS ARE GIVEN WITH AEROS ANT 70 NANOLIGHT TRIKE 8 FOX13 T BREAKDOWN Breakdown of the wing is the reverse of its assembly 1 Detach the hang bracket from the keel ...

Page 14: ...ach the bottom front wires at the nose plate 12 Remove the kingpost from the kingpost mount Lay the kingpost down against the keel Install protection bags on the top and on the bottom of the kingpost fig 30 and fig 31 Figure 30 Figure 31 13 Fold the wings all the way towards the keel pulling the sail over the top of the leading edges At each wingtip remove the tip cover bag Install the protective ...

Page 15: ...ure the sail with Velcro ties 18 Stow the battens in the batten bag and staff them in the front part of the wing between Mylar pockets 19 Install the Velcro ties around the sail and stow the nosecone under the most forward Velcro Figure 36 20 Install the wing protection bag fig 36 Flip the wing over onto the ground Detach the control bar Fit the control bar in the protection bag and stow it betwee...

Page 16: ...t of the pocket at the trailing edge of the sail Measure the angle between the opened part of the batten tip and the batten tube If this angle is about 30 degrees then the batten tension is adjusted correctly fig 37 To increase batten tension rotate the threaded lever batten tip adjuster counter clockwise To decrease batten tension rotate the threaded lever batten tip adjuster clockwise SAIL MOUNT...

Page 17: ...n pockets if you wipe each batten with a rag before you install it in the sail 4 Have a complete inspection performed on the wing and replace any suspension system component that shows any wear and any cable that shows any kinks wear damage corrosion etc 5 Inspect all bolts for tightness all safety rings for proper installation and possible damage Inspect plates and fittings for damage holes in tu...

Page 18: ...ee of fatigue due to repeated bending of cables is almost unavoidable in an aircraft that is assembled and disassembled regularly Bottom side wires are subject to the highest loads in flight and are therefore the most critical This is why we recommend that these wires be replaced annually even if there is no known damage Replace washout wires all bottom wires cross bar tensioning wires every 4 yea...

Page 19: ... order to keep this risk low we recommend that you gradually become familiar with your new wing Before every take off always do both an assembly check and a pre flight check of your wing and a trike unit Do not take off if the sail is wet especially the leading edge as the stall speed will increase significantly Always fly with a dry sail A wet wing must be dried before storing Do not leave your w...

Page 20: ......

Page 21: ......

Page 22: ......

Page 23: ......

Page 24: ......

Page 25: ......

Page 26: ......

Page 27: ......

Page 28: ......

Reviews: