background image

 
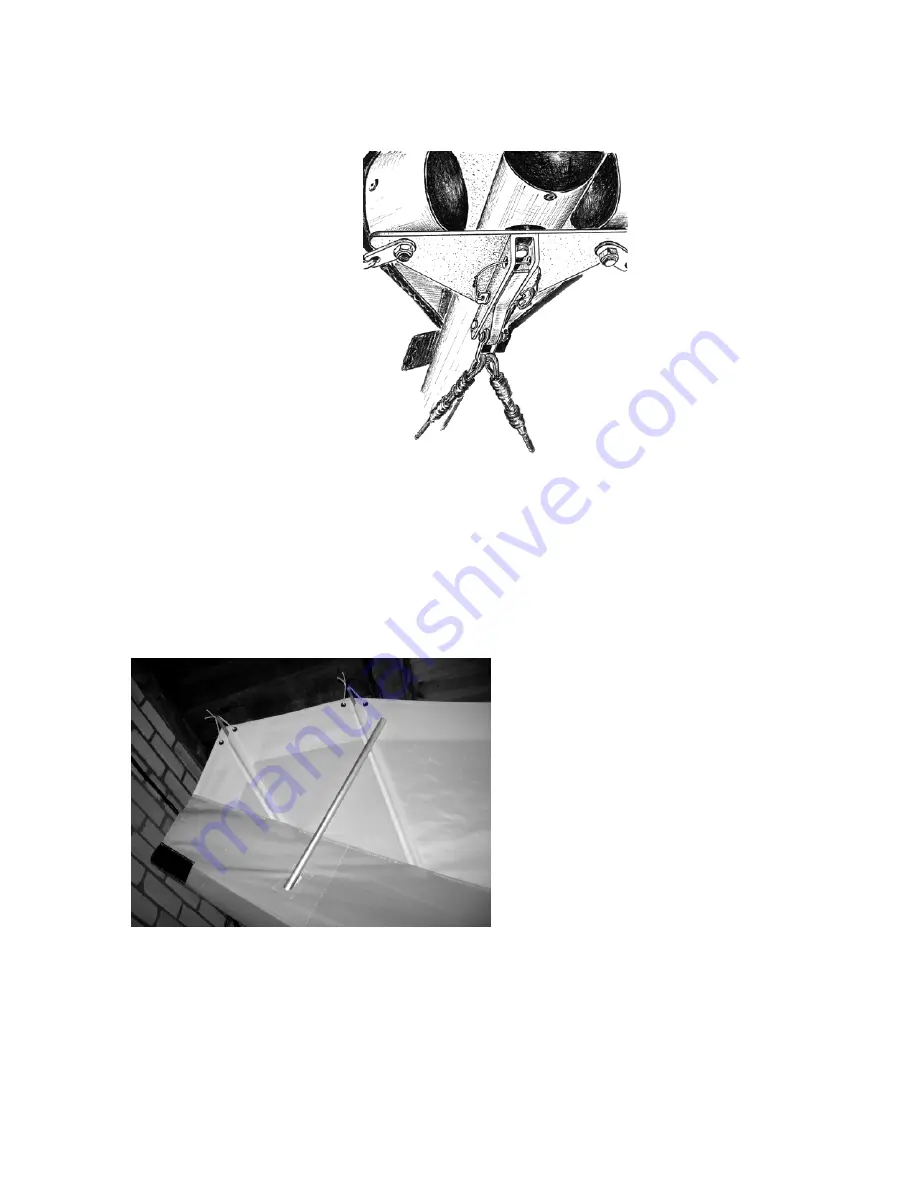
2.2.14. Put the glider on the A-frame. Secure the nose catch of the bottom wires on the nose 
junction channel using the clevis pin and the safety ring (Fig. 20).     
    

                          Fig. 20 


Check all wires for twisted thimbles or tangs. 


2.2.15. Install the washout tips: swing them to the right place underneath the corresponding top 
surface battens through the hole in the bottom surface (Fig. 21). 


Fig. 21 


12

Summary of Contents for Still 17

Page 1: ...__ Manufactured by AEROS Ltd Tel 380 44 455 41 18 Post Volynskaya St 5 Fax 380 44 455 41 16 Kiev 03061 E mail aerosint aerosint kiev ua UKRAINE http www aeros com ua Date of production ____________________ Serial number _______________________ ...

Page 2: ... Wing At The Control Bar _________________________________________________16 3 10 Fit The Nose Cone_________________________________________________________________16 Section 4 Inspection Of The Wing ________________________________________________17 4 1 Sail Check Up______________________________________________________________________17 4 2 Cable System___________________________________________...

Page 3: ...2 ...

Page 4: ...ount of battens for maintaining the airfoil has resulted in significant weight reduction and a fast set up time The structural strength of the Still 17 is sufficient for different flight conditions with defined wing load Please read and be sure you thoroughly understand this Manual before flying your Still 17 Be sure you are thoroughly familiar with set up break down preflight and maintenance proc...

Page 5: ... NOT RECOMMEND TO FLY THE ULTRALIGHT IN SUCH CONDITIONS AS THIS CAN COMPROMISE YOUR SAFETY Section 2 SET UP PROCEDURE 2 1 SET UP PROCEDURE FROM THE PACKAGE 4 METRES LONG Having used the specific techniques described in this manual you will perform the set up and break down procedures without any difficulties However the following procedural descriptions are not intended to be a substitute for the ...

Page 6: ...ter part of the leading edge 3 The position of the self tapping screw has been determined and marked after the test flights Take the screw out before installing the leading edge tube 3 Fig 2 Fig 2 Attach the leading edge tubes N3 to the leading edge tubes N2 according to the marking L left R right marks should be on top Fig 3 a 5 ...

Page 7: ...b Fig 3 4 ...

Page 8: ... that the leading edge tube 3 is properly installed Fig 4 2 1 7 Tighten the sail along the leading edge and mount it to the rear leading edge and attach the securing Velcro Fig 5 The sail is mounted to the leading edge by the inner forward of the two loops of webbing The outer loop is a pull handle only a b Fig 5 2 1 8 Fix the sail with the self tapping screw Make sure you put the screw in the sam...

Page 9: ...atten in a Still 17 is designated as the 1 batten Fig 7 Fig 8 2 1 10 Spread the wings all the way Near the kingpost hole find the shackle of the sweep wires Pull the shackle out the rear end of the keel pocket and check that the sweep wires are not wrapped around the keel Install the pin of the kingpost to the corresponding socket on the keel tube The kingpost has to be between the sweep wires Att...

Page 10: ...nose plate slot Fig 9 2 1 12 Release the sweep wires from the hook on the keel tube to loose a sail tension 2 1 13 The further set up procedure is similar to the one from a 6 meter long package Section 2 2 except points 2 2 1 2 2 4 2 2 SET UP PROCEDURE FROM THE PACKAGE 6 METRES LONG 2 2 1 With the wing in the bag 6 meters long lay the wing on the ground zipper up Fig 10 Fig 10 2 2 2 Undo the zippe...

Page 11: ...n tip rest on top of the keel tube Fig 13 2 2 6 Spread the wings so that the sail is a little loose and the glider is resting flat on the ground Fig 12 Fig 13 2 2 7 Remove the protective bags from the downtubes Spread the downtubes Install the base tube according to the marking Fix the base tube using nuts and safety rings Fig 14 10 ...

Page 12: ...nd the top wires are not wrapped around the keel and are free from the keel hardware WARNING MAKE SURE THAT THE KINGPOST IS INSTALLED BETWEEN THE SWEEP WIRES Fig 13 b a b Fig 15 2 2 9 Attach the hook of the top rear wire with the washout wires to the thimble of the top front wire Fig 16 Make sure that the hook is not inverted and the reflex wires or top wires are not twisted 9 ...

Page 13: ...e right Battens are numbered from the center outwards and the longest batten on the Still 17 is designated as the 1 batten Install the cambered top surface battens in the sail and fix them with the double tensioned rubber bands Insert battens carefully so as to minimize stress and wear on the sail Never insert or remove top surface battens with the crossbar tensioned except for up to the last two ...

Page 14: ... keel tube Fig 19 WARNING AN IN FLIGHT DISANGAGEMENT OF THE SWEEP WIRE ATTACMENT WILL CAUSE A COMPLETE LOSS OF STRUCTURAL SUPPORT OF THE GLIDER AND TOTAL LOSS OF CONTROL NEVER ATTACH THE PULL HANDLE OF THE SHACKLE TO THE HOOK EVEN TEMPORARILY Fig 19 2 2 13 Install the tip battens and fix them with the double tensioned rubber bands 12 ...

Page 15: ...ose junction channel using the clevis pin and the safety ring Fig 20 Fig 20 Check all wires for twisted thimbles or tangs 2 2 15 Install the washout tips swing them to the right place underneath the corresponding top surface battens through the hole in the bottom surface Fig 21 Fig 21 12 ...

Page 16: ...hecked during every pre flight A full pre flight inspection should precede every flight you make not just the first flight of the day Carefully check the entire length of the leading edge pocket to insure that the mylar insert is lying flat in the pocket If any section of the mylar is folded under de tension the crossbar remove the batten closest to the area of distortion and unfold the mylar 3 1 ...

Page 17: ...ess zipper Fig 23 Fig 23 3 3 AT THE LEFT WINGTIP Look into the sail at the wing tip and check that the tip batten is properly installed Check that the washout tip is installed properly 3 4 ALONG THE TRAILING EDGE LEFT WING Check that there are no tears in the sail material along the trailing edge Check that all battens are properly secured Check that the washout tip is properly secured in position...

Page 18: ...er attachment of the bridles and condition of the top rear wire and bridle wires Check the keel mount webbing and bottom rear wires are safely secured to the keel tube 3 6 ALONG THE TRAILING EDGE RIGHT WING Same as for the left wing 3 7 AT THE RIGHT TIP Same as for the left tip 3 8 ALONG THE RIGHT LEADING EDGE Same as for the left leading edge 16 ...

Page 19: ...lates assembly including the sweep wires X bar junction and the center bolt Also visually inspect the crossbars by sighting along the length of the crossbars looking for any evidence of damage Check all bolts nuts and the safety rings which secure the downtubes to the channel Make sure that the channel and hang brascet are secured Fig 26 Fig 26 3 10 FIT THE NOSE CONE Attach the Velcro at the top r...

Page 20: ...the leading edge and the outer tip section of leading edge 4 2 CABLE SYSTEM The cables must be checked for broken wires and corrosion If any defect on a wire is observed no matter how small the cable in question MUST BE REPLACED It is recommended that the entire cable system be replaced once every four years irrespective of service conditions A NOTE ABOUT CABLES AND CABLE MAINTENANCE The cables wh...

Page 21: ...he batten Still 17 should be checked against the template and the bends should be adjusted if necessary Check all the plastic batten heads and tails and replace if necessary 4 5 FASTENERS Check all fasteners bolts screws nuts splint pins etc for corrosion Any corroded fasteners should be replaced Bolts should not be worn and or bent Key bolts should be checked most thoroughly for cracks between th...

Page 22: ...ure the effect of each change Note all adjustments and changes in the log book Only tune and test fly the wing in perfect flying conditions 5 1 1 CG Adjustment Moving the wing hang block forward along the keel tube will speed the wing up Moving the wing hang block backwards along the keel tube will slow the wing down 5 1 2 Turn Trim 2 1 4 There is a self tapping screw for the turn adjustment at th...

Page 23: ...rame parts will need to be disassembled including the removal of all sleeves and bushings flushed liberally with fresh water dried completely When you set up or break down your wing take care not to allow sand soil and dirt to enter the sail batten pockets or tubes Keep the leading edge tube telescopic connectors thoroughly clean as set up or break down will become difficult or impossible if they ...

Page 24: ...mend that you gradually become familiar with your new wing Before every take off always do both an assembly check and a pre flight check Do not take off if the sail is wet especially the leading edge as the stall speed will increase significantly Always fly with a dry sail Take special care to avoid ice covering the glider particularly the leading edge in wintertime A wet wing must be dried before...

Page 25: ...23 LOG BOOK TABLE OF FLIGHT HOURS DATE NUMBER OF FLIGHT TOTAL HOURS BY WHOM ...

Page 26: ......

Page 27: ......

Page 28: ......

Page 29: ......

Page 30: ......

Page 31: ......

Page 32: ......

Page 33: ......

Page 34: ......

Page 35: ......

Page 36: ......

Page 37: ......

Page 38: ......

Page 39: ......

Page 40: ......

Page 41: ......

Page 42: ......

Page 43: ...AEROS PRF15 193 000 AD CONTROL BAR by Zakidyshev 16 07 03 Date Scale 180 320 1 PRF15 190 003 WD 4 PRF15 290 000 AD 3 PRF15 191 000 2 PRF15 193 005 WD ...

Page 44: ...AEROS PRF15 200 000 AD KING POST Scale 1150 3 PRF15 202 000 2 PRF15 201 000 1 PRF15 200 003 WD 5 PRF15 204 000 6 BLIND RIVET 34000 4X12 6 BLIND RIVET 34000 4X12 10 10 4 PRF15 203 000 ...

Reviews: