- Do not place flammable or nylon/fabric ob
-
jects close to and/or on the compressor.
- Do not cover the air inlets on the compressor.
COMPONENTS (fig. A - B - C)
1
Inflation adaptors housing
7
Operating pressure adjustment knob
2
Receiver air pressure gauge
8
Remote Control
3
On/off switch
9
Rubber pipe
4
Remote Control and rubber pipe housing
10
Power cable housing
5
Compressed air outlet with quick connect
11
Receiver condensation drainage tap
6
Air used pressure gauge
- Do not open or tamper with any part of the
compressor. Contact an authorized Service
Center.
2. connEctinG AccESSoriES to
tHE comPrESSor
Before connecting accessories, always
make sure that the compressor is oFF.
All accessories are connected to the com-
pressor by means of the rEmotE con-
TROL (8), which is fitted with quick-connect
connector.
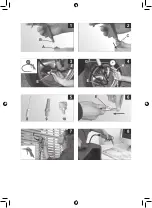
Connect selected accessory to the end (A) of
Remote Control (fig. 1): push the accessory
plug B firmly into A until you hear a metallic
click (it means connection has been success-
ful). Once you finish, switch compressor off,
empty compressed air tank by operating the
connected accessory in vacuum (e.g. blow the
jet in vacuum), then disconnect accessory from
Remote Control, pulling the external flange of
quick-connect connector C backwards (fig. 2).
3. uSE oF tHE comPrESSor
Connect selected accessory. Connect com-
pressor to the electricity network by means of
mains cable situated in housing 10, in the lo-
wer left corner of the compressor.
Press switch 3 to start the compressor. The
compressor will continue to operate until the
air receiver is completely full. On reaching
maximum pressure (10 bar), the compressor
will stop automatically. The pressure value of
the air contained in the receiver is indicated
on gauge 2. For reasons of safety and for im-
proved use, the accessories must operate at
a specific pressure, indicated in table 1 and
represented by the colored segments of the
gauge 6. To adjust the specific operating pres
-
sure for each accessory, turn knob 7 in a clock-
wise direction (+) to increase the pressure and
in a counterclockwise direction (-) to reduce it
(check the precise pressure level on gauge 6).
Once you have set a suitable operating pres-
sure, the accessory is ready for use. It is nor-
mal for the compressor to stop and restart at
intervals during use of the compressed air.
You can use compressed air also at a
distance from a power source:
fill the re
-
ceiver contained inside beforehand following
the procedure described above; disconnect
the compressor from the power supply, take
the compressor to the place where it is to be
used, connect and use the accessory requi-
red. The time of use prior to another recharge
depends on the volume of air you consume.
When you have finished using the compressor,
switch off switch 3 and disconnect the power
cable from the current outlet, replacing it in
the housing 10 on the back. Run the acces-
sory connected dry until there is no more air in
the receiver. It is advisable to store all inflation
adapters in its housing 1, in the upper left cor-
ner of the compressor. It is advisable to store
Remote Control in its housing 4, placed on the
compressor front.
mAintEnAncE
Never clean the machine and its components
with solvents, flammable or toxic liquids. Us
only a damp cloth making sure you have un-
plugged the compressor from the current out-
let. After approx. 2 hours of use, the conden-
sate that has formed must be drained from the
receiver. First of all, vent all the air using the
accessory connected, as described above.
Summary of Contents for AIRLINER 2 COMPACT
Page 3: ...1 2 3 4 5 6 8 7 9 10 10 11...
Page 4: ......
Page 31: ...230 V 50 HZ AC M...
Page 32: ......

