background image

G

B

12

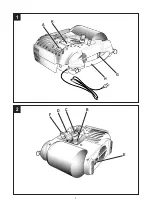
I.  Shoulder belt for easy transport and use

: The compressor may 

be conveniently carried using the shoulder belt.

–  If the metal rings have not already been fitted, insert the two 

rings in the two holes in the ends of the aluminium handle (as 

shown in Figure 7a).

–  To fit the belt to the compressor: attach the shoulder strap by 

inserting the snap hooks into the metal rings on the ends of the 

handle (as shown in Figure 7b).

J.  Strip attach/detach

: In case the compressor is fitted with a 

Velcro® strip, use this strip to secure an air-operated tool (e.g.: 

nailer) or a PVC extension pipe to the body of the compressor (as 

shown in Figures 6a-6b).

K.  Storage box for accessories

.

3.  SCOPE OF USE

The compressor is designed for generating compressed air for tools 

operated by compressed air.
Please note that our equipment has not been designed for use 

in  commercial,  trade  or  industrial  applications.  Our  warranty  will 

be  voided  if  the  machine  is  used  in  commercial,  trade  or  industrial 

businesses or for equivalent purposes.
The machine is to be used only for its prescribed purpose. Any other 

use is deemed to be a case of misuse. The user/operator and not 

the manufacturer will be liable for any damage or injuries of any kind 

caused as a result of this.

4.  ELECTRICAL GROUNDING INSTRUCTIONS

This product should be electrically grounded. In the event of an 

electrical short circuit, grounding reduces the risk of electrical shock 

by providing an escape wire for electrical current. This product is 

equipped with a cord having a grounding wire with an appropriate 

grounding plug. The plug must be plugged into an outlet that is 

properly installed and grounded in accordance with all local codes and 

ordinances.

4.1  Connection of the mains plug

  Important! 

The wires in the mains lead fitted to this product are coloured in 

accordance with the code shown in pic. 9.

●  The 3 pin plug must comply to BS1363/A.

●  Fuse must comply to BS1362.

If for any reason the 13 amp plug fitted to this product requires 

replacement it must be wired in accordance with the following 

instruction:

Do not connect the brown (live) or blue (neutral) to the earth pin marked 

‘E’  

  on the 3 pin plug.

Connect the Blue wire to the terminal marked Neutral (N). Connect 

the Brown wire to the terminal marked Live (L). Connect the Yellow 

& Green wire to the terminal marked Earth (E). Ensure that the outer 

insulation is gripped by the cord grip and that the wires are not trapped 

when replacing the plug cover. The mains lead on this product is fitted 

with  a  13  amp  (BS1363/A)  plug. A  13  amp  (BS1362)  fuse  must  be 

fitted in the plug.

If in doubt consult a qualified electrician

There are no user serviceable parts inside this product except those 

referred to in the manual. Always refer servicing to qualified service 

personnel. Never remove any part of the casing unless qualified to do 

so; this unit contains dangerous voltages.

  Warning! 

For your protection if this product is to be used outdoors it should not 

be exposed to rain or used in damp locations. Do not place the product 

on damp surfaces, use a workbench if available. For added protection 

use a suitable residual current device (R.C.D.) at the socket outlet.

Note: 

If the mains cable requires replacing it must be replaced with 

an identical one and fitted by a qualified person.

5.  PRE-START PROCEDURES

●  Examine  the  machine  for  signs  of  transport  damage.  Report 

any damage immediately to the company which delivered the 

compressor.

●  Verify  that  the  tanks  have  been  drained  and  are  clear  of  any 

moisture or dirt.

●  The compressor should be set up near the working consumer.

●  Avoid long air lines and long supply lines (extensions).

●  Make sure the intake air is dry and dust-free.

●  Do not set up the compressor in damp or wet rooms.

●  The compressor may only be used in suitable rooms (with good 

ventilation and an ambient temperature from +5°C to +40°C). There 

must be no dust, acids, vapours, explosive gases or inflammable 

gases in the room.

●  The compressor is designed to be used in dry rooms. It is prohibited 

to use the compressor in areas where work is conducted with 

sprayed water.

6.  OPERATION INSTRUCTIONS

6.1  Start-Up Procedures

1.  Verify that the On/Off switch is in the Off position.

2.  Verify that the tank air pressure is at 0 PSI.

3.  Attach the air hose to the discharge line.

4.  Plug the unit into a properly grounded outlet.

5.  Push the On/Off switch to On. The On/Off switch will light-up to 

indicate the compressor is on. The compressor will automatically 

cycle on and off to keep the tank pressure maintained .

6.  Adjust  the  pressure  regulator  to  the  proper  pressure  setting 

required for the air tool.

6.2  Shut-Off Procedures

1.  Push in the On/Off switch to the Off position.

7.  CLEANING AND MAINTENANCE

  Warning! 

Pull the power plug before doing any cleaning and maintenance 

work on the appliance.

  Warning! 

Wait until the compressor has completely cooled down. Risk of 

burns!

  Warning! 

Always depressurize the tank before carrying out any cleaning 

and maintenance work.

7.1 Cleaning

● Keep the safety devices free of dirt and dust as far as possible. Wipe 

the equipment with a clean cloth or blow it with compressed air at 

low pressure.

● We recommend that you clean the appliance immediately after you 

use it.

● Clean the appliance regularly with a damp cloth and some soft soap. 

Do not use cleaning agents or solvents; these may be aggressive to 

the plastic parts in the appliance. Ensure that no water can get into 

the interior of the appliance.

● You  must  disconnect  the  hose  and  any  spraying  tools  from  the 

compressor before cleaning. Do not clean the compressor with 

water, solvents or the like.

7.2  Draining tank

The condensation water must be drained off each day by opening the 

drain valve (ref. E) (on the bottom of the pressure vessel).

1.  Verify that the compressor is turned Off.

2.  Holding the handle, tilt the compressor toward the drain valve so 

that they are positioned at the bottom of the tank.

3.  Turn the drain valve to open the valve.

4.  Keep the compressor tilted until all moisture has been removed.

  Warning! 

The condensation water from the pressure vessel will contain 

residual oil. Dispose of the condensation water in an environmentally 

compatible manner at the appropriate collection point.

Summary of Contents for Airliner 5 GO

Page 1: ...truzioni 8 Istruzioni originali GB Instruction manual for owner s use 11 Translation of the original instructions FR Manuel utilisateur 14 Traduction des instructions originales DE Betriebsanleitung 17 Übersetzung der Originalanleitung PL Instrukcje obsługi 20 Tłumaczenie oryginalnej instrukcji ...

Page 2: ...his handbook for future reference FR Conserver le présent manuel pour pouvoir le consulter ultérieurement DE Diese Bedienungsanleitung für späteres Nachschlagen sorgfältig aufbewahren PL Przechowywać niniejszy podręcznik instrukcji obsługi tak aby można było korzystać z niego w przyszłości ...

Page 3: ...rische Spannung PL Uwaga niebezpieczeństwo porażenia prądem elektrycznym IT Pericolo avviamento automatico GB Danger automatic control closed loop FR Risque de démarrage automatique DE Gefahr durch automatischen Anlauf PL Uwaga niebezpieczeństwo automatycznego uruchomienia się IT Protezione obbligatoria dell udito della vista e delle vie respiratorie GB Hearing sight and respiratory protection mus...

Page 4: ...4 HP kW l gallons l min cfm volt Hz A min 1 bar PSI kg lbs g Airliner 5 GO 1 5 1 1 5 1 2 200 7 1 230 50 5 5 3400 10 145 9 19 9 no ...

Page 5: ...5 1 2 E K F B D A G H C ...

Page 6: ...6 3 5 6a 4 6b I H J ...

Page 7: ...7 7a 7b 8 G BS1362 APPROVED FUSE BS1363 A APPROVED 3 PIN PLUG FUSE 13 amp BROWN LIVE WIRE Cord grip EARTH 9 ...

Page 8: ...ari trattamenti e non può essere utilizzata per riempire bombole da immersione Per evitare ustioni gravi non toccare mai le parti della testa del cilindro né le tubazioni durante o subito dopo l utilizzo COSE DA SAPERE Per evitare di surriscaldare il motore elettrico il compressore è progettato per un funzionamento a intermittenza non utilizzare per un ciclo di lavoro di oltre il 15 Se il compress...

Page 9: ... di avvio 1 Verificare che l interruttore On Off acceso spento sia in posizione Off 2 Verificare che la pressione dell aria nel serbatoio sia pari a 0 PSI 3 Collegare il tubo dell aria sull accoppiamento rapido 4 Collegare l unità ad una presa correttamente messa a terra 5 Premere l interruttore On Off in posizione On L interruttore On Off si accenderà per indicare che il compressore è acceso Il c...

Page 10: ...estazioni o eventuali perdite dai giunti e o tubazioni Possibile filtro di aspirazione intasato Sostituire le guarnizioni dei raccordi pulire o sostituire il filtro Il compressore si arresta e riparte autonomamente dopo qualche minuto Intervento della protezione termica causa surriscaldamento del motore Pulire i passaggi d aria nel convogliatore Areare il locale Il compressore dopo alcuni tentativ...

Page 11: ...icular treatments and cannot be used to fill the air bottles of scuba divers To avoid serious burns never touch the cylinder head parts or tubing during or immediately after operation THINGS YOU SHOULD KNOW To avoid overheating of the electric motor this compressor is designed for intermittent operation do not operate on more than a 15 duty cycle If this air compressor pumps air more than 15 of on...

Page 12: ...p locations Do not place the product on damp surfaces use a workbench if available For added protection use a suitable residual current device R C D at the socket outlet Note If the mains cable requires replacing it must be replaced with an identical one and fitted by a qualified person 5 PRE START PROCEDURES Examine the machine for signs of transport damage Report any damage immediately to the co...

Page 13: ...ng with the machine may impair its safety and in any case make the warranty null and void 9 TROUBLESHOOTING GUIDE Note Remove power source and drain tank pressure prior to making any repairs or adjustments FAULT CAUSE REMEDY Leakage of air from the valve of the pressure switch with the compressor off Check valve that due to wear or dirt on the seal does not perform its function correctly Unscrew t...

Page 14: ...proximité et ou sur le compresseur Ne pas nettoyer la machine à l aide de liquides inflammables ou de solvants Utiliser uniquement un chiffon humide en veillant d abord à ce que la fiche soit débranchée de la prise électrique L utilisation du compresseur est strictement limitée à la compression de l air Ne pas utiliser l appareil avec d autres types de gaz L air comprimé produit par cet appareil n...

Page 15: ...ont été drainées correctement et qu elles ne contiennent plus aucune trace d humidité ou de saleté Il est recommandable d installer le compresseur à proximité du consommateur Evitez les tuyaux à air et les câbles d alimentation câbles de ral longe longs Veillez à ce que l air aspiré soit sec et sans poussière N installez pas le compresseur dans un local humide ou détrempé Le compresseur doit être ...

Page 16: ...ion ou des réglages ANOMALIE CAUSE INTERVENTION Fuite d air depuis le clapet du pressostat le compresseur à l arrêt Le clapet de retenue ne fonctionne pas correctement à cause de l usure ou de la présence de salissures sur sa butée d étanchéité Dévisser la tête hexagonale du clapet de retenue nettoyer le logement et le disque en caoutchouc spécial le remplacer en cas d usure Reposer et serrer soig...

Page 17: ...ie nicht mit dem Gerät spielen Entzündliche Gegenstände oder Gegenstände aus Nylon und Stoff niemals in die Nähe und oder auf den Kompressor legen Die Maschine niemals mit entzündbaren Flüssigkeiten oder Lösungsmitteln reinigen Zur Reinigung lediglich ein feuchtes Tuch verwenden Der Stecker muss hierbei von der Steckdose abgezogen sein Die Verwendung des Kompressors ist auf die Erzeugung von Druck...

Page 18: ... Motoranlauf durch Schwergängigkeit gefährdet 5 MASSNAHMEN VOR DEM START Überprüfen Sie das Gerät auf Transportschäden Etwaige Schäden sofort dem Transportunternehmen melden mit dem der Kompressor angeliefert wurde Prüfen Sie ob die Tanks entleert sind der Wasserdampf entzogen und jeglicher Schmutz daraus entfernt wurde Die Aufstellung des Kompressors sollte in der Nähe des Verbrauchers erfolgen L...

Page 19: ...ustritt aus dem Ventil des Druckwächters bei Kompressor in Stillstand Rückhalteventil aufgrund von Verschleiß oder Verunreinigung auf dem Dichtungsanschlag funktionsgestört Den Sechskantkopf des Rückhalteventils abschrauben den Sitz und die Spezialgummischeibe reinigen bei Verschleiß ersetzen Wieder anbringen und sorgfältig anziehen Leistungsverringerung Häufige In betriebnahmen Niedrige Druckwert...

Page 20: ...uprzednio że wtyczka została wyjęta z gniazdka elektrycznego Zastosowanie sprężarki związane jest ściśle ze sprężaniem powietrza Nie stosować maszyny do innego typu gazu Wytwarzane przez to urządzenie sprężone powietrze nie jest możliwe do zastosowania w dziedzinie farmaceutycznej spożywczej lub szpitalnej chyba że zostało poddane specjalnym obróbkom Nie może być także stosowane do napełniania but...

Page 21: ...or powinien być ustawiony w pobliżuużytkownika Unikać długich przewodów powietrznych idługich przewodów do prowadzających przedłużaczy Zwracać uwagę na suche i wolne od kurzupowietrze zasysane Nie stawiać kompresora w wilgotnym lub mokrympomieszczeniu Kompresor musi być używany w nadających siędo tego pomiesz czeniach dobrze wietrzonych otemperaturze od 5 C do 40 C Wpomieszczeniu nie mogą się znaj...

Page 22: ...z zaworu spusto wego USTERKA POWÓD INTERWENCJA Wyciek powietrza z zaworu presostatu przy sprężarce zatrzymanej Zawór zwrotny który z powodu zużycia lub zabrudzenia strony uszczelniającej nie wykonuje właściwie swej funkcji Odkręcić śrubę sześciokątną zaworu zwrotnego wyczyścić gniazdo i specjalną gumową płytkę wymienić jeśli zużyta Ponownie zamontować i dokładnie przykręcić Zmniejszenie wydajności...

Page 23: ...23 ...

Page 24: ...9041655 ...

Reviews: