background image

10

Quantix™ © AeroVironment 2017–2019

Quantix™ © AeroVironment 2017–2019

11


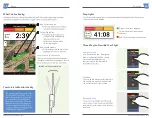
Conduct a Preflight Check 

Open the Quantix application, login, and 

tap “Fly Area” for the desired collection 

application will guide you through a 

commanding the aircraft to launch.


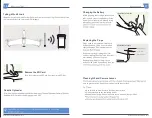
Launch/Land Location 

Place aircraft in an upright position near collection 

area. This will be the launch/land location and 

should have a minimum of 15 feet clearance around 

aircraft with a suggested safety buffer of 50 feet 

in every direction. This area must remain clear the 

vertically from this location to an elevation of 100 


Power Up

Press and hold the power button to power 

on the aircraft. Wait for the aircraft status 

indicator to illuminate orange.

1

2

3

BATTERY INDICATOR 

LIGHTS

BEFORE LAUNCH

Aircraft Status Indicator

Slow Pulsing

Solid Orange

Flashing

Flashing

Chasing Up

Chasing Down

POWER UP

sensor port on nose of aircraft. 

•  Ensure all objects are at least 50 feet away 

from aircraft 

•  Ensure all objects that are over 80 feet 

tall are at least 100 meters away from the 

launch/land location 

• 

OBSTACLE CLEARANCE ZONE

UPRIGHT AIRCRAFT FOR TAKEOFF

80'

100'

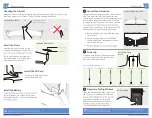
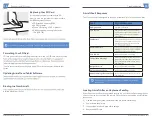
Install the Battery

cavity located on top of the aircraft. Press 

CARRYING THE AIRCRAFT

Handling the Aircraft

Always carry the aircraft by the fuselage (nose of the aircraft). Never try to carry it by 

the wings, propellers, or elevons. Doing so could damage the aircraft.

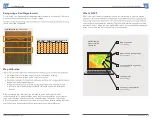
Install the Props

Install each prop by turning it in the 

direction indicated by arrows on the 

The two props with a recessed dot 

must be installed on the two motors 

with silver dots on the shaft. 

INSTALLING CORRECT PROPS

Silver dot

Hold below lenses to 

Install the SD Card

Install the SD Card by inserting 

into the aircraft SD slot. 

Summary of Contents for Quantix

Page 1: ...User Manual...

Page 2: ...User Manual...

Page 3: ...g 13 Stop Lights Override Your Flight Area 14 15 Charge the Aircraft Battery Charge the Tablet Battery Charging Accessories 16 Removed the SD Card Quantix Uploader 17 Changing the Battery Replacing th...

Page 4: ...f your new unmanned the collection area ensure a safe launch and monitor the airspace Quantix will plot Plus the aircraft will automate launch and landing and navigate the preplanned route with three...

Page 5: ...for a soft landing Quantix collecting up to 400 acres of data per multiple types of high resolution imagery 18MP NDVI gNDVI Let s start with what arrived in your reusable Quantix shipping case Sensor...

Page 6: ...ated content This is normal behavior from the tablet manufacturer Although you are free to install other applications it is recommended that you do not run memory or storage intensive applications Thi...

Page 7: ...r into the battery see page 14 for charging details Once battery is fully charged disconnect from charger 3 Install a fully charged battery in the aircraft and power it on by pressing and holding the...

Page 8: ...ould Fly over intended areas Fly in a safe area return paths over more of the area Centrally Located All Return Home Paths Have best line of sight Fly directly over intended areas Fly in a safe area T...

Page 9: ...raft Status Indicator Slow Pulsing Solid Orange Flashing Flashing Chasing Up Chasing Down POWER UP sensor port on nose of aircraft Ensure all objects are at least 50 feet away from aircraft Ensure all...

Page 10: ...ire action Blue Collection Area Yellow Flight Area include launch and landing collection area and while collecting images Red Flight Boundary Quantix lands immediately if the KEEPING A STRONG CONNECTI...

Page 11: ...lug in the aircraft charger to the battery and wall outlet to begin 4 hours 1 Be Ready to Fly with a Fully Charged Battery 0 25 25 50 50 75 75 100 FULLY CHARGED BATTERY CHARGING BATTERY Charge the Tab...

Page 12: ...e props by gripping the motor and unscrewing the prop in the direction indicated by arrows on the prop Replace the prop by turning it in the direction indicated by arrows on the prop Changing the Batt...

Page 13: ...he tablet the aircraft will cancel the path altitude Low Battery battery power to complete the mission it will cancel the mission return home and Depleted Battery battery power to return home it will...

Page 14: ...lect Settings in the Menu button and select Mag Calibration Tap the Play button on the video at the top of the screen to start the video After watching the video tap the Continue button and follow the...

Page 15: ...violation of local laws and regulations Operating Quantix while impaired in judgment from drugs or alcohol Operating Quantix in any unsafe unprofessional or incorrect manner Operating Quantix in incl...

Page 16: ...d can radiate radio frequency energy and if not installed and used in accordance with the instruction manual may cause harmful interference to radio communications in which case the user will be requi...

Page 17: ...900 Innovators Way Simi Valley CA 93065 Customer Service 888 372 2890 ciscustomerservice avinc com www AVdroneanalytics com This brochure consists of AeroVironment Inc general capabilities informatio...

Reviews: