background image

english

troublesHooting - 

(for PERFETTO TXA, TPA and TP central power units)

PROBLEM

CAUSE

SOLUTION 

There is no air intake from all the 
sockets 

Power supply cable disconnected

Connect the power supply cable

12V  socket  cable  line  not  connected  or 
incorrectly connected

Connect  the  12V  socket  cable  line  or 
check the wiring

The number of consecutive central power 
unit  starts  within  a  period  of  1  minute 
was exceeded

Check  the  electric  connection  on  each 
socket.
Press RESET to reset operation

The electric contacts in the hose are dirty. 
Clean them as indicated in the accessory 
instructions.
Press RESET to reset operation

The  maximum  amount  of  time  of 
continuous  central  power  use  has  been 
exceeded

The  microswitch  in  a  vacuum  socket  is 
damaged.
Call a specialised technician.

The  system  remained  on  inadvertently 
for 30 consecutive minutes.
Press RESET or turn the system off and 
on to reset operation

Check the electric connection of the 12V 
socket cable line.
Call a specialised technician.

The motor overheated.
The motor temperature exceeded 80 °C.

Check  if  the  air  exhaust  line  is  free  or 
if  the  two  air  exhaust  openings  are 
blocked.    Wait  for  the  motor  to  cool 
down. Press RESET to reset operation

Make  sure  the  filter  cartridge  is  not 
saturated.  In  this  case,  perform 
maintenance.  Wait  for  the  motor  to 
cool down.
Press RESET to reset operation

The vacuum exceeded 240 mbar for more 
than 15 seconds

The hose inlet is obstructed.
Free the hose, turn the system on and off 
and press RESET

The  dust  container  is  not  correctly 
hooked

Rehook the container correctly.

There  is  no  air  intake  from  a 
socket

The microswitch or the electric contacts 
in a vacuum socket are damaged.

Call a specialised technician.

User and maintenance manual

30

Maintenance

Maintenance

Summary of Contents for TUBO CLASSIC TC

Page 1: ...PERFETTO INOX TXA PERFETTO TPA PERFETTO TP CLASSIC TC Central power unit ...

Page 2: ...Air discharge grills 14 Electric motor air intakes 15 TUBÒ System electrical connection 16 Control panel with AVI display and keyboard 17 Control panel operation with AVI display 19 AVT control panel 19 AVT control panel functioning 20 Central power unit inspection MAINTENANCE 21 Maintenance of Perfetto TXA TPA TP central power units 21 Container emptying 22 Clean Bag insertion 23 Filter cartridge...

Page 3: ...nce inability or associated with prohibited or unauthorised uses Materials components and accessories including electric and electronic ones when the damage is not related to original manufacturing defects or when the damage is due to component wear The manufacturer shall not accept any contractual and extra contractual liability due to damage caused by errors in using and installing the central p...

Page 4: ...vent harming operators who are sensitive to the collected dust Quality system UNI EN ISO 9001 Environmental management system UNI EN ISO 14001 Product certification for the single phase power unit range for the residential market sector series PERFETTO INOX TXA PERFETTO TPA PERFETTO TP CLASSIC TC certifications Aertecnica S p A is a company certified with IDENTIFICATION This user and maintenance m...

Page 5: ...side through the air exhaust line guaranteeing home hygiene and preventing the dust from recirculating in homes The system must only be used by one operator The system must only be used with the hose and cleaning accessories connected to Aertecnica sockets installed in the building The system can reach all areas of the home both inside as well as outside depending on the position of the vacuum soc...

Page 6: ... TP1A and TP1 3 Sound proofed motor chamber 4 Electric motor 5 Temperature sensor 6 Electronic card EVOLUTION 1 0 7 AVI display and bult in keyboard 8 Dual right left dust inlet 9 Built in vacuum socket 10 PRECISION filter cartridge 11 Self Cleaning filter APF system mod PERFETTO TXA and TPA 12 QUICK FIX bracket 13 Side multifunction pockets excluding mod PERFETTO TX1A TP1A and TP1 14 Ergonomic ha...

Page 7: ...2 13 5 13 5 22 22 Height cm 60 90 115 115 60 90 115 115 60 90 115 115 Diameter cm 30 30 34 34 30 30 34 34 30 30 34 34 Weight kg 10 8 13 8 17 3 17 3 10 8 9 8 13 8 12 8 17 3 16 3 17 3 16 3 9 5 12 2 15 3 15 3 Dynamic Control Display compatibility CMT800 YES YES YES YES YES YES YES YES YES YES YES YES Wireless system compatibility CM187 YES YES YES YES YES YES YES YES YES YES YES YES Soft Start starti...

Page 8: ...st materials these materials could cause the electric system to short circuit prevent the proper passage of the dust or damage the sockets and the central power unit turning on off The standard hose comes in two types TYPE 1 hose with an activator union the central power unit turns on when the union B is inserted in the vacuum socket A TYPE 2 hose with a switch the central power unit is turned on ...

Page 9: ...dy existing system without installing the 12V socket line It can be used with all types of vacuum sockets The kit includes a wireless hose 1 and a receiver 2 The 12V socket line cable that is supplied with the central power unit must be connected directly to the wireless input on the central power unit s electronic card Receiver transmission power Inside a building the transmission range between t...

Page 10: ...power unit use the handles positioned on the sides of the packaging A INSTALLATION LOCATION The central power unit must be installed in well ventilated service rooms for example closets garages cellars or attic rooms protected from significant climate changes The high level of electrical protection and resistance to the elements allows for the extension of installation of the central power unit to...

Page 11: ...TO TXA PERFETTO TP PERFETTO TPA CLASSIC TC D 300 340 340 300 300 340 340 300 300 340 340 E 286 304 304 286 286 304 304 286 286 304 304 F 230 340 340 230 230 340 340 230 230 340 340 G 34 34 34 34 34 34 34 34 34 34 34 H 600 1115 1115 600 900 1115 1115 600 900 1115 1115 I 273 308 308 273 273 308 308 273 273 308 308 L 115 137 137 115 115 137 137 115 115 137 137 M 103 112 112 103 103 112 112 103 103 11...

Page 12: ...e central power unit support to the bracket slide 4 With a simple left to right movement slide the central power unit support to the end stop 6 To unhook the central power unit from the support press the lock hook with the help of a screw driver F Slide the central power unit to the left and lift it Unhooking the central power unit 5 The lock hook must release with a CLICK use a screwdriver for le...

Page 13: ...ease ø50F ø82F 3 exhaust grille ø82 4 outlet hole ø82 Use an exhaust grille code TR310 or similar grille without the presence of insect protection netting In the instance of a ø50 terminal use an exhaust grille code TR316 Dust inlet line connection All of the central power units have a dual dust inlet to permit the connection of the socket line hose on both sides of the central power unit making i...

Page 14: ...w The inner side is the one with the grille the grille blades must be rotated downward The external side is the one with a helicoidal section drawing electric motor air intakes The PERFETTO TX3A and TX4A TP3A and TP4A TP3 and TP4 TC3 and TC4 power units have air intakes h that must not be blocked to guarantee electric motor cooling Remove the internal protective sponge k and wash it once a year to...

Page 15: ...uipment DANGER OF ELECTROCUTION Make sure that the electric line is dimensioned to support the central power unit power and check that the mains network corresponds to the voltage specified on the identification plate A B ELECTRICAL CONNECTION DIAGRAM To make the socket line connection wire the central power unit connection cable as shown in the figure ELECTRICAL DANGER If the power supply cable i...

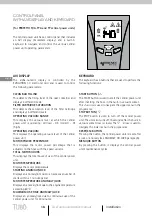
Page 16: ...thin a 1 minute period MOTOR TEMPERATURE ANOMALY LOCK Displays an anomaly lock due to the engine temperature exceeding 80 C MAXIMUM USE TIME ANOMALY LOCK Displays an anomaly lock due to continuous use of the central power unit for 30 minutes KEYBOARD The keyboard has 4 buttons that are used to perform the following functions START BUTTON r The START button is used to start the central power unit a...

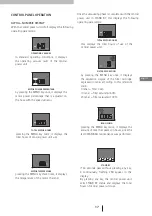
Page 17: ...onds pass without pressing any key 3 continuously flashing LED appear in the display By pressing any key the central power unit exits STAND BY status and displays the total hours of central power unit use MOTOR POWER PERCENTAGE by pressing the MENU key once it displays the motor power percentage that is adjusted on the hose with the speed variator Once the vacuuming phase is completed with the cen...

Page 18: ...than 240 mbar the wording will flash and the central power unit will be locked after 15 seconds due to excessive operating vacuum see ANOMALY AND LOCK TABLE MOTOR TEMPERATURE ANOMALY LOCK Displays an anomaly lock due to the motor chamber temperature exceeding 80 C the temperature warning light appears which flashes together with the fixed maintenance warning light that indicates a central power un...

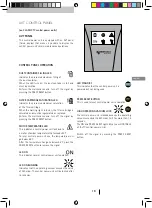
Page 19: ... button MOTOR TEMPERATURE LED This indicates a central power unit lock due to a motor chamber temperature that exceeds 80 C To reset central power unit use the temperature must go below 55 C After the temperature has gone below 55 C press the PRESS RESET button to remove the signal LED ON This indicates normal central power unit operation LED ON BLINKING Indicates that the operating vacuum exceeds...

Page 20: ...tained by the central power unit which will stop automatically after 15 seconds Note the value that was reached value 1 Disconnect the tubing from the central power unit and insert a vacuum gauge AT010 in its place Activate the central power unit jumpering the 12V socket cable line check the vacuum value obtained by the central power unit which will stop automatically after 15 seconds Note the val...

Page 21: ...TTO TXA TPA AND TP CENTRAL POWER UNITS container emptying These central power units indicate the CLEAN BAG filling level on the display It is recommended to replace the CLEAN BAG before it reaches it maximum capacity limit 1 Rotate both handles a upwards simultaneously The dust container will lower 2 Close the CLEAN BAG by pulling the strips b all the way without unhooking the dust container 3 Unh...

Page 22: ...o that the strips enter the slots g of the dust container handles Fold the CLEANBAG under each clamp pair 1 2 and close them one at the time ensuring that the bottom of the bag is completely fitted inside the blocking system 3 Fold the upper part of the bag inside the bag tensioner ring k The CLEANBAG must adhere to the internal walls of the dust container Insert the strips into the handle slots g...

Page 23: ...ompletely b The alignment system guarantees perfect filter cartridge fastening 4 Rehook the dust container and close the handles These central power units display the filter cartridge clogging level The filter cartridge maintenance signal will appear on the central power unit AVI display NOTE It is recommended to replace the cartridge when the clogging level indicated on the display exceeds 80 It ...

Page 24: ...ply The central power unit must not be operated without the filter cartridge inserted Failure to observe this rule could cause damage to the motor that is not covered by the warranty filter cartridge replacement ATTENTION When carrying out this operation it is easy to come into contact with the dust collected on the cartridge walls Before removing the filter cartridge it is recommended to wear sui...

Page 25: ...the knob completely b The alignment system guarantees perfect filter cartridge fastening 4 Rehook the dust container and close the handles USE ONLY ORIGINAL AERTECNICA SPARE PARTS Check that the dust container gasket g is in good condition and placed correctly In case of anomaly call a Technical Service Center NOTE b b g 25 ...

Page 26: ...nel for the CLASSIC TC series shows the saturated filter cartridge indication ATTENTION When carrying out this operation it is easy to come into contact with the dust collected on the cartridge walls Before removing the filter cartridge it is recommended to wear suitable personal protective garments 1 Vacuum the dust collected on the saturated cartridge walls using the system itself 2 After an ini...

Page 27: ... use It is recommended to contact authorised organisations and agencies and to respect the current applicable legal regulations cover cup tangential openings AVT panel cone document holder polypropylene under motor gasket thermoplastic rubber PRECISION filter cartridge polyester ABS fastening bracket 30 glass filled nylon antivibration bracket rubber rubber sleeves SBR NR rubber wiring clamps air ...

Page 28: ...f the central power unit has an anomaly proceed with normal cleaning without turning off the system yet After 1 minute of system use the warning light will turn off on its own If the central power unit is locked press RESET to reset use these symbols appear these symbols appear these symbols appear this symbol flashes this symbol flashes 5 consecutive starts of the central power unit in 1 minute t...

Page 29: ...it is locked press RESET or remove and reinsert the hose or turn the system off and on using the switch on the hose If the central control unit has an anomaly reduce the intake within 15 seconds to prevent it from locking If the central control unit is locked press RESET to reset use or remove and reinsert the hose or turn the system off and on using the switch on the hose If the central control u...

Page 30: ...The system remained on inadvertently for 30 consecutive minutes Press RESET or turn the system off and on to reset operation Check the electric connection of the 12V socket cable line Call a specialised technician The motor overheated The motor temperature exceeded 80 C Check if the air exhaust line is free or if the two air exhaust openings are blocked Wait for the motor to cool down Press RESET ...

Page 31: ...ith the sockets closed The microswitch or the electric contacts in a vacuum socket are damaged Call a specialised technician The AVT panel remains off The central power unit power supply cable is disconnected Connect the power supply cable The protective fuse burnt out Call a specialised technician The electronic card is defective Call a specialised technician Call a specialised technician for oth...

Page 32: ...ion Multiple vacuum sockets are being used at the same time on the system The central power unit may only be used by one operator at a time The dust container gasket is damaged or out of position Check the position of the dust container gasket The air exhaust line is clogged Check if the air exhaust line is free or if two air exhaust openings are blocked The hose is partially obstructed Free the o...

Page 33: ......

Page 34: ...and the related technical documentation without incurring any obligation to third parties This version of the user instruction and maintenance manual describes the features relative to the central power unit in standard production on the date on which this publication was licensed for printing ViaCerchiadiSant Egidio 760 47521Cesena FC ITALY Tel 390547 637311 Fax 390547631388 info aertecnica com w...

Reviews: