background image

+ User Manual

Indicator LEDs

version 1.4.9 (09/04/14)

page 31

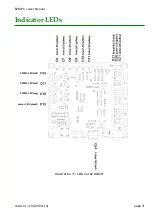
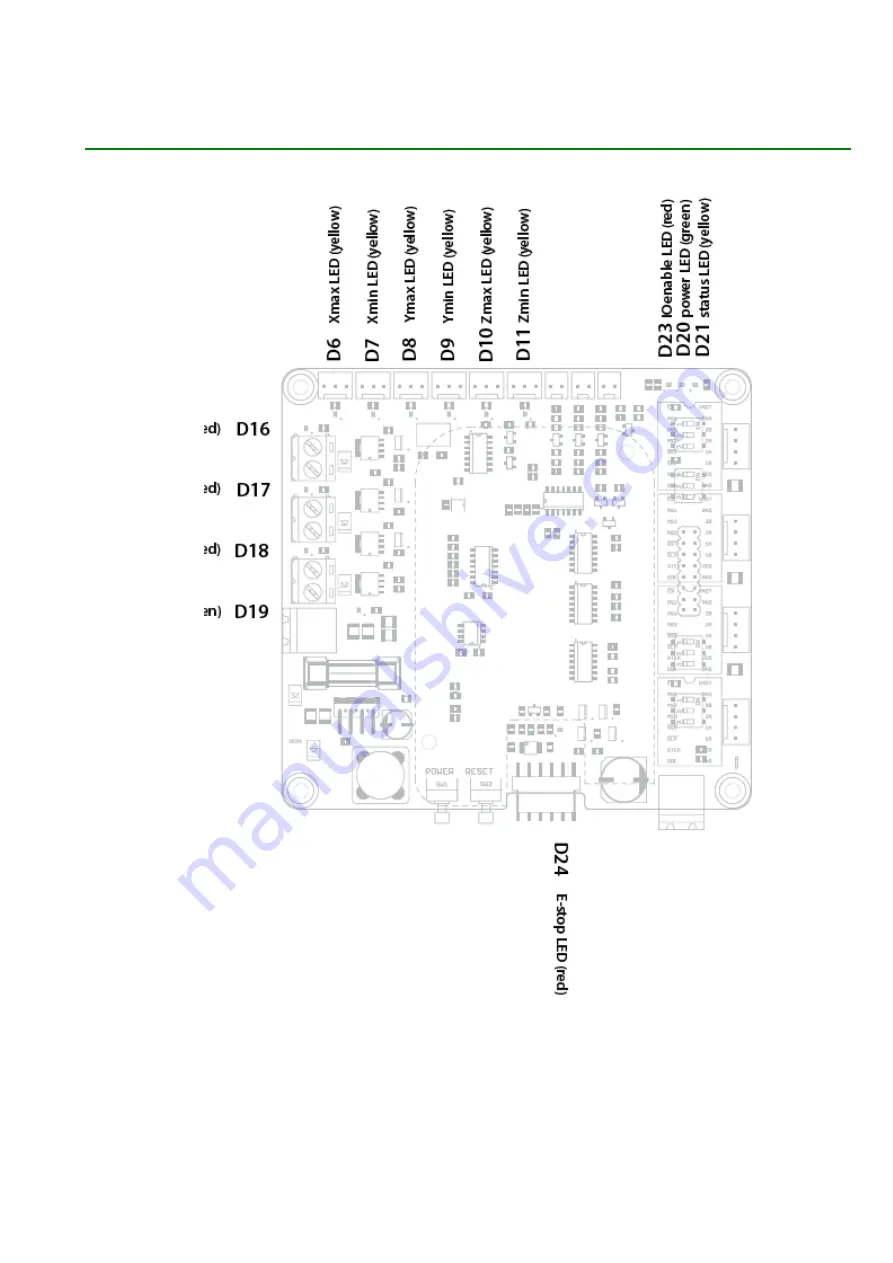
Illustration 11: LEDs on the BeBoPr

D

24

E-s

to

p L

ED

 (re

d)

D19

D18

D17

D16

D

23

D

20

D

21

IO

en

ab

le

 L

ED

 (re

d)

po

w

er

 L

ED

 (g

re

en

)

st

at

us

 L

ED

 (y

el

lo

w

)

PWM0 LED (red)

PWM0 LED (red)

PWM0 LED (red)

power LED (green)

D

6

Xm

ax

 L

ED

 (y

el

lo

w

)

D

7

Xm

in

 L

ED

 (y

el

lo

w

)

D

8

Ym

ax

 L

ED

 (y

el

lo

w

)

D

9

Ym

in

 L

ED

 (y

el

lo

w

)

D

10

Zm

ax

 L

ED

 (y

el

lo

w

)

D

11

Zm

in

 L

ED

 (y

el

lo

w

)

Summary of Contents for BeBoPr++

Page 1: ...BEBOPR USER MANUAL Copyright AES allround embedded services 2012 2014 Author Bas Laarhoven Version 1 4 9 Date April 09 2014 ...

Page 2: ...OR OTHER PARTIES PROVIDE THE DESIGN AS IS WITHOUT WARRANTY OF ANY KIND EITHER EXPRESSED OR IMPLIED INCLUDING BUT NOT LIMITED TO THE IMPLIED WARRANTIES OF MERCHANTABILITY AND FITNESS FOR A PARTICULAR PURPOSE THE ENTIRE RISK AS TO THE QUALITY AND PERFORMANCE OF THE DESIGN IS WITH YOU SHOULD THE DESIGN PROVE DEFECTIVE YOU ASSUME THE COST OF ALL NECESSARY SERVICING REPAIR OR CORRECTION Limitation on L...

Page 3: ... 15 Other NC Applications 15 The Cape 16 Power 16 Configuration EEPROM 16 Daughter modules 17 Connections 19 Power Connections 19 Stepper Motor Connections 20 Stepper signals connector 20 Thermistor connectors 21 Limit switch connectors 21 PWM analogue outputs 21 PWM Power Outputs 22 BeBoPr improvements 22 Free wheeling diodes 23 Power dissipation 23 Analogue inputs 25 Signal Conditioning 25 Prote...

Page 4: ...35 I2C and Emergency Stop 36 Emergency Stop Input 36 I2C Bus 36 Specifications preliminary 37 Connectors 38 Mating Connectors 40 I O connectors 40 Power connectors 41 Troubleshooting 42 References 43 Board dimensions 44 version 1 4 9 09 04 14 page 4 ...

Page 5: ...ginal BeagleBone and the BeagleBone Black It also reduces complexity and manufacturing costs This manual tries to provide all information necessary to install operate and troubleshoot the BeBoPr This manual is still work in progress Partly the content may still refer to the original BeBoPr and may not be applicable on the BeBoPr Please do not hesitate to report errors and or send other constructiv...

Page 6: ... the left pin pin 1 to the middle pin should light the yellow LED next to the connector This step verifies that the step down voltage converter on the BeBoPr is working A voltmeter should measure 5 00 0 05 Volts on the outer two pins of each limit switch connector Step 6 Now turn the power off wait one minute and then attach the BeagleBone to the BeBoPr Take note of the orientation and make sure a...

Page 7: ...e to the top side There are no longer components underneath the board reducing the overall board height and manufacturing costs The choice of components makes it no longer possible to solder the board only a soldering iron As the board was never officially offered as DIY kit this shouldn t be an issue Elevated BeagleBone mounting With the BeBoPr Bridge the distance between the BeagleBone and the B...

Page 8: ...laced into the board s input power line Input power LED A green LED located near the input power connector indicates the presence of supply power It will not light if the fuse has blown This LED replaces the three green LEDs I2C connector The BeagleBone s I2C2 bus is now routed to a 4 pin connector no need to solder wires directly to the board any more This allows I O expansion or connection of a ...

Page 9: ...lways obvious and hard to debug now this signal s state is directly visible Larger bypass capacitor for stepper modules The bulk capacitance that bypasses the stepper motors power supply has been increased A high quality 220 uF 50V electrolytic capacitor has been added This should prevent damage to the Pololu stepper driver modules caused from over voltage spikes generated by the motors Reset butt...

Page 10: ...TOP input are located between the reset button and the stepper motor power connector beneath the RJ45 connector of the BeagleBone Software Compatibility The hardware is backwards compatible with the BeBoPr and BeBoPr with Bridge No software changes should be necessary to operate a BeBoPr with the software designed for a BeBoPr or BeBoPr with Bridge When using the extra current that the BeBoPr can ...

Page 11: ...hree high power outputs are connected to the processor s PWM devices These outputs can also be used as digital outputs to control a relay a motor or other DC load Digital inputs 6x Six digital inputs can be used for simple logic signals or to connect switches or opto sensors directly The three pin connectors also provide a 5 Volt signal for sensors that need a supply voltage The supply is protecte...

Page 12: ... or heaters or analogue signals for laser power control These outputs can be controlled directly by the high resolution PWM controllers in the AM335X processor or via GPIO signals for bit bang or simple on off control The output closest to the board power input connector J20 is dimensioned to deliver 120 W to 200 W depending on the voltage used 10A 12 Volts or 8A 24 Volts The other two outputs can...

Page 13: ...rew not tightened properly a bad solder joint Any place with some resistance becomes important Thermistor Inputs The analog inputs are used for thermistors that measure the temperature of the temperature controlled devices often the heated build platform HPB or bed and up to two extruder s NC router specific I O view A router will use the stepper signals and limit switches just like a 3D printer T...

Page 14: ...rlay is selected by configuration information in the EEPROM on the BeBoPr The BeagleBone Black needs kernel 3 8 or later 3D printer software Open source BeBoPr code An open source code repository to build a 3D printer with the BeBoPr is available at https github com modmaker BeBoPr This code uses one of the PRU coprocessors for the step pulse generation and can freely be changed PRU stepper code E...

Page 15: ...r 3D printer code Other NC Applications What has been written about 3D printer software above also applies for other numerical control applications Being it a simple router a laser engraver or another dedicated machine These applications will probably not need the PWM heater outputs from the BeBoPr But often they need to control devices like a spindle coolant fluid pump or laser power supply These...

Page 16: ...nverter creates the 5 Volts DC required for the BeagleBone BeBoPr and external digital inputs Configuration EEPROM The BeBoPr uses an on board EEPROM to identify itself to the BeagleBone version 1 4 9 09 04 14 page 16 Illustration 2 BeBoPr features on an early prototype ...

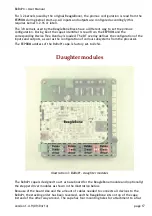
Page 17: ...uration of the inputs and outputs as wel as the configuration of various subsystems from the processor The EEPROM address of the BeBoPr cape is factory set to 0x54 Daughter modules The BeBoPr cape is designed to act as base board for the BeagleBone module and optionally the stepper driver modules as shown in the illustration below Because of the board size and the amount of cables needed to connec...

Page 18: ... height there can only be a single BeBoPr and a single BeagleBone in the stack The BeagleBone is always the first board of a stack and the BeBoPr cape is always the last because neither board has stack through connectors Other capes can be stacked between the BeBoPr and the BeagleBone but not all combinations will work properly This depends on the signals used by the other capes version 1 4 9 09 0...

Page 19: ...t unconnected if no Pololu like stepper drivers modules are used J20 Board power Connect a 12 24 Volt DC regulated power supply This is the supply for the BeagleBone and the high power PWM outputs Both connectors have the ground on pin 1 and the supply plus on pin 2 version 1 4 9 09 04 14 page 19 Illustration 4 BeBoPr cape connectors ...

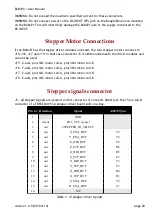
Page 20: ...il B J16 Y axis pins 1 2 motor coil A pins 3 4 motor coil B J17 Z axis pins 1 2 motor coil A pins 3 4 motor coil B J19 E axis pins 1 2 motor coil A pins 3 4 motor coil B Stepper signals connector J5 all stepper signals are present on this connector It connects directly to the 15 pin sub D connector of a TB6560 4V5 3A stepper driver board sold on e Bay Pin nr Direction Signal AM3359 pin 1 GND 2 in ...

Page 21: ...leBone gpio68 J13 Z max limit sensor BeagleBone gpio33 J14 Z min limit sensor BeagleBone gpio27 All limit switches have a 5 Volt supply pin pin1 a ground pin pin 3 and a signal pin in between pin 2 The input is pulled high to the 5 Volt by a 560 Ω pull up resistor in series with a LED Connecting pin 2 to the ground pin 3 will activate the LED and change the signal on the gpio pin of the BeagleBone...

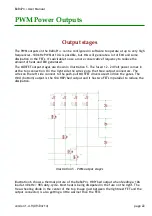
Page 22: ...ection On the right side the wires go to the three output connectors The wires on the left side connect to the push pull MOSFET drivers used to drive the gates The third bottom output is the 10A HBP bed output and it has two FETs in parallel to reduce the dissipation Illustration 6 shows a thermal picture of the BeBoPr HBP bed output when feeding a 10A load at 40 kHz 98 duty cycle Most heat is bei...

Page 23: ...as possible or as a last resort mount it together with the wires of the load at the output connector Connect the diode anti parallel to the load i e connect the or Anode to the negative output terminal and the or Cathode to the positive output terminal Power dissipation Most of the following section is no longer applicable to the BeBoPr because of changes to the design As the information herein is...

Page 24: ...ssipation reaches 3 2 W four times the dissipation at double the current But another effect gets important If the temperature of a FET rises the Rdson increases too The Rdson will double if the FET s internal temperature rises from 25 degrees to 175 degrees Celsius This resistance increase of 100 will also increase the power that is dissipated in the FET with 100 The resulting temperature rise wil...

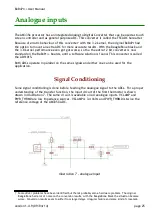
Page 25: ...signals and either one can be used for the application Signal Conditioning Some signal conditioning is done before feeding the analogue signal to the ADCs For a proper understanding of the transfer function the input circuit of the first thermistor is shown drawn in illustration 7 The same circuit is available on all analogue inputs VCLAMP and PWR_THRM0 are low impedance sources VCLAMP is 3 4 Volt...

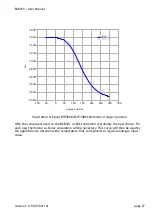
Page 26: ... a 0 2 048 Volt range resulting in 1 mV resolution Voltage inputs Instead of using thermistors on the analogue inputs it is also possible to measure voltages directly Depending on the internal resistance of the source is being measured it may be necessary to remove the 2k05 resistors for best results R22 in illustration 7 R28 and R34 for the other inputs Thermistor curve The analogue input circuit...

Page 27: ...e necessary This curve will then be used by the application to determine the temperature that corresponds to a given analogue input value version 1 4 9 09 04 14 page 27 Illustration 8 Epcos B57560G104F 100k thermistor transfer function 100 50 0 50 100 150 200 250 300 350 0 000 0 200 0 400 0 600 0 800 1 000 1 200 1 400 1 600 1 800 Vadc degrees Celcius ain ...

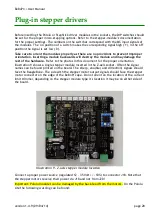
Page 28: ... this document for the proper orientation illustration 9 shows a single stepper module inserted in the Z axis socket Often the signal names can be found printed on the board The st e p ena ble and dir ection signals should face the BeagleBone The side with the stepper motor output signals should face the stepper motor connector on the edge of the BeBoPr cape Do not orient on the location of the cu...

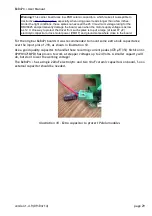
Page 29: ...ard So no external capacitor should be needed version 1 4 9 09 04 14 page 29 Warning This carrier board uses low ESR ceramic capacitors which makes it susceptible to destructive LC voltage spikes especially when using power leads longer than a few inches Under the right conditions these spikes can exceed the 45 V maximum voltage rating for the DRV8825 and permanently damage the board even when the...

Page 30: ...e BeBoPr the I O enable signal is also to the Emergency Stop circuit ESTOP must be negated before I O enable can be activated via gpio66 The BeBoPr has a red LED D23 marked IOE that turns on if the I O enable signal is active Another override is via pin 2 on J5 If this pin is pulled low all stepper driver outputs are disabled tri stated This feature can be used to prevent overloading the stepper o...

Page 31: ... the BeBoPr D24 E stop LED r ed D19 D18 D17 D16 D23 D20 D21 IOenable LED red power LED g reen status LED y ellow PWM0 LED red PWM0 LED red PWM0 LED red power LED green D6 Xmax LED y ellow D7 Xmin LED y ellow D8 Ymax LED y ellow D9 Ymin LED y ellow D10 Zmax LED y ellow D11 Zmin LED y ellow ...

Page 32: ...d to gpio32 The default configuration will make this LED blink with the BeagleBone s heartbeat signal A red LED D24 E stop in illustration 11 turns on when the the emergency stop has been activated The red LED D23 IOenable in illustration 11 is on when the BeBoPr s input and output signals are enabled active Input signal LEDs A yellow LEDs next to each limit switch connector indicates the state of...

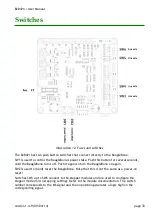
Page 33: ...reset the BeagleBone Note that this is not the same as a power on reset Switches SW3 up to SW6 connect to the stepper modules and are used to configure the stepper mode micro stepping setting Refer to the module documentation The switch number corresponds to the MS signal and the on position generates a logic high on the corresponding signal version 1 4 9 09 04 14 page 33 Illustration 12 Fuses and...

Page 34: ...o less than 300 mA and after removal of the short operation will be back to normal The power that is connected to J20 is fused by a single fuse F1 on illustration 12 This fuse protects the BeBoPr against short circuits on the PWM outputs and will also blow on long term overload conditions Replace the fuse only by an identical type Schurter SPT 10A HT ceram fuse time lag nr 0001 2514 version 1 4 9 ...

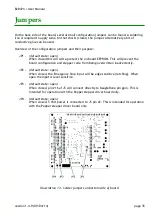
Page 35: ... configuration and stepper code from being overwritten inadvertently JP2 default state open When closed the Emergency Stop input will be edge sensitive latching When open the input is level sensitive JP3 default state open When closed pin 16 of J5 will connect directly to BeagleBone pin gpio This is intended for operation with the Pepper stepper driver board only JP4 default state open When closed...

Page 36: ...rface to 24 Volt signals A normally closed contact should pull the ESTOP input low to GND during normal operation Breaking the contact will activate the emergency stop state An opto coupler with open collector output can be used to interface with industrial level e g 24 V signals This way the board can be used without when the emergency stop is not required or during set up and testing I2C Bus The...

Page 37: ...tor Short circuit protection by a non resettable 5x20 mm cartridge fuse F1 The stepper output signals on J5 are 5 Volt CMOS level compatible Pin 16 connects directly to the BeagleBone once jumper JP3 is closed The voltage on this pin should never exceed the 3 3 Volts maximum rating of the BeagleBone s processor or the BeagleBone will be damaged The Pololu StepStick boards are driven by 5 Volt CMOS...

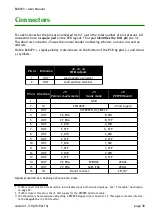
Page 38: ...5 PEPPER board 1 GND 2 IN DISABLE 5 Volt supply 3 OUT STEPPER_IO_SELECT 4 OUT Z_ENA B_DIR 5 OUT Y_ENA B_STP 6 OUT E_DIR A_DIR 7 OUT E_STP A_STP 8 OUT Z_DIR Z_DIR 9 OUT Z_STP Z_STP 10 OUT Y_DIR Y_DIR 11 OUT Y_STP Y_STP 12 OUT X_DIR X_DIR 13 OUT X_STP X_STP 14 OUT E_ENA SPINDLE ENA2 15 OUT X_ENA AXES_ENA ENA1 16 IN Do not connect SPI_IN Signals preceded by a hash sign are active low If JP4 is open t...

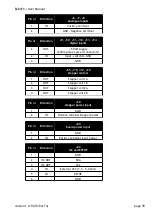
Page 39: ...in nr Direction J15 J16 J17 J19 stepper motors 1 OUT Stepper coil 1 A 2 OUT Stepper coil 1 B 3 OUT Stepper coil 2 A 4 OUT Stepper coil 2 B Pin nr Direction J18 stepper power input 1 GND 2 IN Positive terminal stepper power Pin nr Direction J20 board power input 1 GND 2 IN Positive terminal input power Pin nr Direction J22 I2C and ESTOP 1 GND 2 IN OUT SDA 3 IN OUT SCL 4 IN External VCC 3 3 5 0 Volt...

Page 40: ...pe KK series 6471 The I O connectors required for a complete board are specified in the table below Count Partno Brand Description 4 22 01 2025 Molex Crimp housing 2 54mm 2 way 6 22 01 2035 Molex Crimp housing 2 54mm 3 way 5 22 01 2045 Molex Crimp housing 2 54mm 4 way 46 08 50 0032 Molex Crimp contact tin 22 30AWG Officially these connectors require special and very expensive tooling to attach the...

Page 41: ...ts used in this design every 4 mΩ of resistance in the connection will generate a full Watt of power being dissipated in the connectors Although many of these connectors look similar they may differ in quality and materials used Only the connector specified below should be used with the BeBoPr Other connectors may mechanically fit but will require proper electrical de rating i e a reduction of the...

Page 42: ...BeBoPr User Manual Troubleshooting T B D version 1 4 9 09 04 14 page 42 ...

Page 43: ...hese may contain more up to date information and other useful links 3 For on line help and other links don t forget to visit and register at the BeBoPr forum http forum bebopr info 4 Charles Steinkuehler maintains an excellent blog about his MachineKit effort at this place http blog machinekit io p machinekit_16 html 5 If you re going to run LinuxCNC watch the ntp newsgroups emc users and emc deve...

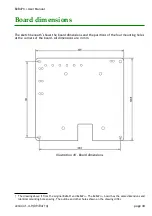
Page 44: ...ting holes at the corners of the board All dimensions are in mm The drawing above if from the original BeBoPr and BeBoPr The BeBoPr board has the same dimensions and identical mounting hole spacing The outline and other holes shown on the drawing differ version 1 4 9 09 04 14 page 44 Illustration 18 Board dimensions ...

Reviews: