background image

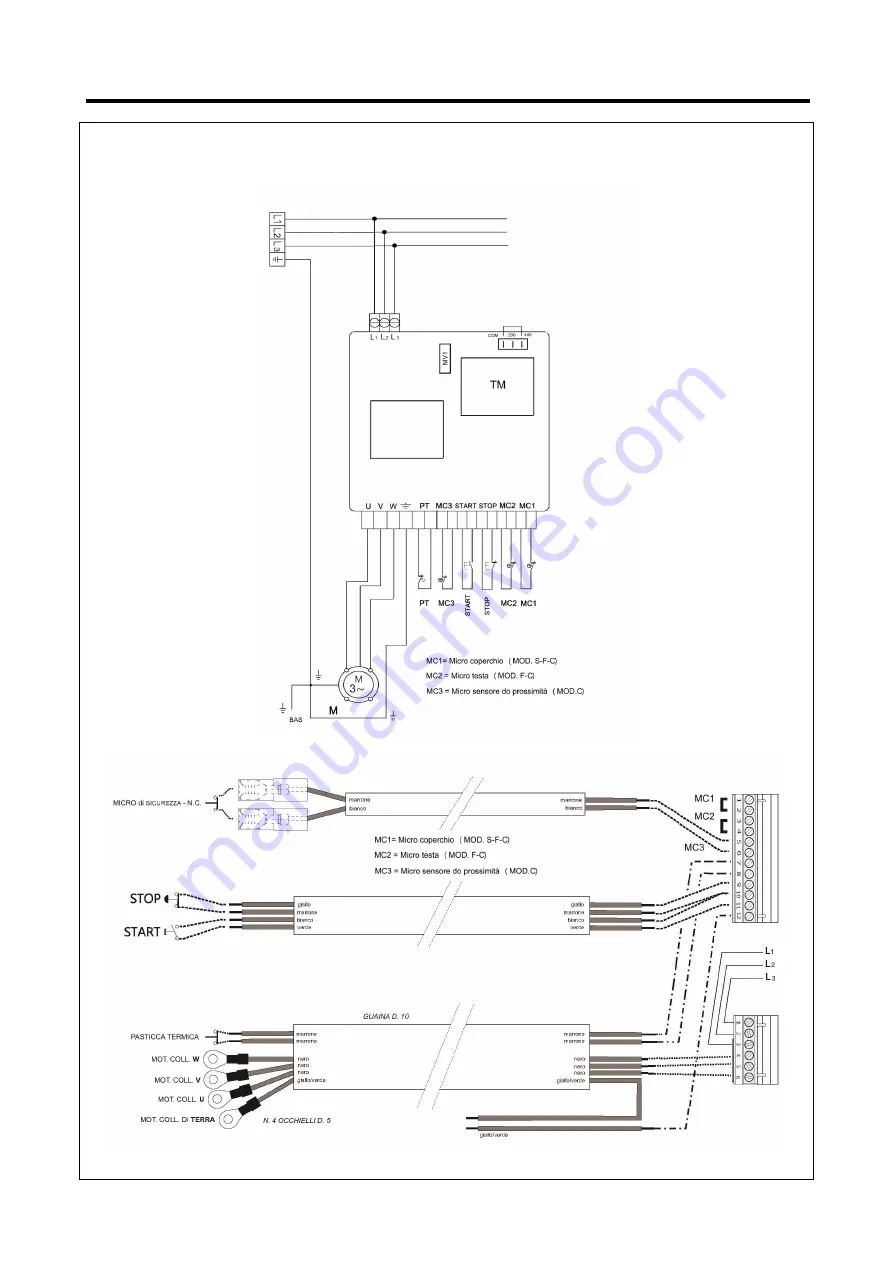
SCHEMA ELETTRICO • ELECTRICAL WIRING DIAGRAM • SCHÉMA ÉLECTRIQUE • SCHALTPLAN • 

ESQUEMA ELECTRICO • ESQUEMA ELÉCTRICO • 

ЭЛЕКТРИЧЕСКАЯ


СХЕМА


7-12-18-25-38-50SN/FN/CNS 

(3 Phase) 


Summary of Contents for 12/CNS

Page 1: ...uso e manutenzione use and maintenance emploi et entretien Benutz und Wartungsanleitung uso y mantenimiento uso e manutenção использованиe и техобслуживаниe MOD021V08 12 18 25 38 50 CNS 12 18 25 38 50 FN 7 12 18 25 38 50 SN ...

Page 2: ......

Page 3: ...di sicurezza Informazioni sulla sicurezza 2 INFORMAZIONI SULL INSTALLAZIONE Imballo e disimballo Zona d installazione Collegamento elettrico 4 4 5 5 5 6 6 6 7 7 7 3 INFORMAZIONI SULL USO E LA PULIZIA Descrizione dei comandi Uso dell impastatrice Consigli d uso Pulizia a fine giornata Estrazione delle parti amovibili mod CNS Lunga inattività della macchina 4 RICERCA GUASTI Premessa Inconvenienti ca...

Page 4: ...acchina Conservare questo manuale in un luogo appropriato al fine di averlo sempre a portata di mano per la sua consultazione Per mettere in evidenza alcune parti del testo sono stati inseriti i seguenti simboli PERICOLO ATTENZIONE indica i pericoli che possono provocare gravi lesioni è necessario prestare attenzione INFORMAZIONI indicazioni tecniche di particolare importanza Al presente manuale v...

Page 5: ...mballo kg 72 73 112 127 230 Livello di rumorosità 70 dB A Installazione A terra Istruzioni comando digitale optional Assicurarsi che la spina di alimentazione sia correttamente inserita nella presa corrente e premere il tasto START STOP la macchina si accenderà e sarà pronta per l uso si illuminerà il led a fianco del tasto Per avviare la macchina in modalità timer premere per 2 volte consecutive ...

Page 6: ...persone o cose conseguenti l inosservanza delle norme di sicurezza La corretta dislocazione della macchina l illuminazione e la pulizia dell ambiente sono condizioni importanti ai fini della sicurezza personale Non esporre la macchina agli agenti atmosferici L allacciamento a la messa in opera della macchina devono essere eseguiti solo da personale tecnico specializzato Verificare che le caratteri...

Page 7: ... lavoro Tabella Condizioni ambientali Descrizioni Valori Temperatura di funzionamento 0 35 C 32 95 F Temperatura di magazzinaggio 15 a 65 C da 6 8 a 149 F Umidità relativa Massima 80 con temperatura ambiente di 20 C Massima 50 con temperatura ambiente tra 20 60 C Polverosità ambientale Inferiore a 0 03 g m Collegamento elettrico PERICOLO ATTENZIONE Il collegamento elettrico alla rete di alimentazi...

Page 8: ... è abbassato e se la pentola è bloccata sulla flangia Nel momento in cui l impasto diverrà un amalgama abbastanza compatta dopo circa 5 minuti arrestare la macchina premendo il pulsante di arresto 0 e ruotare il selettore di velocità sulla posizione 1 Riavviare quindi la macchina premendo il pulsante di avviamento I sino ad ottenere un impasto della consistenza desiderata Al termine della lavorazi...

Page 9: ...rio la flangia inferiore Lunga inattività della macchina Dovendo lasciare ferma la macchina per lunghi periodi disinserire l interruttore generale a muro effettuare una pulizia generale della macchina e ricoprirla con un telo onde proteggerla dalla polvere RICERCA GUASTI 4 Premessa In caso di guasti o malfunzionamenti scollegare l interruttore generale a muro e contattare il Servizio Assistenza de...

Page 10: ......

Page 11: ...ensions Safety devices Safety information 2 INSTALLATION Packing and unpacking Installation area Electric connection 4 4 5 5 5 6 6 6 7 7 7 3 OPERATION AND CLEANING Control descriptions Kneader Operation Operation tips End day cleaning Removal of the removable parts mod CNS Long periods of inactivity 4 TROUBLESHOOTING Foreword Troubles causes and remedies ANNEXES Disposal and recycling Spare parts ...

Page 12: ...l the operators who interact with the machine Keep this manual in a suitable place where it can be conveniently reached for consultation In order to highlight some parts of the text the following symbols have been used DANGER CAUTION it indicates hazards likely to cause severe injury caution is requested INFORMATION technical indications of special interest This manual comes with the following ann...

Page 13: ...er batch kg 12 18 25 38 50 Net weight kg 65 66 103 115 206 Packaged weight kg 72 73 112 127 230 Noise 70 dB A Installation On the floor Instructions Digital control optional Make sure the plug is inserted correctly in the power outlet and press the START STOP key The machine will turn on and is ready to use the LED next to the key will come on To start the machine in timer mode press the key with ...

Page 14: ...strictly respected The manufacturer declines all responsability for injures to persons or damages to property resulting from failure to comply with these safety rules Correct machine setting lighting and workshop cleanness are pre conditions for personal safety Do not expose the machine to atmospheric agents The machine connection and start up should only be executed by skilled engineers Check tha...

Page 15: ...nvironmental Condition Table Descriptions Values Working temperature 0 35 C 32 95 F Storage temperature 15 to 65 C from 6 8 to 149 F Relative humidity Maximum 80 at an ambient temperature of 20 C Maximum 50 at an ambient temperature of 20 60 C Ambient dust Lower than 0 03 g m Electric connection DANGER CAUTION Electric connection to the power mains should be executed by skilled engineers Single ph...

Page 16: ... can only be controlled if the lid is down and if the pot is blocked on the flange When the dough becomes a rather compact mixture about 5 minutes later stop the machine by pressing the stop button 0 and rotate the speed selector to position 1 Restart the machine by pressing the start button I until the required consistency is achieved After operation completion press the stop button 0 Lift the li...

Page 17: ...ting anti clockwise the lower flange Long periods of inactivity If the machine is to be left idle for long periods of time turn off the main wall switch thoroughly clean the machine and cover it with a sheet to protect it from dust TROUBLESHOOTING 4 Foreword In the event of breakdowns or malfunctioning turn off the main wall switch and contact your local Dealer s After sales service Do not disasse...

Page 18: ......

Page 19: ...Informations sur la sécurité 2 INFORMATIONS SUR L INSTALLATION Emballage et déballage Zone d installation Branchement électrique 4 4 5 5 5 6 6 6 7 7 7 3 INFORMATION SUR L EMPLOI ET LE NETTOYAGE Description des commandes Utilisation de la pétrisseuse Conseils d emploi Nettoyage à la fin de la journée Extraction des parties amovibles mod CNS Inactivité prolungée de la machine 4 RECHERCHE DES PANNES ...

Page 20: ... qui travaillent avec la machine Conserver ce manuel dans un lieu convenable pour pouvoir toujours le consulter Pour mettre en évidence certaines parties du texte les symboles suivants ont été insérés DANGER ATTENTION il indique les dangers qui peuvent provoquer des lésions graves il faut prêter attention INFORMATIONS indications techniques très importantes Annexes de ce manuel Le bulletin de gara...

Page 21: ... 12 18 25 38 50 Poids net kg 65 66 103 115 206 Poids avec emballage kg 72 73 112 127 230 Niveau de bruit 70 dB A Installation Sur plancher Instructions commande numérique en option S assurer que la fiche d alimentation est correctement introduite dans la prise du courant puis appuyer sur la touche START STOP la machine démarre et est prête à l usage la DEL située à côté de la touche s allume Pour ...

Page 22: ...érivant de l inobservation des normes de sécurité L emplacement correct de la machine l éclairage et le nettoyage de la zone sont des conditions importantes pour la sécurité personelle Ne pas exposer la machine aux agents atmosphériques Le branchement et le démarrage de la machine ne doivent être exécutés que par du personnel technique spécialisé Vérifier si le caractéristiques de l installation s...

Page 23: ...il Tableau Conditions ambiantes Descriptions Valeurs Température de fonctionnement 0 35 C 32 95 F Température de magasinage 15 à 65 C de 6 8 à 149 F Humidité relative Maximum 80 avec température ambiante de 20 C Maximum 50 avec température ambiante entre 20 et 60 C Poussière ambiante Inférieure a 0 03 g m Branchement électrique DANGER ATTENTION Le branchement électrique sur le réseau d alimentatio...

Page 24: ...our les mod CNS Tourner le sélecteur de vitesse sur la position 2 Mettre in marche la machine en appuyant sur le bouton de démarrage I le démarrage se vérifie seulement si le couvercle est baissé et si le récipient est bloqué sur la base de fixation Lorsque la pâte deviendra un amalgame suffisamment compacte après environ 5 minutes arrêter la machine en appuyant sur le bouton d arrêt 0 et tourner ...

Page 25: ...achine et la couvrir au moyen d une housse pour la protéger contre la poussière RECHERCHE DES PANNES 4 Avant propos En cas de pannes ou de mauvais fonctionnement déconnecter l interrupteur général mural et contacter le Service d Assistance de votre Revendeur Éviter de démonter les parties internes de la machine Le Constructeur décline toute responsabilité pour des altérations éventuelles Inconvéni...

Page 26: ......

Page 27: ...hutzvorrichtungen Sicherheitsinformationen 2 AUFSTELLUNG Verpackung und Auspacken Aufstellbereich Elektrischer Anschluss 4 4 5 5 5 6 6 6 7 7 7 3 GEBRAUCH UND REINIGUNG Beschreibung der Bedienelemente Gebrauch der Teigknetmaschine Gebrauchshinweise Reinigung am Ende eines Tages Herausziehen der beweglichen Teile Mod CNS Längerer Maschinenstillstand 4 STÖRUNGSSUCHE Voraussetzung Störung Ursache Behe...

Page 28: ...ch ist an einem zugänglichen Ort aufzubewahren damit es zum Nachschlagen immer schnell zur Hand ist Um einige Textabschnitte besonders hervorzuheben wurden folgende Symbole eingesetzt GEFAHR ACHTUNG weist auf Gefahren hin die zu schweren Verletzungen führen können es ist erforderlich Vorsicht walten zu lassen INFORMATIONEN technische Hinweise von besonderer Bedeutung Dem vorliegenden Handbuch werd...

Page 29: ... 230 Lärmpegel 70 dB A Aufstellen Auf der Erde Anleitung Digitale Bedienblende optional Prüfen ob der Netzstecker richtig in die Steckdose eingesteckt ist und die Taste START STOP drücken Das Gerät wird eingeschaltet und ist betriebsbereit die LED neben der Taste leuchtet auf Zum Starten des Geräts im Timer Modus 2 Mal hintereinander die Taste mit dem Uhr Symbol drücken die LED daneben leuchtet au...

Page 30: ... Sicherheitsvorschriften verursacht wurden Die korrekte Maschinenverlagerung Beleuchtung und Reinigung des Aufstellungsraumes stellen wichtige Faktoren für die persönliche Sicherheit dar Die Maschine nicht den Witterungsverhältnissen aussetzen Der Anschluss und die Inbetriebnahme der Maschine dürfen nur von qualifiziertem Fachpersonal vorgenommen werden Überprüfen dass die Kennwerte der Anlage wo ...

Page 31: ...enden Gesetze erfolgen Tabelle der Umgebungsbedingungen Beschreibung Werte Betriebstemperatur 0 35 C 32 95 F Lagertemperatur 15 bis 65 C von 6 8 bis 149 F Relative Feuchtigkeit Maximal 80 bei einer Umgebungstemperatur von 20 C Maximal 50 bei einer Umgebungstemperatur zwischen 20 60 C Umweltstaub Geringer als 0 03 g m Elektrischer Anschluss GEFAHR ACHTUNG Der elektrische Anschluss an das Versorgung...

Page 32: ...swahlschalter in die Position2 Maschine durch Drücken der Start Taste I in Gang setzen die Ingangsetzung erfolgt nur bei gesenktem Deckel und wenn die Maschine über den Feststellflansch verriegelt ist Schalten Sie die Maschine ab sobald der Teig ein gut kompaktes Gemisch ergibt nach zirka 5 Minuten Drücken Sie dazu den Stopp Taster und drehen den Geschwindigkeitswahlschalter in die Position 1 Star...

Page 33: ...hinenreinigung vornehmen und sie zum Schutz vor Staub mit einem Tuch abdecken STÖRUNGSSUCHE 4 Voraussetzung Bei Pannen oder Störungen den Wand Netzschalter abschalten und den Kundendienst Ihres Händlers verständigen Die inneren Maschinenteile auf keinen Fall abmontieren Der Hersteller lehnt jede Haftung für eventuelle Verletzungen ab Störung Ursache Behebung Störung Ursache Behebung Netzschalter a...

Page 34: ......

Page 35: ...nes sobre la seguridad 2 INFORMACIONES SOBRE LA INSTALACIÓN Embalaje y desembalaje Zona de instalación Conexión eléctrica 4 4 5 5 5 6 6 6 7 7 7 3 INFORMACIONES SOBRE EL USO Y LA LIMPIEZA Descripción de los mandos Uso de la amasadora Consejos para el uso Limpieza al final de la jornada Extracción de las partes amovibles mod CNS Inactividad de lamáquina durantemucho tiempo 4 BÚSQUEDA AVERÍAS Prelimi...

Page 36: ...ctúan con la máquina Guardar este manual en un lugar adecuado con el fin de tenerlo siempre al alcance de la mano para poder consultarlo Con el fin de poner en evidencia algunas partes del texto se han introducido los siguientes símbolos PELIGRO ATENCIÓN indica los peligros que pueden causar graves lesiones es necesario prestar atención INFORMACIONES indicaciones técnicas de gran importancia Al pr...

Page 37: ...112 127 230 Nivel de ruido 70 dB A Instalación En el piso Instrucciones mando digital opcional Asegúrese de que la clavija de alimentación esté correctamente conectada a la toma corriente y presione la tecla START STOP la máquina se encenderá y estará lista para el uso se iluminará el led al costado de la tecla Para iniciar la máquina en modalidad temporizador presione 2 veces seguidas la tecla co...

Page 38: ...s o cosas causados por la inobservancia de las normas de seguridad El correcto posicionamiento de la máquina la iluminación y la limpieza del lugar son condiciones muy importantes por lo que se refiere a la seguridad personal No exponer la máquina a los agentes atmosféricos La conexión y la puesta en función de la máquina deben ser realizadas exclusivamente por personal técnico especializado Verif...

Page 39: ...de seguridad en el trabajo Tabla Condiciones Ambientales Descripciones Valores Temperatura de funcionamiento 0 35 C 32 95 F Temperatura de almacenaje 15 a 65 C de 6 8 a 149 F Humedad relativa Máxima 80 con temperatura ambiente de 20 C Máxima 50 con temperatura ambiente entre 20 60 C Cantidad de polvo en el ambiente Inferior a 0 03 g m Conexión eléctrica PELIGRO ATENCIÓN La conexión eléctrica a la ...

Page 40: ...la máquina apretando el bóton I correspondiente la activación se realiza sólo si se ha bajado la tapa y si la cuba está bien colocada en la abrazadera Cuando la pasta de vuelve una amalgama bastante compacta después de aprox 5 minutos detener la máquina presionando el pulsador de parada 0 y girar el selector de velocidad a la posición 1 Poner nuevamente en marcha la máquina presionando el pulsador...

Page 41: ...ividad de la máquina durante mucho tiempo En caso de que nose utilice la máquina durante mucho tiempo desactivar el interruptor general de pared efectuar una limpieza general de la máquina y cubrirla con una tela para protegerla del polvo BÚSQUEDA AVERÍAS 4 Preliminares En caso de averías o funcionamientos incorrectos le aconsejamos desactivar el interruptor general de pared y dirigirse al Servici...

Page 42: ......

Page 43: ...a Informações sobre a segurança 2 INFORMAÇÕES SOBRE A INSTALAÇÃO Embalagem e desembalagem Zona de instalação Ligação eléctrica 4 4 5 5 5 6 6 6 7 7 7 3 INFORMAÇÕES SOBRE O USO E A LIMPEZA Descrição dos comandos Uso da amassadeira Conselhos para o uso Limpeza diária Extracção das partes móveis mod CNS Longo período de inactividade da máquina 4 PROCURA DE AVARIAS Premissa Inconvenientes causas soluçõ...

Page 44: ... a máquina Guarde este manual num lugar próprio de modo a tê lo sempre ao alcance quando for necessário Para evidenciar algumas partes do texto foram inseridos os seguintes símbolos PERIGO ATENÇÃO indica os perigos que podem provocar graves lesões é necessário prestar muita atenção INFORMAÇÕES indicações técnicas de particular importância Anexa se a este manual O certificado de garantia onde figur...

Page 45: ...25 38 50 Peso líquido kg 65 66 103 115 206 Peso com embalagem kg 72 73 112 127 230 Nível de ruído 70 dB A Instalação Na terra Instruções comando digital opciona Assegurar se que a ficha de alimentação esteja corretamente introduzida na tomada de corrente e pressionar a tecla START STOP a máquina acende se e está pronta a ser usada se iluminarà o led no lado da tecla Para inicializar a máquina em m...

Page 46: ...pela inobservância das normas de segurança A correcta posição da máquina a iluminação e a limpeza do ambiente de trabalho são condições importantes para a segurança pessoal Não exponha a máquina aos agentes atmosféricos A ligação e o funcionamento da máquina devem ser realizados exclusivamente por pessoal técnico especializado Controle que as características da instalação onde a máquina será coloc...

Page 47: ...Tabela Condições ambientais Descrição Valores Temperatura de funcionamento 0 35 C 32 95 F Temperatura de armazenagem 15 a 65 C de 6 8 a 149 F Humidade relativa Máxima 80 com temperatura ambiente de 20 C Máxima 50 com temperatura ambiente entre 20 60 C Poeira do ambiente Inferior a 0 03 g m Ligação eléctrica PERIGO ATENÇÃO A ligação eléctrica à rede de alimentação deve ser efectuada por pessoal esp...

Page 48: ...na posição 2 Ponha a máquina a funcionar premindo o botão de arranque I a máquina funciona só se a tampa estiver fechada e se a taça está bloqueada no rebordo Quando a massa se tornar numa amálgama bastante compacta depois de cerca de 5 minutos pare a máquina premindo o botão de paragem 0 e rode o selector de velocidade na posição 1 Volte a por a máquina a funcionar premindo o botão de arranque I ...

Page 49: ... e cubra a com uma lona para protegê la contra a poeira PROCURA DE AVARIAS 4 Premissa Em caso de avarias ou mau funcionamento desligue o interruptor geral e contacte o Serviço de Assistência do vosso Revendedor Não desmonte as partes internas da máquina O construtor declina qualquer responsabilidade contra eventuais intervenções não autorizadas Inconvenientes causas soluções Inconveniente Causa So...

Page 50: ......

Page 51: ...мации по безопасности 2 ИНФОРМАЦИИ ПО УСТАНОВКЕ Упаковка и распаковка Зона установки Электрическое подсоединение 4 4 5 5 5 6 6 6 7 7 7 3 ИНФОРМАЦИИ ПО ИСПОЛЬЗОВАНИЮ И ОЧИСТКА Описание команд Применение месильной машины Советы по применению Очистка в конце рабочего дня Извлечение вынимающихся деталей мод CN Долгое неиспользование машины 4 ПОИСК НЕИСПРАВНОСТЕЙ Введение Неполадки причины исправления ...

Page 52: ...шины в знакомом месте и свободно доступном чтобы всегда иметь его под рукой для консультации Чтобы выделить некоторые части текста особой важности или чтобы указать некоторые важные спецификации были приняты символы значение которых далее описано ОПАСНОСТЬ ВНИМАНИЕ указывает ситуации сильной опасности которые если не замечены вовремя необходимо придать особое внимание ИНФОРМАЦИИ технические указан...

Page 53: ...3 Теста на цикл кг 12 18 25 38 50 Чистый вес кг 65 66 103 115 206 Вес с упаковкой кг 72 73 112 127 230 Уровень шума Ниже 70 дВ A Установка На земле Инструкции цифрового управления факультативно Проверить что штеккер питания правильно установлен в разъём электропитания и нажать на кнопку START STOP машина включается и готова к эксплуатации зажигается светодиод рядом с кнопкой Для запуска машины в р...

Page 54: ...ждения людям или вещам полученным в результате не выдерживания норм безопасности Правильное расположение машины освещение и чистота окружающей среды это важные условия для безопасности человека на рабочем месте Не подвергать машину атмосферным агентам Подсоединение и введение в эксплуатацию машины должны быть выполнены только специализированным технически персоналом Проверить чтобы характеристики ...

Page 55: ...ния Величины Температура функционирования 0 35 C 32 95 F Температура складирования 15 a 65 C da 6 8 a 149 F Удельная влажность Максимум 80 при температуре окружающей среды 20 C Максимум 50 при температуре окружающей среды 20 60 C Запылённость среды Ниже 0 03 г м Электрическое подсоединение ОПАСНОСТЬ ВНИМАНИЕ Электрическоесоединениексети питаниядолжнобытьвыполненоспециализированнымперсоналом Соедин...

Page 56: ...ектор скоростей в позицию 2 Запустить машину нажимая на кнопку I только если опущена крышка и дежа блокирована на держателе происходит запуск В момент когда тесто примет вид достаточно плотной массы приблизительно через 5 минут остановить машину нажатием кнопки Стопа 0 и повернуть селектор скорости в позицию 1 Включить машину нажатием кнопки Пуска I и продолжить замес до тех пор пока тесто не прим...

Page 57: ...ний фланец Длительное простаивание машины Если придётся оставлять на долгое время машину без деятельности отключить главный выключатель на стене произвести общую очистку машины и покрыть её полотном во избежании попадания пыли ПОИСК НЕИПРАВНОСТЕЙ 4 Введение В случае неполадок или неисправностей отключить общий выключатель на стене и вызвать Сервис Технической Помощи вашего Продавца Избегать демонт...

Page 58: ...auf eines neuen Geräts verpflichtet sich der Nutzer dieses nicht als unsortierten Siedlungsabfall zu entsorgen sondern dem Händler oder Verteiler im Verhältnis eins zu eins zurückzuerstatten Der Händler sorgt für die Entsorgung des Geräts unter Einhaltung der vom WEEE System vorgesehenen Vorgehensweise Wenn das Gerät in Italien zu entsorgen ist den Hersteller direkt kontakterien Nutzer außerhalb I...

Page 59: ......

Page 60: ...CATALOGOPARTIDIRICAMBIO SPAREPARTSCATALOGUE CATALOGUEPIÈCESDE RECHANGE ERSATZTEILKATALOG CATALOGODE REPUESTOS CATÁLOGODE PEÇASSOBRESSALENTES КАТАЛОГЗАПЧАСТЕЙ 7 12 18 SN ...

Page 61: ...CATALOGOPARTIDIRICAMBIO SPAREPARTSCATALOGUE CATALOGUEPIÈCESDE RECHANGE ERSATZTEILKATALOG CATALOGODE REPUESTOS CATÁLOGODE PEÇASSOBRESSALENTES КАТАЛОГЗАПЧАСТЕЙ 25 38 SN ...

Page 62: ...CATALOGOPARTIDIRICAMBIO SPAREPARTSCATALOGUE CATALOGUEPIÈCESDE RECHANGE ERSATZTEILKATALOG CATALOGODE REPUESTOS CATÁLOGODE PEÇASSOBRESSALENTES КАТАЛОГЗАПЧАСТЕЙ 50 SN ...

Page 63: ...CATALOGOPARTIDIRICAMBIO SPAREPARTSCATALOGUE CATALOGUEPIÈCESDE RECHANGE ERSATZTEILKATALOG CATALOGODE REPUESTOS CATÁLOGO DE PEÇASSOBRESSALENTES КАТАЛОГЗАПЧАСТЕЙ 12 18 CNS FN ...

Page 64: ...CATALOGOPARTIDIRICAMBIO SPAREPARTSCATALOGUE CATALOGUEPIÈCESDE RECHANGE ERSATZTEILKATALOG CATALOGODE REPUESTOS CATÁLOGODE PEÇASSOBRESSALENTES КАТАЛОГЗАПЧАСТЕЙ 25 38 CNS FN ...

Page 65: ...CATALOGOPARTIDIRICAMBIO SPAREPARTSCATALOGUE CATALOGUEPIÈCESDE RECHANGE ERSATZTEILKATALOG CATALOGODE REPUESTOS CATÁLOGODE PEÇASSOBRESSALENTES КАТАЛОГЗАПЧАСТЕЙ 50 CNS FN ...

Page 66: ...SCHEMA ELETTRICO ELECTRICAL WIRING DIAGRAM SCHÉMA ÉLECTRIQUE SCHALTPLAN ESQUEMA ELECTRICO ESQUEMA ELÉCTRICO ЭЛЕКТРИЧЕСКАЯ СХЕМА 7 12 18 25 38SN FN CNS 1 Phase ...

Page 67: ...SCHEMA ELETTRICO ELECTRICAL WIRING DIAGRAM SCHÉMA ÉLECTRIQUE SCHALTPLAN ESQUEMA ELECTRICO ESQUEMA ELÉCTRICO ЭЛЕКТРИЧЕСКАЯ СХЕМА 7 12 18 25 38 50SN FN CNS 3 Phase ...

Page 68: ...SCHEMA ELETTRICO ELECTRICAL WIRING DIAGRAM SCHÉMA ÉLECTRIQUE SCHALTPLAN ESQUEMA ELECTRICO ESQUEMA ELÉCTRICO ЭЛЕКТРИЧЕСКАЯ СХЕМА 12 18 25 38 50SN FN CNS 2 Speed ...

Page 69: ... y define todos los derechos del cliente con respecto a las imperfecciones defectos y o faltantes en cantidad del pedido de los productos comprados Para cualquier controversia jurídica es reconocida Tribunal competente de residencia de los fabricantes CONDIÇÕES DE GARANTIA A garantia tem a duração de 12 meses e está subordinada à apresentação de uma cópia de idóneo documento fiscal ou fatura compr...

Page 70: ......

Page 71: ...Via Sandro Pertini 29 47826 Villa Verucchio Rimini Italy e mail mail fimarspa it http www fimarspa it ...

Page 72: ......

Page 73: ......

Reviews: